

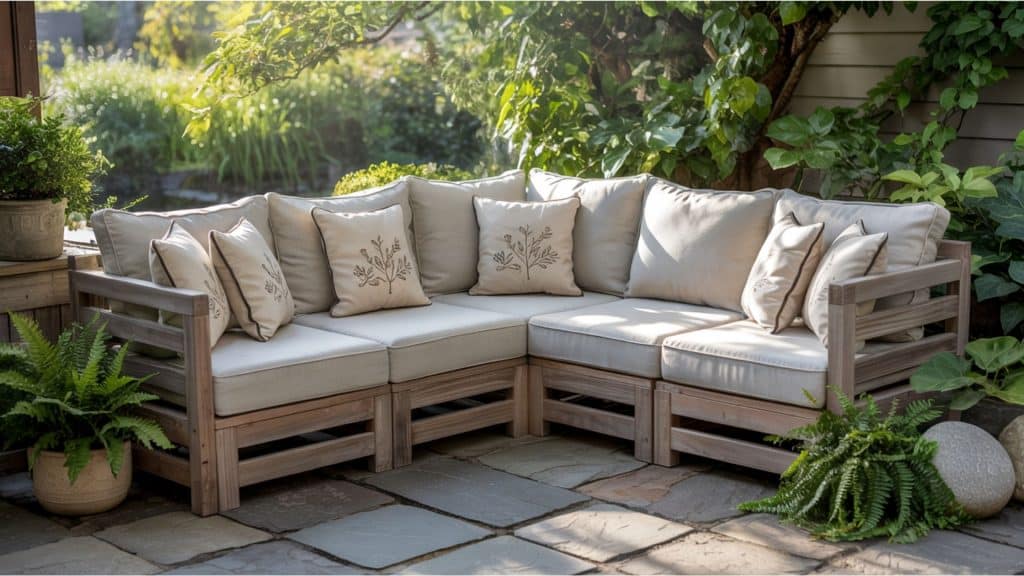

Tired of seeing those crazy high prices for outdoor sectionals at furniture stores? You’re not alone! A decent outdoor sectional can cost thousands of dollars.
However, here’s the good news: you can build your own DIY outdoor sectional for significantly less money. Plus, you get to make it exactly how you want it. Want it bigger? Make it bigger.
Prefer different colors? Pick whatever you love! I’m here to show you exactly how to create an amazing outdoor sectional that’ll make your neighbors jealous.
You’ll save tons of money and have fun doing it. Ready to build something awesome? Let’s get your hands dirty!
DIY Guide for an Outdoor Sectional
Building it yourself means you also control the quality. You’ll know every joint is solid and every screw is tight. No shortcuts or cheap materials here.
There’s also something amazing about relaxing on furniture you built with your own hands.
Your friends will be impressed when you tell them you made it. You’ll save money and create something extraordinary at the same time.
Materials and Tools You’ll Need
I want to show you exactly what your DIY outdoor sectional will cost to build. The table below breaks down each material and outlines the associated costs.
| Material/Equipment | Estimated Cost Range (USD) |
|---|---|
| 4×4 Lumber (corner/support) | $30 – $60 |
| 2×4 Lumber (frame/sides/back) | $60 – $150 |
| 1×4 Lumber (slats) | $25 – $60 |
| Pocket hole screws (1 1/2″) | $8 – $15 |
| Wood screws (3″ & 4″) | $8 – $18 |
| Wood glue | $4 – $10 |
| Orbital sander (if needed) | $25 – $50 |
| Sandpaper (120 & 220 grit) | $5 – $12 |
| Drill with a pocket hole jig | $20 – $45 (jig only) |
| Speed square | $5 – $10 |
| Tape measure | $5 – $12 |
| Clamp | $8 – $18 |
| Silicone caulk | $4 – $10 |
| Spar urethane (for sealing) | $12 – $25 |
| Cushions (24×24″ per piece) | $20 – $45 each (x4–6: $80–$270) |
| Paint (Early American/White) | $15 – $30 |
| Exterior wood stain | $10 – $25 |
| Miter saw (if needed) | $60 – $120 (buy) / $20–$40 (rent) |
| Impact driver (if required) | $30 – $70 |
The Total Estimated cost is $374 – $1,000. These prices provide a clear idea of the potential costs involved in your DIY project. Adjustments can be made based on the materials you select or the tools you already own.
NOTE: The costs are estimates and may vary based on location, material availability, sales, and the specific products chosen.
STEP 1: Plan Your Sectional Design
Before you begin, plan the layout and design of your outdoor sectional. Decide on the shape, size, and placement. Use standard measurements or adjust them based on your space and style preferences.
Helpful Advice
- Sketch your design before cutting.
- Measure your space carefully to ensure a good fit.
- Consider a modular design for flexibility.
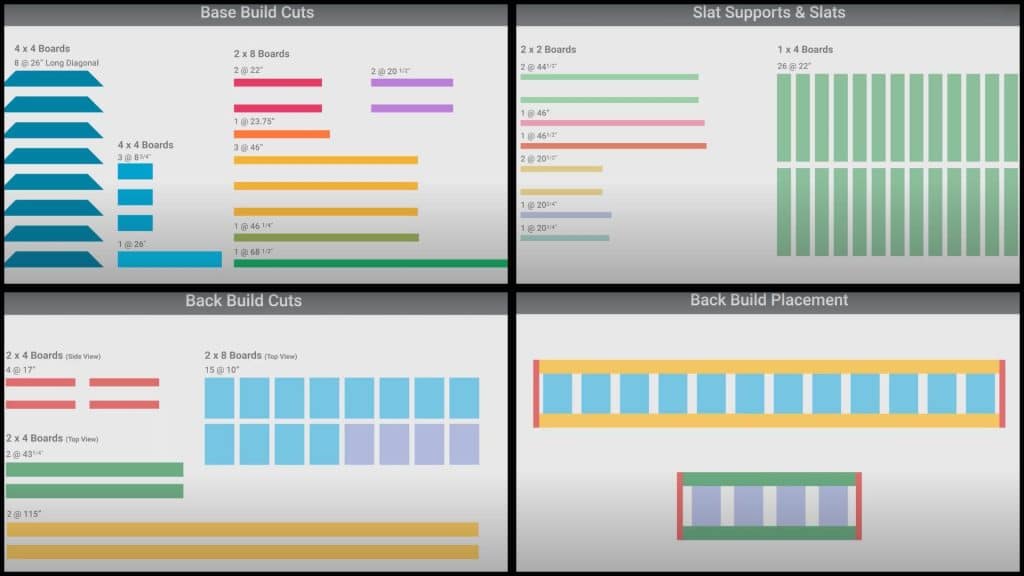
STEP 2: Cut and Assemble the Frame
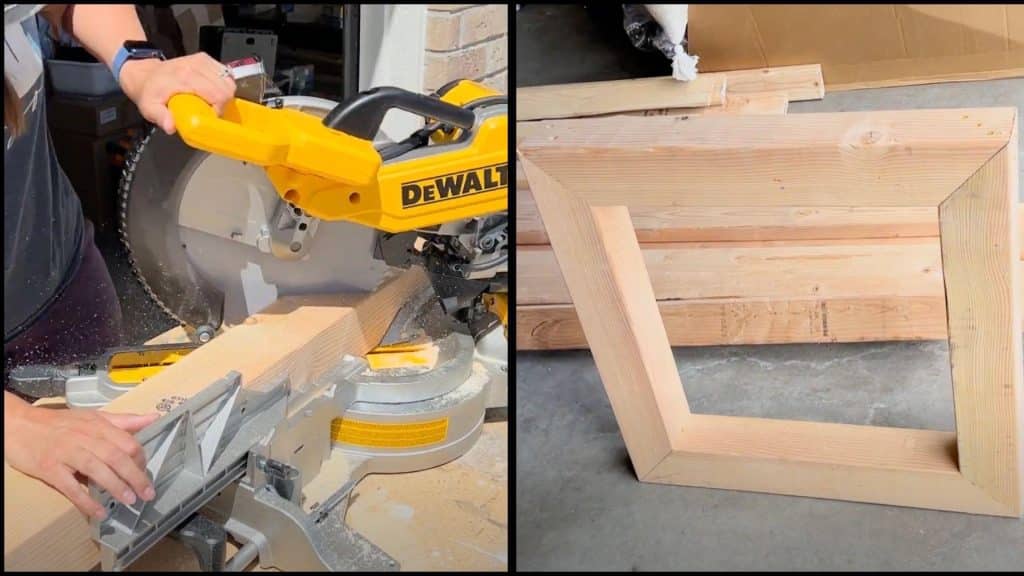
Begin cutting your lumber pieces to size for the frame. This includes side posts, back supports, and corner posts. Once the cuts are made, assemble them using wood glue and screws, ensuring everything is tightly secured for stability.
Helpful Advice
- Use a speed square to ensure cuts are straight.
- For extra support, use wood glue along with screws.
- Pre-drill holes to make screwing easier and prevent splitting.
STEP 3: Build the Slat Supports and Back Rest
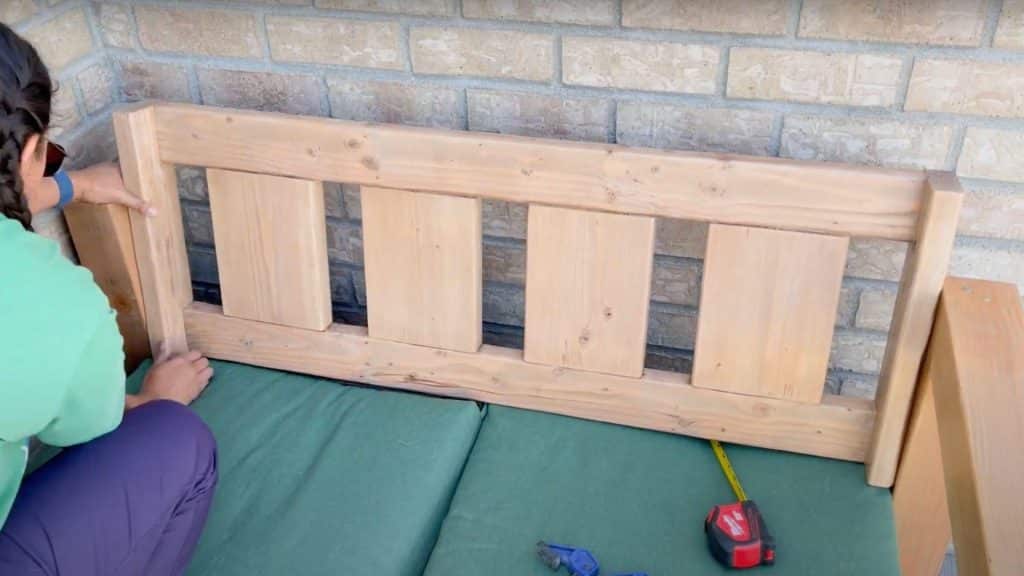
Cut the slat supports and backrest pieces to the correct size. Attach the slat supports evenly across the sectional’s base. Install the backrest pieces, making sure they’re securely attached to the frame.
Helpful Advice
- Measure carefully to ensure even spacing of the slats.
- Securely attach slats with screws or nails.
- Use clamps to hold the pieces in place before screwing them together.
STEP 4: Sand and Stain the Wood
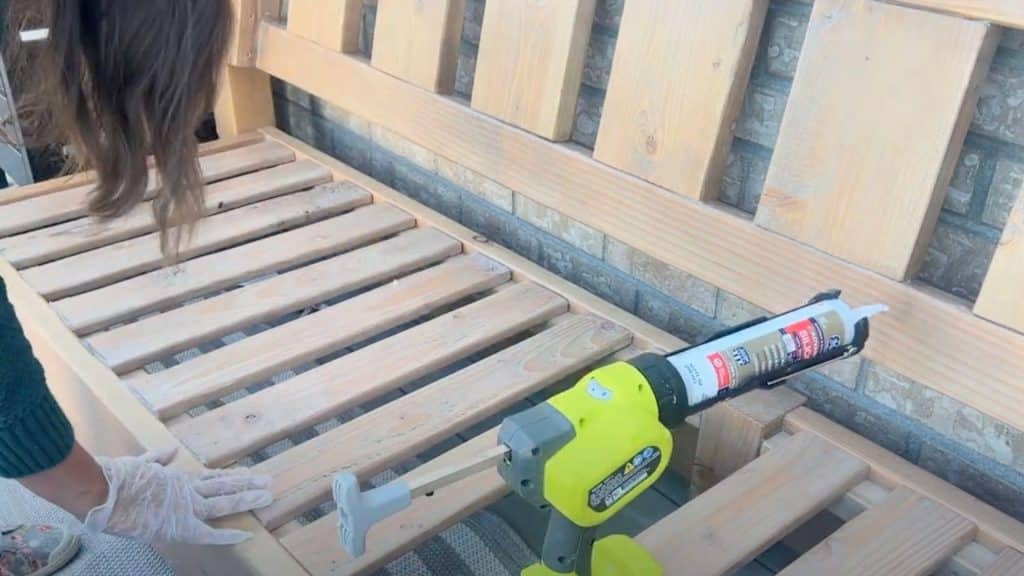
Smooth out any rough edges with a sander before applying wood stain. Use a pre-stain conditioner to ensure even coloring, then apply your desired stain (e.g., Early American). Seal the wood with spar urethane to protect it from the elements.
Helpful Advice
- Sand the wood first with 120-grit sandpaper, then finish with 220-grit sandpaper.
- Apply two coats of stain for a rich, finished look.
- Let each coat dry before adding another for the best result.
STEP 5: Assemble the Sectional and Add Cushions

Once the frame and backrest are complete, assemble the sectional by attaching the pieces together. Finally, place your cushions on the frame for added comfort and adjust them to achieve the perfect fit.
Helpful Advice
- Use screws to securely attach the final back and side pieces.
- Space the cushions evenly for a neat look.
- Make sure the cushions are weather-resistant for long-lasting use.
Follow Along: DIY Outdoor Sectional Video Walkthrough
Design Ideas You Can Try to Make It Unique
Change your basic outdoor sectional into a stunning centerpiece with these design ideas. The table below shows different ways to customize your build for maximum style and functionality.
| Design Element | Creative Ideas |
|---|---|
| Shape | L-shaped, U-shaped, Curved edges, Modular pieces |
| Storage | Built-in side tables, Hidden compartments, Lift-up seats |
| Color | Two-tone stain, Distressed finish, Painted accents |
| Comfort | Adjustable backs, Built-in cup holders, Extra-deep seats |
| Details | Rope accents, Metal hardware, Carved patterns |
| Additions | Built-in planters, Integrated lighting, and Removable ottomans |
| Size | Compact balcony, Oversized family, Expandable modules |
| Weather | Sloped drainage, Quick-dry spacing, UV-resistant finish |
Mix and match these design elements to create a sectional that perfectly fits your space and style. Choose the features that matter most to you and incorporate them into your build plan.
Maintenance and Care Tips for Outdoor Sectional
Taking care of your DIY outdoor sectional keeps it looking great for years. Regular maintenance goes a long way toward protecting your investment.
- Clean your sectional monthly with mild soap and water to remove dirt and prevent stains from setting in.
- Check all screws and joints twice a year, tightening any loose hardware to keep your sectional sturdy and safe.
- Cover or move your sectional during harsh weather, such as heavy storms, to prevent unnecessary damage and wear.
- Apply fresh stain or sealant every two years to protect the wood from sun damage and moisture.
Following these simple steps will keep your sectional beautiful and functional. Your hard work deserves proper care to make it last for decades.
Mistakes to Avoid when DIYing an Outdoor Sectional
Even experienced builders make mistakes when creating outdoor furniture. Learning from these common errors will save you time, money, and frustration.
- Measure twice and cut once because rushing through planning leads to pieces that don’t fit together correctly.
- Choose weather-resistant wood, such as cedar or teak, instead of regular pine, which is prone to rotting quickly outdoors.
- Never skip the weatherproofing step, as unsealed wood will crack, warp, and deteriorate within just one season.
- Build a strong frame with proper support beams, or your sectional will wobble and fall apart.
Avoiding these mistakes means your sectional will be sturdy and beautiful from day one. Take your time and do it right the first time.
Summing It Up
Your DIY outdoor sectional project offers incredible savings while giving you complete control over the design.
You’ll create exactly what you want without breaking the bank. Plus, there’s nothing quite like the pride of relaxing on furniture you built yourself.
Every time you sit down, you’ll remember the satisfaction of creating something beautiful with your own hands.
Don’t let the project intimidate you – just take it one step at a time. You’ve got all the knowledge you need to succeed right here.
Start gathering your materials and get ready for an amazing weekend project. I’d love to hear how yours turns out; comment below with your questions and success stories!


