


Keeping kids busy without spending a fortune is one of those things that always feels harder than it should, trust me on that. That is where DIY toys you can make at home come in handy.
Most of what you need is already sitting in your recycling bin, junk drawer, or craft supply stash. These projects are screen-free, hands-on, and genuinely fun to put together.
My go-to approach is grouping ideas by toy type, which is exactly how this list is laid out. The materials are simple, the steps are clear, and the results are worth every bit of effort you put in.
Understanding DIY Toys
DIY toys are homemade playthings built from everyday household materials rather than store-bought kits. Think cardboard boxes, empty plastic bottles, fabric scraps, paper rolls, and rubber bands, the kind of stuff that piles up in my house and usually ends up in the trash.
The appeal, in my experience, is real: these toys cost almost nothing, keep kids away from screens, and build useful skills along the way. The best part, to my mind, is watching a child play with something made from a cereal box with the same excitement as a brand-new purchase.
Safety matters here, especially for younger children. Always choose age-appropriate materials, skip small loose parts for toddlers, and use non-toxic supplies when possible. A little planning on your end goes a long way.
DIY Toys From Cardboard and Recycled Materials
Cardboard boxes, toilet paper rolls, plastic bottles, and coffee cans are some of the most versatile materials in any home. With a little tape and imagination, everyday packaging becomes something a child will actually want to play with. Here are eleven ideas to get started.
1. Cardboard Playhouse
Turn a simple cardboard box into a cozy playhouse where your child can imagine, decorate, and create their own little world indoors.
Materials: Large cardboard box, box cutter, strong packing tape, washable paint, thick markers, and extra cardboard strips for reinforcement.
How to make it:
- Choose a sturdy box large enough for your child to sit inside comfortably, then tape the bottom flaps shut
- Mark a doorway on the front panel measuring 40 cm tall and 25 cm wide using a ruler and marker
- Cut carefully along the marked lines, leaving one side attached so the door can swing open
- Draw two square windows 15 cm × 15 cm on the side panels and cut them out to let light in
- Cut cardboard strips 5 cm wide and tape them firmly into each interior corner for added structural strength
- Let children paint the walls or add stickers, then allow at least 30 minutes drying time before play
Important Safety Notes: Place the playhouse on a rug or foam mat for stability, tape sharp edges for safety, and encourage kids to decorate with curtains.
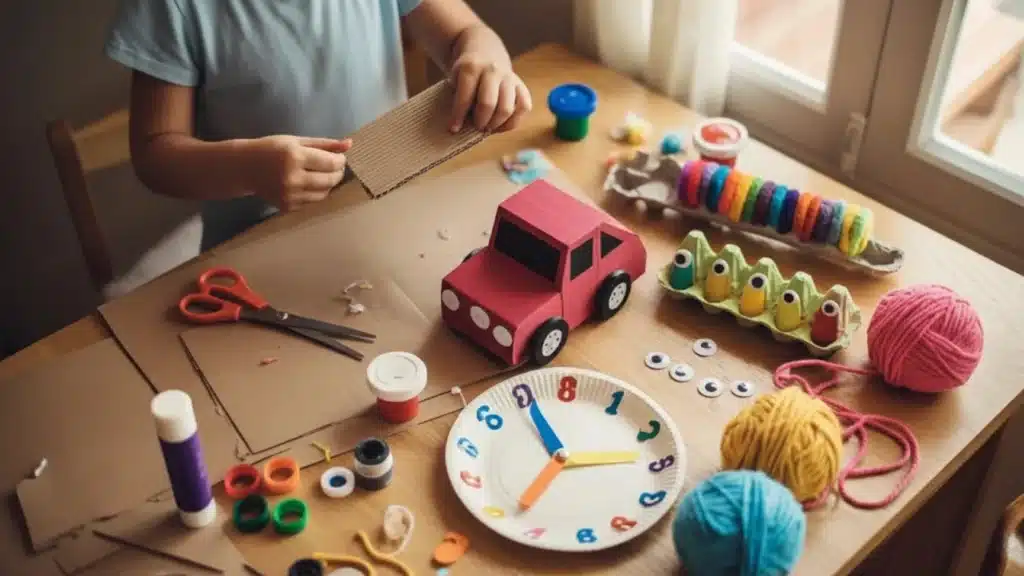
2. Cardboard Car or Truck
Your child will love climbing into their own cardboard car and heading off on make-believe road trips around the living room.
Materials: Large cardboard box (at least 60 cm × 40 cm × 40 cm), box cutter, strong tape, paper plate (25 cm diameter), dark permanent marker.
How to make it:
- Remove top flaps completely to create an open seating space roughly 40 cm × 40 cm
- Cut a low doorway opening 30 cm tall × 25 cm wide along one side panel
- Trace and cut four matching cardboard circles, each 15 cm in diameter, for wheels
- Tape wheels securely onto both sides of the box at equal height, about 8 cm from the bottom edge
- Attach a 25 cm paper plate inside the front panel as a steering wheel, centered at the child’s arm height
- Draw headlights (10 cm circles), door lines, and window details using a dark permanent marker
Important Safety Notes: Tape all cut edges before use, place on a flat non-slip surface, and check wheel attachments regularly during play.
3. Mini Cardboard Dollhouse
This compact dollhouse gives your child a detailed space to arrange tiny rooms and act out their own small-scale stories.
Materials: Thick cardboard base (50 cm × 40 cm), fabric scraps, non-toxic glue, scissors, ruler.
How to make it:
- Cut away one large 50 cm × 40 cm side panel completely to create open front access to the rooms
- Measure and glue a vertical cardboard strip 40 cm tall by 4 cm wide down the center of the base
- Add a horizontal strip 50 cm long by 4 cm wide across the middle to divide the space into four rooms
- Secure all dividers firmly with extra glue along every join so the interior walls stay fully upright
- Cover each roughly 20 cm × 20 cm wall section with glued decorative scrapbook paper for a finished look
- Cut small furniture pieces, such as 5 cm tall chairs and 6 cm wide tables, from spare cardboard scraps
Important Safety Notes: Use non-toxic glue only, allow full drying time before handling, and check all dividers are firmly secured before play begins.
4. Cardboard Marble Run
Watch your child’s eyes light up as marbles zigzag down a track they helped design, learning cause and effect along the way.
Materials: Large cardboard sheet (60 cm × 90 cm), paper towel rolls (each 28 cm long), hot glue, marbles (1.5 cm diameter).
How to make it:
- Cut paper towel rolls lengthwise to create open channel pieces, each measuring 28 cm long for the track
- Arrange channels diagonally at a 30-degree angle across the board to form a zigzag path downward
- Glue each channel firmly onto the 60 cm × 90 cm cardboard backing with at least 3 cm of glue contact per side
- Leave 4–5 cm drop gaps between each channel section so the marble can fall through cleanly
- Test a 1.5 cm marble from the top, adjusting slope angles in 5-degree increments until movement is smooth
- Add extra glue under any loose sections and allow a full 20 minutes drying time before use
Important Safety Notes: Keep marbles away from children under 3, supervise play at all times, and check all glued sections regularly for signs of loosening.
5. Cardboard Parking Garage
Give your child’s toy car collection a proper home with a multi-level garage complete with ramps, floors, and numbered parking spots.
Materials: Three flat cardboard boxes (each 50 cm × 35 cm × 8 cm), extra cardboard, tape, and marker.
How to make it:
- Stack three flat 50 cm × 35 cm × 8 cm boxes evenly on top of each other to form the garage levels
- Cut ramp openings 15 cm wide by 12 cm tall on alternating sides to connect the upper and lower floors
- Insert angled cardboard ramps 30 cm long by 15 cm wide into each opening between levels
- Tape every ramp securely at both the top and bottom edges to prevent any shifting during active play
- Draw parking lines with each space 10 cm wide by 18 cm long, and add clear numbers on every floor
- Test by rolling toy cars up to 8 cm wide through the full structure before allowing children to play
Important Safety Notes: Reinforce all ramp joints with extra tape, ensure the structure sits on a flat surface, and check stability before each play session.
6. Cardboard Rocket Ship
Take your child on a trip to outer space without leaving the living room, using nothing more than a tall box and some paint.
Materials: Tall cardboard box (at least 40 cm × 40 cm × 100 cm), extra cardboard, tape, and paint.
How to make it:
- Stand the tall box upright to form a rocket body standing approximately 100 cm tall on a flat surface
- Roll a 50 cm × 50 cm cardboard sheet tightly into a cone shape and secure the seam firmly with tape
- Attach the cone to the top of the box using 10 cm strips of strong tape applied all the way around
- Cut four triangular fins 25 cm tall by 20 cm wide at the base, and attach them evenly around the bottom
- Reinforce every seam with 5 cm wide tape strips applied both inside and outside for maximum strength
- Paint the full rocket in chosen colors and allow at least 60 minutes of complete drying time before play
Important Safety Notes: Ensure the cone is firmly attached before play, place it on a stable, flat surface, and thoroughly tape all sharp cut edges.
7. Cardboard Puppet Theater
Set up a stage where your child can perform puppet shows for the whole family using a single large cardboard box.
Materials: Large cardboard box (60 cm × 40 cm × 80 cm), fabric strips (each 40 cm long × 15 cm wide), tape, paint.
How to make it:
- Stand the box upright at 80 cm tall with the open side facing outward toward the seated audience
- Cut a wide stage window 40 cm wide by 25 cm tall near the top of the front panel
- Tape 40 cm fabric strips inside along the top edge of the window opening to serve as stage curtains
- Cut a performer access doorway 35 cm tall by 25 cm wide at the back of the box for entry
- Decorate the entire front surface with paint, keeping the 40 cm × 25 cm stage window area completely clear
- Allow at least 45 minutes of full drying time before setting up for the first puppet performance
Important Safety Notes: Tape all cut edges, ensure the box sits flat and stable on the floor, and check curtain attachments are secure before each show.
8. Plastic Bottle Sensory Shaker
This calming sensory toy keeps young children engaged as they tilt and shake it to watch glitter swirl slowly inside.
Materials: Clear plastic bottle (500 ml), clean water, glitter or small beads (3–5 mm), strong, waterproof glue, a tightly sealing cap, and a funnel.
How to make it:
- Fill the 500 ml clear plastic bottle to the 250 ml mark with clean room-temperature water
- Add 2 tablespoons of glitter or small 3–5 mm beads carefully into the bottle using a funnel
- Leave a 3–4 cm air gap at the top of the bottle to allow movement and swirling inside
- Apply a 1 cm ring of waterproof glue inside the cap threads carefully before sealing it shut
- Twist the cap firmly until completely closed, and wipe away any glue that squeezes out around the rim
- Shake gently and check closely for any leaks for at least 10 minutes before handing it to a child
Important Safety Notes: Glue the cap permanently shut, never leave a toddler unsupervised with the bottle, and inspect the seal regularly for signs of loosening.
9. Coffee Can Coin Bank
Teach your child the value of saving with a personalized coin bank made from a recycled coffee can that you decorate together.
Materials: Coffee can with lid (10 cm diameter × 14 cm tall), craft knife, decorative paper (cut to 44 cm × 14 cm to wrap the can), tape.
How to make it:
- Clean and dry the 10 cm diameter by 14 cm tall coffee can thoroughly inside and out before starting
- Cut a coin slot 3 cm long by 0.5 cm wide, centered precisely in the middle of the plastic lid
- Smooth all rough edges around the slot by folding tape neatly over the entire cut opening
- Wrap the outer surface of the can with a 44 cm × 14 cm sheet of decorative paper for personalizing
- Secure the decorative paper tightly using clear tape along both the top and bottom edges of the can
- Snap the lid firmly closed and test the slot with a standard 2.5 cm diameter coin drop
Important Safety Notes: Tape all cut edges on the lid slot, ensure the lid snaps fully closed every time, and keep away from children under 3 due to the choking risk from coins.
10. Egg Carton Caterpillar
This cheerful caterpillar is made from an egg carton and a handful of craft supplies your child can paint and personalize freely.
Materials: Standard 12-egg carton, non-toxic paint, googly eyes (1.5 cm diameter), pipe cleaners (30 cm long), and non-toxic glue.
How to make it:
- Cut a single row of six connected cups from the egg carton, forming a strip roughly 30 cm long
- Paint each of the six cups a different bright color, then allow at least 30 minutes of full drying time
- Glue two 1.5 cm googly eyes firmly and flat onto the front cup of the caterpillar strip
- Poke two small holes 1 cm apart above the eyes using a pencil tip pressed through gently
- Insert a 30 cm pipe cleaner through both holes and bend each side into an antenna shape, 8 cm tall
- Draw small 1 cm patterns or dots along each cup segment using a marker for extra decoratio
Important Safety Notes: Use non-toxic paint and glue only, allow full drying before handling, and check that googly eyes are firmly attached before giving to young children.
11. Toilet Paper Roll Binoculars
Your child can take these homemade binoculars on indoor or outdoor adventures and decorate them however they choose.
Materials: Two toilet paper rolls (each 11 cm long × 4 cm diameter), tape, non-toxic paint, yarn (60 cm length).
How to make it:
- Align two 11 cm long toilet paper rolls evenly side by side, with both ends perfectly flush
- Tape the rolls tightly together along the full 11 cm touching seam using several overlapping strips
- Paint the outer surfaces of both rolls in chosen colors and allow at least 30 minutes of drying time
- Punch one small hole 1 cm from the outer edge on each roll for the carrying strap
- Thread a 60 cm length of yarn through both holes and tie a strong double knot at each end
- Adjust the yarn loop so the finished binoculars hang comfortably at the child’s chest height
Important Safety Notes: Ensure yarn knots are tight and secure, check that paint is fully dry before wear, and use child-safe paint throughout.
DIY Sensory and Toddler Toys
Toddlers learn through touch, sound, and movement. The toys in this section support fine motor development, sensory processing, and early problem-solving without requiring much in the way of materials or prep time.
12. Hair Gel Sensory Bag
This mess-free sensory bag lets your child press and move objects without getting their hands dirty, making it great for quiet, focused play.
Materials: Large freezer bag (27 cm × 28 cm), clear hair gel (200 ml), small plastic items (2–5 cm), strong packing tape.
How to make it:
- Open the 27 cm × 28 cm freezer bag and squeeze 200 ml of clear hair gel evenly inside
- Add 8–10 small plastic items, each 2–5 cm in size, spread evenly throughout the gel layer
- Press out all excess air from the bag before sealing the zipper completely and firmly shut
- Tape the full 27 cm zipper edge with a double layer of packing tape to prevent any opening
- Lay the sealed bag flat on a sturdy table and smooth it to an even 1 cm thickness throughout
- Tape all four outer edges with 3 cm wide tape strips before handing to a toddler for play
Important Safety Notes: Tape all edges thoroughly to prevent gel leaks, supervise toddlers at all times, and check the seal is fully intact before each use.
13. Fabric Scrap Texture Board
This simple texture board turns leftover fabric scraps into a rich sensory activity that keeps toddlers engaged through touch and feel.
Materials: Thick cardboard base (40 cm × 40 cm), fabric scraps in varied textures, and non-toxic glue.
How to make it:
- Cut a sturdy 40 cm × 40 cm cardboard square from thick cardboard to serve as the base board
- Select 9–12 fabric scraps with clearly different textures, such as rough, smooth, fluffy, and bumpy
- Cut every selected fabric piece into equal 10 cm × 10 cm squares to create a neat, uniform grid
- Spread non-toxic glue evenly across each 10 cm × 10 cm section of the cardboard surface carefully
- Press each fabric square firmly into its glued section, smoothing out any bubbles or lifted edges
- Allow the completed board a full 60 minutes of drying time before handing it to a child
Important Safety Notes: Use only non-toxic glue, ensure all fabric edges are firmly glued down, and check for loose pieces before each use.
14. Rice Sensory Bin
A sensory bin for rice gives your toddler a whole world of scooping, pouring, and digging, with hidden toys to find beneath the surface.
Materials: Shallow plastic bin (50 cm × 35 cm × 10 cm deep), 1–2 kg uncooked rice, cups, spoons, small toys (at least 5 cm in size).
How to make it:
- Pour 1–2 kg of uncooked rice evenly into the 50 cm × 35 cm bin to a depth of about 6 cm
- Bury 5–8 small toys, each at least 5 cm in size, lightly beneath the rice surface for discovering
- Add 2–3 scoops, cups, and small funnels to encourage scooping, filling, and pouring play
- Place the bin on a 60 cm × 60 cm mat beneath it to catch any rice that spills over the edges
- Show your toddler how to scoop and pour rice using the provided cups and funnels to get started
- Supervise closely throughout every sensory play session to ensure safe and engaged exploration
Important Safety Notes: Keep rice bins out of reach of children under 18 months, supervise at all times, and store rice in a sealed container between uses.
15. Water Bead Bottle
This sealed bottle filled with water beads makes a visually engaging toy that develops focus and visual tracking without any mess.
Materials: Clear plastic bottle (750 ml), water beads (expand to 1–1.5 cm each), clean water, and waterproof glue.
How to make it:
- Soak water beads in clean water for 4–6 hours until they have fully expanded to 1–1.5 cm each
- Fill the clear 750 ml bottle to the 500 ml mark with fresh, clean water before adding beads
- Add 20–25 fully expanded beads carefully through the bottle opening using a funnel for control
- Leave a 5 cm air space at the top of the bottle to allow the beads to move and float freely
- Apply a 1 cm ring of waterproof glue inside the cap, and seal the bottle tightly and completely
- Shake gently and inspect the cap seal closely for at least 10 minutes before toddler handling
Important Safety Notes: Glue the cap permanently shut, never give to children under three due to bead choking risk, and inspect the seal regularly.
16. Rainbow Capillary Action Paper Towel Experiment
This colorful experiment lets your child watch science happen in real time as colors travel up paper towels completely on their own.
Materials: Paper towel sheet (full size, approximately 28 cm × 28 cm), washable markers, two clear cups (250 ml each), water.
How to make it:
- Draw thick, 4 cm wide rainbow color stripes across both short ends of the full-size paper towel
- Fill two 250 ml cups to the 150 ml mark each with clean water before setting them in position
- Place the two filled cups 20 cm apart from each other on a flat and stable surface
- Fold the paper towel lengthwise to a 7 cm width and dip one colored end into each cup
- Ensure only the bottom 3 cm of each colored end is actually touching the water surface
- Watch the colors travel upward and meet in the center naturally over the next 20–40 minutes
Important Safety Notes: Use only washable markers, place cups on a stable surface to avoid spills, and supervise young children around water at all times.
17. Crinkle Paper Toy
Babies and toddlers are drawn to the satisfying crinkling sound this toy makes every time they squeeze or grab it during play.
Materials: Two cotton fabric squares (20 cm × 20 cm each), one cellophane sheet (18 cm × 18 cm), ribbon pieces (each 10 cm long), needle, thread.
How to make it:
- Cut two 20 cm × 20 cm cotton fabric squares of completely equal size for the outer layers
- Place an 18 cm × 18 cm cellophane sheet centered precisely between the two fabric layers
- Insert 4 ribbon loops, each 10 cm folded down to 5 cm, evenly along the edges before sewing
- Sew around all four edges with a 1 cm seam allowance, leaving a 5 cm opening on one side
- Turn the fabric carefully right side out through the 5 cm opening, pulling gently to avoid tearing
- Sew the 5 cm opening fully closed using small 3 mm hand stitches for a neat and secure finish
Important Safety Notes: Check all stitching is secure before giving to a baby, ensure ribbon loops cannot be pulled off, and inspect the toy regularly for wear and loose seams.
18. Simple Treasure Basket
A treasure basket gives babies a safe, open-ended way to handle different textures, weights, and shapes entirely at their own pace.
Materials: Low wide basket (30 cm diameter × 10 cm tall), wooden spoons, fabric pieces, safe household objects (each at least 6 cm).
How to make it:
- Choose a wide, shallow basket no taller than 10 cm with no sharp edges, splinters, or rough spots
- Gather 8–12 safe household objects, each at least 6 cm in size, with varied textures and weights
- Place all items loosely inside the 30 cm diameter basket with at least 3 cm spacing between them
- Remove any object smaller than 6 cm immediately, as it could pose a serious choking hazard
- Sit baby nearby within arm’s reach and allow completely free, open-ended exploration of the basket
- Rotate 3–4 objects every week to maintain the baby’s interest and introduce new textures regularly
Important Safety Notes: Check every item for choking hazards before placing it in the basket, supervise babies at all times, and inspect all objects regularly for damage or sharp edges.
19. Paper Towel Roll Ball Drop
A cardboard box and a few paper towel rolls become a drop-and-chase toy your toddler will return to again and again.
Materials: Tall cardboard box (30 cm × 30 cm × 60 cm), paper towel rolls (each 28 cm long), tape, soft foam ball (6 cm diameter).
How to make it:
- Stand the 60 cm tall cardboard box upright and secure it firmly against a wall before starting
- Cut an entry hole 8 cm × 8 cm near the top front panel, positioned 50 cm up from the floor
- Tape paper towel rolls diagonally inside at 35-degree angles to form a smooth zigzag path down
- Leave a 5 cm drop gap between the bottom of one roll and the top of the next roll below
- Cut an exit hole 8 cm × 8 cm near the bottom front panel, positioned 10 cm up from the floor
- Test the full path using a 6 cm foam ball, adjusting the roll angles until movement is completely smooth
Important Safety Notes: Secure the box firmly against a wall to prevent tipping, tape all cut edges, and use only a soft foam ball during play.
20. Bottle Cap Matching Game
This matching game uses recycled bottle caps to help your child practice letter recognition and memory skills at the same time.
Materials: 20 matching bottle caps (3–4 cm diameter each), permanent marker.
How to make it:
- Collect 10 pairs of matching bottle caps, with each cap measuring 3–4 cm in diameter
- Write identical letters inside each matching pair of caps clearly using a permanent marker
- Shuffle all 20 caps thoroughly and lay them face down in a grid on a flat surface
- Arrange the caps in a 4 × 5 grid pattern with 2 cm of even spacing between each cap
- Flip two caps per turn and look for a matching letter pair before turning the unmatched caps back over
- Keep all matched pairs set aside and continue playing until all 10 pairs have been found
Important Safety Notes: Check all caps for sharp edges before play, keep small caps away from children under three, and store in a sealed container between sessions.
21. Shape Sorting Box
This color-coded shape sorter helps your child match shapes and solve a simple, hands-on problem independently.
Materials: Sturdy cardboard box (25 cm × 25 cm × 15 cm), extra cardboard, and non-toxic paint.
How to make it:
- Cut five shapes into the 25 cm × 25 cm box lid: a 6 cm circle, a 6 cm square, a 7 cm base triangle, an 8 cm × 4 cm rectangle, and a 7 cm wide star
- Trace each matching shape onto spare cardboard and cut every piece out carefully along the outline
- Paint each shape and its corresponding hole the exact same color using non-toxic paint throughout
- Allow all painted pieces and the box lid at least 45 minutes of full drying time before use
- Demonstrate posting each shape through its correct 6–8 cm opening slowly and clearly for the child
- Reset all pieces and repeat the activity as your child builds confidence, matching each shape correctly
Important Safety Notes: Use non-toxic paint, ensure cut shapes have no sharp edges, and check that pieces are too large to be swallowed before giving to young children.
22. DIY Puzzle From Cereal Box
Turning an empty cereal box into a puzzle is one of the quickest ways to make a personalized activity your child will want to repeat.
Materials: Empty cereal box (front panel approximately 20 cm × 30 cm), scissors, and marker.
How to make it:
- Cut the 20 cm × 30 cm front panel cleanly and completely from the empty cereal box
- Draw 6–8 irregular puzzle-piece lines across the panel surface using a marker for cutting guides
- Cut carefully along each drawn line, separating all pieces into sections roughly 6–8 cm wide each
- Mix all the cut pieces thoroughly before handing them to your child to begin solving the puzzle
- Store all finished pieces neatly inside the original cereal box after every completed play session
- Gradually increase the puzzle to 12–15 pieces as your child’s cutting and fitting skills develop
Important Safety Notes: Check all cut edges are smooth before play, supervise young children to prevent pieces from being put in their mouths, and store pieces safely to avoid loss.
When you offer hands-on sensory play, you naturally build focus, coordination, and confidence. Try one simple setup this week, and you will notice how deeply your toddler engages.
DIY STEM and Educational Toys
Hands-on learning sticks better than any worksheet. The projects in this section introduce kids to force, balance, time, and motion through play that they actually want to do. No expensive kits needed.
23. Marshmallow Catapult
This popsicle-stick catapult turns basic physics into a game your child will want to set up targets for and play over and over.
Materials: 10 craft sticks (15 cm long each), rubber bands, plastic spoon (15 cm long), mini marshmallows (1.5 cm diameter).
How to make it:
- Stack 8 craft sticks and secure both ends of the bundle tightly with rubber bands at each end
- Stand 2 craft sticks upright at one end of the stack and hold them together with a rubber band
- Slide the 8-stick bundle between the two upright sticks so it sits firmly 3 cm from the top
- Attach a 15 cm plastic spoon to the top of the upright sticks securely using 2 rubber bands
- Load a 1.5 cm mini marshmallow into the spoon bowl and press the spoon down 4–5 cm to prime
- Release the spoon quickly to launch the marshmallow forward a distance of up to 2–3 metres
Important Safety Notes: Supervise all launching activity, aim only at soft targets, and keep rubber bands away from young children to prevent snapping injuries.
24. Paper Plate Clock
This hands-on clock helps your child read time in a way that sticks far better than any worksheet or screen-based activity.
Materials: Paper plate (23 cm diameter), cardboard, brass brad, marker.
How to make it:
- Write numbers 1–12 evenly spaced around the plate edge, with each number standing 2 cm tall for easy reading
- Cut a long 10 cm minute hand and a shorter 7 cm hour hand from a piece of spare cardboard
- Color each hand a different shade so children can clearly distinguish between the minute and hour hands
- Punch a small 3 mm hole through the exact center point of the paper plate before assembly
- Insert a brass brad through both cardboard hands and the center hole, then secure it flat from behind
- Practice setting and reading real daily schedule times together each day to reinforce learning naturally
Important Safety Notes: Press the brass brad flat on the back to avoid scratching, use child-safe markers, and supervise younger children during the making process.
25. DIY Balance Scale
This simple scale helps your child compare weights using everyday household objects, making balance and measurement tangible and easy to grasp.
Materials: Two paper cups (9 cm tall each), string (4 × 20 cm lengths), ruler (30 cm), pencil.
How to make it:
- Punch two holes 1 cm from the top rim on opposite sides of each 9 cm paper cup
- Thread a 20 cm string through each pair of holes to form a sturdy handle loop
- Attach both cup handles to opposite ends of the 30 cm ruler, each sitting 2 cm from the end
- Balance the ruler carefully across a pencil positioned at the 15 cm center mark to create the pivot
- Place small objects like coins, buttons, or pebbles into each cup to compare their relative weights
- Observe which side dips lower as different objects are added to or removed from each cup
Important Safety Notes: Use only lightweight objects, ensure all string knots are secure before use, and supervise children to prevent small objects from being put in their mouths.
26. DIY Magnetic Fishing Game
This magnetic fishing game builds counting, color recognition, and patience all at once using nothing more than cardboard and a magnet.
Materials: Thick cardboard, paper clips (3 cm each), string (50 cm), small magnet (2 cm), chopstick (25 cm long).
How to make it:
- Cut 10 fish shapes from thick cardboard, each measuring approximately 8 cm long by 5 cm wide
- Decorate each fish with a number from 1–10 or a distinct bright color using markers for variety
- Tape a 3 cm paper clip firmly and flat onto the mouth area of every individual fish shape
- Tie a 50 cm length of string onto the 25 cm chopstick, knotted securely 3 cm from one end
- Attach a 2 cm magnet firmly to the free dangling end of the string using strong tape
- Lower the magnet to within 2 cm of each fish and watch the paper clip snap it upward
Important Safety Notes: Keep small magnets away from children under five, check paper clip attachments before each game, and supervise play at all times.
27. Balloon Rocket
This balloon rocket shoots across a taut string, giving your child a hands-on introduction to thrust and motion through exciting play.
Materials: String (3–5 metres long), plastic straw (20 cm), balloon (30 cm when inflated), tape.
How to make it:
- Thread the full 3–5 metre string through the 20 cm plastic straw completely before tying anything
- Stretch the string tightly between two fixed anchor points set 3–5 metres apart from each other
- Inflate the balloon to roughly 25–30 cm in length and pinch the open end firmly closed without tying
- Tape the inflated balloon firmly onto the straw using two separate 5 cm tape strips for security
- Hold the pinched balloon end completely closed and steady until you are fully ready to launch
- Release the end and watch the escaping air shoot the balloon across the entire 3–5 metre string
Important Safety Notes: Tie string anchor points securely to fixed objects, keep the 3–5 metre launch path clear of faces, and supervise balloon inflation to prevent overinflating.
28. Spoon Catapult
This craft stick catapult gives your child more launch power to test different objects and compare how far each one travels.
Materials: 12 popsicle sticks (15 cm each), rubber bands, plastic spoon (18 cm).
How to make it:
- Stack 10 popsicle sticks (15 cm each) in a flat bundle and secure both ends tightly with rubber bands
- Stand 2 sticks upright to form the fulcrum and bind them with a rubber band 3 cm from the top
- Slide the 10-stick bundle firmly between the two upright sticks, positioning it 4 cm from the top
- Lay one flat 15 cm stick horizontally across the center of the upright fulcrum to create the arm
- Attach the 18 cm plastic spoon securely to the longer end of the arm using a rubber band
- Press the spoon down 5 cm and release quickly to launch small objects up to 3 metres forward
Important Safety Notes: Supervise all launching; aim only toward clear, open areas at least 3 metres wide; and keep rubber bands away from young children.
29. Paper Airplane Challenge
This activity turns basic paper folding into a full experiment your child can run, measure, and repeat with different designs each time.
Materials: 4 sheets of A4 paper (21 cm × 29.7 cm each), a tape measure (at least 5 metres), and small stickers for labeling.
How to make it:
- Fold four clearly different airplane designs from four separate 21 cm × 29.7 cm A4 paper sheets
- Label each finished plane with a small numbered sticker from 1 through 4 for straightforward tracking
- Mark a consistent starting line on the floor using tape, positioned at least 2 metres from any wall
- Throw each plane forward from the same line using a steady and consistent force every single time
- Measure the exact distance each plane travels from the line using a tape measure of at least 5 metres
- Record all four distances carefully and compare which airplane design flew the furthest overal
Important Safety Notes: Choose an open indoor or outdoor space at least 5 metres long, keep bystanders clear of the flight path, and fold back the sharp nose tips for younger children.
30. Paper Spinner
This simple spinner shows your child how colors appear to merge together when they spin fast enough, a satisfying visual result every time.
Materials: Stiff cardstock (10 cm × 10 cm), markers, toothpick (6.5 cm long).
How to make it:
- Cut a neat 8 cm diameter hexagon shape from a sheet of stiff 10 cm × 10 cm cardstock
- Divide the surface into six equal 60-degree sections by drawing lines with a ruler and pencil
- Color alternating sections in two strongly contrasting colors, each section roughly 3 cm wide
- Push the 6.5 cm toothpick carefully and straight through the exact center point of the hexagon
- Leave 1.5 cm of the toothpick protruding below and 3 cm above the cardstock surface for balance
- Spin it quickly between your fingers and watch the two contrasting colors appear to blend together
Important Safety Notes: Supervise toothpick use at all times, trim the sharp tip for children under five, and ensure the toothpick is centered before each spin.
31. Paper Chain Building Game
This pattern-based building game challenges your child to follow sequences and think ahead as the chain grows longer with each loop.
Materials: Colored paper strips (each 20 cm long × 2.5 cm wide), non-toxic glue.
How to make it:
- Cut colored paper into uniform strips, each measuring exactly 20 cm long by 2.5 cm wide
- Write a simple repeating color sequence pattern onto a small 5 cm × 5 cm guide card for reference
- Form the first 20 cm strip into a loop by gluing the two ends together with a 1 cm overlap
- Thread the next 20 cm strip through the first completed loop before gluing its ends firmly together
- Continue adding one loop at a time, following the pattern card carefully with each new strip added
- Measure the finished chain once complete, aiming to reach at least 50 cm in total length
Important Safety Notes: Use only non-toxic glue, keep it away from mouths, and ensure all strips are cut with smooth 90-degree edges before handling.
32. DIY Drum From Tin Cans
This homemade drum gives your child a real instrument to tap and experiment with, producing different sounds depending on the can size and tension.
Materials: Tin can (10 cm diameter × 12 cm tall), balloon (25 cm when inflated), thick rubber band (10 cm diameter), chopsticks (25 cm long each).
How to make it:
- Clean the 10 cm × 12 cm tin can thoroughly and check the entire rim carefully for any sharp edges
- Cut the balloon neck off cleanly and stretch the remaining rubber piece over the full 10 cm opening
- Secure the stretched balloon tightly in place using a 10 cm diameter rubber band around the rim
- Press the surface gently to confirm it feels taut with only about 3–4 mm of flexible give remaining
- Wrap 2 cm of foam or fabric padding around each end of the two 25 cm chopsticks for softer tapping
- Tap the drum surface steadily with both padded chopsticks to produce clear and satisfying rhythmic sounds
Important Safety Notes: Check the can rim carefully for sharp edges and tape any rough spots, ensure the rubber band holds the balloon firmly, and supervise chopstick use with younger children.
These hands-on builds make learning feel active instead of forced or dull. Pick one project, test it together, and you will see how quickly curiosity grows through doing.
DIY Pretend Play and Creative Toys
Pretend play is how children make sense of the world around them. These projects give kids the props they need to act out stories, try on roles, and create their own games without any expensive accessories.
33. DIY Play Kitchen Food
These cardboard food pieces give your child a full set of props for playing restaurant, chef, or grocery store right at home.
Materials: Thick cardboard sheet (50 cm × 70 cm), non-toxic paint, dark marker.
How to make it:
- Draw fruit shapes (8 cm wide), vegetables (10 cm tall), and bread slices (10 cm × 8 cm) onto the cardboard sheet
- Cut each food shape out carefully along its drawn outline using a pair of scissors with smooth edges
- Paint every piece in realistic food colors using non-toxic paint and allow a full 45 minutes to dry
- Add fine detail lines like seeds, crusts, and stripes using a dark marker with a 1–2 mm tip
- Check each piece thoroughly for any sharp or torn cardboard edges before handing them to a child
- Store all finished food pieces neatly inside a small basket or lidded box between each play session
Important Safety Notes: Use only non-toxic paint, allow full drying before play, and check regularly for damaged or torn pieces that may have sharp cardboard edges.
34. Cardboard Cash Register
This play cash register sets your child up to run their own pretend shop and practice number recognition through everyday play.
Materials: Medium box (25 cm × 20 cm × 15 cm), small box (15 cm × 10 cm × 5 cm), marker, cardboard scraps.
How to make it:
- Close and tape the 25 cm × 20 cm × 15 cm medium box on all sides to form a solid, stable base
- Attach the smaller 15 cm × 10 cm × 5 cm box on top of the base and secure it firmly with tape
- Draw a grid of number buttons, each 2 cm × 2 cm, arranged in a 3 × 4 layout across the front panel
- Cut a 15 cm × 3 cm rectangular slot near the bottom front edge of the box for the cash drawer
- Slide a shallow 15 cm × 10 cm cardboard tray into the slot opening to serve as the working drawer
- Add paper money cut to 10 cm × 5 cm and round cardboard coins 3 cm in diameter to complete the setup
Important Safety Notes: Tape all box seams firmly, check for sharp cut edges on the 15 cm drawer slot, and keep small coin pieces out of reach of children under 3.
35. Doctor Kit From Household Items
This homemade doctor kit gives your child everything needed to set up a pretend clinic and care for toys through role-play.
Materials: Cardboard, pipe cleaners (30 cm long), craft stick (15 cm), gauze roll (5 cm wide).
How to make it:
- Cut a round 8 cm diameter cardboard circle to serve as the stethoscope chest piece base
- Fold a 30 cm pipe cleaner in half and attach it to the chest piece to form the earpiece shape
- Paint one end of a 15 cm craft stick red to represent a simple pretend thermometer clearly
- Roll a 30 cm length of 5 cm wide gauze into a neat and soft bandage wrap for pretend injuries
- Rule five to six lines across 10 cm × 8 cm paper sheets to create a simple pretend prescription pad
- Place all finished tools together inside a small 20 cm × 15 cm bag or container for easy carrying
Important Safety Notes: Fold all pipe cleaner ends flat to avoid scratching; use non-toxic paint on the craft stick; and keep small pieces away from children under 3.
36. DIY Sock Puppet
A sock puppet comes together in minutes and gives children a character with a name and voice they will return to long after the first day.
Materials: Clean adult sock (25–28 cm long), two googly eyes (2 cm diameter each), yarn (10 × 15 cm strands), and non-toxic glue.
How to make it:
- Slide a clean 25–28 cm adult sock over one hand to check the fit and confirm the mouth position
- Lightly mark the eye positions with a pencil, placing them 5 cm back from the toe end of the sock
- Glue two 2 cm googly eyes firmly at the marked positions, sitting just above the knuckle line
- Cut a 3 cm × 1.5 cm felt tongue piece and attach it securely inside the folded mouth area
- Glue 10 strands of 15 cm yarn evenly along the top edge of the sock to create the puppet’s hair
- Allow at least 60 minutes of full drying time before handing the finished puppet to a child for play
Important Safety Notes: Use strong, non-toxic glue; check that the googly eyes are firmly set before giving to young children; and ensure the yarn is securely attached, with no loose strands longer than 15 cm.
37. Superhero Masks
These cardboard masks let your child step into their favorite character and head off on adventures around the house in full costume.
Materials: Thick cardboard (25 cm × 15 cm), non-toxic paint, elastic string (35 cm long).
How to make it:
- Draw a symmetrical mask shape 22 cm wide by 10 cm tall onto the 25 cm × 15 cm cardboard sheet
- Cut two oval eye holes, each 4 cm wide by 2.5 cm tall, spaced 7 cm apart at the center point
- Decorate the entire front surface of the mask using non-toxic paint in the child’s chosen colors
- Allow at least 45 minutes of complete drying time before moving on to any further assembly steps
- Punch 3 mm holes 1 cm from each outer edge of the finished 22 cm wide mask shape
- Thread a 35 cm elastic band through both holes and tie firm double knots at each end to secure
Important Safety Notes: Ensure eye holes are large enough for clear vision, check that the 35 cm elastic is not too tight around the head, and use non-toxic paint throughout.
38. DIY Tool Belt
This fabric tool belt lets your child strap on their cardboard tools and get to work fixing everything in sight with a real sense of purpose.
Materials: Fabric strip (70 cm long × 8 cm wide), cardboard, non-toxic paint.
How to make it:
- Cut a 70 cm × 8 cm fabric strip that fits comfortably around the child’s waist with room to tie
- Attach three small fabric pockets, each 10 cm × 8 cm, evenly spaced along the front of the strip
- Draw a hammer (20 cm), a wrench (18 cm), and a screwdriver (16 cm) onto thick cardboard sheets
- Cut each tool shape out carefully, following the drawn outlines as closely and neatly as possible
- Paint every tool in grey and brown tones using non-toxic paint, then allow 45 minutes to dry fully
- Tie the belt securely around the child’s waist with a 5 cm overlap at each end for a comfortable fit
Important Safety Notes: Check that the belt tie is not too tight around the waist, use non-toxic paint on all cardboard tools, and ensure all pockets are sewn firmly before loading with tools.
39. Homemade Doll Bed
This shoebox doll bed gives your child’s favorite toy a proper place to rest, complete with a hand-sewn pillow and a fabric blanket.
Materials: Shoebox (30 cm × 15 cm × 10 cm), fabric pieces, cotton stuffing, cardboard (15 cm × 10 cm for headboard).
How to make it:
- Line the interior of the 30 cm × 15 cm × 10 cm shoebox with a fabric sheet cut to fit and glued flat
- Cut a 15 cm × 10 cm cardboard piece to serve as a simple rectangular headboard for the bed
- Glue the headboard upright and firmly against the inside of one 15 cm end wall of the shoebox
- Sew a small pillow from two 10 cm × 8 cm fabric squares stitched together along three sides
- Fill the pillow lightly with cotton stuffing and stitch the remaining open 8 cm edge fully closed
- Place the finished pillow and a 20 cm × 15 cm fabric blanket neatly inside the completed bed
Important Safety Notes: Use non-toxic glue for lining, ensure the headboard is firmly attached before play, and check all pillow stitching is secure before giving to a child.
40. Paper Fortune Teller
This classic folded paper toy gives your child a fun way to play prediction games with friends or family using one square sheet.
Materials: Square paper sheet (20 cm × 20 cm), marker.
How to make it:
- Fold all four corners of the 20 cm × 20 cm square sheet inward to meet precisely at the center point
- Flip the paper over and fold the four new corners inward to the center point once more
- Fold the resulting 10 cm × 10 cm square in half to create a neat 5 cm × 10 cm rectangle shape
- Insert both thumbs and both forefingers into the four 5 cm × 5 cm inner pockets to operate it
- Write numbers 1–8 on the outer triangles and a different color on each of the inner visible triangles
- Add a short 2–3 word fortune beneath each of the eight inner flaps using a child-safe marker
Important Safety Notes: Use child-safe markers only, ensure folds are crisp so the fortune teller holds its shape during use, and replace with a fresh 20 cm × 20 cm sheet when worn.
41. Origami Jumping Frog
This origami frog takes one sheet of paper and a few precise folds to produce a toy that actually jumps when pressed from behind.
Materials: One rectangular paper sheet (A4, 21 cm × 29.7 cm).
How to make it:
- Fold the 21 cm × 29.7 cm sheet in half lengthwise to create a long 10.5 cm × 29.7 cm strip
- Fold the top two corners diagonally inward so they meet neatly at the center to form a triangle point
- Collapse the triangle folds inward to produce a compact 10.5 cm × 10.5 cm layered square shape
- Fold the bottom rectangular section of approximately 10.5 cm × 9 cm upward to begin forming the body
- Fold the resulting 5 cm bottom edge firmly back down to create the rear spring for jumping
- Press the 5 cm rear fold down quickly and release to make the frog leap 10–15 cm forward
Important Safety Notes: Use paper with no sharp, torn edges, supervise younger children during folding steps, and replace the frog when it becomes too worn to jump cleanly.
42. Paper Pop It
This paper pop-up gives your child a low-cost, reusable fidget activity they can carry anywhere and reset easily with a fresh sheet.
Materials: Cardstock sheet (20 cm × 20 cm), marker.
How to make it:
- Draw a 6 × 6 grid of circles, each 2.5 cm in diameter, across the full 20 cm × 20 cm cardstock sheet
- Leave 0.5 cm of even spacing between each circle as you draw the full grid across the surface
- Place a small 3 mm dot inside the very center of every individual circle across the entire grid
- Hand the sheet to the child and invite them to begin crossing out circles one at a time in any order
- Continue marking off circles until all 36 across the complete 6 × 6 grid have been crossed out
- Draw or print a fresh 20 cm × 20 cm sheet to reset the activity and start a new round of play
Important Safety Notes: Use only non-toxic markers, replace worn sheets to keep cardstock edges smooth, and ensure all corners are trimmed to avoid sharp points before handing the cardstock to a child.
43. Paper Puppet
This paper bag puppet sparks immediate creative play and gives your child a full cast of characters to build and perform with the same afternoon.
Materials: Standard paper bag (18 cm × 10 cm × 6 cm), yarn (10 × 20 cm strands), non-toxic glue, marker.
How to make it:
- Place the 18 cm × 10 cm paper bag flat with the sealed bottom flap positioned facing upward
- Draw eyes 2 cm wide, a nose 1 cm tall, and a mouth 4 cm wide onto the 10 cm × 6 cm top flap
- Glue 10 strands of 20 cm yarn evenly along the top sealed edge of the bag to create the hair
- Cut two 5 cm × 4 cm paper ear shapes and glue one firmly to each side of the bag
- Slide one hand inside the bag with your fingers reaching up into the 6 cm top sealed flap
- Move your fingers upward to open and close the 4 cm mouth flap naturally during your performance
Important Safety Notes: Use non-toxic glue and markers, ensure all yarn strands are firmly attached with no loose ends longer than 20 cm, and check the bag opening is wide enough for your child’s hand.
When you give children simple props, they create full worlds on their own. Choose one idea here, set it up, and watch stories unfold in ways you never expected.
Quick Tips for Making DIY Toys
A few simple habits make the building process smoother, safer, and more enjoyable for everyone involved. Keep these in mind before starting any project.
- Use age-safe, non-toxic materials and avoid small, loose parts for children under three
- Sand sharp cardboard edges and supervise all cutting, gluing, and hot glue gun steps
- Start with the simplest project in a category before moving to more complex builds
- Let kids help design and decorate, it increases how long they actually play with the toy
- Store finished toys in labeled bins and rotate them weekly to keep interest high
Starting with one idea and seeing it through is better than planning ten projects at once and finishing none.
Final Thoughts
The best thing about these DIY toys you can make at home is that most of what you need is already within reach. A cardboard box, a pair of scissors, some tape, and a little time are enough to make something a child will actually use.
From my experience watching kids play, a homemade toy often gets more attention than a store-bought one, partly because they helped make it, and partly because it feels like theirs in a way that bought toys rarely do. Start with one idea this week, something that fits what you already have at home.
The process of building together is as valuable as the toy itself. Bookmark this list, come back to it when you need a new project, and keep the craft supplies within reach for when the mood strikes. Drop a comment below and share your ideas too!


