


Have you ever dreamed of adding an island to your kitchen but worried it might feel cramped?
The truth is, a poorly planned island can make cooking and moving around frustrating. That’s why understanding kitchen island spacing requirements is so important.
In this post, I’ll walk you through how much room you really need for comfort and function. You’ll see tips for seating, clearance around appliances, and ways to keep traffic flowing smoothly.
By the end, you’ll know exactly how to plan an island that fits your space and makes your kitchen easier to use every day.
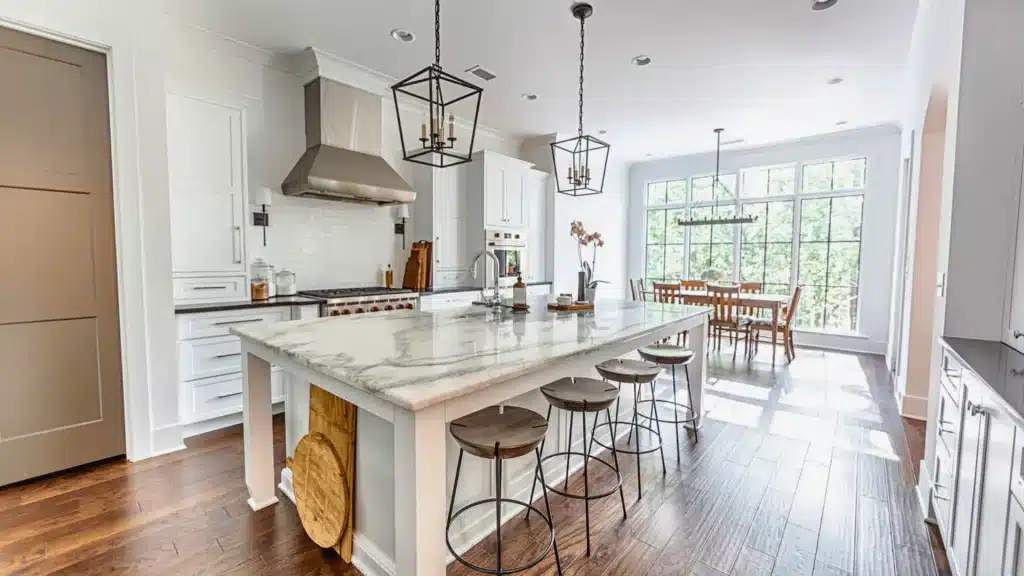
Kitchen Island Spacing Requirements
Proper spacing around your kitchen island affects three key areas. Function comes first – you need room to cook, clean, and access storage without obstacles. Comfort matters too, especially if multiple people use the kitchen at once.
Safety rounds out the trio of concerns. Tight spaces lead to accidents when you’re carrying hot pans or sharp knives. Good spacing prevents collisions and gives everyone room to move safely.
The National Kitchen and Bath Association (NKBA) sets industry standards for these measurements. Their guidelines help ensure your kitchen works well for daily use.
Kitchen Island Dimensions and Spacing Guidelines
The right island size and clearance keep your kitchen functional and comfortable.
Before choosing dimensions, think about how you’ll use the island, how many people will be cooking, and where appliances are located.
Proper measurements ensure good workflow, easy movement, and a balanced look.
| Clearance Distance | Best For | Key Benefits |
|---|---|---|
| 36 inches | Single-cook kitchens, tight spaces | Basic movement, minimum door clearance |
| 42 inches | Most families, standard layouts | Comfortable passing, full door opening |
| 48-60 inches | Multiple cooks, accessibility needs | Free movement, wheelchair access |
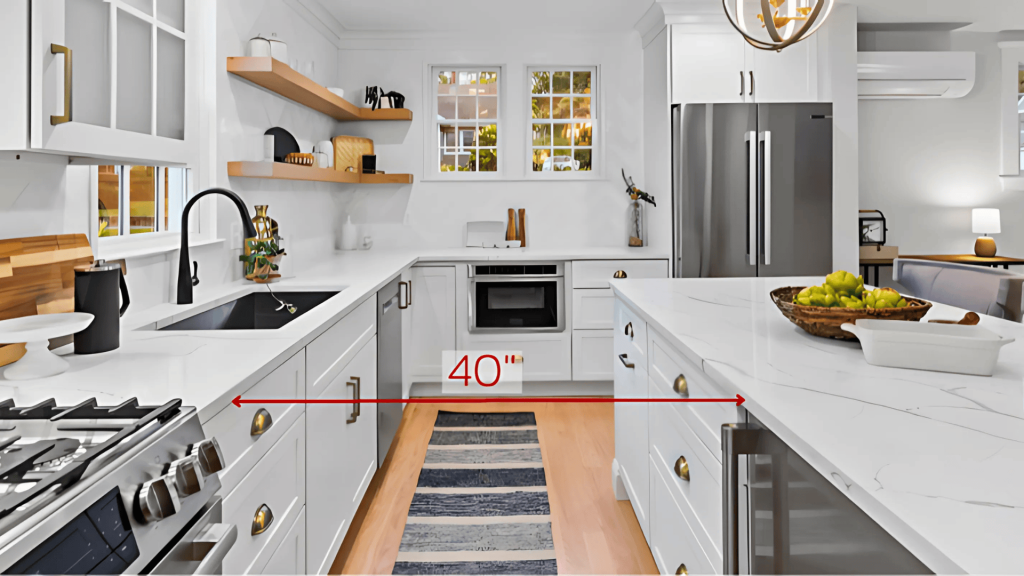
The Absolute Minimum (36 Inches)
Thirty-six inches represents the bare minimum walkway around your island. This measurement works for single-cook kitchens with basic foot traffic.
You can walk around the island and open most cabinet doors without major issues.
However, this tight spacing creates challenges. If someone stands on the island, others must squeeze past them sideways. Opening appliance doors like dishwashers or ovens reduces the walkway even more.
Consider 36 inches only if your kitchen space absolutely requires it. Even then, think carefully about how you use your kitchen daily.
Comfortable Layout (42 Inches)
Forty-two inches creates a much better experience for most families. This spacing allows comfortable movement even when someone works at the island. Two people can pass each other without turning sideways.
Most cabinet and appliance doors open fully without blocking the walkway. You can carry dishes, groceries, or cooking supplies without feeling cramped. This measurement works well for average-sized kitchens with moderate activity.
The NKBA recommends 42 inches as the standard for good reason. It balances space efficiency with practical comfort.
Multiple Cooks & Accessibility (48–60 Inches)
Large families or serious home cooks benefit from wider clearances. Forty-eight inches accommodates two people working on opposite sides of the island simultaneously. Neither person feels crowded or restricted.
Sixty inches provides luxury-level spacing. Multiple people can move freely, even during busy cooking sessions. This width also meets accessibility requirements for wheelchair users.
Choose wider spacing if your kitchen sees heavy use or if accessibility matters for your household.
Special Considerations for Seating
If your kitchen island includes seating, the spacing needs to change to keep the area comfortable and functional.
Planning ahead ensures guests and family members have enough room to sit and move without disrupting the cooking area. Here are some key considerations to keep in mind before making your choices:
| Seating Type | Overhang Needed | Space Behind Seats |
|---|---|---|
| Counter height (36″) | 10-12 inches | 24 inches minimum |
| Bar height (42″) | 12-15 inches | 24 inches minimum |
| High-traffic areas | Same as above | 32-36 inches |
Space Behind Chairs
Bar stools and chairs need room to pull out from the island. Plan for 24 inches between the seat back and any wall or cabinet behind it. This allows people to sit down and stand up comfortably.
High-traffic areas need even more space. If people walk behind seated guests frequently, increase this measurement to 32-36 inches. This prevents awkward squeezing and keeps conversations pleasant.
Overhang Depth for Legroom
Your island’s overhang depth determines seating comfort. Counter-height seating needs 10-12 inches of overhang for adequate legroom. Bar-height seating requires 12-15 inches since stools sit higher.
Shallow overhangs force people to sit sideways or lean forward uncomfortably. Deeper overhangs provide better support but may require additional structural bracing underneath.
Bar vs. Counter Height Differences
Counter-height islands, at about 36 inches, pair well with standard kitchen chairs or low stools and are often more comfortable for children and older adults.
Bar-height islands, around 42 inches, require taller stools but can improve sight lines across the kitchen.
Choose the height that best fits your family’s comfort, accessibility needs, and overall kitchen design.
Factors That Influence Spacing in the Kitchen
Several elements in your kitchen’s layout can affect how much room you need around an island. Considering these factors early helps you design a space that’s both functional and comfortable:
Kitchen size and shape
- Galley kitchens require precise measurements to prevent bottlenecks.
- L-shaped kitchens typically fit islands more easily than narrow layouts.
Appliance locations
- Refrigerator doors need ample swing clearance.
- Dishwashers extend into walkways when open.
- Wall ovens require a safe space for door opening and loading.
Work triangle efficiency
- The sink, stove, and refrigerator should remain connected for a smooth workflow.
- Island placement should support, not interrupt, this layout.
Traffic flow
- Kitchens that double as passageways need wider clearances.
- Limited-foot-traffic kitchens can manage with smaller spacing.
Planning for Your Kitchen Island
Smart planning helps avoid costly mistakes and ensures your island fits your space and lifestyle.
A well-designed kitchen island can improve how you cook, dine, and gather. Here are some important points to think about before you start planning yours:
Step 1: Measure Your Space. Use a tape measure to record distances and create a simple floor plan.
Step 2: Mark the Footprint. Use painter’s tape on the floor to outline the island’s size and test movement.
Step 3: Simulate the Island. Use cardboard boxes to mimic height and bulk, checking sight lines and flow.
Step 4: Observe Traffic. Live with the layout for several days to see how it works with daily movement.
Step 5: Plan Ahead. Consider future appliances, family needs, and potential resale value.
If you’d like to see a step-by-step visual tutorial, you can watch it here.
Pro Tip: Taking time to test layouts before committing can save money and prevent design regrets later.
Accessibility and Safety Standards
The Americans with Disabilities Act (ADA) sets specific requirements for accessible kitchens. Islands must allow 60 inches of turning space for wheelchairs. This often means 60-inch clearances on at least one side.
Accessible islands also need lower work surfaces (34 inches high) and knee space underneath for wheelchair users. These features benefit everyone, including children and shorter adults.
Senior-friendly layouts prioritize safety and ease of use. Rounded corners prevent injuries from bumps. Good lighting reduces shadows and improves visibility. Non-slip flooring materials help prevent falls.
Small Kitchen with Island Solutions
Even in a small kitchen, the right island design can add function and style. Here are some smart solutions to make the most of limited space. Some of the best options include:
- Narrow islands (24–30 inches wide): Provide extra prep space without overwhelming the room.
- Rolling or mobile islands: Offer flexibility and can be moved aside when you need maximum floor space. Choose models with locking wheels for stability during use.
- Peninsula designs: Connect to existing cabinets instead of standing alone, saving valuable floor space.
- Butcher block carts: Give you a functional workspace at a lower cost than permanent islands.
- Fold-down tables: Take up minimal room when not in use but expand when you need extra prep space.
Pro Tip: In tight kitchens, focus on storage rather than seating. Alternative prep stations are also a smart choice when a permanent island isn’t possible, giving you the workspace you need without taking over the room.
Common Mistakes to Avoid
Even the best kitchen island plans can fall short if certain details are overlooked. Here are some common mistakes to avoid when designing yours:
- Choosing an island too large for your space: Measure twice and plan conservatively. You can always upgrade later if you renovate.
- Forgetting appliance door clearances: Dishwashers, wall ovens, and refrigerators need extra room to open fully. Mark these swing patterns on your floor plan.
- Overcrowding seating areas: Allow proper spacing between seats and behind chairs. Quality matters more than quantity when it comes to island seating.
- Ignoring natural traffic patterns: Watch how people move through your current kitchen before finalizing island placement.
- Skipping the test phase: Use tape outlines or cardboard boxes to simulate your island before building. Live with the layout for several days.
- Placing the island too close to the work triangle: Your island should enhance workflow between sink, stove, and refrigerator, not interrupt it.
The biggest mistake is rushing the planning process. Take time to consider how your family actually uses the kitchen. Good planning prevents daily frustration and expensive changes later.
Wrapping Up
Getting the spacing right for my kitchen island has been all about making the space work better for how I cook, eat, and gather. Now that I understand the main kitchen island spacing requirements, I can plan with much more confidence.
I’ve seen how clearances, seating, and appliance placement all affect how comfortable and easy the kitchen feels to use.
The right measurements let me move freely, prep meals and really make the most of the space I have.
I always take my time to measure carefully and think about how my family actually uses the kitchen every day. If this helped you, check out other posts on the website for more tips and ideas to make your home work for you!


