


Need more counter space without paying for a full kitchen remodel? I get why a kitchen island feels like the perfect fix, but the build can seem confusing once you start looking at cabinets, lumber, countertops, and clearances.
A diy kitchen island can be simple if you choose the right method before buying anything.
You might use stock cabinets, a wood frame, IKEA cabinets, a movable base, or even a solid secondhand dresser. This guide helps you compare each option, choose the right size, gather materials, follow safe build steps, and avoid mistakes that make an island wobbly, crowded, or hard to use.
Can You Actually Build a Kitchen Island Yourself?
Yes, you can build a DIY kitchen island yourself without hiring a contractor or owning a workshop full of tools. The real question is which method fits your skill level, space, and budget — and whether you pick that method before you spend a dollar.
I like this project because you can keep it simple or build it out over time. Stock cabinets, a wood frame, IKEA cabinets, or even a solid secondhand dresser all work. What changes is the build order, the tools you need, and how much a mistake costs you mid-project.
A basic storage island is a weekend build. One with a sink, cooktop, wiring, or a heavy stone top is a different project entirely. This guide walks through the version that is genuinely within reach: a level base, a rigid structure, a countertop that is properly supported, and a finished result you will actually use.
| Difficulty | 2/5 (stock cabinets or repurposed furniture) to 3/5 (wood frame) |
| Time | One weekend for most builds |
| Cost | $50 (repurposed furniture) to $4,000 (stock cabinet build with stone top) |
| Tools Needed | Drill, level, clamps, circular saw or jigsaw, measuring tape, shims |
| Skill Required | Beginner to intermediate, depending on the method |
Is a DIY Kitchen Island the Right Project for You?
The mistake I made on my first build was not picking the wrong method. It was not known ahead of time where the method would break down. Stock cabinet islands look simple until you are shimming a crooked floor at 11 pm and questioning every decision. Here is the honest scope check before you commit.
This stays in DIY territory when the island adds prep or counter space, drawers or cabinet storage, seating or a breakfast bar, a butcher block or laminate top, or casters for a movable setup.
The project moves out of DIY territory once a sink, cooktop, gas line, or heavy stone countertop enters the plan. Outlets on a permanent island fall under local electrical code in most US states and need a licensed electrician for installation. If your island stays within that list, you have a project that is well within reach on a weekend.
| Safety Note: Outlets on a permanently installed kitchen island require a licensed electrician and a permit in most US jurisdictions. Check your local building department requirements before starting any permanent installation. |
Choose Your Build Method Before You Buy Anything
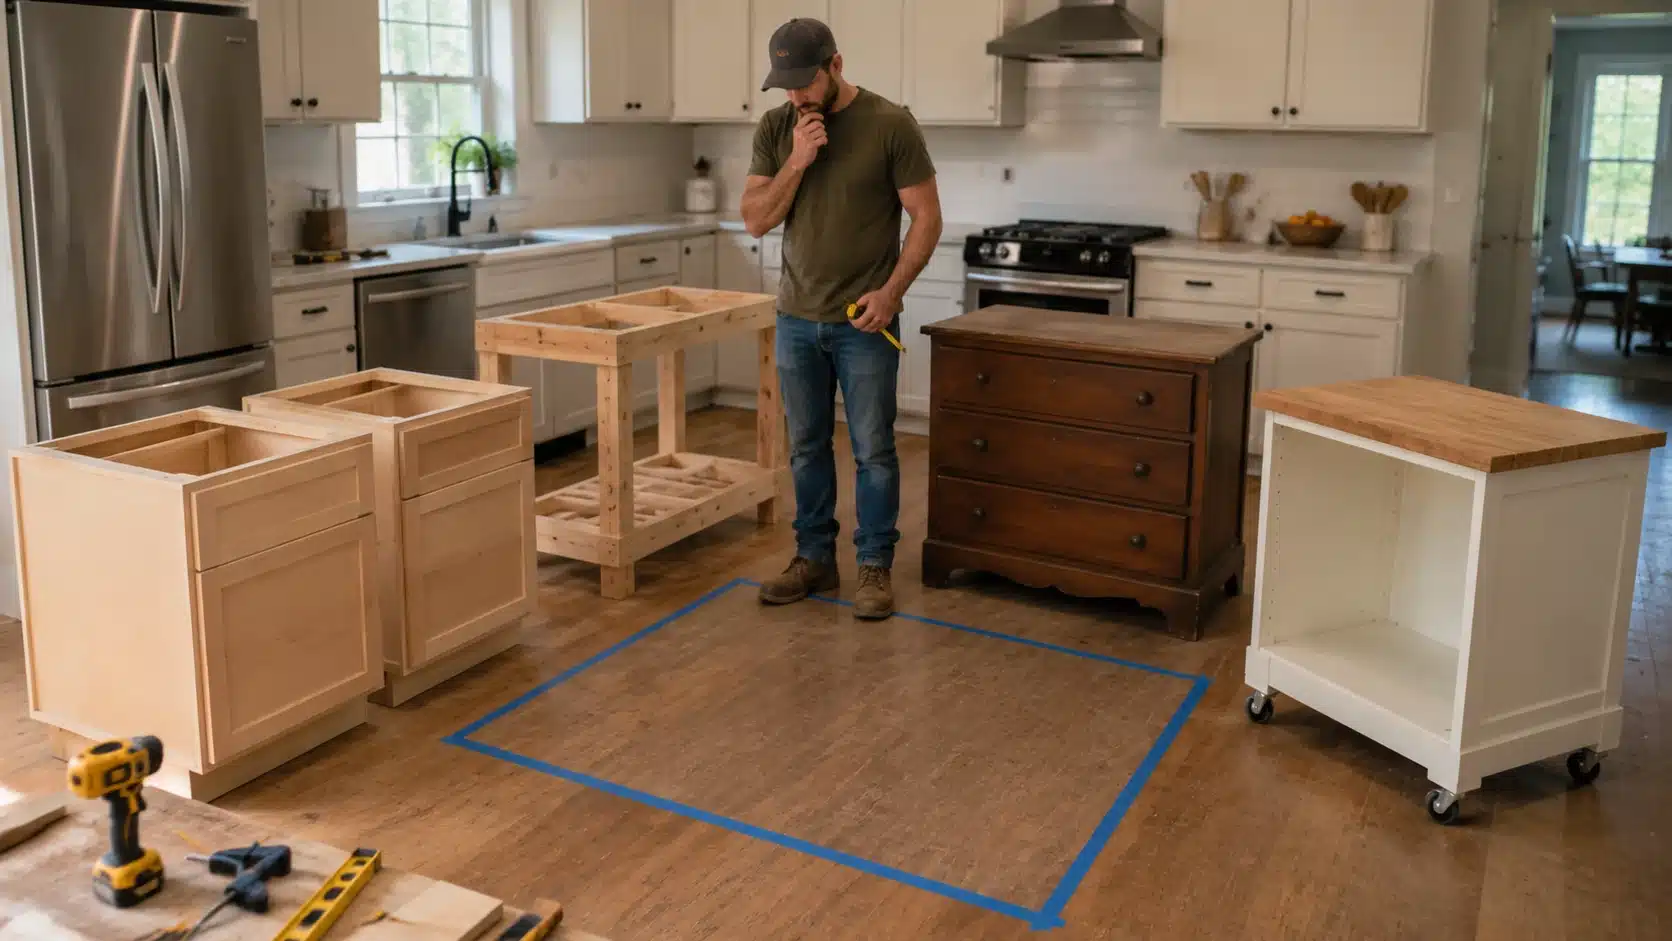
Most people pick a build method based on a photo. The real question is which method holds up given your floor space, storage needs, skill level, and tools. Cabinets carry the load through box frames.
Wood frames carry it through legs and rails. Repurposed furniture needs reinforcement before it can handle countertop weight. Getting this right upfront saves you from a wobbly island six months in.
| Build Method | Best For | Skill Level | Typical Cost (USD) |
| Stock cabinets | Storage-heavy builds | Beginner to Intermediate | $600 – $4,000 |
| Wood frame | Open, table-style islands | Intermediate | $150 – $1,200 |
| Repurposed furniture | Fast, budget builds | Beginner | $50 – $600 |
| IKEA cabinets | Modular, customizable islands | Beginner to Intermediate | $300 – $1,800 |
| Movable island | Small kitchens, renters | Beginner | $100 – $800 |
Once the method is clear, the materials follow naturally. The next section covers what each build requires from the first cut to the last check before you load the drawers.
How to Build a Kitchen Island: Step-by-Step by Method
The method determines the build order. Here is how each build moves from start to finished island, with a check at each critical point before moving forward.
| Pre-Use Safety Checklist: Push firmly from each corner and check the level across the countertop in both directions. Sit on any seating overhang or apply equivalent weight before using. Open every drawer and door fully. Confirm nothing contacts the stove, refrigerator, or dishwasher door. If outlets are planned, hire a licensed electrician and pull the required permit. |
Method 1: Stock Cabinet Island
Materials you need: Base cabinets, 2x4s for the toe-kick frame, side panels, back panels, trim, molding, countertop, cabinet screws, corner brackets, shims, glue, nails, and a butcher block or laminate top.
Step 1: Confirm Dimensions. Measure your kitchen floor space, then compare it with the cabinet sizes before you order anything. Mark the island footprint with painter’s tape, open nearby doors and drawers, and make sure the planned island leaves enough clearance for walking and appliance access.
Step 2: Build the Base Frame. Build a 2×4 toe-kick frame that matches the cabinet layout. Square the corners, check the level, and shim where needed. Once everything sits flat, fasten the frame securely to the floor so the island has a stable base.
Step 3: Set the Cabinets. Place the base cabinets on the toe-kick frame and check that each one sits level. Clamp the cabinet boxes together before drilling. Keep the fronts flush, line up the tops, and adjust with shims before fastening anything permanently.
Step 4: Fasten Cabinets Together. Drive screws through the inside cabinet frames to connect all boxes into one solid unit. Work slowly so the cabinet faces stay even. After fastening, check for gaps, rocking, or twisting before adding panels or countertop support.
Step 5: Add Side and Back Panels. Cut the side and back panels to fit the exposed cabinet ends. Use glue and finish nails to secure them neatly. These panels hide unfinished cabinet backs and sides while giving the island a cleaner, built-in look from every angle.
Step 6: Install Trim and Molding. Attach toe-kick trim, seam molding, and edge trim where needed. This covers gaps, panel seams, and exposed edges. Keep cuts tight and even. A clean trim job is what makes a stock cabinet island look like it was built for the room.
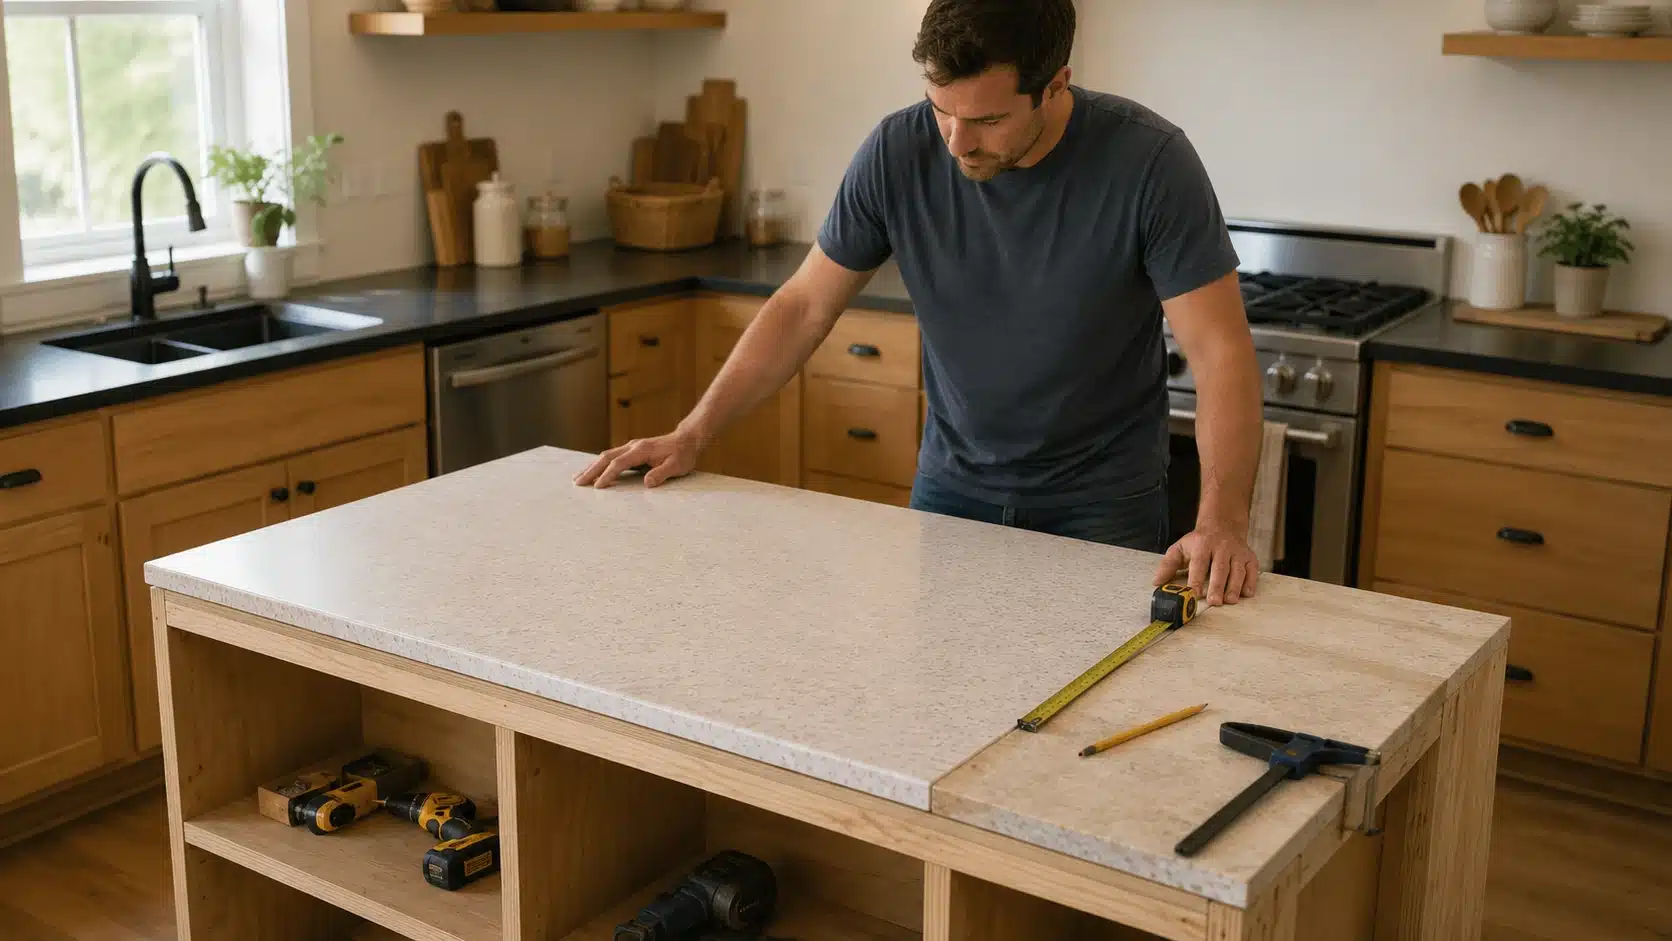
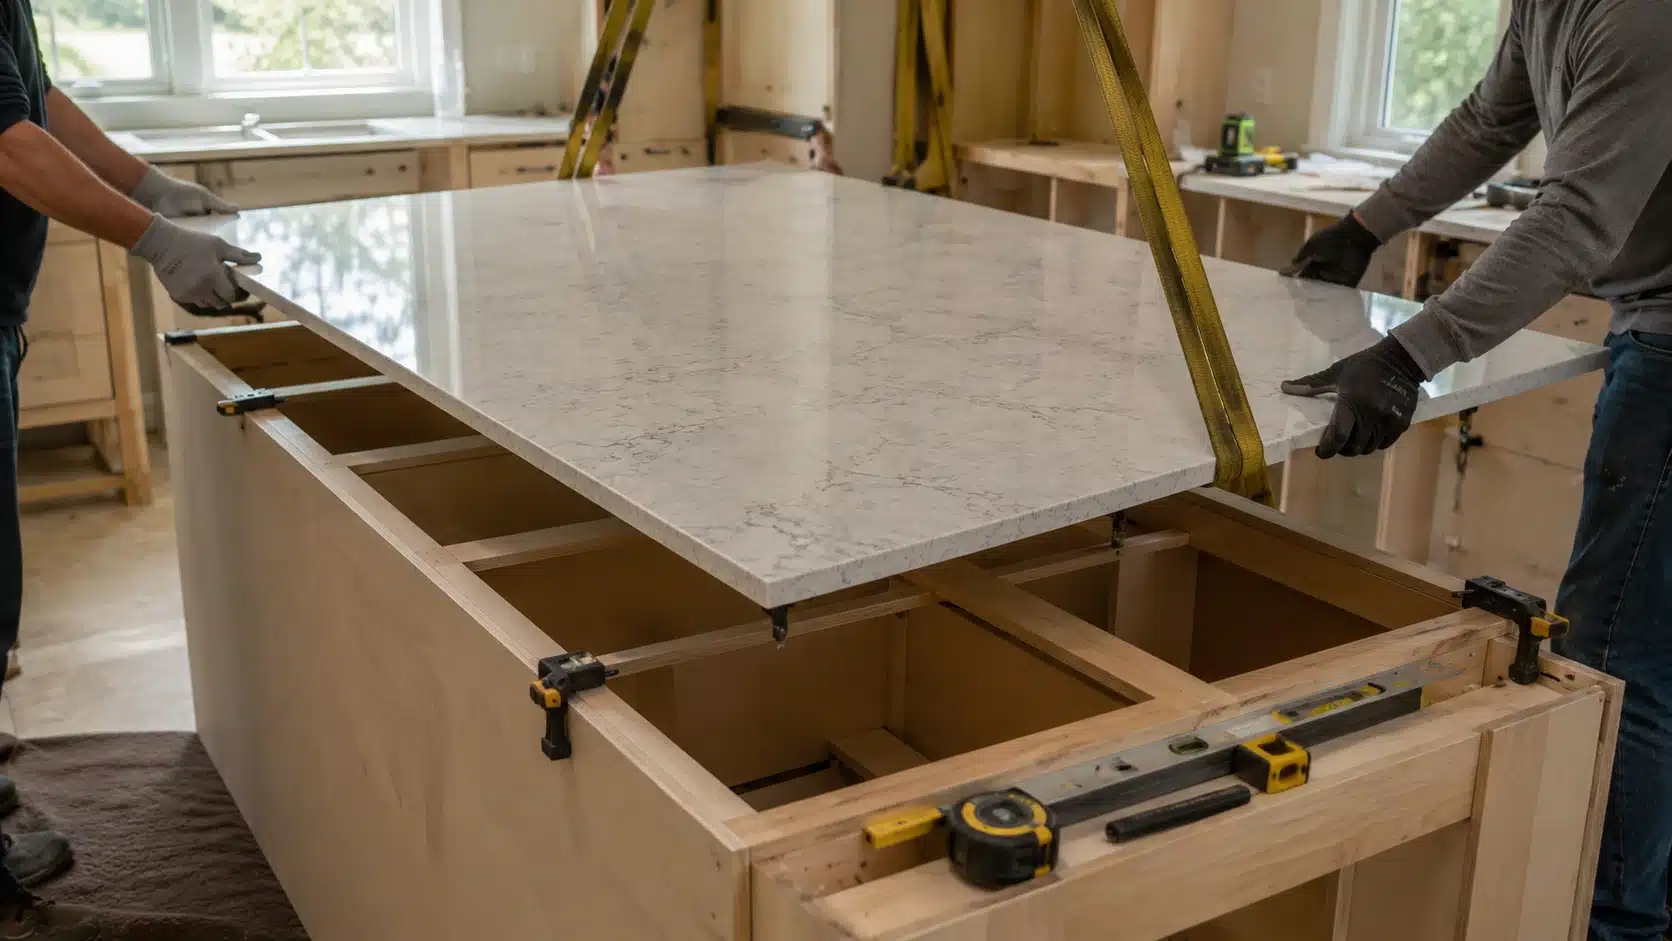
Step 7: Install the Countertop. Set the countertop in place and check that it sits level on the cabinet frames. Fasten it from below through the cabinets, not down through the top. Make sure any overhang is supported before using the island for seating or prep.
| Check before moving on: Does the countertop sit level? Do all drawers open fully without catching? Does anything rock when pushed? |
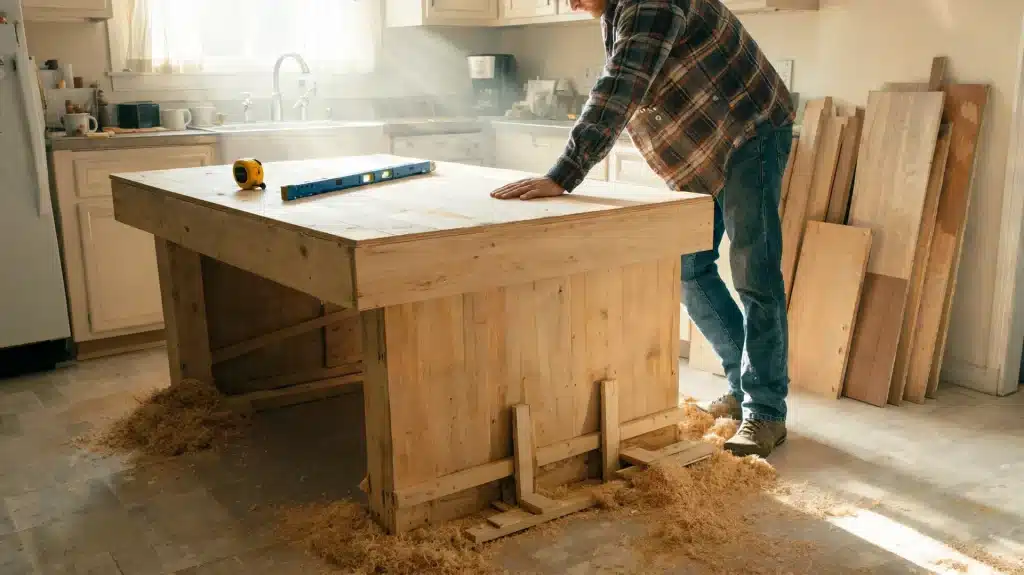
Method 2: Wood Frame Island
Materials you need: 2x4s for lighter builds, 2x6s for wider builds, plywood for shelves, pocket-hole screws, structural brackets, sandpaper, wood filler, countertop, fasteners, wood finish, and figure-eight fasteners or cleats.
Step 1: Cut the Lumber. Measure your planned island size, then cut the legs, top rails, lower rails, and shelf supports to length. Label the pieces before assembly. Accurate cuts matter here because a small error can make the frame twist or sit unevenly.
Step 2: Assemble and Square the Frame. Join the legs and rails with pocket-hole screws, structural brackets, or both. Check the frame for square before tightening every joint. Measure diagonally from corner to corner. If the numbers match, the frame is square and ready.
Step 3: Add the Lower Shelf. Cut plywood to fit between the legs and rest on the lower rails. Secure it firmly so it does not shift or rattle. The shelf adds storage, but it also helps strengthen the frame and reduce side-to-side movement.
Step 4: Sand and Finish Before the Top. Fill screw holes, dents, or open gaps with wood filler. Sand all surfaces smooth before the countertop goes on because corners become harder to reach later. Your finish choice depends on the wood species and uses — some take oil well, others need a sealer first. Let it dry fully before moving on.
Step 5: Attach the Countertop. Place the countertop on the frame and center the overhang on all sides. Use figure-eight fasteners or cleats so the top can move slightly with seasonal wood changes. Do not lock solid wood too tightly in place.
| Check before moving on: Push each leg firmly. Any diagonal rack in the frame means you need a cross brace added before the countertop goes on. |
Method 3: Repurposed Furniture Island
Materials you need: A solid wood dresser, table, or cabinet, interior bracing, metal corner brackets, 2×2 braces, kitchen-grade primer, paint, sealer, countertop, replacement knobs or pulls, screws, and sandpaper.
Step 1: Remove Weak Components. Take out sagging drawers, thin shelves, loose backs, or decorative tops that add height but not strength. Keep only the solid parts of the furniture body. This gives you a stronger base before adding countertop weight or storage.
Step 2: Check and Reinforce the Body. Push the sides, back, and top frame firmly. If anything flexes, add corner brackets or 2×2 braces inside the body. A furniture island needs extra support because it was not always built to hold a heavy countertop.
Step 3: Sand, Prime, and Paint. Sand the outside so primer can grip the surface. Apply a bonding primer, then use a kitchen-grade paint that can handle cleaning and daily touch. Let each coat dry before adding the countertop or reinstalling hardware.
Step 4: Fit and Fasten the Countertop. Cut the countertop to match the furniture body, including any planned overhang. Set it in place, check the balance, and fasten it from inside the cabinet or dresser frame. Avoid driving screws down through the visible top surface.
Step 5: Seal and Add Hardware. Seal surfaces that may contact food-prep tools, cleaning products, or moisture. Add new pulls, knobs, or handles if the old ones feel loose or dated. Then load the drawers slowly and check that nothing sags or shifts.
| Check before moving on: Load the drawers with weight and check for sag. Add more internal bracing if anything moves. |
Method 4: IKEA Cabinet Island
Materials you need: IKEA SEKTION cabinet units, cover panels, island support brackets, leveling legs, connecting hardware, cabinet connector bolts, toe-kick strips, countertop, screws, shims, and any doors, drawers, or hardware needed.
Step 1: Measure Before Ordering. Measure your kitchen floor space, then compare it with the SEKTION cabinet depth, width, and height. Include countertop overhang in your plan. IKEA cabinets have set sizes, so your island footprint should be confirmed before placing the order.
Step 2: Assemble the Cabinet Units. Build each cabinet unit by following the IKEA instructions closely. Keep every box square as you assemble it. Check the corners, tighten the hardware, and make sure the cabinets sit flat before connecting them into one island body.
Step 3: Install Island Support Brackets. Attach the island support brackets to the cabinet units as required. These brackets help keep the island stable and secure. Check that each bracket is aligned correctly before fastening, because crooked support affects the countertop and cabinet layout.
Step 4: Fasten Cabinets Together. Clamp all cabinet units flush at the front and bottom. Use cabinet connector bolts to pull the boxes together tightly. Check the cabinet faces as you work so the doors and drawers line up cleanly across the full island.
Step 5: Add Cover Panels on Exposed Sides. Cut and attach cover panels to any side that will be visible. These panels hide the unfinished cabinet backs and ends. Keep the panels straight, secure them firmly, and make sure all exposed sides look finished before adding the top.
Step 6: Install Leveling Legs and Toe-Kick. Snap the leveling legs into place and adjust them until the island sits evenly. Use a level across the cabinet tops in both directions. Once everything is steady, add the toe-kick strips along the base for a finished look.
Step 7: Install the Countertop. Place the countertop on the assembled cabinet base and check for full support. Fasten it from below through the cabinet structure. Do not screw through the top surface. Add support where needed if the edges or overhang flex.
| Check before moving on: Are all cabinet fronts flush with each other? Do doors and drawers open without catching? Is the countertop fully supported with no flex at the edges? |
Method 5: Movable Island
Materials you need: A small cabinet base or wood frame, 2×4 base frame, heavy-duty locking casters, screws, brackets, butcher block or laminate countertop, fasteners, shims, and a finish or sealer if using wood.
Step 1: Keep the Footprint Small. Plan a compact island that is usually 24 to 36 inches wide. A movable island needs enough room to roll, turn, and park safely. Keep the size practical so it does not block cabinets, appliances, or walking paths.
Step 2: Choose the Right Casters. Use heavy-duty locking casters rated above the estimated loaded weight of the island. Include the countertop, cabinet body, stored items, and anything placed on top. Better casters make the island safer and easier to move when needed.
Step 3: Mount Casters to a Solid Base. Attach the casters to a 2×4 base frame, not thin cabinet floor panels. A strong base spreads the weight better and keeps the wheels from tearing loose. Check that every caster is tight before standing the island upright.
Step 4: Pick a Lighter Countertop. Choose butcher block or laminate for a movable island because both are easier to handle than stone. A lighter top reduces tipping risk and strain on the casters. Make sure the top is fastened well before moving the island.
Step 5: Test All Four Casters. Set the island upright and confirm all four casters touch the floor evenly. Lock each wheel, then push gently from every side. If the island rocks, tips, or rolls while locked, fix the base before adding storage.
| Check before moving on: Lock all four casters and push hard from one side. A movable island should not rock or tip under pressure. |
Every method follows the same core logic: a level base, a rigid structure, and a countertop that is properly supported. What changes is the starting material. The checks at each stage stay the same no matter which route you take.
Getting the Size Right Before You Order Anything
Sizing is where the whole project can go wrong before a single board is cut. The National Kitchen and Bath Association recommends at least 42 inches of clearance for single-cook kitchens and 48 inches for kitchens with more than one person working in them. Get this wrong and every step after it pays for the mistake: cabinet selection, frame cuts, countertop order, and seating layout.
Mark the layout on the floor with painter’s tape first, then walk around it with all appliances fully open. If it feels tight with tape, it will be worse with a real island in place. Plan seating and overhang carefully, allowing 12 to 15 inches of countertop overhang per stool, with brackets underneath to prevent sagging. Check storage and door swing by adding cabinet door and drawer swing distances to your clearance measurements before finalizing the footprint.
Every material order and every cut that follows depends on getting these numbers right before a single board is bought.
Best Countertop Options for a DIY Kitchen Island
The countertop affects cost, durability, maintenance, and style, so choose it before finalizing the island size. A light top is easier for a DIY install. A heavy one may need extra support and an extra set of hands. The edge shape is part of this decision too — different countertop edge profiles carry different visual weights and finishing requirements. Match the surface to how you actually cook and clean, not just the look you found online.
1. Butcher Block

Butcher block is one of the easiest countertop choices for a DIY kitchen island because it is lighter than stone and easier to cut and install. It adds warmth and works well for prep space, casual kitchens, and cabinet-based islands.
The main care needs are sealing, wiping spills quickly, and regular oiling to prevent stains, cracks, and moisture damage.
2. Laminate
Laminate keeps the island lightweight and budget-friendly. It comes in many colors, patterns, stone looks, and wood looks, so it works with different kitchen styles.
It is easy to clean and a good choice for rentals or small kitchens. The trade-off: it can chip, scratch, or burn if handled roughly.
3. Plywood with Sealer
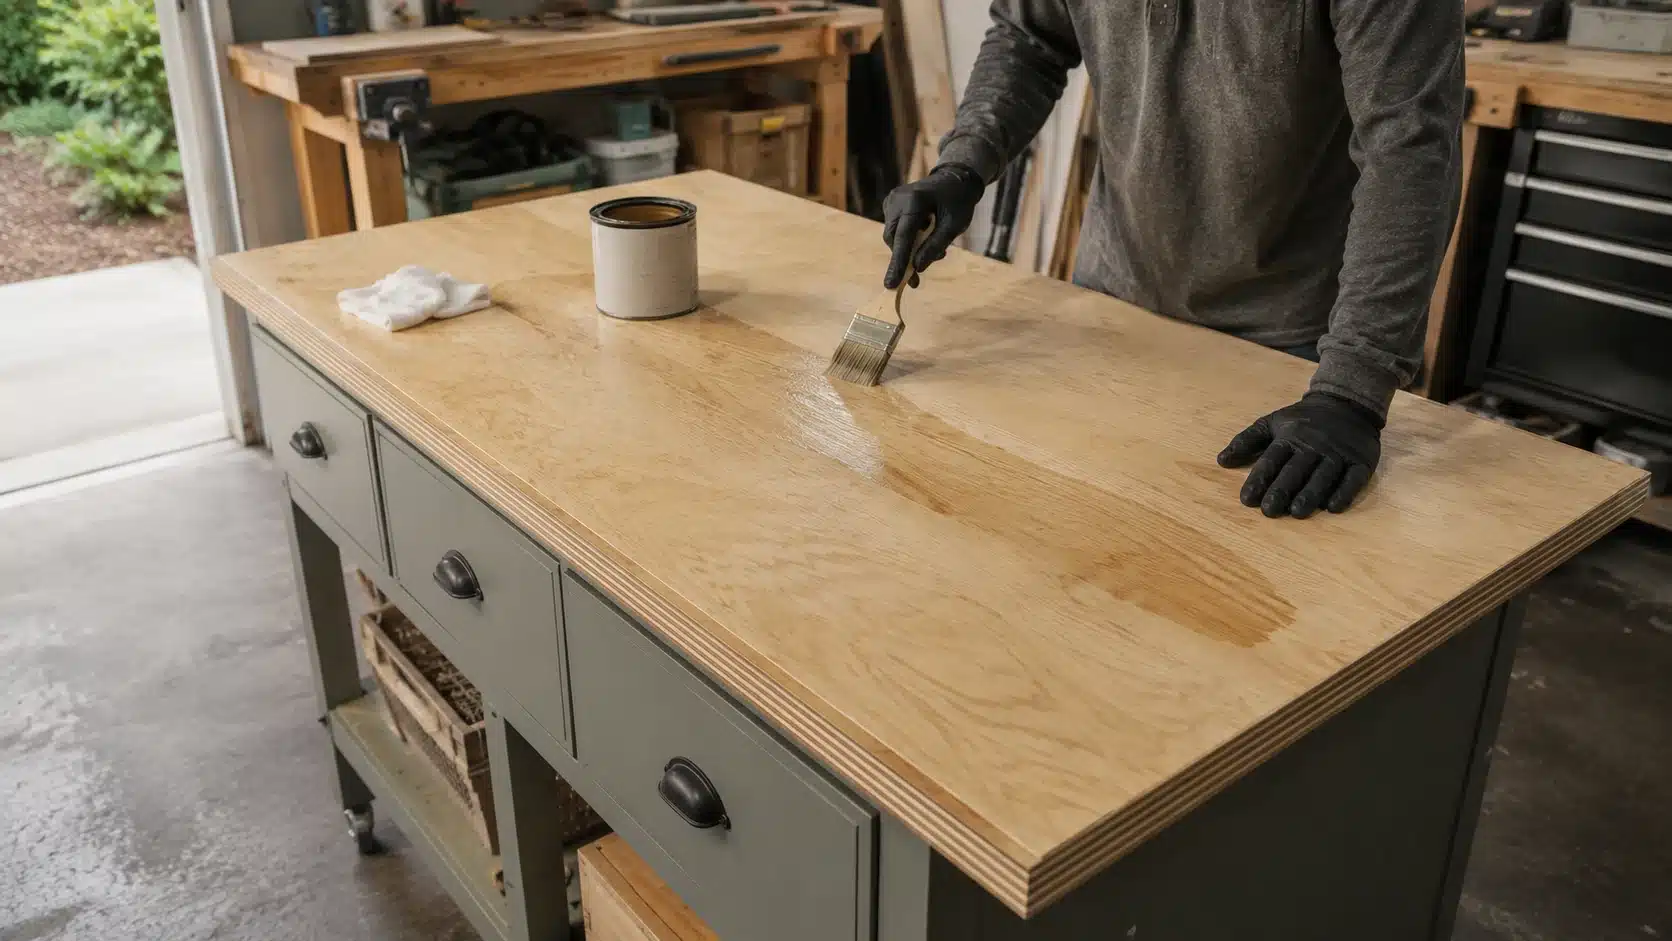
Plywood with sealer is a low-cost option for rustic, utility, or farmhouse-style kitchen islands. It is easy to cut, sand, stain, and customize.
The key is sealing the top, bottom, and edges carefully. Without proper sealing, plywood can absorb moisture, swell, or stain quickly from daily kitchen use.
4. Stone or Quartz Remnant
A stone or quartz remnant gives a DIY kitchen island a polished, high-end look with strong durability. If you want a marble look without the slab weight and cost, DIY marble countertops are a realistic middle ground worth considering.
For a real stone install, the base must be level, strong, and fully supported, and you may need help with lifting and safe fastening.
5. Stainless Steel

Stainless steel handles heat, moisture, and frequent cleaning well and gives the island a clean, professional look. It works especially well in modern or utility-style kitchens. The downside is that it shows scratches, dents, fingerprints, and water marks more easily than softer-looking surfaces.
For most DIY builds, butcher block, laminate, or sealed plywood is the easier path. Heavy stone, quartz, or steel may need more planning, lifting help, and stronger cabinet support.
Mistakes to Avoid and Final Safety Checks
Most problems with a finished kitchen island started in planning or base work, not during cutting or assembly. Catching them early saves time, materials, and a lot of frustration.
- Building too large a block blocks the work triangle and makes drawers hard to reach. Test the footprint with tape before ordering anything.
- Skipping leveling and shimming creates countertop gaps, misaligned trim, and drawers that hang at the wrong angle.
- Forgetting overhang support is a common one: seating overhangs past 12 inches will sag and crack over time without brackets, corbels, or support legs.
- Picking the wrong method for your skill level matters too — wood frame builds need accurate cuts and solid joinery, and that gap shows on a finished island.
- Finally, ignoring local code can turn a finished project into a permit problem. Some jurisdictions require permits or outlets on permanently installed islands, so check with your local building department before starting.
A finished island that passes these checks will hold up through daily use. Fix anything that moves, flexes, or catches before loading it with cookware or putting weight on the seating overhang.
Frequently Asked Questions
These are the questions I hear most often from people who are partway through their build and hit a decision they did not expect.
Can you build a kitchen island without cabinets?
Yes. A wood frame, table-style base, or repurposed furniture all work without cabinets. Open shelving and a clean countertop are fully achievable. The frame just needs to be square, level, and strong enough for the countertop weight.
What is the cheapest way to build a kitchen island?
Repurposing a solid wood dresser or table and adding a new countertop is usually the lowest-cost route. A wood frame island is also affordable if you already own basic tools. Avoid plumbing, wiring, and stone tops if budget is the main constraint.
Can I add wheels to any kitchen island?
Only if the base is solid enough to hold them. Casters must attach to a solid wood frame, not thin cabinet panels. Use locking casters rated above the total island weight, including the countertop and anything stored inside.
How tall should a DIY kitchen island be?
Most kitchen islands are 36 inches tall, matching standard countertop height. Bar-style seating typically calls for 42 inches. If you go taller, make sure the stools and knee clearance match that height before you finalize the build.
Can I use a dresser as a kitchen island?
Yes, if it is solid wood and structurally sound. Reinforce weak areas, add a durable countertop, seal the surface, and use kitchen-safe paint or finish. Avoid particleboard dressers — they will not hold up under daily kitchen use.
Does a kitchen island need to be attached to the floor?
Permanent islands with cabinets, outlets, or seating overhangs are usually floor-anchored for stability. Movable islands do not need floor attachment, but locking casters and a stable base are non-negotiable.
What countertop is easiest to install on a DIY island?
Butcher block and laminate are the easiest. Both are lighter than stone, easier to cut, and simpler to fasten from below. Butcher block needs sealing; laminate requires less maintenance and is usually more budget-friendly.
How much countertop overhang is safe for seating?
12 inches is the standard minimum; 15 inches gives more knee room. Anything longer needs brackets, corbels, or support legs. Check for flex before using the island — unsupported overhangs sag and pull loose over time.
Final Verdict
Upgrading your home with a custom layout is entirely within your reach when you focus on a straightforward design.
By selecting a method that matches your current skill level and tools, you can avoid common pitfalls like uneven frames or cramped walkways.
I always emphasize that measuring your floor clearance and securing a level base are the most critical steps for long-term success.
Now that you know how to build a kitchen island using stock cabinets, a wood frame, or repurposed furniture, you can confidently choose the perfect countertop and finishes for your daily needs.
What style are you planning to create? Drop a comment below to share your DIY plans or ask a question before you start building.


