


A DIY outdoor cat house that keeps rain out and holds warmth sounds simple. In practice, most first builds fail at the same three points: the bedding gets wet from the bottom up, the entrance lets cold air pour straight in, and the shelter sits directly on ground that pulls heat away all night.
Fix those three things before you cut anything, and the rest falls into place.
This guide covers the double plastic bin build that most people should start with, plus a full wooden build for anyone who wants something that lasts more than one winter.
You’ll get the steps, the supplies, the sizing logic, and the honest mistakes to skip the first time around.
| Difficulty | 2/5 – straightforward cuts and assembly, no advanced tools needed |
| Time | 1–3 hours (bin build) or a full weekend (wooden build) |
| Cost | $15–$40 (bin build) or $80–$180 (wooden build) |
| Tools Needed | Box cutter or jigsaw, tape measure, duct tape or staple gun, marker |
| Skill Required | Beginner – the bin build genuinely needs no prior experience |
Before picking a build type, understand what the shelter actually needs to do. A feral cat shelter should trap body heat, shed rain, resist wind, stay clean to maintain, and sit above cold or wet ground. Every decision below traces back to those five requirements.
Which DIY Outdoor Cat House Build Is Right for Your Situation
There are three real options. The bin build is right for most people. The wooden build is right if you want something that survives two winters without replacement. The foam cooler option is a short-term emergency fix, not a long-term solution.
| Build Type | Best For | Cost Range | Durability | Build Time |
| Double plastic bin | Most readers – first build, multiple cats | $15–$40 | 1–2 seasons with care | 1–2 hours |
| Wooden insulated shelter | Year-round use, long-term colony care | $80–$180 | 3–5+ years sealed well | Full weekend |
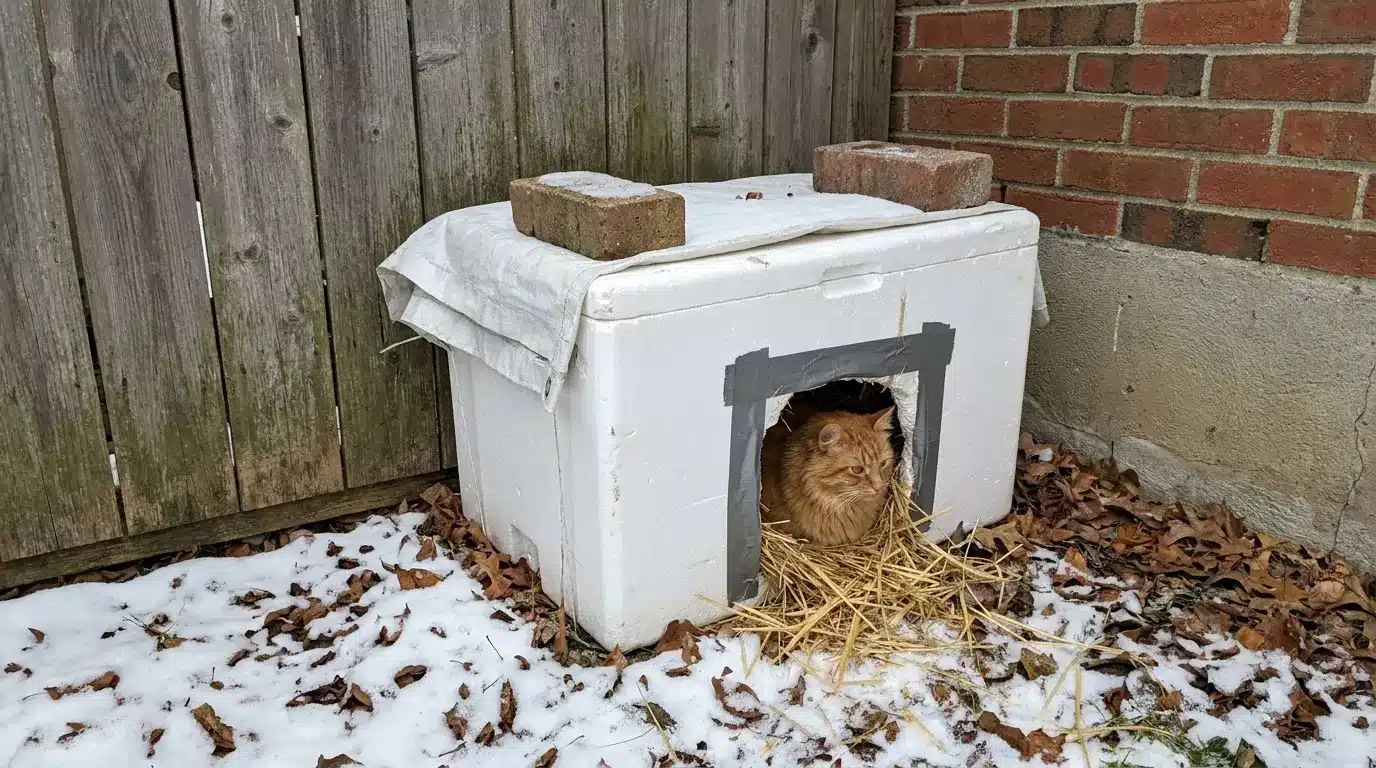
| Foam cooler shelter | Emergency cold weather, same-day setup | $10–$20 | One season – cracks under UV | 30 minutes |
A foam cooler shelter gets a cat through a cold night, but the material degrades quickly outdoors and isn’t worth rebuilding. Use it to buy time while you build something more solid.
How to Build a DIY Outdoor Cat House: Double Plastic Bin Method
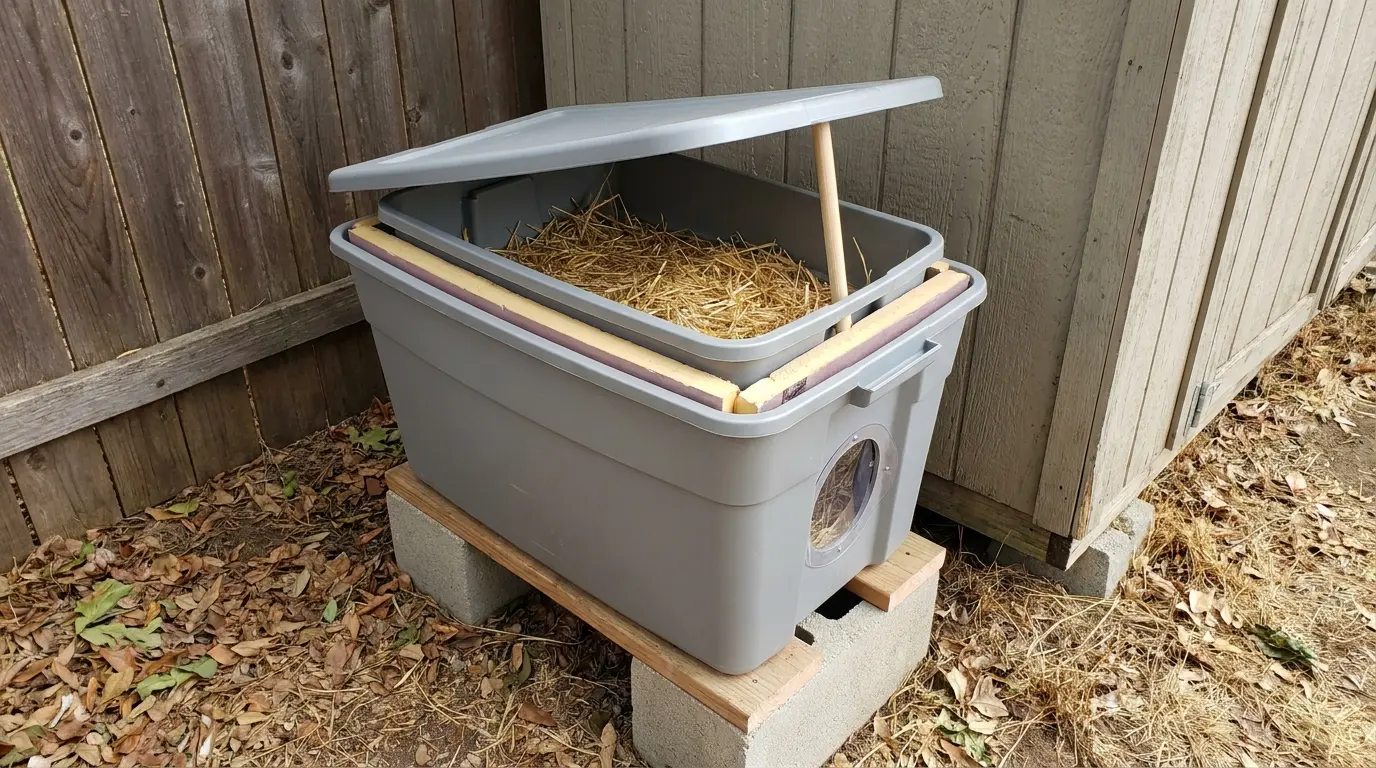
This is the build I’d start with if I were doing it now. You need two bins – one large to act as the outer shell, one smaller to sit inside as the sleeping chamber – plus foam insulation to fill the gap between them.
The layered design is what makes it work: the outer bin blocks wind and rain, the insulation layer traps warmth, and the inner bin keeps the sleeping area snug and easy to clean.
Supplies for the Bin Build
- One large plastic storage bin (18–25 gallon) with a lid – Rubbermaid or HDX polypropylene hold up better in cold than Sterilite, which tends to crack
- One smaller plastic bin or styrofoam cooler to fit inside the large bin with a 2-inch gap on all sides
- Rigid foam insulation board (or bubble insulation like Reflectix) cut to fill the gap
- Loose straw for bedding – not hay, not blankets, not towels (see below)
- Box cutter or jigsaw
- Heavy duct tape or Gorilla tape
- Marker and ruler
- Two bricks, wooden blocks, or a small pallet to raise the shelter
- Optional: a short length of vinyl or rubber to make a door flap
| Pro Tip: Straw, not hay. Hay absorbs moisture and turns cold and moldy. Loose straw stays drier and lets cats burrow down into it, which is exactly how they hold body heat through a cold night. Alley Cat Allies and the Feral Cat Coalition of Oregon both make this the first rule of outdoor cat shelter bedding. |
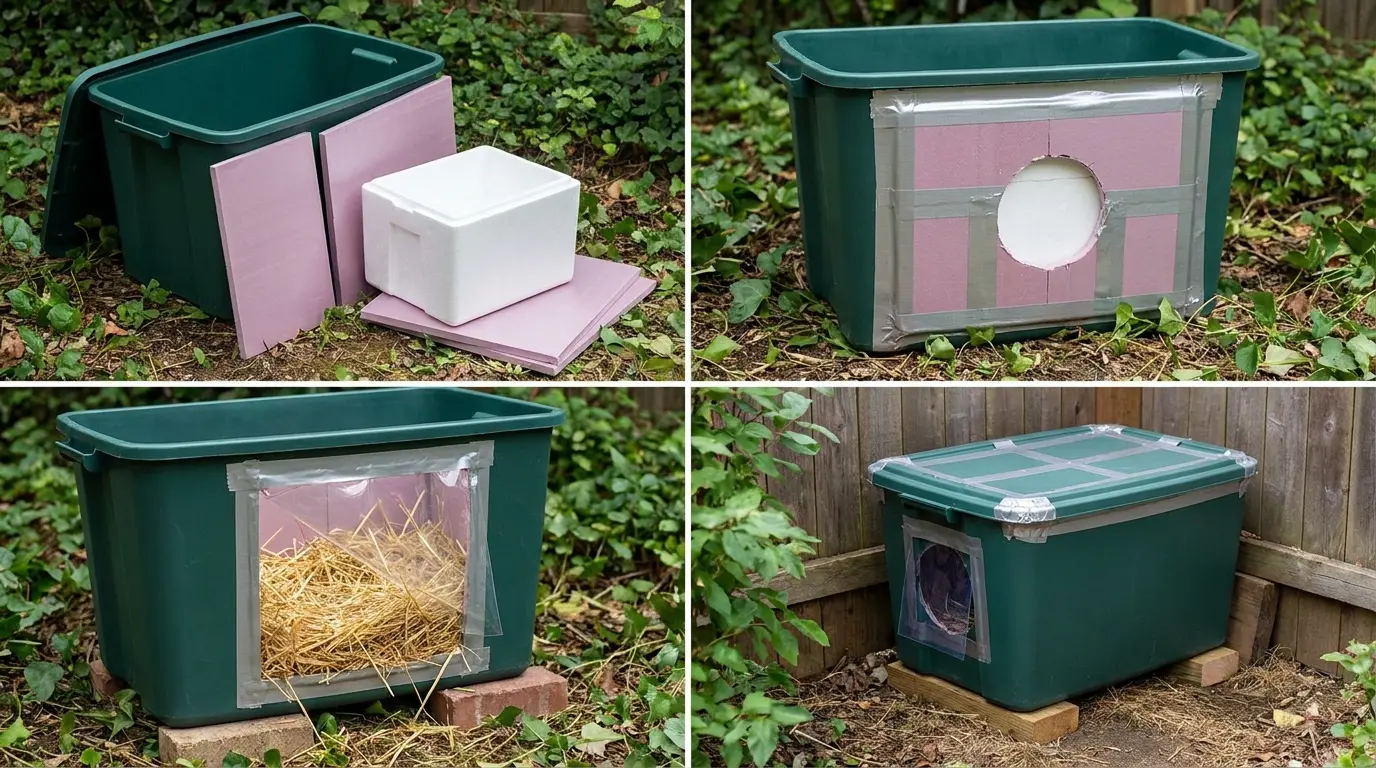
Step 1. Mark and Cut the Entrance
On the large outer bin, mark an entrance rectangle on one of the short ends.
Keep it 5 to 6 inches wide and 5 to 7 inches tall, positioned about 2 inches up from the bottom edge – the slight height keeps rain from pooling at the threshold and blowing straight in.
Cut with a box cutter; if the plastic is thick, heating the blade briefly with a lighter makes the cut cleaner.
Make the same size cut in the smaller inner bin, aligned to match the outer opening. Both cuts need to line up when the bins are stacked.
Step 2. Cut and Fit the Insulation
Measure the floor, walls, and lid of the inner bin, then cut rigid foam or bubble insulation to fit each surface. Foam board works better than bubble wrap because it won’t compress over time and lose its insulating value.
Tape each piece into place inside the outer bin before nesting the inner bin in. The goal is a snug layer on all sides, with no large air gaps. Air gaps feel like insulation but actually let cold circulate.
Step 3. Nest the Inner Bin
Place the inner bin inside the outer bin so the two entrance holes line up. If the inner bin sits too low, add a piece of foam under it as a floor pad.
Pack any remaining gaps around the sides with cut foam offcuts – this is where most of the warmth gets lost if it’s left loose. Don’t worry about a perfect finish; the cats don’t care. Focus on blocking air movement.
Step 4. Tape the Seams and Lid
Run a strip of duct tape around the joint where the outer bin’s lid meets the body. The lid on most bins doesn’t seal tightly enough to keep rain out through a storm.
Don’t seal the lid permanently – you need to open the shelter to replace bedding. The tape here is weatherproofing, not bonding; it peels away for cleaning and goes back on afterward.
Step 5. Add the Door Flap
A loose flap cut from a vinyl placemat, heavy rubber mat, or thick plastic sheeting reduces the cold air entering through the entrance. Tape it across the top of the hole on the outside so it swings freely.
This is the step most people skip and then wonder why the shelter feels drafty. One catch: some cats won’t use a shelter with a flap until they’ve checked it out.
Tape the flap open for two or three days when you first set the shelter out, then let it fall into place once the cat is used to going in and out.
Step 6. Add Straw Bedding and Raise the Shelter
Fill the inner bin with 3 to 4 inches of loose straw – enough for the cat to push down into it, not so much that the space feels cramped and the cat can’t turn around.
Set the shelter on two bricks, a pallet, or a stack of wooden boards. Getting it 3 to 4 inches off the ground is enough to stop cold from wicking up through the base and to keep the underside dry after rain.
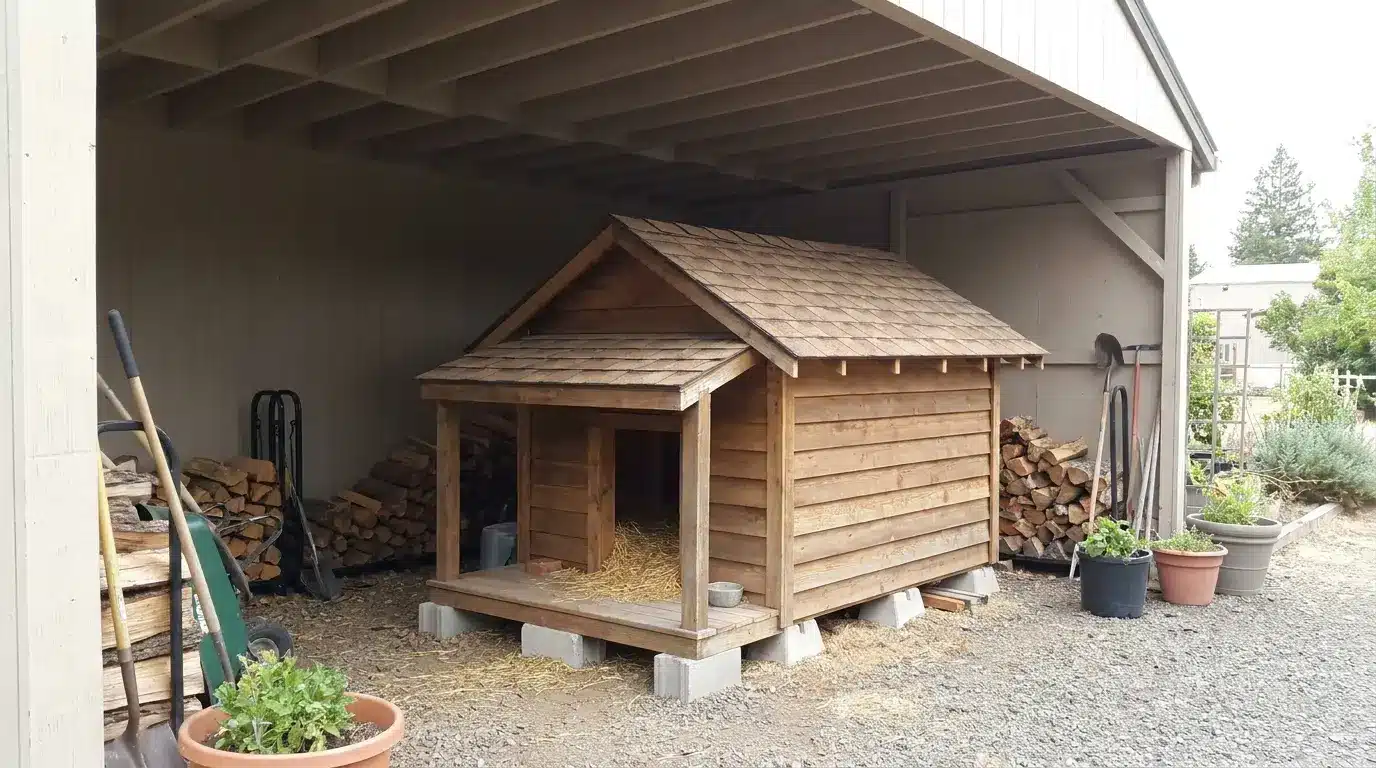
How to Build a Wooden DIY Outdoor Cat House
The wooden build takes longer and costs more, but it holds up in a way that plastic doesn’t.
A well-sealed timber frame with OSB sheathing, foam insulation, plywood interior lining, and roofing felt on top should last several winters without the lid cracking or the sides warping. This is the build to choose if you’re caring for a colony long-term.
Before choosing your lumber, it’s worth knowing how different boards behave outdoors – our guide to the best types of wood and their uses covers how species and engineered boards like OSB and plywood hold up over time.
Here’s the material list based on the cat shelter build:
- Scrap 2×4 boards for the main frame
- 2×6 or 2×8 boards, ripped down if needed
- Extra siding pieces for the outside walls
- Foam board insulation for added warmth
- Plywood pieces for panels or support areas
- 1-inch wood strips for smaller framing parts
- Particle board for covering sections, if available
- Old pallet wood or other spare boards
- Deck railing spindles or thin wood pieces for roof supports
- A strong ridge beam, such as poplar or maple
- Ondura roofing panels for the roof
- Wood stain or weatherproof sealer
- Blankets, straw, or bedding for the inside
- Screws or nails to hold everything together
- Optional plastic strips for the door openings
Most of the shelter can be made from leftover wood and spare materials, so you do not need everything to match perfectly. The main goal is to make it strong, dry, and safe for outdoor cats.
1. Plan a Safe Outdoor Cat Shelter

Start by deciding what the shelter needs to do. It should give outdoor cats a dry, quiet, and protected place to rest. Since it will stay outside, it needs to handle cold air, rain, snow, and other animals. A simple plan makes the build easier.
Think about the size, where the doors should go, and how the cats will move through the shelter before you start cutting wood.
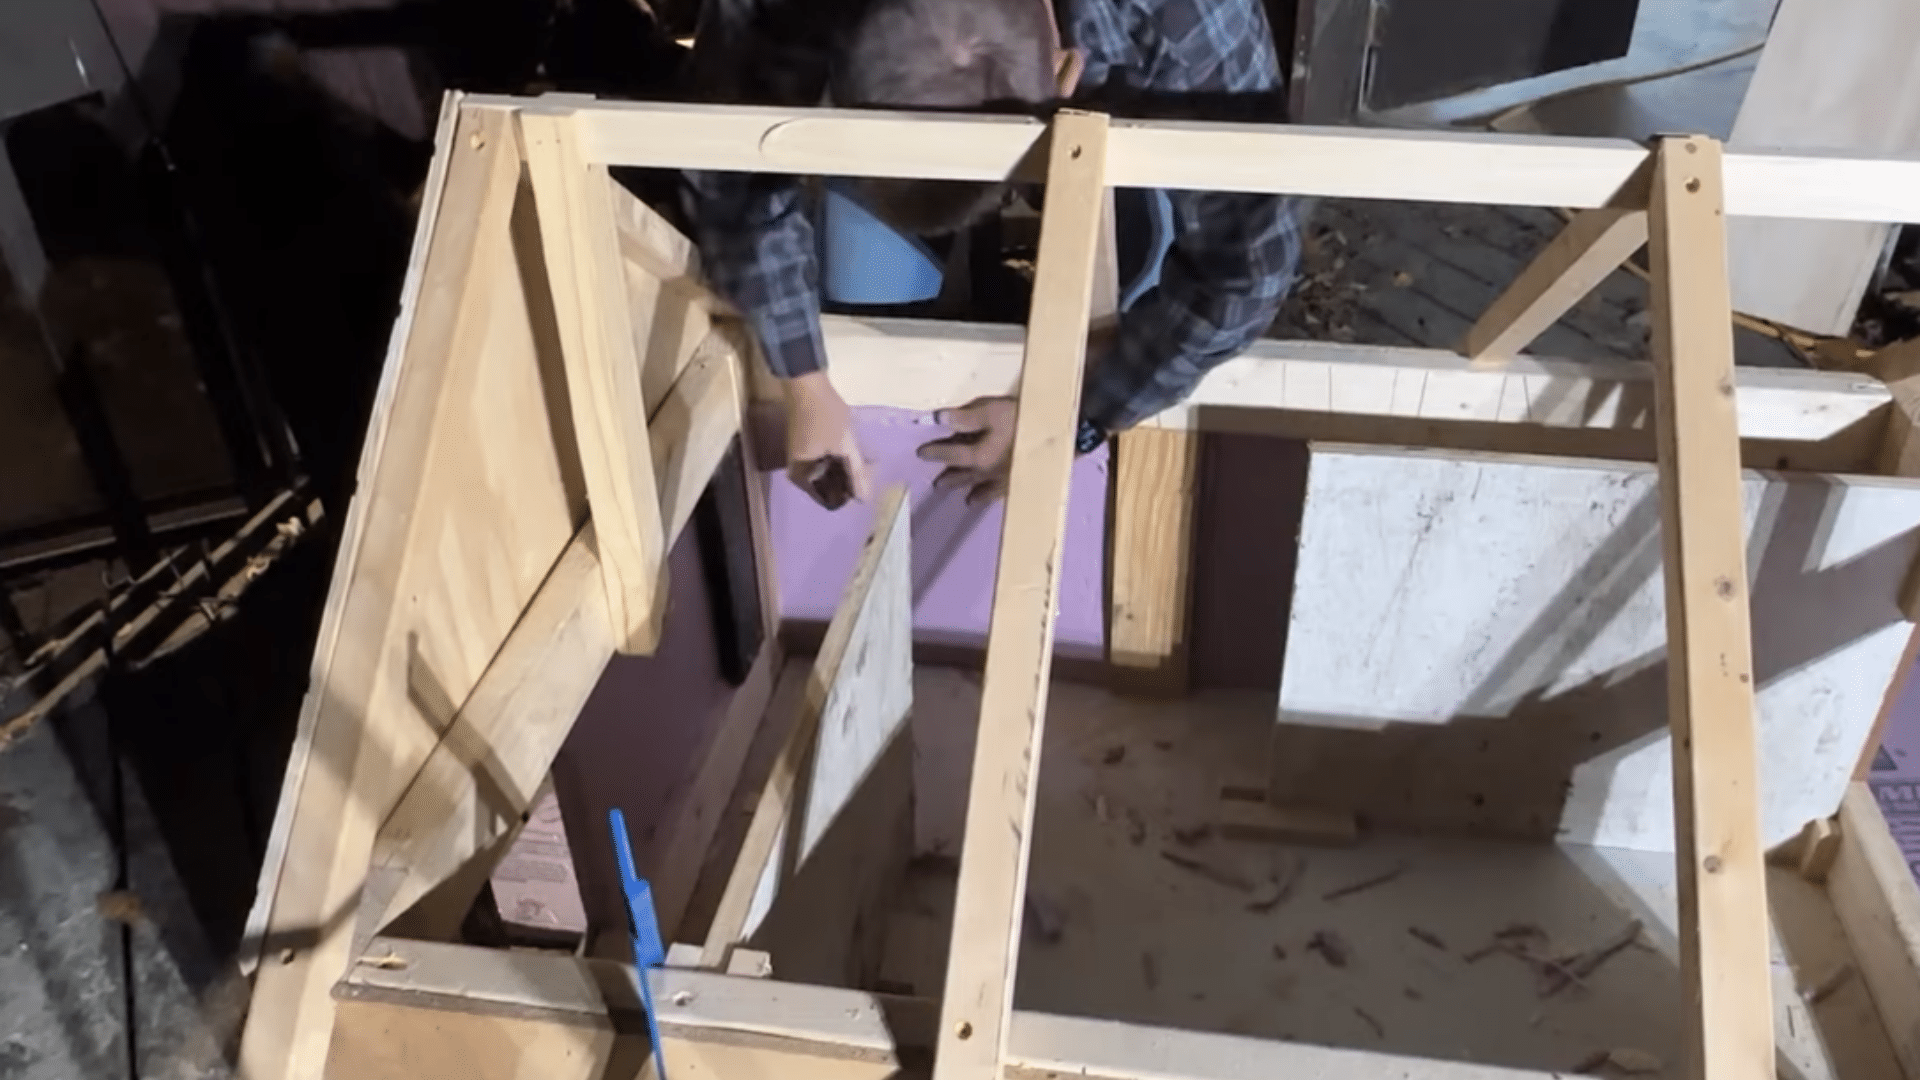
2. Build a Simple Frame with Two Doors
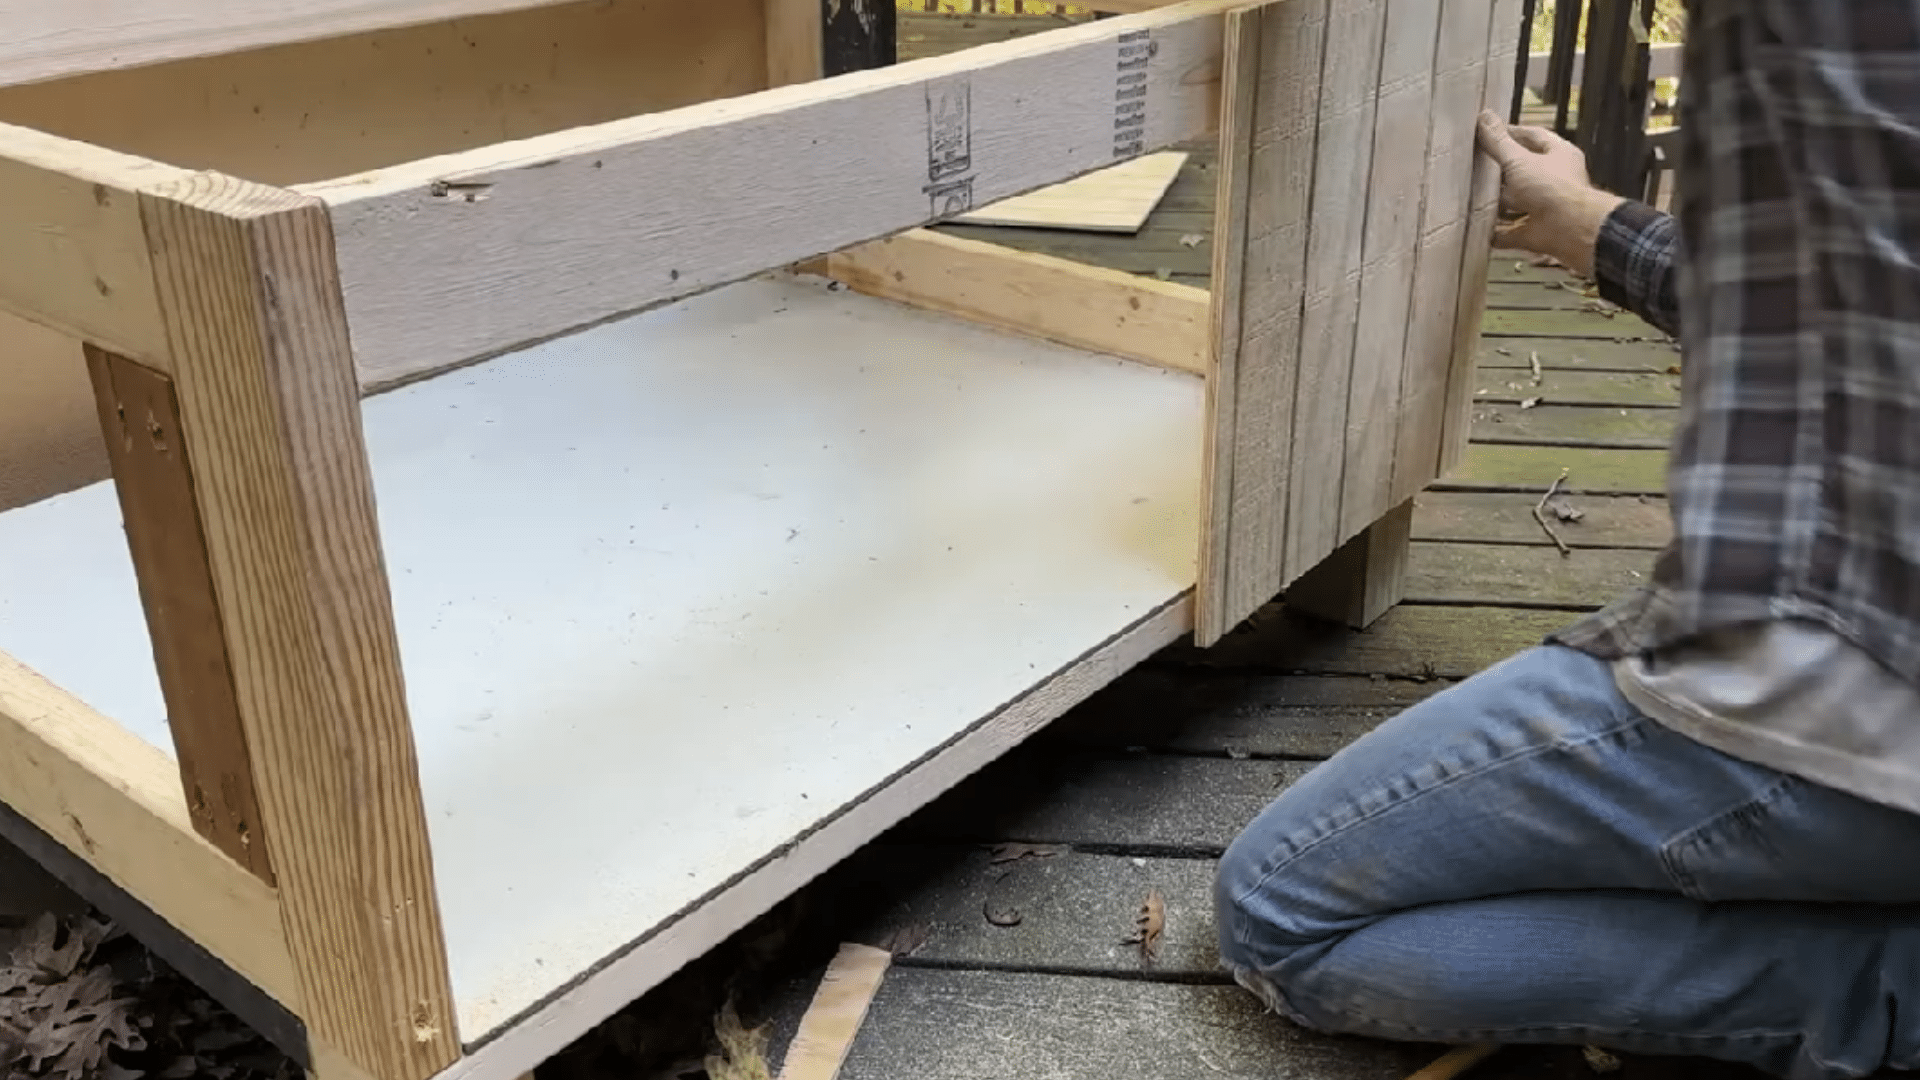
A rectangular frame works well because it is easy to build and gives the cats enough room inside. Add one entrance and one exit so the cats never feel trapped. This is especially helpful for outdoor cats because they like having a quick way out if another animal comes close.
The frame does not have to be perfect, but it should be strong enough to hold the walls and roof.
3. Use Baffles to Block Wind and Cold
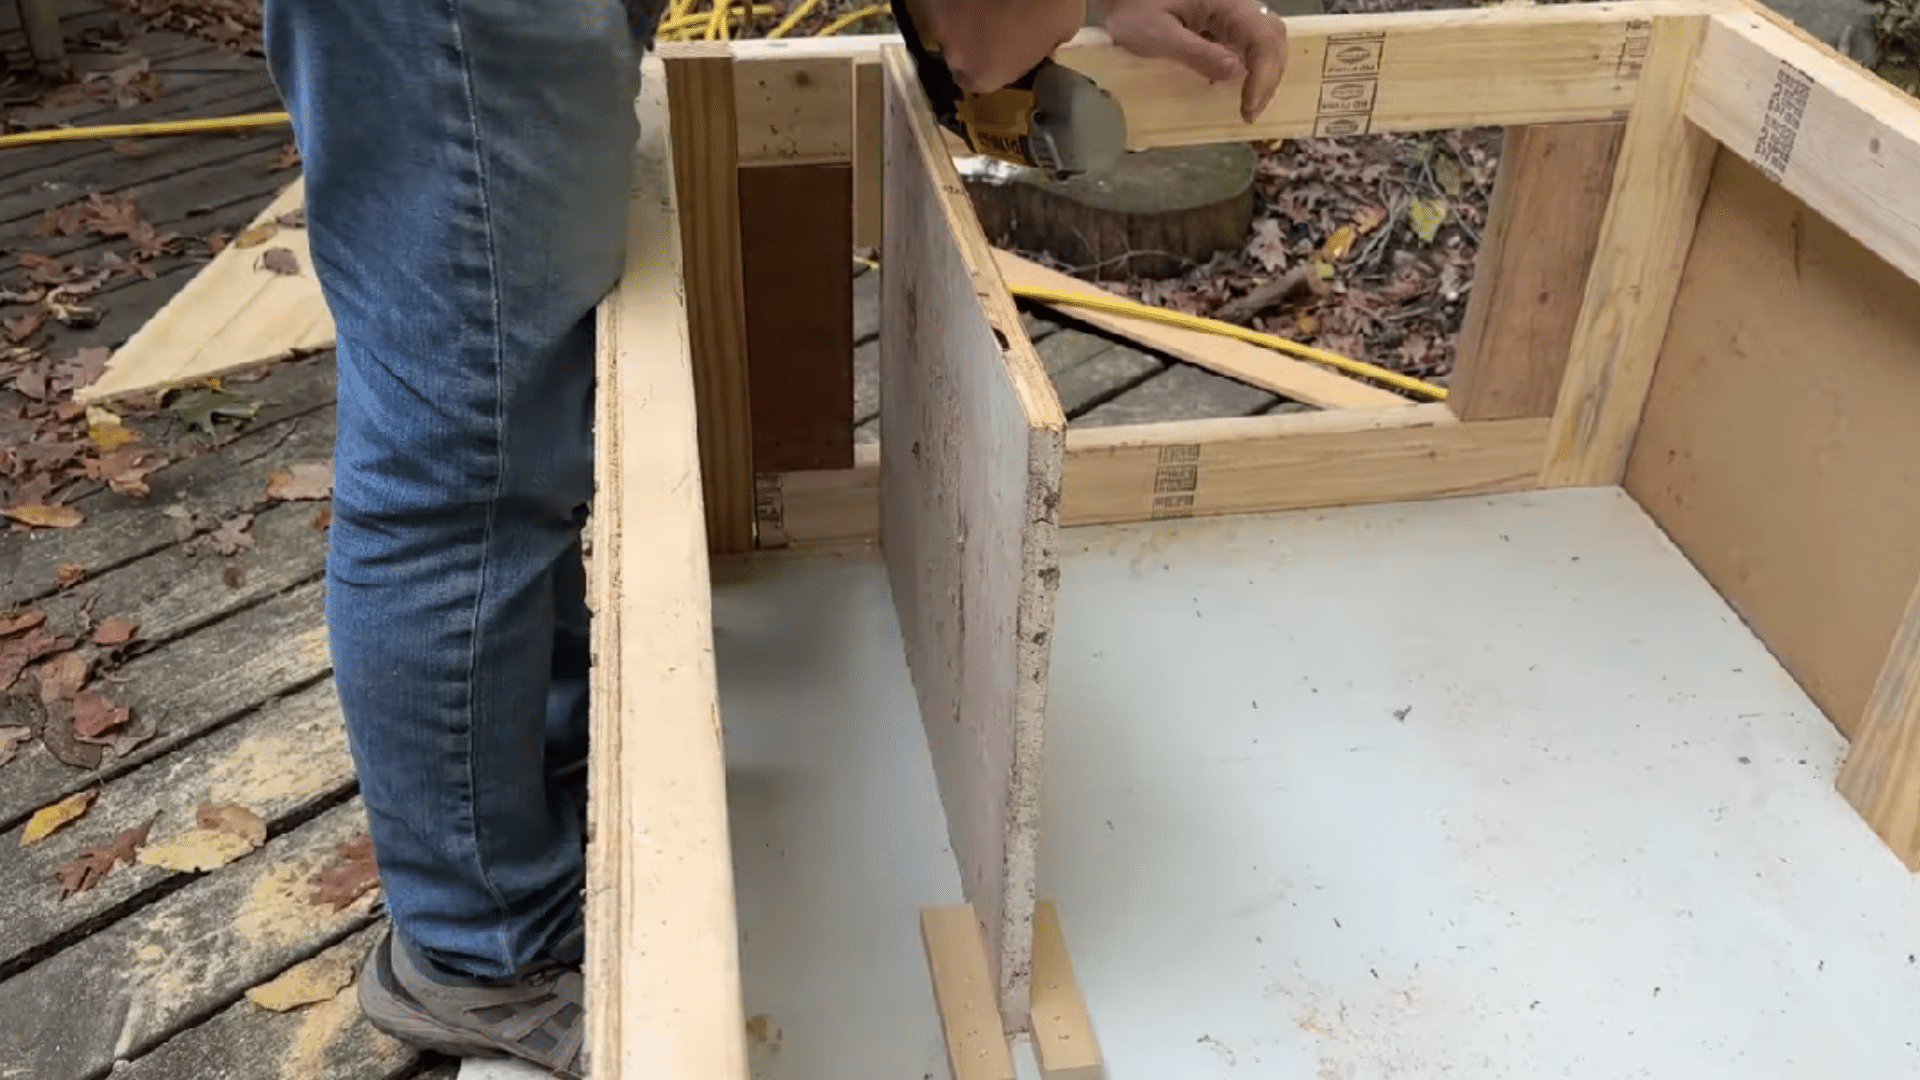
Inside the shelter, add small divider walls near the doors. These baffles let the cats walk in and out, but they stop wind from blowing straight into the sleeping area. This makes the shelter warmer and more comfortable without making it hard for the cats to use.
It is a simple idea, but it adds a lot of protection. Small details like this can make the space feel much safer.
4. Finish the Inside for Comfort
Once the frame is ready, make the inside cozy and easy to use. Add blankets, bedding, or soft material where the cats can curl up and rest. If there are small raised spots or ledges, cats may enjoy sitting there too. Keep the inside dry and simple so it is easy to clean later.
A good shelter should feel safe, warm, and calm without being crowded or hard to maintain.
5. Add the Roof and Set It Up
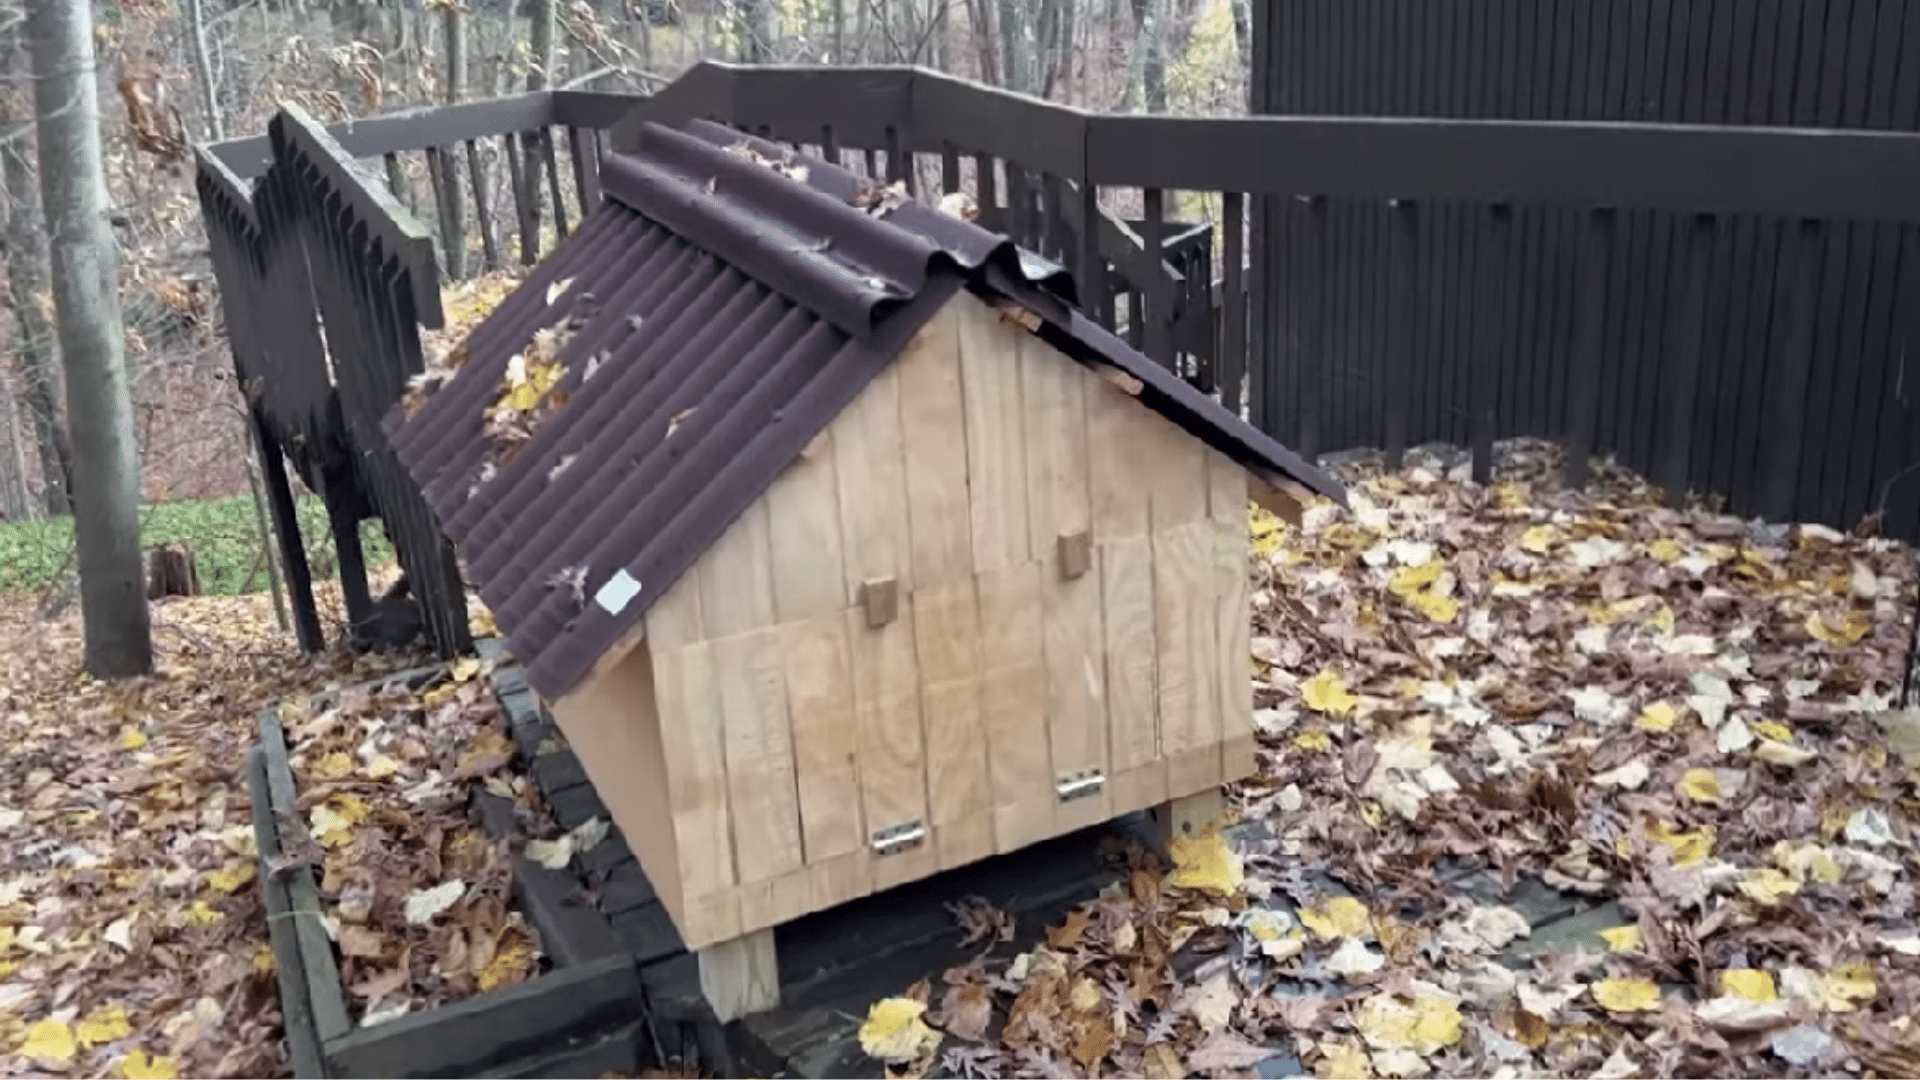
Finish the shelter with a strong roof that keeps rain and snow out. Overlap the roofing pieces so water runs off instead of leaking inside. A small overhang above the doors can also help keep the entrances dry.
After that, place the shelter in a quiet outdoor spot and let the cats find it at their own pace. Food nearby may help, but patience matters most
Watch the video for a step-by-step walkthrough of the full wooden build:
How Big Should an Outdoor Cat House Be?
Smaller is warmer. A shelter that fits one or two cats snugly traps far more body heat than a large box with a lot of empty air. The cat should be able to walk in, turn around, and lie down – but it shouldn’t be able to stand up fully with space to spare. That extra height is dead air the cat has to heat all night.
| Cat Count | Best Setup | Why It Works |
| 1 cat | Small insulated bin, roughly 14″ x 16″ interior | Body heat fills the space quickly |
| 2 cats | Slightly larger inner chamber, 16″ x 20″ or similar | Cats share warmth; snug still beats spacious |
| 3+ cats | Two or three separate shelters rather than one large one | Multiple small shelters are warmer than one large shelter and reduce territorial conflict |
Not all feral cats in the same colony will share a shelter willingly, even when they feed together. Building two smaller shelters is usually more effective than building one large one.
Where to Place a DIY Outdoor Cat Shelter
Placement determines whether the shelter gets used. Cats are more likely to accept a new shelter if it sits near a path or resting spot they already use. A corner against a wall or fence works better than an open location – the solid backing reduces the number of directions a cat has to watch, which matters for skittish ferals.
This is the same logic behind positioning any outdoor structure: tucking it against an existing feature in the yard rather than floating it in open space.
Our outdoor deck ideas guide covers how to use existing structures to anchor outdoor projects – worth reading if you’re thinking about making the cat shelter part of a larger yard setup.
Keep the entrance facing away from prevailing wind and not directly toward the main human foot traffic area. Avoid spots where rainwater pools.
Raising the shelter on bricks helps, but a persistently wet location stays wet through and around the base regardless.
The shelter should sit somewhere that drains cleanly after rain, has some natural cover overhead if possible, and gives the cat at least one clear exit direction from the entrance.
Weather Setup: Cold, Rain, Wind, and Snow
The same shelter behaves differently depending on the weather coming at it. These adjustments take a few minutes and make a real difference in how warm the interior stays.
Cold weather: Pack the straw full enough that the cat disappears into it when it lies down. If the shelter has a flap, make sure the flap is in place. Insulation does more work when the air gap around it is sealed.
Rainy weather: Angle the shelter entrance slightly downward at the front edge – just enough that any water that enters runs out rather than pooling at the threshold. Check the seam tape after heavy rain; once the tape fails, water follows the seam into the insulation layer, and the shelter loses most of its warmth.
Windy weather: Turn the entrance to face away from the wind direction. Add weight – a flat stone or brick on top of the lid – to stop the shelter from shifting or tipping. A shelter that moves when a cat is inside will not get used twice.
Snowy weather: Check the entrance daily during snowfall. Snow packs into the entrance and can trap a cat inside or lock it out. A short tube entrance – a cylinder cut from a plastic container taped to the bin opening – keeps snow from blocking the hole from the outside.
Mild weather: Keep the shelter shaded so it does not overheat during the day. Check for ants, fleas, and rodents more frequently when food is placed nearby, and replace the straw if it feels even slightly damp – mild weather doesn’t dry it out the way cold nights do.

Maintaining the Shelter Through the Season
A shelter that hasn’t been checked in three weeks is often wet inside and useless. The bedding absorbs moisture from the cat’s breath, condensation on the plastic walls, and any small leaks at the seams. Replace straw whenever it feels damp or compressed – compressed straw has no insulating value left.
The Humane Society recommends shelters small enough to retain body heat, while the Hundred Cat Foundation recommends removing all old straw in late spring, letting the shelter air out fully, then refilling with fresh dry straw before the first cold nights in fall. That seasonal reset also gives you a chance to check the foam for compression, the tape for failures, and the plastic for cracks. A cracked bin base will let water in from the ground no matter how well you seal the lid.
| Check Interval | What to Check |
| Weekly | Straw dryness, lid seal, entrance blockage, pests near the shelter |
| After every storm | Seam tape, base position, bedding wetness, entrance clearance |
| Each season change | Full straw replacement, foam condition, lid fit, plastic integrity |
| Replace the shelter | If you find mold, soaked insulation, cracked base, or a lid that no longer seals |
Maintenance is the part most guides skip. A wet shelter is worse than no shelter – a cat that curls up in cold damp straw loses body heat faster than one sleeping in a dry exposed spot.
Troubleshooting: When the Shelter Isn’t Working
Most problems have a straightforward fix once you know where to look. If a cat has stopped using the shelter or refuses to start, run through this list before rebuilding.
| Problem | Likely Cause | Fix |
| Cat won’t enter | Flap feels unfamiliar or the shelter is in a new location | Tape the flap open for 3–5 days; place a small amount of catnip near the entrance, not inside |
| Straw is wet | Water entering through seam, base, or entrance; shelter too low | Re-tape all seams, raise the base, angle the entrance slightly downward at the lip |
| Shelter feels cold inside | Too much empty space, foam has compressed, or there’s an air gap | Add more straw, replace compressed foam, seal any gaps around the lid and entrance edges |
| Water enters at the doorway | Entrance faces rain or wind direction | Rotate the shelter so the entrance faces away from prevailing weather; add a short covered tunnel extension if needed |
| Shelter shifts or tips | Wind, uneven base, or no weight on the lid | Place a flat stone or brick on top of the lid; re-level the base blocks |
| Insects or rodents | Food placed too close, or damp bedding is attracting pests | Move feeding station at least 10 feet away; replace straw and let shelter air out before refilling |
If a cat stopped using a shelter that was working, check the bedding first. Damp or soiled straw is almost always the reason before any structural problem is.
When a DIY Cat House Isn’t Enough
An outdoor cat shelter helps healthy adult cats manage cold nights and wet weather. It doesn’t replace veterinary care for sick or injured cats, it can’t protect kittens in extreme cold, and it doesn’t help in flood-prone areas where the ground itself becomes the problem. If a cat appears weak, injured, or unable to stay warm despite a dry shelter, contact a local rescue group, TNR program, or vet rather than modifying the shelter further.
If a cat can safely come indoors – even to an enclosed porch, basement, or garage – that’s a better option than an outdoor shelter for any cat that’s already showing signs of cold stress.
Frequently Asked Questions About DIY Outdoor Cat Houses
Here are the questions I hear most often from people who’ve got materials on the workbench and a skeptical feral cat watching from twenty feet away.
How do you build an outdoor cat house for winter?
Use a double-bin design with rigid foam insulation between the layers, a small 5–6 inch entrance, loose straw bedding inside the inner chamber, and the whole shelter raised on bricks or a pallet. The layered insulation and small entrance are what make the difference in cold weather – not the size of the bin.
How do you make an outdoor cat house out of wood?
Build a timber frame, sheath it with OSB, fill the wall cavities with 25 mm foam insulation, line the interior with 6 mm plywood, cover the roof with felt on top of OSB, and seal all exterior joints. Fit a cat flap to the front opening and seal the cladding and roof edges before the first rain hits.
How do you insulate an outdoor cat house?
Rigid foam board is the most reliable option. It doesn’t compress over time, doesn’t absorb moisture, and provides consistent R-value even when the temperature drops sharply. Fill all gaps – a few loose foam offcuts in an air gap do almost nothing useful.
How do you heat an outdoor cat house without electricity?
Insulation and body heat together are enough for healthy adult cats in most US climates. A snug shelter with straw bedding, rigid foam insulation, a flap-covered entrance, and no unnecessary air space inside will hold a cat’s body heat effectively through most cold nights without any powered heating.
What do you put in an outdoor cat house?
Loose straw only. Not hay, not blankets, not towels, not fleece. Fabric and hay both absorb moisture and get cold. Loose straw compresses slightly under the cat’s weight and stays dry much longer. Replace it when it starts to feel damp or flat – it loses its insulating value quickly after that point.
Should an outdoor cat house have one door or two?
One door holds warmth better. Two doors make sense if predator activity in your area is high – a second exit prevents a cat from being cornered inside. If you add a second entrance, keep both openings small to limit drafts and reduce access for larger animals.
Final Verdict
Yes – if you do it right and actually maintain it.
The double-bin diy outdoor cat house is one of the most effective cold-weather options for community cats, and I say that having seen what happens when it’s built well versus when it’s slapped together with a single bin and a fleece blanket inside.
The wooden build is worth the extra weekend if you’re caring for a colony year-round and want something that doesn’t need replacing every spring.
Start with the bin version, get the sizing and bedding right, raise it off the ground, and check the straw after every storm. That’s the build that keeps working.
If you’re new to this, cut the entrance hole in a spare bin first to get the feel of it – then build the real one.


