

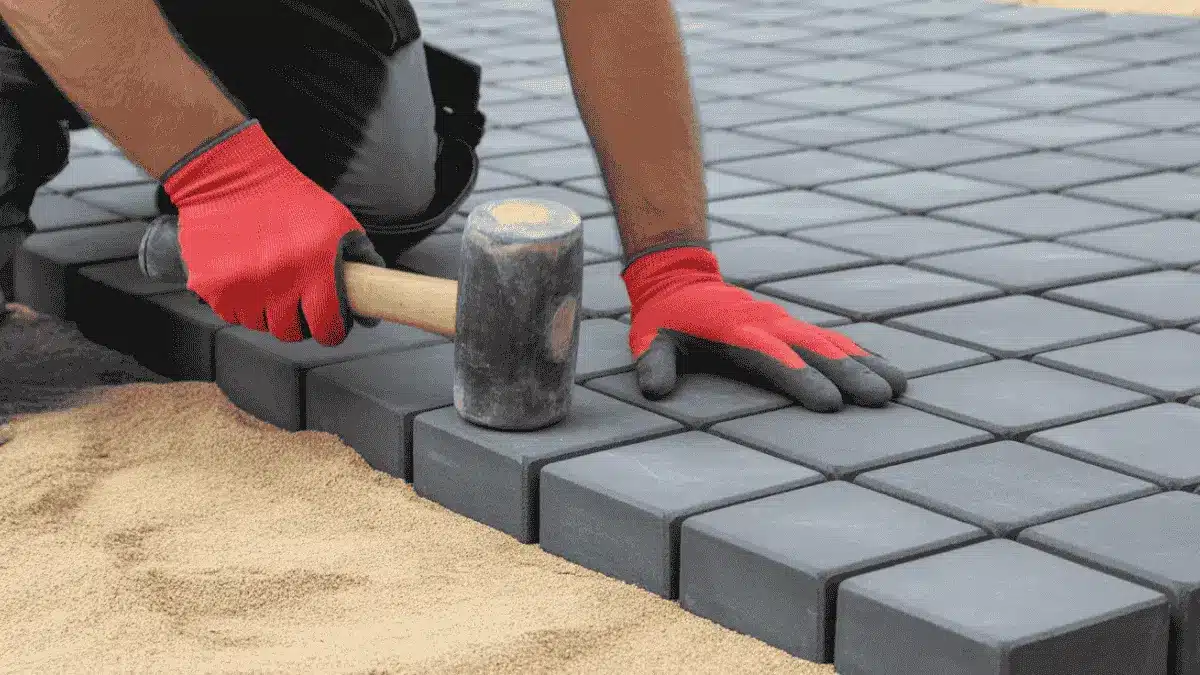
When I first started designing outdoor spaces for clients, paver pricing was the question I was asked most often. I’ve planned and overseen dozens of patio and driveway installations over the years, and honestly, even with experience, every quote can feel confusing without a clear framework to read it. I quickly realized that the total cost depends on several factors, including the size of the space, the type of pavers, and the amount of prep work required. I’ll break everything down in simple terms. You’ll learn the average cost per square foot, how much patios and driveways usually cost, what affects labor prices, and how to estimate your own project. All costs are estimated US averages. Your actual numbers will vary by location, project size, materials, and contractor. Where are Pavers Commonly Installed? Pavers are installed in many outdoor areas because they are durable, versatile, and visually appealing. Most homeowners use pavers for patios, driveways, and walkways. Patios create comfortable outdoor living spaces, while driveways require a strong base to support vehicle weight. Pavers are also popular for pool decks, garden paths, courtyards, and entryways. Some homeowners install them around fire pits or outdoor kitchens to create a finished look. Because pavers come in different styles and materials, they work well in both modern and traditional designs, making them a flexible choice for many landscaping projects. What Goes Into the Cost of Paver Installation? The cost of paver installation includes materials and labor, with labor usually the largest expense at 50-70% due to the need for specialized equipment, skills, and time for proper base preparation. The excavation process alone takes 1-2 days, depending on soil conditions and site accessibility, followed by precise grading, multiple compaction layers, and careful leveling to create a stable, long-lasting foundation. Contractors typically charge $50 to $80 per hour for labor, or $4 to $11 per square foot, and a standard 300 sq. ft. patio averages 35 to 40 labor hours to complete professionally. The materials component includes the pavers themselves, ranging from $4 to $30+ per square foot by type and quality, plus essential base materials such as gravel, bedding sand, edge restraints, and joint sand. Additional expenses like drainage, removing old concrete, or soil stabilization add $500 to $5,000+ to your project. Knowing these costs helps you estimate budgets and compare quotes effectively. 1. Average Paver Installation Cost Most homeowners spend $10 to $30 per square foot, similar to broader construction cost-per-square-foot estimates used across home projects. The national average for standard patio projects typically ranges from $12 to $25 per square foot. Here’s how that breaks down: Low-end projects: $8 to $12 per sq. ft. (basic concrete pavers, simple layout) Mid-range projects: $15 to $25 per sq. ft. (better materials, standard patterns) High-end projects: $25 to $40+ per sq. ft. (natural stone, detailed designs) Understanding these average paver installation costs helps you set realistic expectations, compare contractor quotes confidently, and plan your patio or driveway project without surprise expenses. 2. Project Size Examples Here are real-world project size examples to help you understand how square footage directly affects total installation cost and overall budget expectations. Here’s what homeowners typically spend: Small patio (10×10 – 100 sq. ft.): $1,000 to $2,500+ Medium patio (20×20 – 400 sq. ft.): $4,000 to $12,000+ Driveway (around 1,000 sq. ft.): $10,000 to $30,000+ Pool deck (600–800 sq. ft.): $9,000 to $24,000+ Walkway (150–250 sq. ft.): $1,500 to $6,000+ Outdoor living area with fire pit (200–300 sq. ft.): $3,000 to $9,000+ As project size increases, total cost rises significantly, similar to how the cost of adding a roomscales with square footage and complexity. 3. Material Cost Per Square Foot Material choice plays a major role in determining your total installation cost, as different paver types vary widely in price and appearance. Concrete pavers: $4 to $10 per sq. ft. (materials only) Brick pavers: $5 to $15 per sq. ft. Natural stone or flagstone: $10 to $30+ per sq. ft. Porcelain pavers: $12 to $25+ per sq. ft., a growing choice for modern outdoor spaces. Porcelain is highly resistant to stains, UV fading, and moisture, which makes it popular for pool decks and contemporary patios. The tradeoff is that it requires more precise cutting and handling during installation, which raises labor time. I’ve started recommending porcelain more often for clients in wetter climates, it doesn’t absorb water the way natural stone does, which means it holds up significantly better through freeze-thaw cycles. The material cost is higher, but the long-term maintenance savings are real. Factors That Affect The Installation Cost Several important factors influence the cost of installation, and understanding these variables helps you estimate your project budget more accurately and avoid unexpected expenses. Size of the Area: More square footage means more materials and labor. A small patio costs less overall than a large driveway, but the per-foot rate may stay similar. Site Preparation: If your yard needs grading, drainage correction, or removal of old concrete, costs increase. Base preparation is one of the most important parts of the job. Design Complexity: Simple grid patterns cost less than detailed layouts, such as herringbone or custom inlays. Borders and decorative edges also add labor time. Type of Pavers: Concrete is affordable. Natural stone costs significantly more due to the material price and installation time. Local Labor Rates: Contractor rates vary by region. Urban areas with higher living costs usually charge more than rural areas. Reviewing these cost factors carefully helps plan more effectively, make smarter material choices, and set more realistic expectations before starting any patio, driveway, or walkway installation project. Professional vs. DIY Installation Costs I know many homeowners consider installing pavers themselves to save money. Here’s how the numbers compare. Cost to Install Pavers Professionally Professional installation includes excavation, materials, equipment, and labor. Category Price (USA) Details Total Installed Cost $10 to $30 per sq. ft. Full job from prep to finish Labor Portion $4 to $15 per sq. ft. Excavation, base, laying Materials $4 to $20+ per sq. ft. Depends on paver type Equipment Included Compactors, saws, tools Warranty Often included Coverage varies by contractor Hiring professionals means less stress and better long-term durability. Proper base work prevents sinking and shifting later. DIY Installation Cost Breakdown DIY looks cheaper because you skip labor, but you still pay for materials and tools. Category Price (USA) Details Pavers $4 to $15 per sq. ft. Based on type Base & Sand $1 to $3 per sq. ft. Gravel and bedding Tool Rental $100 to $400 Compactor and saw Total DIY Range $3 to $8 per sq. ft. (materials only) Excludes your time Extra Costs Varies Mistakes or rework DIY can save thousands in labor, but it requires physical work, careful measuring, and proper compaction. Is Installing Pavers Worth the Cost? Compared to plain concrete slabs, pavers usually cost more upfront. However, they last longer and are easier to repair. If one section cracks, you can replace individual pavers instead of redoing the whole surface. Pavers also boost curb appeal and can increase property value. Research from the landscaping and remodeling industry suggests that a well-installed paver patio can recoup 50–75% of its cost in added home resale value, a meaningful return compared to most other outdoor upgrades. Natural stone and high-end finishes tend to push toward the higher end of that range. Many homeowners choose them because they look better and handle freeze-thaw cycles well. If your yard or driveway needs an upgrade, pavers often deliver strong long-term value. Tips to Save Money on Paver Installation Saving money on paver installation is absolutely possible with careful planning, smart material choices, and a few strategic decisions before construction even begins. Choose standard concrete pavers instead of premium stone. Keep the design simple to reduce labor time. Get 3–5 contractor quotes to compare pricing. Prep the site yourself if possible, such as by clearing grass or debris. Order roughly 10% more pavers than your square footage calculation, cutting waste and breakage are real, and buying a second batch later can mean a color or texture mismatch. Install during the off-season (late fall through early spring in most of the US) when contractor demand drops, I’ve seen clients save 10–15% on labor costs simply by scheduling a November or February install instead of peak summer. By planning ahead and focusing on long-term durability instead of shortcuts, you can lower upfront costs while protecting your investment for years to come. That’s a Wrap Now you have a clear understanding of what paver installation costs and what influences those numbers. After years of designing outdoor spaces, I’ve found the biggest mistake isn’t choosing the wrong material; it’s skipping proper base prep to save money, only to pay more later for repairs. Whether it’s a small patio or a large driveway, use this guide to set a realistic budget, ask the right questions, and compare quotes confidently. A properly installed paver surface can last for decades and transform your outdoor space. Start by measuring your area and getting a few local quotes. If this guide helped, check out other cost breakdowns for smarter planning and spending.
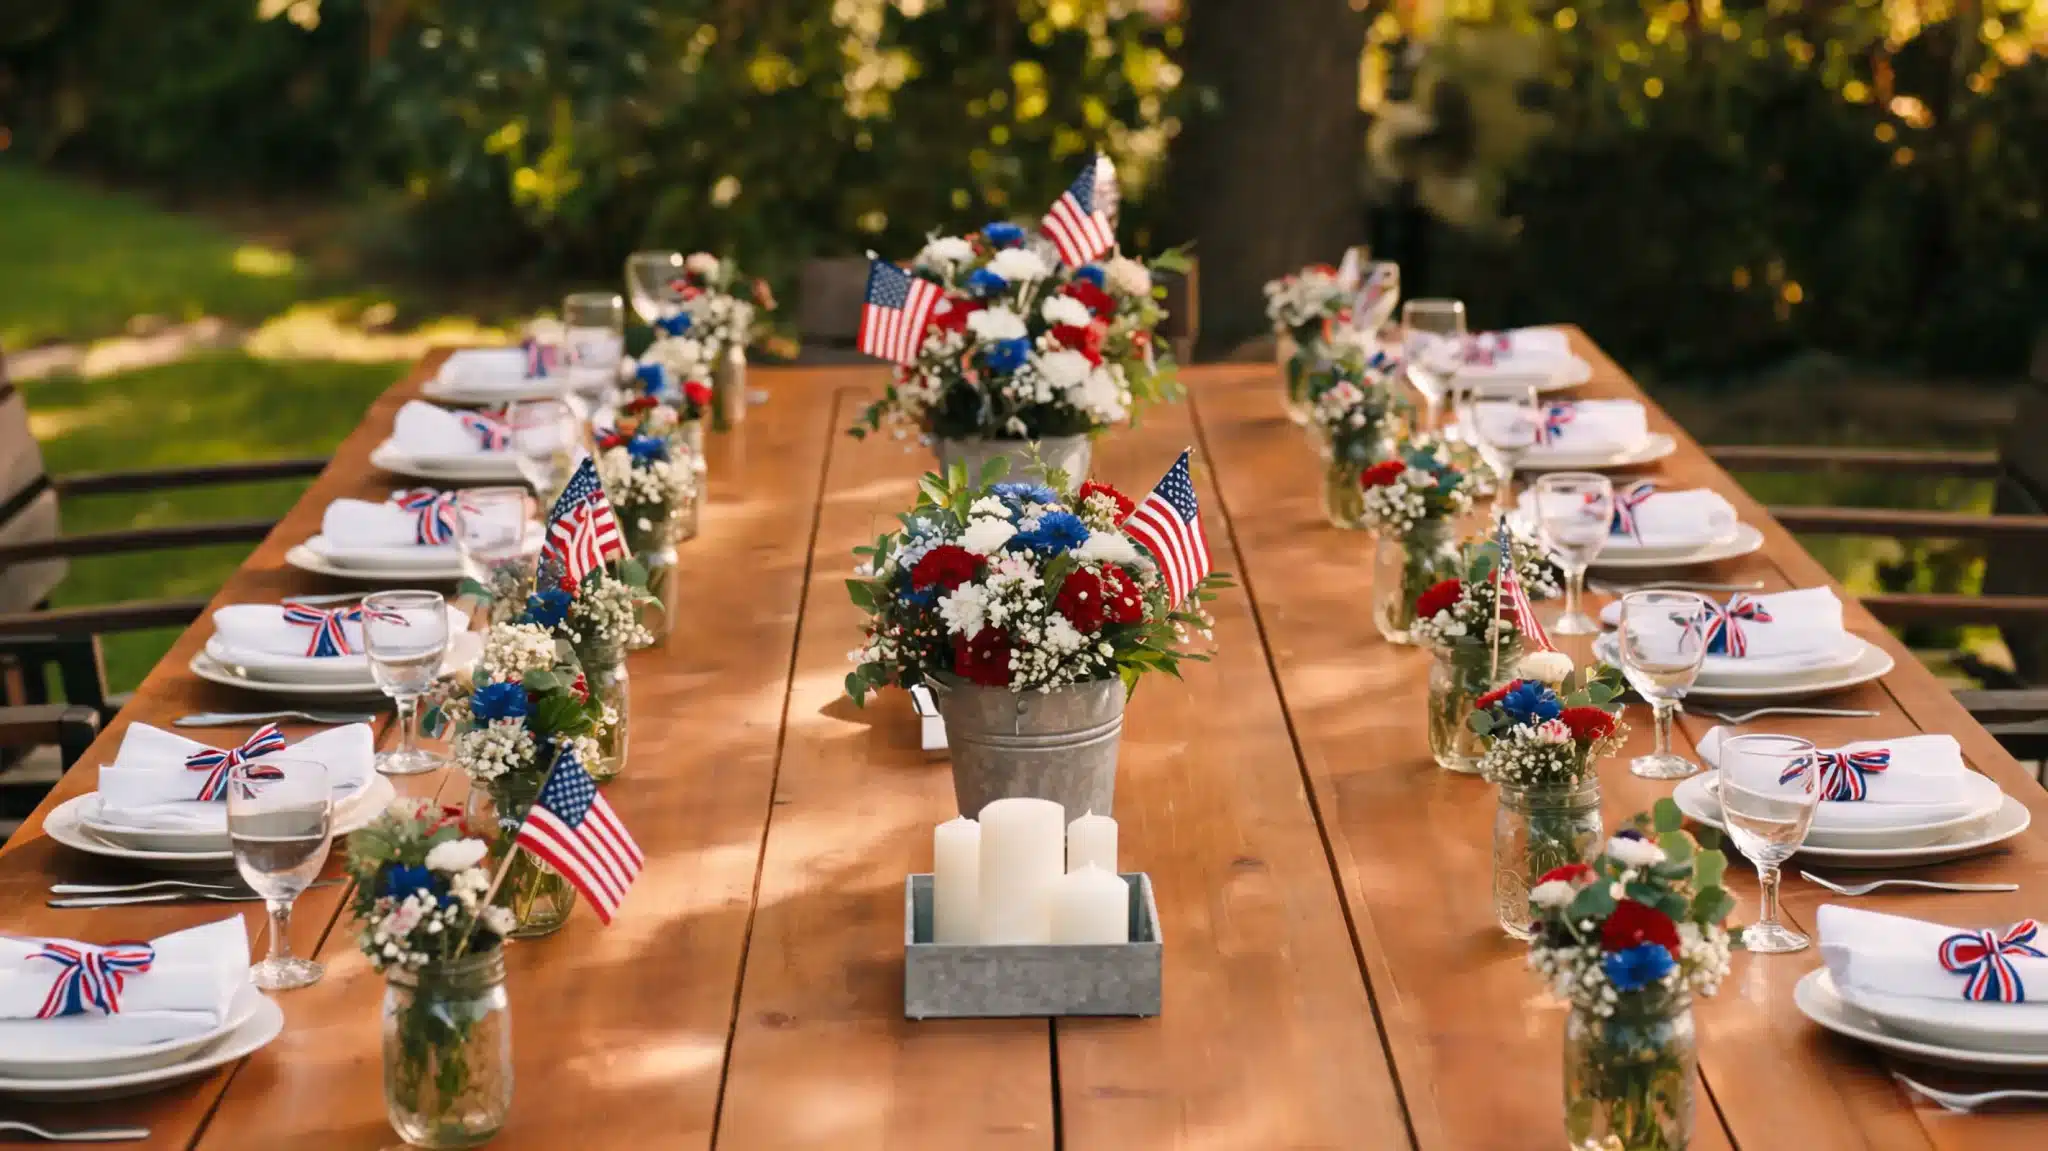
A good Memorial Day centerpiece idea doesn’t take a florist’s budget or three hours of prep. Most of the ones I’ve put together cost under $15 and were done before the first guests arrived. What they did take was knowing which details actually show and which ones don’t matter once food hits the table. Memorial Day carries weight. It’s about honoring and remembering, and a well-set table quietly reflects that without turning your backyard into a parade float. The centerpiece is the first thing people see when they sit down, get it right, and everything else reads as intentional, even if the rest of the setup was thrown together. I’ll cover DIY designs you can build from hardware store supplies, flower combinations that hold up in summer heat, indoor and outdoor versions, and the small details that keep the whole table from looking scattered. If you’re also decorating your front door, these Memorial Day wreath ideas pair perfectly with any of the centerpiece setups here. Difficulty 2/5, Most designs require no special skills Time 15–30 minutes per centerpiece Cost Range $5–$20 for DIY versions; $0 extra if reusing supplies Tools Needed Hot glue gun, scissors, paintbrush (for painted mason jar versions) Skill Required Beginner, no floral arrangement experience needed The most common mistake people make with patriotic centerpieces is overcomplicating them. The project card above tells you what you actually need before you start buying things you won’t use. What Actually Makes a Patriotic Centerpiece Work Before assembling anything, it helps to know which decisions actually affect how the finished piece reads from across the table. There are four of them, and color is the one most people get wrong first. Element What to Do What Goes Wrong Color Palette Pick one red, one blue, and use white as a balance Mixing burgundy, navy, and cobalt together reads muddy Height and Scale Match the centerpiece height to the table size Tall arrangements on small tables block sightlines and conversations Texture Mix Combine florals, metal, wood, and fabric One material only falls visually flat, no matter how good the flowers are Lighting Add a candle or small lantern for evening use Skipping lighting entirely kills the table once the sun goes down Color does the heavy lifting. Texture adds depth. Lighting finishes the job after dark. Get those four right, and everything else falls into place without much effort. Memorial Day Centerpiece Ideas for the Dining Table The indoor dining table is where these designs need to hold up under close inspection, as people sit around it for hours. 1. Classic Mason Jar Flower Arrangement Three mason jars, of different heights, filled with red carnations, white daisies, and blue hydrangeas, are one of the most reliable indoor Memorial Day centerpiece ideas you can put together. It looks handcrafted, costs almost nothing, and works on any table size because you control how spread out the cluster sits. Varying jar heights does most of the design work for you. The eye moves naturally from the tallest to the shortest and back, no styling tricks required. Where to buy: Jars at IKEA or Walmart; flowers at any grocery store or farmers market Best for: Casual dining tables and kitchen counters where a relaxed, homemade look fits 2. Galvanized Metal Bucket Display A galvanized metal bucket filled with mixed red, white, and blue flowers adds a rustic focal point with almost zero assembly time. The metal contrasts with soft florals in a way plastic containers can’t replicate; it gives the whole arrangement an intentional, layered look without requiring any arrangement skill. Use floral foam inside to hold stems upright and extend flower life through a full afternoon and evening of use. Where to buy: Amazon, Home Depot, IKEA, or Walmart for galvanized buckets Best for: Farmhouse, rustic, or outdoor-inspired dining rooms 3. Lantern and Floral Combo Centerpiece A glass or metal lantern in the center of the table, surrounded by small clusters of red and white flowers with blue ribbon accents, is the one centerpiece that genuinely changes character after dark. Daytime it’s a styled floral arrangement. Evening, it becomes something else entirely. Battery-operated candles inside the lantern are the safer call for indoor setups; same warm glow, zero fire risk during a long dinner. Where to buy: Lanterns at HomeGoods, TJ Maxx, Amazon, or Target Best for: Evening gatherings and dinner parties where the table needs to carry the ambiance 4. Tiered Tray Patriotic Display A two or three-tiered tray styled with small flag picks, white pillar candles, star ornaments, and mini florals is the right call for smaller dining tables that need height without width. It fills vertical space without overwhelming a four-person table the way a wide flat arrangement would. Swap out the florals for small desserts or themed treats if the table is doubling as a food display; the tray structure holds up either way. Where to buy: Tiered trays at Amazon, HomeGoods, Hobby Lobby, or TJ Maxx Best for: Smaller dining tables where a flat arrangement would disappear visually 5. Patriotic Candle Tray Arrangement A wooden or metal tray with three white pillar candles at varying heights, surrounded by red and blue florals and scattered star confetti, creates a clean, structured Memorial Day centerpiece that reads as deliberately styled rather than assembled in ten minutes, even if it was. Keep the candles unscented. Scented candles compete with food during dinner, and the last thing anyone wants at a Memorial Day cookout is a vanilla-and-carnation situation. Where to buy: Trays at IKEA or Target; candles at HomeGoods, Bath and Body Works, or Amazon Best for: Formal dining tables where a polished, structured centerpiece fits the setting 6. Patriotic Centerpiece DIY Wreath A red, white, and blue wreath laid flat in the center of the table, with candles or small florals placed in the middle, is one of those ideas that seems obvious once you see it, but most people never think to try. The same wreath hanging on your wall or as part of your door ideas for home décor can pull double duty across the whole space before guests arrive. Where to buy: Pre-made wreaths at Hobby Lobby, Amazon, or Etsy Best for: Large dining tables that need wide coverage without a tall arrangement blocking sight lines Any one of these works on its own. Combine two, say the table runner from the decor section below, with one of these centerpieces, and the dining table becomes the strongest visual in the whole setup. Outdoor Memorial Day Centerpiece Ideas Outdoor tables have three problems indoor ones don’t: wind, direct sunlight that wilts fresh flowers fast, and the fact that they’re sitting in open space that swallows small centerpieces whole. 7. Flag and Greenery Bucket Centerpiece A metal or clay pot with a small American flag, fresh greenery, and a handful of red and white flowers is the quickest outdoor centerpiece on this list. It’s lightweight, easy to move if you’re rearranging seating at the last minute, and handles mild wind without tipping. Anchor the flag stem deep into floral foam inside the pot, not just pushed into soil. Shallow placement means the flag falls at the worst possible moment, usually mid-dinner. Where to buy: Pots at Home Depot or Walmart; flags at Dollar Tree or Amazon Best for: Picnic tables, patio dining tables, and backyard BBQ setups 8. Patriotic Lantern Cluster Centerpiece Three lanterns at varying heights, each holding a red, white, or blue candle, are grouped in the center of an outdoor table. The varying heights create visual interest, and the lanterns handle the main outdoor problem with candles: wind. Surround the base of each with white pebbles or fresh greenery to anchor the display and give it a finished look. Where to buy: Lanterns at Amazon, Target, Home Depot, or IKEA Best for: Evening outdoor dinners where ambiance and wind-resistance both matter 9. Wooden Crate Floral Display A small wooden crate or wine box filled with red, white, and blue flowers and a few small flags is sturdy enough for outdoor use and adds a warmth that metal or plastic containers don’t. Wood texture alongside soft florals is one of those combinations that reads expensive regardless of the actual budget. Line the inside with a plastic bag before adding floral foam; water will destroy an unprotected wood box after a few hours. Where to buy: Wooden crates at Hobby Lobby, Michaels, Amazon, or craft stores Best for: Rustic or farmhouse-themed outdoor setups and backyard BBQs 10. Patriotic Mason Jar Lantern Cluster Three mason jars filled with layered sand, pebbles, or water beads in red, white, and blue, with a tea light sitting on top of each. Make a portable outdoor centerpiece that works on uneven picnic tables because the sand base stabilizes everything. Cluster them on a wooden board or tray, and they look intentional rather than just placed. Where to buy: Mason jars at Walmart or IKEA; sand and pebbles at Dollar Tree or craft stores Best for: Picnic tables and backyard setups where portability and lightweight matter 11. Balloon Bouquet Table Centerpiece Red, white, and blue balloons tied to a weight in the center of an outdoor table. Mix latex with star-shaped foil balloons for variety. The only setup note that actually matters: keep the strings short. Long strings mean balloons drift into faces throughout the meal, and the table stops feeling festive around the third time someone bats one aside. Where to buy: Party City, Dollar Tree, Amazon, or Walmart for balloons and weights Best for: Casual backyard parties, kids’ tables, and daytime outdoor celebrations Outdoors, the right centerpiece is always the one that holds its ground. Keep it simple, keep it sturdy, and the open space works for the setup instead of against it. Table Decor That Makes the Centerpiece Actually Land A centerpiece sitting on a bare table looks like an afterthought. These additions are what make the whole setup look like it was planned together. 12. Patriotic Table Runner with Star Print A navy or red striped table runner defines the decorating zone, frames the centerpiece, and ties the table together with one piece. Pair with white dishes and cloth napkins, and the whole setup photographs cleanly without any other styling work. Where to buy: Amazon, Etsy, HomeGoods, Pottery Barn, or Target Best for: Both indoor and outdoor tables as the foundational layer 13. Patriotic Place Settings with Flag Picks A small flag tucked into each folded napkin at every place setting is a detail that costs almost nothing and makes the table feel genuinely thoughtful. Write each guest’s name on a small tag tied to the flag stem, and it doubles as a place card; two problems solved with one Dollar Tree purchase. Where to buy: Flag picks at Dollar Tree, Amazon, or Party City, usually in bulk packs Best for: Any setup where individual place settings are part of the overall look 14. Red Gingham Tablecloth Base Layer A red gingham tablecloth communicates the holiday immediately without requiring any other color work. Layer a white or natural linen runner across the center, and the centerpiece sits against a two-toned base that makes everything above it pop. Works equally well indoors and outdoors and wipes clean after a BBQ, which matters more than people remember when they’re setting up. Where to buy: Amazon, Walmart, Target, or IKEA for outdoor-friendly tablecloth options Best for: Casual BBQ setups, picnic-style gatherings, and backyard outdoor dining 15. Patriotic Dessert and Snack Display Table A tiered stand loaded with red, white, and blue treats, strawberries, marshmallows, blueberries, and themed cookies, works as both a centerpiece and a food station. Add small flags between the tiers and a scatter of star confetti on the tray. Replenish as things get eaten so the display stays full throughout the event rather than looking ransacked by the second hour. Where to buy: Tiered stands at Amazon or HomeGoods; themed picks at Party City or Walmart Best for: Buffet setups, dessert tables, and kitchen counters during larger gatherings 16. Patriotic Napkin Fold with Ribbon Tie Rolled cloth napkins tied with red, white, or navy twine on each plate refine a basic table setting into something that looks like someone actually styled it. Tuck a small sprig of baby’s breath or a star pick into the twine. It costs almost nothing and takes under five minutes for a full table, the highest ROI detail on this list. Where to buy: Cloth napkins at IKEA or Amazon; twine at Hobby Lobby, Michaels, or Dollar Tree Best for: Any Memorial Day table where small details make the biggest cumulative difference Small details add up fast. Get these five right, and the whole table looks planned weeks in advance, even if it was assembled the morning of. DIY Memorial Day Centerpiece Ideas You Can Build at Home Store-bought works fine. But the DIY versions on this list cost less, look more personal, and, most importantly, can be stored and reused next year without any degradation. 17. Painted Mason Jar Flower Vases What can go wrong first: Paint applied to a damp or greasy jar peels at the rim within an hour. Clean and dry the jars completely; this takes three minutes and prevents the most common failure point. Materials needed: 3 clean glass mason jars in different sizes, red and blue chalk paint, painter’s tape, paintbrush, and fresh flowers in patriotic colors. Clean and dry the jars completely before starting. Tape off any sections you want to keep unpainted. Paint each jar a different color: one red, one blue, and leave one white or natural glass. Let dry fully for at least one hour before removing tape. Fill each jar with fresh flowers in complementary colors. Cluster all three jars on a tray or wooden board. Faster the second time: Skip taping entirely. Paint each jar a solid color all the way to the rim. The imperfect edges read as handmade, not sloppy, and you save ten minutes. 18. Rustic Wooden Box Centerpiece What can go wrong first: Skipping the plastic bag liner inside the crate. Water from floral foam soaks through unprotected wood in under an hour, and the crate warps or stains the table. This step takes 30 seconds and protects both. Materials needed: Small wooden crate or wine box, chalk paint or spray paint, floral foam, mixed red, white, and blue flowers, small American flag picks, greenery or eucalyptus. Lightly sand the box if needed for a smooth paint surface. Paint the outside in alternating stripe sections, or leave the wood natural. Line the inside with a plastic bag to protect from water. Cut the floral foam to fit snugly inside and soak it in water. Insert greenery first as a base layer across the foam. Add flowers in color clusters: red, white, and blue grouped separately. Tuck flag picks in at varying heights to finish. 19. Star Candle Holder Tray Display What can go wrong first: Candles that tip during the meal. Use candle holders — not just candles balanced on the tray — and fill gaps with decorative stones heavy enough to act as a buffer if someone reaches across the table. Materials needed: Wooden or metal serving tray, 3 white pillar candles at varying heights, star-shaped candle holders or glass votive holders, red and blue decorative stones or sand, small flag picks and star scatter. Place the tray flat on the table as the base. Arrange the three candles at varying heights using holders. Fill gaps between candles with red and blue decorative stones. Scatter star confetti or small star ornaments across the tray surface. Add flag picks at each corner of the tray as framing elements. Light candles only when guests are seated. Never leave them unattended. 20. Tin Can Patriotic Vase Cluster What can go wrong first: Painting cans that still have label residue. The label glue repels paint, and you get patchy coverage. Soak the cans in warm water for ten minutes before starting; the labels and glue come off cleanly. Materials needed: 5 clean tin cans in different sizes, red and blue chalk or spray paint, twine or ribbon, a hot glue gun, and fresh or faux flowers. Soak and remove labels, then clean all cans thoroughly. Paint each can, alternating red, white, and blue. Let dry completely, then wrap the rim with twine secured by hot glue. Arrange the five cans in a cluster on a wooden board, tallest in the back. Fill each can with a single color of flower for a color-blocked look. Place the whole cluster directly on the table runner as the centerpiece. Fastest DIY on the list: Paint the cans the night before. The next morning, add flowers and it’s done in under ten minutes, the quickest patriotic centerpiece setup if you’re working with morning-of prep time. 21. Burlap and Ribbon Floral Arrangement What can go wrong first: Burlap wrapped too tightly frays within a couple of hours, especially near the hot glue attachment points. Wrap loosely and use enough glue at the top and bottom edges, not just a single line down the back, to keep it from unraveling mid-event. Materials needed: Glass vase or mason jar, burlap ribbon in natural tone, red or blue satin ribbon, floral foam, mixed patriotic flowers, hot glue gun. Wrap the outside of the vase with burlap ribbon and secure with hot glue at the top, bottom, and back seam. Layer a thinner red or blue ribbon over the burlap and tie a bow at the front. Soak floral foam in water and place snugly inside the vase. Insert greenery first as a base, filling evenly around the foam. Add flowers in a dome shape, working from the center outward. Alternate red, white, and blue blooms so no two colors sit directly next to each other. None of these requires special skills or more than thirty minutes. The results consistently look like they took longer, which is the whole point of doing it yourself. Budget Breakdown: What Each DIY Centerpiece Actually Costs DIY Centerpiece Estimated Cost Time to Make Painted Mason Jar Flower Vases $8–$12 20 mins Rustic Wooden Box Centerpiece $15–$20 30 mins Star Candle Holder Tray Display $12–$18 15 mins Tin Can Patriotic Vase Cluster $5–$10 25 mins (plus overnight dry time) Burlap and Ribbon Floral Arrangement $10–$15 20 mins Fresh flowers are the most expensive line item across all five. Swap them for faux florals, and every budget drops by roughly half, and the centerpiece lasts for years instead of two days. Mistakes That Make a Centerpiece Fall Flat Even well-planned setups fail because of a few overlooked details. These are the ones I’ve watched sink an otherwise solid table, and they’re all fixable before guests arrive. Going too tall: Blocks eye contact across the table. Keep arrangements low or use a narrow base if you need height; tall and wide is the combination to avoid. Overcrowding the arrangement: Empty space inside the design makes individual flowers visible. More isn’t better once you’re past a certain density. Wrong scale for the table: A single small mason jar on an 8-foot dining table looks lost. Match the centerpiece footprint to the surface size, or use multiple smaller pieces spread along the table length. Clashing shades: Pick one red and one blue. Mixing burgundy, true red, navy, and cobalt blue in the same arrangement reads as unintentional. No tray or base: Loose items placed directly on a tablecloth look scattered rather than styled. A tray underneath ties everything together and contains any water drips from fresh flowers. How to Store and Reuse Your Memorial Day Centerpiece The smartest move is buying once and reusing every year. Ten minutes of care at the end of the holiday means next Memorial Day practically sets itself up. Disassemble carefully: Separate each element rather than packing everything compressed into one box. Use clear labeled bins: One bin per centerpiece. No digging, no guessing next year. Switch to faux florals: Properly stored faux flowers look just as good twelve months later. Fresh flowers don’t survive the week, let alone a year. Wrap ribbon and burlap separately: Roll ribbon around cardboard; store burlap flat in a zip bag to prevent fraying. Wrap candles in tissue paper: Prevents chipping and dust buildup through storage months. These habits take ten minutes after the holiday ends and save real frustration when Memorial Day comes back around next year. Final Verdict After making most of these more than once, the honest answer is that the painted mason jar cluster and the tin can vase design are the two I’d build again without hesitating. They cost the least, take the least time, and consistently look better than what you’d find pre-made at a party store for twice the price. If you have a larger table or are setting up outdoors, the wooden crate display is the most durable and visually flexible option on the list. Pick one Memorial Day centerpiece idea from this guide, build it this weekend, and store it properly at the end of the day; you’ll spend nothing on it next year. Frequently Asked Questions What flowers are best for a Memorial Day centerpiece? Red carnations, white daisies, blue hydrangeas, and red tulips are the most reliable options. Carnations and daisies hold up longer in summer heat than roses or peonies, which matters for outdoor setups where the arrangement might sit in direct sunlight for several hours. How do you make a simple patriotic centerpiece for a table? The tin can cluster is the simplest: paint the cans the night before, add flowers in the morning, and the centerpiece is done in under ten minutes. Three cans, three colors, one wooden board underneath to tie them together. Can I use fake flowers for a Memorial Day centerpiece? Yes, and for outdoor setups it’s often the better call. Faux flowers don’t wilt in heat, don’t need water, and can be stored and reused the following year. The wooden box and mason jar versions on this list work just as well with quality faux florals as with fresh ones. What are the best centerpiece ideas for a Memorial Day BBQ? The galvanized bucket display, wooden crate arrangement, and flag-and-greenery pot all work well for BBQ setups; they’re durable, visually appropriate for outdoor casual dining, and don’t require anything fragile. Keep the height low enough that it doesn’t interfere with serving dishes moving across the table. How many centerpieces does a long table need? Two to three evenly spaced arrangements work better than one large centerpiece for tables longer than 6 feet. A single piece only serves the middle third of the table. Smaller repeated arrangements at 18-24 inch intervals down the length cover the full table without blocking the view or conversation. How do I keep outdoor flowers from wilting at a Memorial Day party? Floral foam soaked in water and kept shaded when not in use is the main solution. Cut stems at a 45-degree angle before placing them in foam; this increases water uptake significantly. Avoid direct midday sun if you can position the table differently, and mist the arrangement with a spray bottle every couple of hours. What’s a good Memorial Day centerpiece that doubles as a host gift? A DIY mason jar arrangement or a styled tin can cluster travels well and costs under $15 to put together. Wrap the base with twine and add a small tag. It works as a centerpiece for the host’s table after the party, which is more useful than most brought gifts.
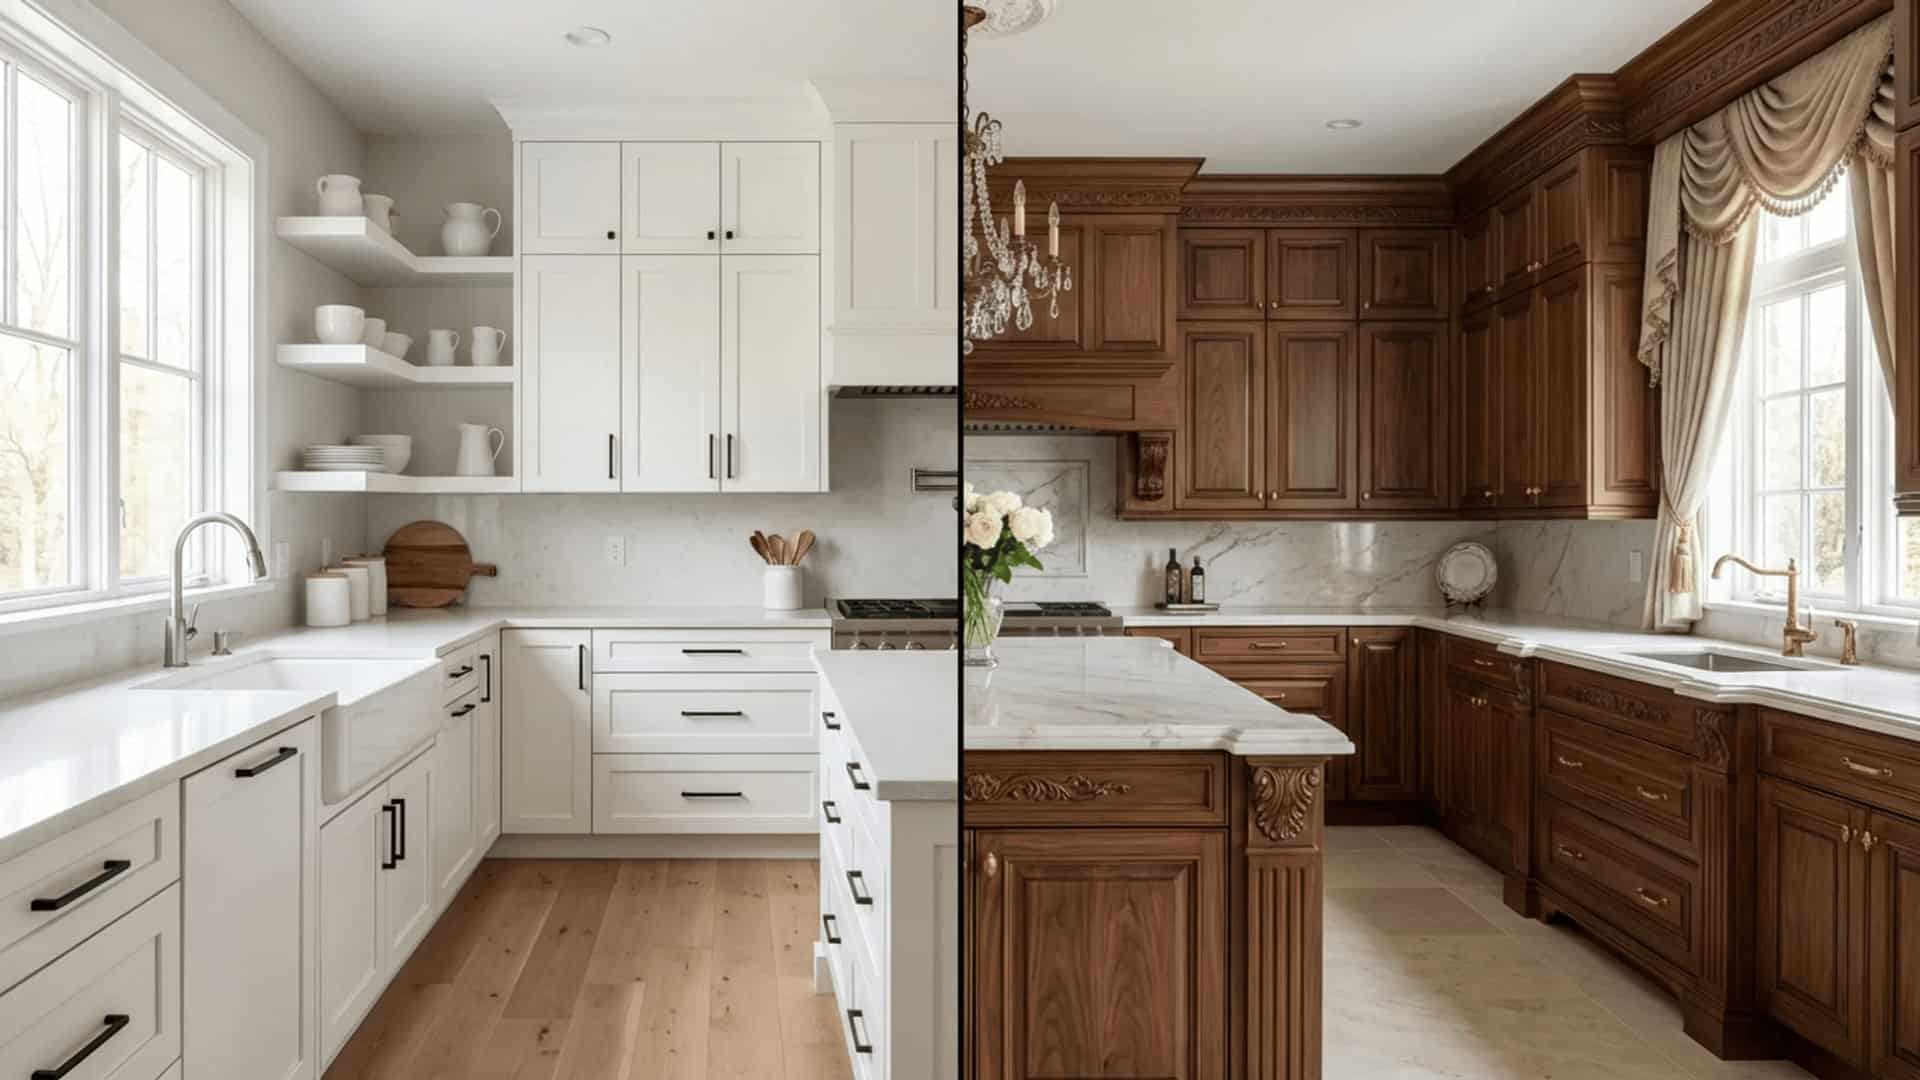
Cabinet style shapes how a kitchen feels the moment you walk in. When people ask me about shaker cabinets vs traditional cabinets, they’re usually trying to understand which design will actually work better in their space. After more than twenty years working with wood and building custom cabinetry, I’ve installed both styles in all kinds of kitchens. Each one has strengths that become obvious once you look closely at construction, design, and long-term durability. I’ll walk you through the key differences that matter when choosing between kitchen cabinet styles. You’ll see how shaker and traditional designs compare in style, materials, cost, cleaning, and overall kitchen compatibility, so you can make a confident decision for your home. What are Shaker Cabinets? Shaker cabinets trace back to the Shaker religious community in 18th-century America . They valued simplicity and function, and that philosophy shows in the cabinet design. Each door uses a five-piece construction: four frame pieces surrounding a flat, recessed center panel . The edges stay square and clean, with no curves or decorative carving. Most shaker cabinets come in white, grey, navy, or natural wood finishes. Materials range from solid wood to MDF, depending on budget. They suit modern, farmhouse, and transitional kitchens particularly well. One thing I’ve noticed over the years: shaker doors are forgiving to paint and repaint. If a homeowner wants to update the kitchen color five years down the road without replacing the boxes, shaker is almost always the right starting point. The flat panel takes paint cleanly and evenly, unlike raised-panel doors, where touch-ups around the molding edges tend to show. The design has stayed popular because it doesn’t lean too far in any one direction, making it easy to style around. What are Traditional Cabinets? Traditional cabinets have a heavier, more detailed look than the shaker-style cabinets. The defining feature is the raised center panel , which sits higher than the door frame, creating depth and shadow lines that give the cabinet a rich, layered appearance. Decorative molding runs along the edges, and the profiles are often curved or beveled . Crown molding at the top, rope detailing, and carved accents are common touches. Nothing about this style is minimal. These cabinets fit naturally in classic kitchens, think warm wood tones, stone countertops, and antique-style hardware. In luxury home designs, they add a formal, built-over-time feel that shaker cabinets simply don’t replicate. If the kitchen leans traditional or high-end, this cabinet style tends to feel right at home. Shaker Cabinets vs Traditional Cabinets: Key Differences Cabinet appearance shapes the entire feel of a kitchen. Here’s how shaker and traditional styles differ visually from door to frame. 1. Design and Style Shaker: Shaker cabinets focus on simple, functional design. A flat recessed center panel sits inside a square frame with no carving or trim. Clean lines keep the look balanced and work well in many kitchen styles. Traditional: Traditional cabinets highlight decorative detail. Raised panels, carved trim, and crown molding add depth and shadow lines. The layered design gives kitchens a more formal appearance and makes the cabinets stand out. 2. Materials and Finishes Shaker: Shaker cabinets often feature natural wood or smooth painted finishes. If you’re choosing paint colors with white cabinets, neutral tones like grey or light wood work particularly well. These finishes help the cabinets blend easily with different kitchen materials. Traditional: Traditional cabinets often use deeper wood tones, such as cherry or walnut. Finishes may include glazing or lacquer that highlight carved details and trim, giving the cabinets a richer, more decorative look. 3. Cabinet Doors and Panels Shaker: Shaker cabinet doors feature a flat, recessed center panel within a square frame. The simple construction keeps the door profile clean and balanced, making it suitable for both modern and farmhouse kitchens. Traditional: Traditional cabinet doors usually feature raised center panels. Decorative molding or carved edges often appear around the frame, creating stronger depth and giving the cabinets a classic, detailed appearance. 4. Hardware Choices Shaker: Shaker cabinets pair well with simple hardware. Matte black, brushed nickel, or stainless knobs and pulls keep the design clean and understated while supporting the cabinet’s minimal style. Traditional: Traditional cabinets often use decorative hardware such as brass, gold, or antique-finish knobs and pulls. These choices complement the detailed cabinet surfaces and reinforce the classic kitchen style. 5. Cleaning and Maintenance This is where shaker cabinets have a real, practical advantage. The flat recessed panel has almost no areas where grease, dust, and moisture can collect and hide. A damp cloth wipes clean in seconds. Traditional cabinets are the opposite. Every carved edge and molding profile is a groove where cooking residue can settle. Cleaning thoroughly requires a soft-bristle brush or toothbrush to get into those crevices, especially around the raised panel edges and crown molding. For families who cook frequently, this ongoing maintenance commitment is worth taking seriously before choosing the style. I have clients who loved the look of traditional cabinets when they installed them and came to genuinely resent the cleaning by year three. That’s not a knock on the style; it’s just an honest heads-up. 6. Resale Value and Market Appeal From a resale perspective, shaker cabinets are the safer choice in most markets. Their neutral, versatile appearance appeals to a wide range of buyers, and real estate professionals consistently note that transitional and contemporary kitchens tend to photograph better and attract broader buyer interest. Traditional cabinets hold their value well in the right home, a formal colonial or Tudor-style property where the interior architecture supports the style. In a mid-century ranch or a contemporary open-plan home, traditional cabinets can actually narrow your buyer pool. They signal a specific aesthetic that not every buyer shares. This doesn’t mean you should design your kitchen around resale. But if you’re planning to sell within five to ten years, it’s a factor worth knowing. Cost Comparison: Shaker vs. Traditional Cabinets Cabinet cost depends on construction complexity, materials, and installation. Understanding these factors helps you estimate the real budget needed for each style. Cost Factor Shaker Cabinets Traditional Cabinets Estimated Cost (Per Linear Foot – USA) Manufacturing Complexity Simple five-piece construction with flat panels makes production easier and faster. Raised panels, carving, and decorative molding require more detailed manufacturing. Shaker: $60–$650 / Traditional: $150–$1,200+ Material Costs Often available in MDF or solid wood with painted finishes, which keeps costs moderate. Typically built from premium hardwoods like cherry or walnut, increasing overall material costs. Shaker: $60–$200 (stock) up to $1,200+ custom / Traditional: $200–$1,200+ Installation Costs Straightforward designs are quicker to install, reducing labor time. Heavier doors and trim require more labor and precision. Shaker: $100–$450 / Traditional: $150–$500+ Customization Options Easy to customize with paint colors and hardware changes. Detailed molding and finishes increase the cost significantly. Shaker: $150–$650 / Traditional: $300–$1,200+ In most kitchens, shaker cabinets cost less because of their simpler construction, while traditional cabinets often require higher budgets for materials and craftsmanship. Hidden Costs to Watch For The per-linear-foot numbers above cover the cabinets themselves, but there are real additional costs that can catch homeowners off guard. With traditional cabinets, the crown molding installation, custom corbels, and glazing touchups after delivery add up. I’ve seen projects where the “extras” pushed the total budget 20–30% higher than the original quote. Always ask your cabinet supplier for an itemized quote that includes trim, hardware, and finish work. With shaker cabinets, the biggest cost variable is whether you’re buying stock, semi-custom, or fully custom. Stock shaker cabinets from big-box retailers can be perfectly serviceable, but the box construction is often thinner and the hardware is basic. Semi-custom is usually the sweet spot for quality-conscious buyers who don’t want to pay fully custom prices. Which Cabinet Style is Right for You? Choosing between the two comes down to your home’s existing style, budget, and the level of detail that feels right for the space. When Shaker Cabinets Make More Sense Shaker cabinets tend to be the more practical pick for most renovations. Here’s when they’re clearly the better direction. Modern, transitional, or farmhouse interior style Working within a moderate or mid-range budget Low-maintenance cleaning is a priority Smaller kitchen where visual weight needs to stay light Planning to resell with a broad buyer appeal in mind Clean, functional look preferred over decorative detailing Shaker cabinets work well in most renovation scenarios. They’re versatile, practical, and easy to style around. When Traditional Cabinets are a Better Choice Traditional cabinets make sense in specific situations, when the home and budget genuinely support the style. Classic, formal, or luxury interior design direction Large kitchen that can carry heavier visual weight Crown molding and ornate fixtures are already present Budget supports higher manufacturing and installation costs Detailed woodwork and craftsmanship are a priority Comfortable with regular cleaning and maintenance upkeep Traditional cabinets are worth it in the right setting, when the home, budget, and design vision all align. Can You Mix Shaker and Traditional Elements? Yes, and this is increasingly common in high-end kitchen renovations. A popular approach is using traditional-style cabinets for the perimeter cabinetry and a shaker-style island, or vice versa. The contrast can look intentional and layered when the hardware and color palette tie both elements together. I’ve completed a handful of kitchens where the upper cabinets were inset shaker in a warm white, and the lower cabinets were a more traditional raised-panel design in a walnut stain. The mix worked because both pieces shared the same hardware finish and the same countertop material. When the bridge elements are consistent, mixing profiles reads as a design choice rather than an inconsistency. If you’re considering a mixed approach, stick to one unifying element, whether that’s hardware finish, color family, or countertop material, and let everything else flex around it. Final Thoughts By now, you should have a clearer understanding of how shaker cabinets vs traditional cabinets compare in real kitchens. Shaker cabinets bring simple lines, versatile design, and practical maintenance that works well in many homes. Traditional cabinets offer deeper detail, raised panels, and a more formal presence that suits classic interiors. After years of building and installing cabinets, I’ve found that the right choice always depends on the kitchen itself. You want cabinets that match the home’s character, hold up to daily use, and fit comfortably within your budget. When those elements align, the result feels natural and lasting. Take a good look at your space before deciding, and if this guide helped you narrow the choice, share which cabinet style you’re leaning toward. Frequently Asked Questions Do shaker cabinets increase home value? Shaker cabinets often help with resale because they suit many kitchen styles. Buyers usually prefer simple designs that feel current, making these cabinets a safer option when preparing a home for sale. Are traditional cabinets going out of style? Traditional cabinets are not outdated, but they work best in homes with classic architecture. In modern layouts, they can feel heavy, so their appeal depends on how well they match the overall design. Which cabinet style lasts longer? Both styles can last decades if built with quality materials. Durability depends more on construction, wood type, and hardware than the door style itself, along with proper care and regular maintenance. Can shaker cabinets look high-end? Yes, shaker cabinets can look upscale when paired with premium finishes, solid wood, and good hardware. Details like soft-close hinges and custom paint colors can make a big difference in overall appearance. Are traditional cabinets harder to clean? Traditional cabinets need more effort to clean due to grooves and carved details. Grease and dust settle into these areas, so regular wiping and occasional detailed cleaning help keep them in good condition. What kitchen styles suit shaker cabinets best? Shaker cabinets fit modern, transitional, and farmhouse kitchens. Their simple design blends easily with different materials and colors, making them a flexible option for many home layouts.

