


Heard the term rough in plumbing and wondered why everyone treats it like such a big milestone? It can be confusing when you see open walls, exposed pipes, and no working fixtures yet.
If you’re building a home or planning a remodel, you’re probably trying to understand what happens during rough-in plumbing and why it matters. I know it can feel overwhelming when contractors use unfamiliar terms without much explanation.
The good news is that this stage is easier to understand than it sounds.
By the end, you’ll know what a rough-in is, what plumbers install during this phase, why inspections matter, and how this work prepares your home for sinks, toilets, showers, and other finished fixtures.
| Cost Note: Figures in this article are estimates based on national averages from Angi and industry guides (2025). Actual costs vary significantly by region, contractor, pipe material, and number of fixtures. Always get at least three quotes before committing to any project above $1,000. |
What Is Rough-In Plumbing?
Rough-in plumbing is the phase where plumbers install every pipe, drain, and vent connection inside open walls, floors, and ceilings before drywall, tile, or cabinetry goes up.
By the time rough-in is done, your home has the full infrastructure for water supply and waste removal, but no visible fixtures yet. No faucets, no toilets, no showerheads.
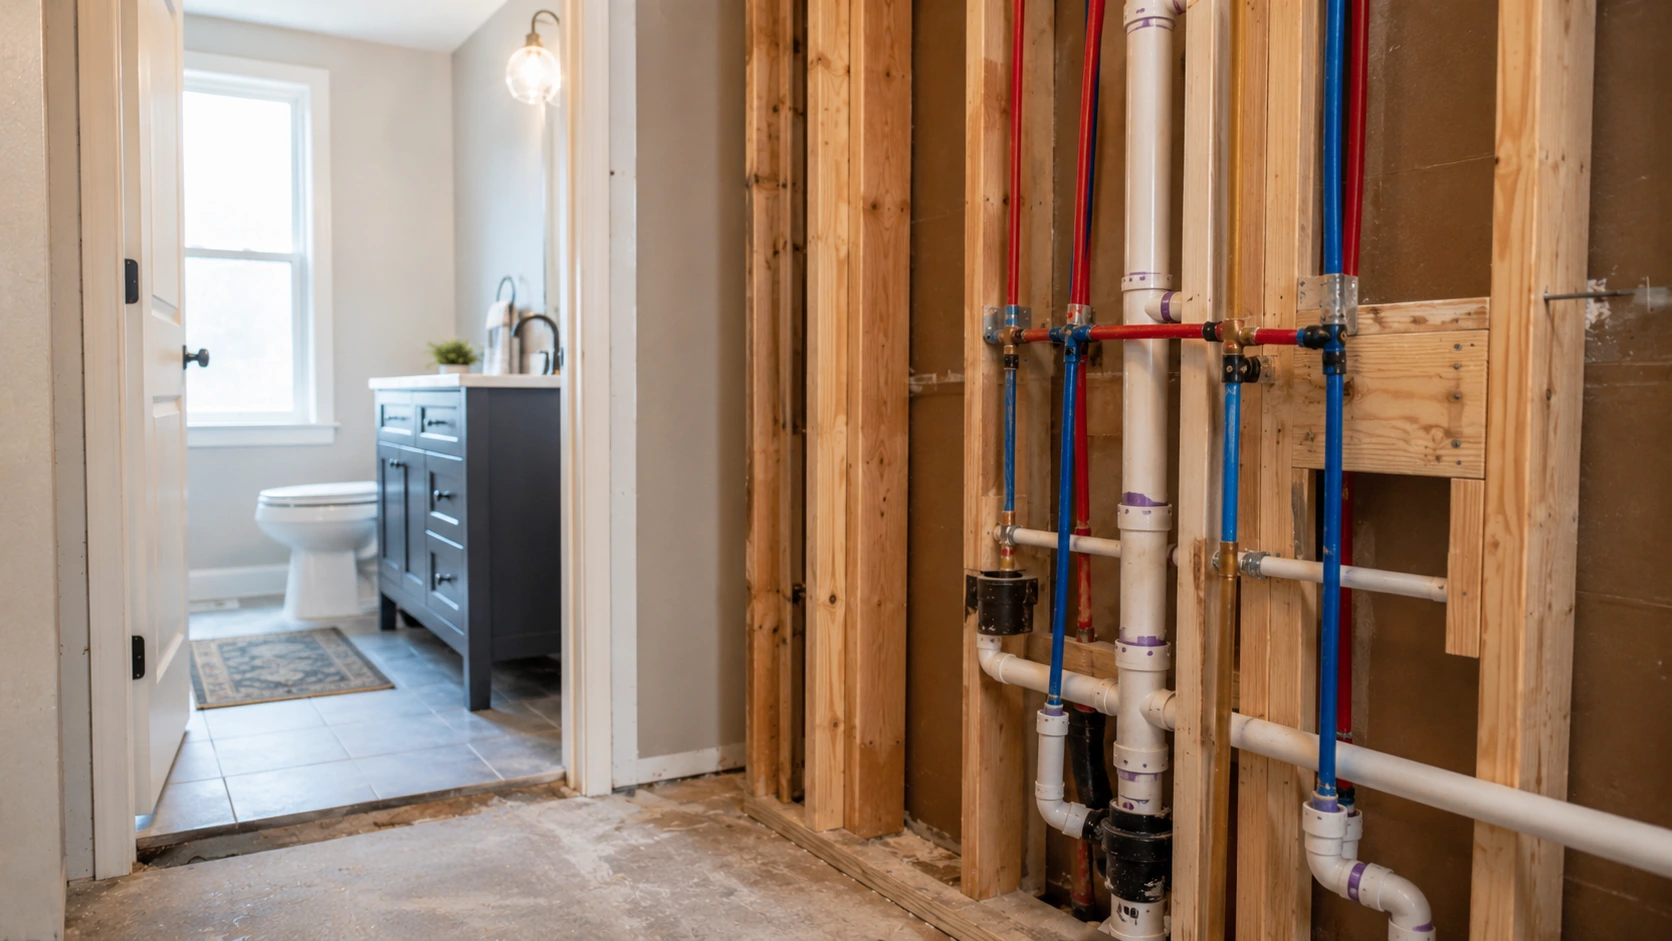
Think of it as the plumbing skeleton. Every fixture location is staked out and connected to the system. The toilet may not be there, but its drain stub-out is already set at the right distance from the wall.
The shower may have nothing installed yet, but its valve, P-trap, and supply lines are roughed in and waiting. That positioning is what rough-in means: the hidden work that makes the finished work possible.
| Line Item | Low End | High End | What Drives the Variation |
| Single bathroom rough-in | $3,000 | $20,000 | Fixture count, pipe material, labor rates |
| Whole-house rough-in (2,000 sq ft) | $8,000 | $30,000 | Number of bathrooms, stories, slab vs crawl space |
| Cost per fixture (rough-in only) | $300 | $600 | Fixture type, access difficulty, regional labor |
| Cost per square foot | $4.00 | $15.00 | Complexity, number of stacks, layout |
| Finish plumbing (add after rough-in) | $1,500 | $6,000+ | Fixture quality, number of trim items |
Those ranges are wide because rough-in cost is almost entirely driven by how many fixtures you have, what pipe material is used, how many stories the home has, and your regional labor market.
A simple one-bathroom remodel in a single-story house with accessible walls is nothing like roughing in a three-bathroom custom home on a slab with a master suite above the garage. Both are “rough-in plumbing,” and the cost reflects the difference.
What Happens During a Plumbing Rough-In?
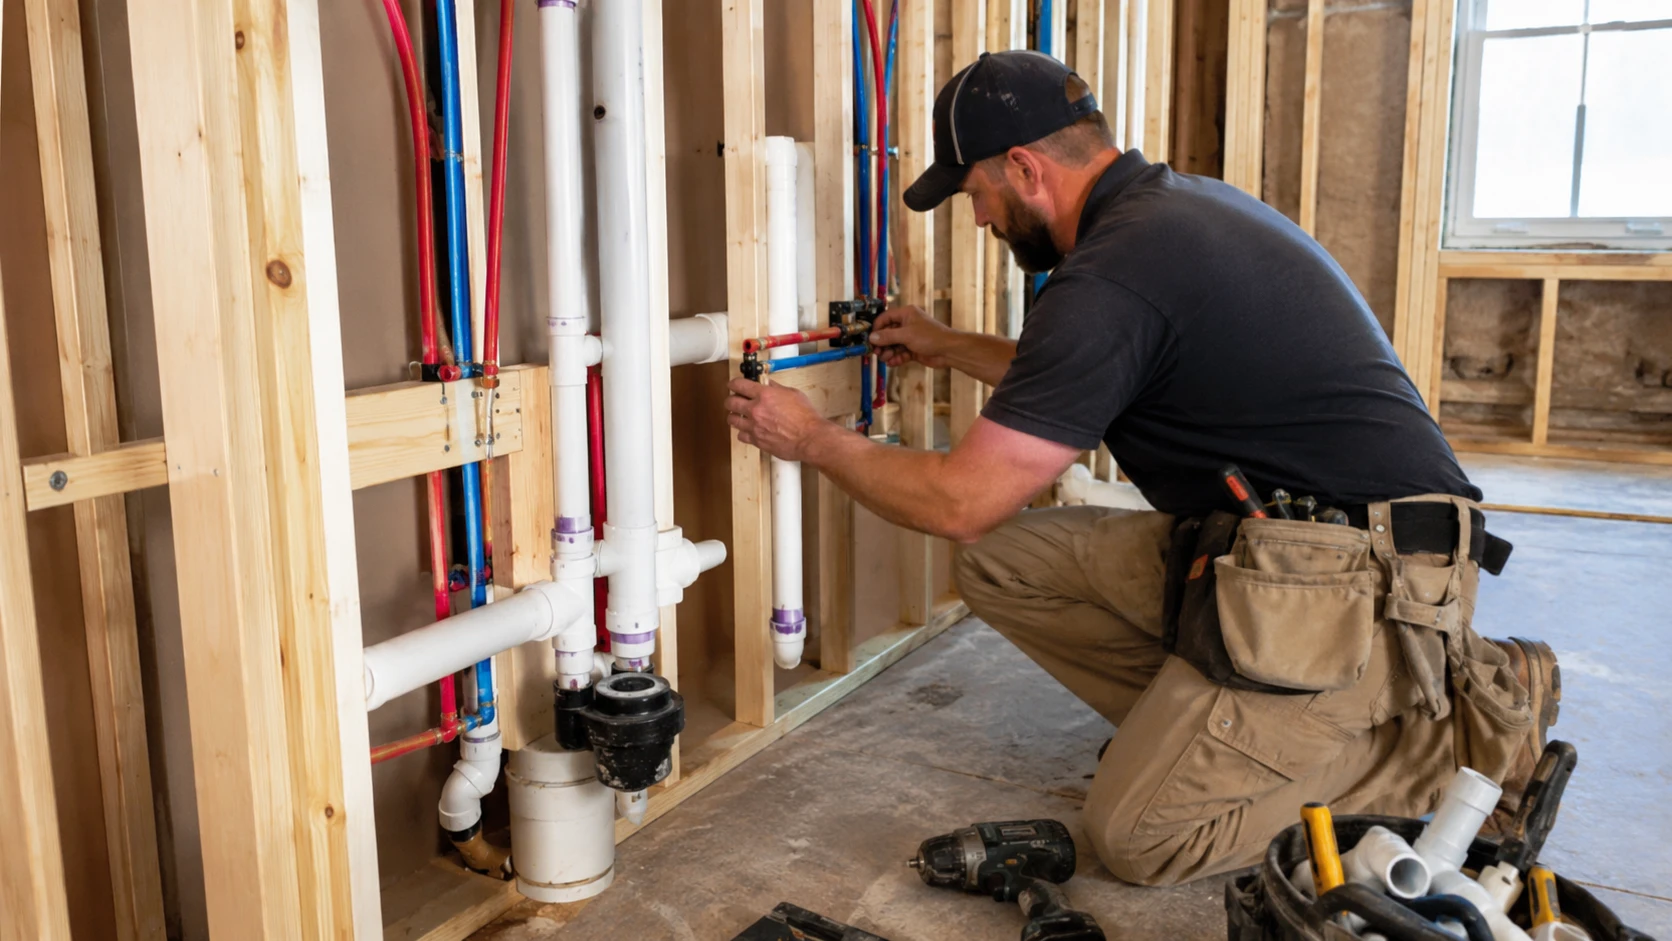
The plumber works from the building plan, marking fixture locations and running the three-core systems before any surface goes up. Here is what gets installed at each rough-in task.
| Rough-In Task | What It Means |
| Fixture layout | Marks where toilets, sinks, tubs, showers, and appliances will go |
| Water supply lines | Runs hot and cold water pipes to each fixture location |
| Drain lines | Adds pipes that carry wastewater away from sinks, toilets, tubs, and showers |
| Vent pipes | Installs pipes that allow air movement through the drain system to prevent siphoning and odors |
| Pipe supports | Secures pipes so they stay stable inside walls or floors |
| Pressure testing | Checks water lines for leaks before walls are closed |
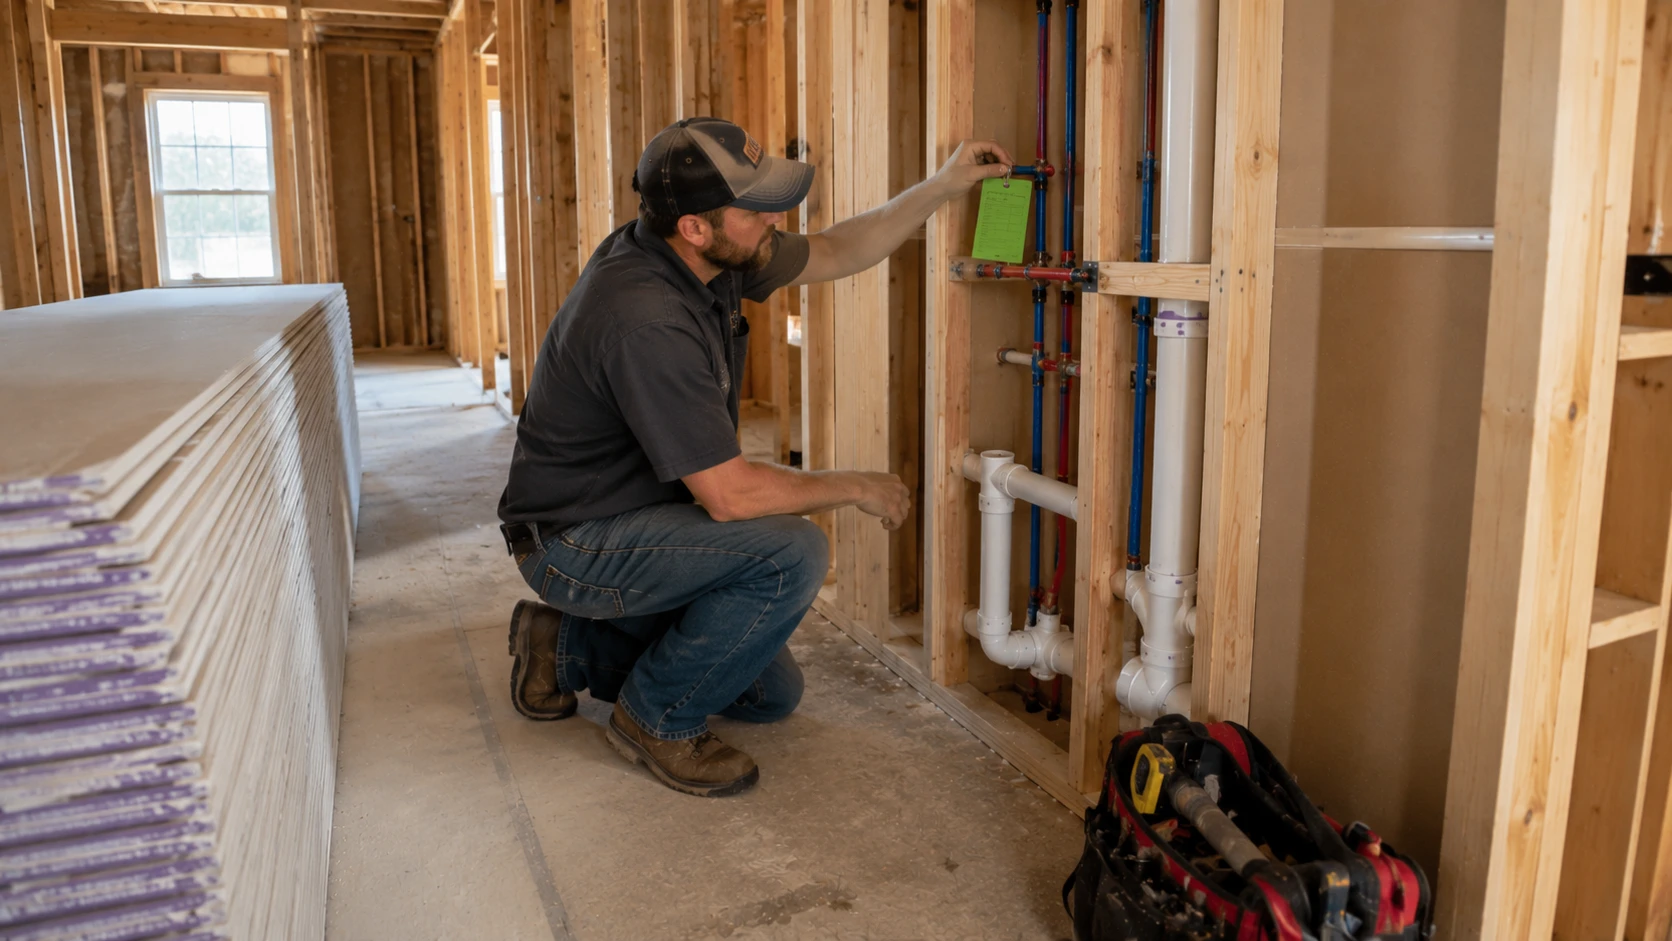
| Inspection | Confirms the rough-in meets local code before the next stage begins |
Most of this work happens during framing, before insulation and drywall. That open-wall window is the only practical time to run pipes cleanly. Once the walls close, access to fix problems costs significantly more.
Rough-In Plumbing vs. Finish Plumbing
This is the distinction I hear most homeowners mix up in their contracts, and it matters because the two phases are usually billed separately.
Rough-in covers everything hidden: the drain pipes, vent stacks, supply lines, and stub-outs that end inside walls and floors.
Finish plumbing, also called trim-out, is the second visit your plumber makes after drywall, tile, and cabinets are done. That is when the visible pieces get connected: toilets, faucets, showerheads, under-sink drain assemblies, and fixture valves.
In a bathroom remodel, for example, painting shower tile is one of the final steps that only happens after finishing plumbing is complete.
| Comparison Point | Rough-In Plumbing | Finish Plumbing |
| Main job | Install hidden pipe routes | Connect usable fixtures |
| Timing | Before drywall and finished surfaces | After walls, floors, and cabinets |
| Includes | Drains, vents, supply lines, stub-outs | Toilets, faucets, sinks, valves, trim |
| Access needed | Open framing | Finished rooms |
| Inspection type | Rough inspection before covering | Final inspection after fixture install |
| Also called | Rough-in phase | Trim-out plumbing |
When you see a contract that lists rough-in and finish plumbing as separate line items, that is correct. Do not assume rough-in covers installed fixtures. If a contractor’s quote only mentions rough-in, ask explicitly what finish plumbing will add to the total.
New Construction Plumbing Rough-In: Main Steps
New construction rough-in happens after framing is complete and before insulation or drywall goes up. That open-wall window is the only practical time to run pipes cleanly through studs, joists, and slab penetrations.
Understanding the full scope of a new build also means knowing what comes before the plumber even arrives, the structural decisions made at the framing stage, including the roof framing type, can affect how drain stacks are routed to the exterior. Here is how the rough-in process unfolds on a typical multi-bathroom new build.
- Confirm the whole-house rough-in plan has been reviewed and approved before framing closes. This walkthrough covers drain routing, fixture rough-ins, venting, water lines, and stack locations.
- The primary stack rises from the slab with a 45-degree offset, then runs through the floor joists. It serves the toilet, shower, and lavatory while maintaining proper drain pitch.
- A three-inch line connects to the toilet. A three-by-two wye sends two-inch piping to the shower P-trap and lavatory. The lavatory wet vents both fixtures.
- Upper-floor bathrooms tie into shared roof venting. Each includes a toilet, lavatory, and tile shower with valve rough-in and a handheld connection stub-out.
- Additional stacks serve secondary bathrooms, using three-inch toilet lines and two-inch branches for lavatories and tile showers, with P-traps insulated near unconditioned spaces like garages.
- The main workhorse stack handles the heaviest fixture load: laundry areas, a bar sink, and multiple bathrooms feeding into the same drain system.
- Laundry and utility rough-ins include a washing machine box, water heater stub-outs, and a floor drain or pan drain routed to the exterior.
- Upper-level plumbing often uses cast iron for the main stack to reduce noise transfer through floor assemblies. Island kitchen sinks and top-floor laundry add fixture complexity.
- Water supply uses PEX-A expansion pipe entering at 1.25 inches before splitting into two one-inch distribution systems, one for hot and one for cold.
Each step builds on the one before it. Skipping the walkthrough at Step 1 or rushing the drain pitch at Step 2 creates problems that do not show up until the tile is in and the walls are closed.
What Fixtures Are Planned During Rough-In?
Every fixture that needs water, drainage, or both gets its position set during rough-in. The list matters because a missed fixture location means opening walls later at full remodel cost.
Common fixture locations that must be staked out during rough-in include: toilets, bathroom sinks, kitchen sinks, showers, bathtubs, laundry sinks, washing machines, dishwashers, ice maker lines, water heaters, outdoor hose bibs, and floor drains.
Shower rough-in is one of the more precise placements on this list. The valve position, drain center, and curb height all have to align with whatever small bathroom shower design you have chosen, because changing any of those dimensions after tile is in means demolition.
The same logic applies to kitchen sinks: the drain stub-out position needs to match the cabinet layout, which is why the kitchen layout and design should be finalized before rough-in begins.
Appliance connections are the most commonly forgotten category. If you plan to add a refrigerator ice maker, a bar sink, or a wet bar, those stub-outs need to be in the wall before drywall closes. Adding them after costs multiples of what they would cost during rough-in.
Where Rough-In Plumbing Budgets Go Wrong
This is where most homeowners get surprised. The rough-in quote looks manageable until one of these hits.
Fixture Locations Are Changed After Rough-In Starts
Moving a toilet drain six inches because the vanity turned out to be wider than planned is not a small job. The drain is already set in concrete or through framing. Changes mid-rough-in cost $500 to $2,000 per fixture relocation, depending on how far along the work is.
Pipe Material Upgrades
PEX is the most common supply pipe in new construction and runs $0.50 to $2.00 per linear foot for materials. Copper runs two to four times that. If the original quote assumed PEX and the inspector or HOA requires copper in certain sections, that gap adds up fast on a whole-house rough-in.
Slab or Underground Work
When drain lines have to go under a concrete slab, excavation and concrete patching add $1,500 to $5,000 or more on top of standard rough-in costs. This comes up in slab-on-grade homes and basement bathroom additions more often than homeowners expect.
Inspection Corrections
Failing the rough-in inspection is not a disaster, but it does cost time and sometimes money. Common correction items are drain slope, vent sizing, and pipe support spacing. Budget a buffer of 5 to 10 percent of the rough-in total for corrections, especially in jurisdictions with stricter inspectors.
Finish Plumbing Treated as Included
Some homeowners sign a rough-in contract and assume the fixtures will be installed in the same visit. They are not. Finish plumbing is a separate mobilization. If your contract does not include it, expect an additional $1,500 to $6,000 depending on fixture count and quality. The same budget discipline applies to other home systems: house painting costs, for instance, are also routinely underestimated when interior and exterior work are scoped separately.
What is Negotiable vs. What Isn’t
Rough-in pricing has real and fake flexibility. Here is where you can push back and where you cannot.
Negotiable: Pipe material choice (PEX vs. CPVC for supply lines), fixture count (cutting a planned bar sink or second laundry location), timing flexibility if your schedule is not rigid, and bundling rough-in with finish plumbing in a single contract for a lower combined rate.
Not negotiable: Permit fees, inspection scheduling, required drain slope per code (a quarter-inch drop per foot of horizontal run), vent sizing requirements, and licensed plumber requirements for any work that will be inspected.
Asking a contractor to skip a permit to save money on rough-in plumbing is the single most expensive shortcut in residential construction. When you sell the home or file a claim, unpermitted plumbing becomes your problem.
How Long Does Rough-In Plumbing Take?
A small bathroom remodel takes one to two days of rough-in.
A full new construction project on a two-story home with three bathrooms, a kitchen, and a laundry room takes four to seven days, sometimes longer if inspections require return visits or if the framing crew and plumbing crew have scheduling gaps.
Delays are most common when fixture selections are not finalized before rough-in starts, when framing changes force pipe reroutes, or when the inspection is scheduled but the work is not ready.
All three of those delays are preventable with better planning before the plumber mobilizes.
Questions to Ask Your Contractor Before Rough-In Starts
These are the questions I recommend asking before you sign anything or before the first pipe goes in. The answers tell you whether you have a contractor who has done this before or one who is figuring it out on your project.
- Does this quote include finish plumbing, or is that a separate contract?
- What pipe material are you using for supply lines, and why?
- Are all fixture locations finalized before you start? What happens if they change?
- Will you pull the permit, and is that cost included in the quote?
- Who schedules the rough-in inspection, and what happens if it fails?
- Is underground or slab work in scope, and how is that priced?
- What is your process if framing changes force a pipe reroute?
A contractor who cannot answer these specifically is a contractor whose rough-in quote will have surprises attached to it.
Common Rough-In Plumbing Mistakes to Avoid
Most of the expensive rough-in mistakes are not plumbing errors. They are planning errors that the plumber had to work around.
- Choosing fixture locations too late, after rough-in has already started
- Not confirming cabinet or vanity dimensions before drain stub-out placement
- Setting toilet drains too close to walls (standard rough-in distance is 12 inches from the finished wall to the center of the drain)
- Skipping vent pipe requirements or assuming the inspector will not catch them
- Getting the drain slope wrong (water sits in improperly sloped pipes and causes chronic clog issues)
- Running pipes where future fasteners will hit them without installing nail plates
- Skipping pressure tests before drywall closes the walls
- Covering walls before inspection approval
The toilet distance issue is worth flagging specifically. A toilet set at 10 inches from the wall instead of 12 means the toilet physically cannot be installed correctly later. That drain has to move, and by that point, moving it involves cutting concrete or opening floors.
Why the Rough-In Inspection Matters
The rough-in inspection is the one point in the project where an independent set of eyes confirms the work is safe before it gets permanently hidden.
The inspector checks drain pitch, vent sizing, pipe supports, water line routing, and code compliance for your jurisdiction. In 37 states, that means International Plumbing Code (IPC) requirements. Other states, including California, Oregon, and Minnesota, have their own adopted codes.
Passing the inspection also protects you at resale. If unpermitted rough-in plumbing is discovered during a home sale inspection, it becomes a negotiating item or a deal-breaker. Permitted and inspected work is documentation that the plumbing was done to code at the time of construction.
| Pro Tip: Ask your plumber to pressure-test the water supply lines before calling for the rough-in inspection. A failed pressure test found during inspection means a second inspection visit. Finding it yourself before scheduling saves days on your timeline. |
Frequently Asked Questions About Rough-In Plumbing
How do table finishes affect room feel?
Glossy or reflective surfaces can make a room feel brighter and larger, while dark or matte finishes add warmth but may feel heavier. Consider lighting and wall color when choosing a finish to ensure your table complements the room’s overall look.
Can a rug impact table clearance?
Yes. Thick or high-pile rugs reduce chair clearance and make pulling out chairs harder. Measure the rug size and pile height to ensure at least 36 inches of space around the table, maintaining comfort and free movement.
How do table corners affect safety?
Sharp corners can cause bumps in tight spaces, especially with children. Rounded, beveled, or bullnose edges reduce impact risk while maintaining functional table dimensions in a smaller dining area.
Do room doors influence table placement?
Yes. Swinging doors can block chairs or limit clearance. Measure door arcs and ensure end chairs or walkways aren’t obstructed before selecting a table size, especially in compact dining areas.
How does table shape affect conversation?
Round tables promote eye contact and easier conversation for small groups. Rectangular tables separate diners at the ends, while oval tables balance seating and flow in narrow rooms. Choose a shape to improve interaction and comfort.
Can lighting height affect table fit?
Pendant or chandelier height should allow unobstructed view and movement. Low lighting can interfere with headspace above chairs, so ensure proper clearance between the table surface and light fixture.
Summing Up
Getting a handle on your home’s hidden infrastructure takes the stress out of your next big renovation or build.
Now that you understand how rough-in plumbing lays the structural framework for your water lines, drains, and vents, you can confidently navigate contractor quotes and timelines.
Recognizing the clear line between this open-wall skeleton phase and the final trim-out ensures you won’t face surprise expenses when it is time to install your actual fixtures. This foundational knowledge ultimately protects your budget, saves your sanity, and ensures your project passes inspections with flying colors.
What part of your upcoming plumbing project feels the most challenging? Drop a comment below to share your experiences or ask a question.


