A DIY pergola is one of the best ways to upgrade your backyard without building a full outdoor room. It gives your patio, garden, or deck a clear focal point while adding shade, comfort, and style. If you enjoy weekend projects, learning how to build a pergola can be a smart and rewarding choice.
The best part is that you do not need to be a professional builder to get started. With the right pergola plans, basic tools, strong materials, and careful measuring, you can build a structure that looks clean and lasts for years.
Here you will find planning, materials, tools, building steps, costs, mistakes, and maintenance, so you can start your project with more confidence.
Is Building a DIY Pergola Worth the Effort?
A DIY pergola is worth it if you want to save money and control the final look. When you build it yourself, you can choose the size, wood type, stain, height, width, and extra features that fit your yard.
You also avoid high labor costs, which makes this project a smart choice if you enjoy using tools and have some free time. Still, DIY is not right for every project. You may want to hire a professional if your pergola is large, attached to your home, or built on uneven ground.
A pro can help with permits, safety, measurements, and heavy lifting. Before you decide, be honest about your skill level, tools, and time. A simple freestanding pergola is usually the easiest option.
Planning Your Pergola Before You Build
Good planning makes your pergola project easier and safer. Before buying lumber, decide on the location, size, style, and layout that best fit your yard.
- Choose the location: Pick a useful spot, like apatio, deck, garden path, or dining area. Check the sunlight so the space gets enough shade.
- Decide the size: Common sizes are 10×10 or 12×12 feet. Measure your furniture and leave room to walk around.
- Check permits: Some pergolas need local permits, especially attached ones or structures near property lines. Call utilities before digging.
- Pick the style: A freestanding pergola works in open yards. An attached pergola connects to your home and needs extra care.
Once your plan is clear, the build feels smoother. A few smart choices now can help you avoid wasted materials, permit issues, and expensive fixes later.
How to Build a DIY Pergola Step by Step
Before you start building, understand the full process from layout to final checks. These steps follow the video and keep the project clear, safe, and organized.
Materials and Tools Needed
Before you start building, gather all the materials and tools you need in one place. This helps you avoid delays, incorrect purchases, and extra trips to the store.
| Item | What You Need | Quantity | Purpose |
|---|---|---|---|
| Lumber | 6×6 posts, beams, rafters, and cross slats | As per the plan | Builds the main pergola frame and roof pattern |
| Anchoring supplies | Concrete mix, gravel, post anchors, or metal post bases | As needed | Secures the pergola and keeps it stable |
| Fasteners and hardware | Outdoor screws, bolts, washers, brackets, and joist hangers | As needed | Connects posts, beams, and rafters strongly |
| Measuring tools | Tape measure, level, and speed square | 1 each | Helps with accurate layout, spacing, and straight cuts |
| Cutting and drilling tools | Circular saw and drill | 1 each | Cuts lumber and fastens pieces together |
| Digging tools | Post hole digger or auger | 1 | Digs holes for pergola posts |
| Holding and tightening tools | Clamps and socket wrench | 1 set | Holds boards in place and tightens bolts |
| Access and safety gear | Ladder, gloves, eye protection, and hearing protection | 1 set | Helps you work safely while cutting and installing |
With the right lumber, hardware, tools, and safety gear, your DIY pergola project becomes easier, safer, and more organized from start to finish.
Step 1: Plan the Size and Layout

Plan the size of your pergola before starting any work. In the video, the builder chose a 12×20 ft pergola to fit neatly within the patio slab.
He wanted the structure to remain within the paver area so it would look custom and balanced. Marking the layout first helps you avoid spacing mistakes before digging, cutting, or buying final materials.
Step 2: Remove Pavers and Mark Footings
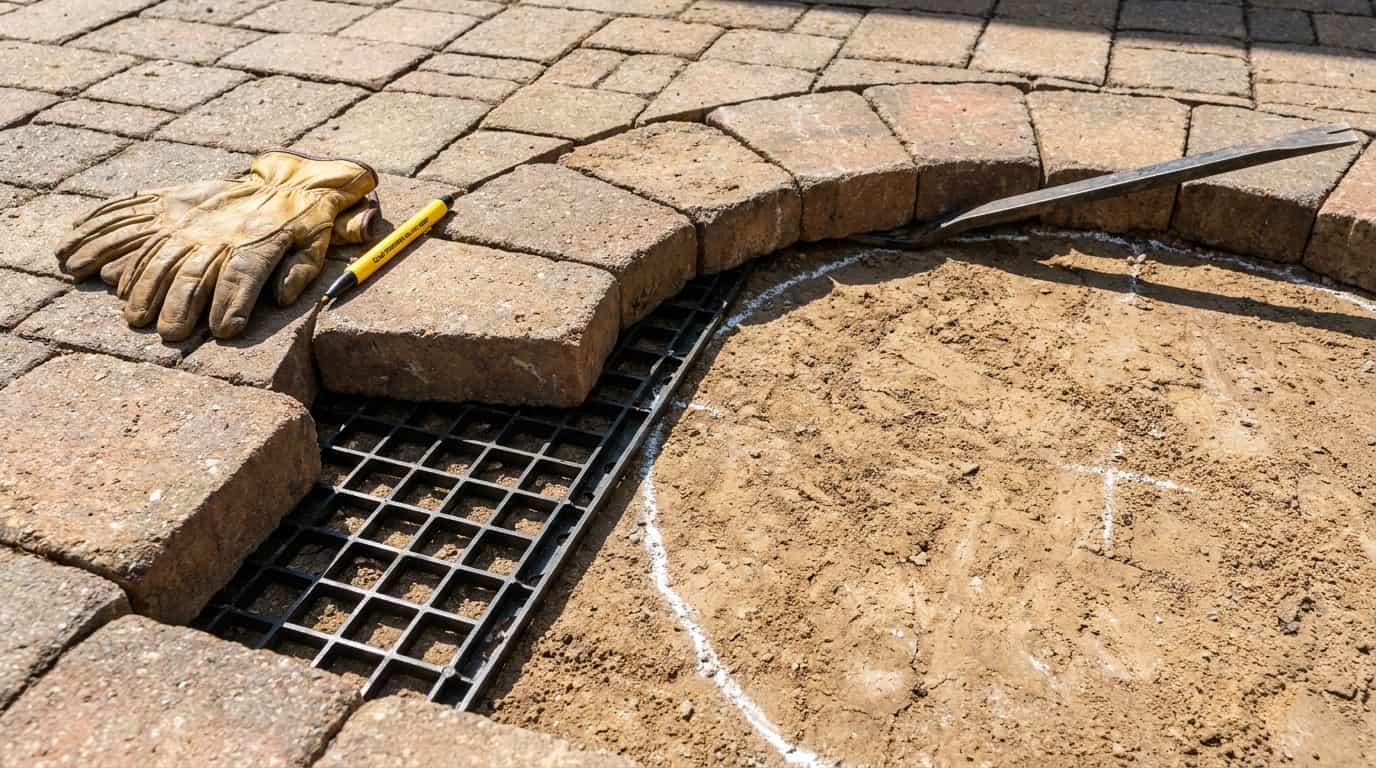
Remove only the pavers needed for the post footings. The builder traced around the concrete forms so he did not cut away too much of the paver grid.
This helped keep the patio clean and made it easier to place the surrounding pavers back later. Careful marking also keeps each footing in the right spot.
Step 3: Dig Footing Holes Below Frost Line

Dig each footing hole deep enough to pass the frost line. In the video, the builder first used an auger, then widened the holes by hand because the tubes were larger.
This step matters because shallow footings can shift during winter freeze-and-thaw cycles. Strong footings help keep the pergola stable for years.
Step 4: Add Gravel and Adjust Spacing

Add gravel at the bottom of each footing hole to improve drainage. The builder also had to adjust the post spacing because his boards were not long enough for the planned overhang.
This is a good reminder to check lumber lengths before concrete work. An early layout fix can prevent bigger problems later.
Step 5: Pour Concrete and Set Anchors

Pour concrete into the footing forms and set the metal post anchors while the mix is still wet. The builder used a string line to keep all anchors facing the same direction.
This helps the posts line up cleanly when installed. Take time here because crooked anchors can make the rest of the pergola harder to build.
Step 6: Cure Footings and Seal Lumber

Let the concrete cure overnight before installing the posts. While waiting, seal or stain the lumber before assembly.
The builder used a transparent wood sealer to protect the boards and avoid drips on the patio later. Pre-sealing also makes it easier to coat edges and surfaces before the lumber is raised overhead.
Step 7: Cut and Install Posts

Choose your final pergola height before setting the posts. The builder started with 12-ft posts but cut them down to 10 ft because they looked better with the house.
Each post was placed into its anchor, checked with a level, and secured. Level anchors make this step much easier and help the frame stay straight.
Step 8: Install Main Beams

Cut decorative ends from the main beams for a cleaner custom look. The builder used large 2×10 beams and secured them with strong 5-inch lag bolts.
These beams form the main support layer of the pergola. Make sure they are straight, level, and tightly fastened before adding the upper rafters.
Step 9: Add Cross Rafters and Top Layer

Install the 2×6 cross rafters across the main beams, spacing them evenly. In the video, the spacing was around 9–10 inches apart for shade and style. Then add the final 2×4 top layer.
Leave small gaps where boards meet so the wood can expand and contract without buckling later.
Step 10: Add Braces and Final Check

Add decorative braces between the posts and beams using long lag bolts. These braces add detail and can help reduce side-to-side movement.
Once they are installed, tighten all hardware, check alignment, and inspect the full pergola. In the video, the total project cost came to around $1,500, including lumber, concrete, hardware, and stain.
Once the pergola is built, review every connection, post, and board. A careful final check helps your structure stay strong, clean, and ready to use.
DIY Pergola Cost Breakdown
Building a DIY pergola can fit many budgets, from simple backyard projects to large custom outdoor spaces. Understanding the main costs helps you plan smarter before buying materials.
| Pergola Cost Type | Estimated Cost | Best For | Main Cost Drivers |
|---|---|---|---|
| Basic DIY Pergola | $800–$1,500 | Small pergolas and simple designs | Pressure-treated lumber, basic hardware, no add-ons |
| Mid-Range DIY Pergola | $1,500–$3,000 | 10×10 or 12×12 pergolas | Better wood, stronger hardware, stain or sealer |
| Large DIY Pergola | $3,000–$5,000 | Bigger backyard pergolas | Longer beams, more rafters, extra supports |
| Professional Pergola Build | $3,000–$8,000+ | Large, attached, or complex builds | Labor, permits, design work, structural needs |
| Extra Add-Ons | $100–$1,000+ | Comfort and style upgrades | Lights, curtains, privacy screens, shade covers, plants |
Your final pergola cost depends on the size, wood type, hardware, and extra features you choose. A clear budget plan helps avoid overspending and unexpected project delays later
Pergola Design Ideas for Your Backyard
After the structure is built, design details can make your pergola feel like a real outdoor living space. Keep the style simple and useful.
1. Pergola With String Lights

String lights are one of the easiest ways to upgrade a pergola and instantly change its mood. When placed along beams, rafters, or wrapped around posts, they create a soft, warm glow that works well for evenings.
Choose outdoor-rated, weatherproof lights so they last longer in rain and heat. Secure the wiring neatly to avoid sagging or safety issues. This setup is perfect for dinners, casual seating, or relaxing nights outside.
2. Pergola With Climbing Plants
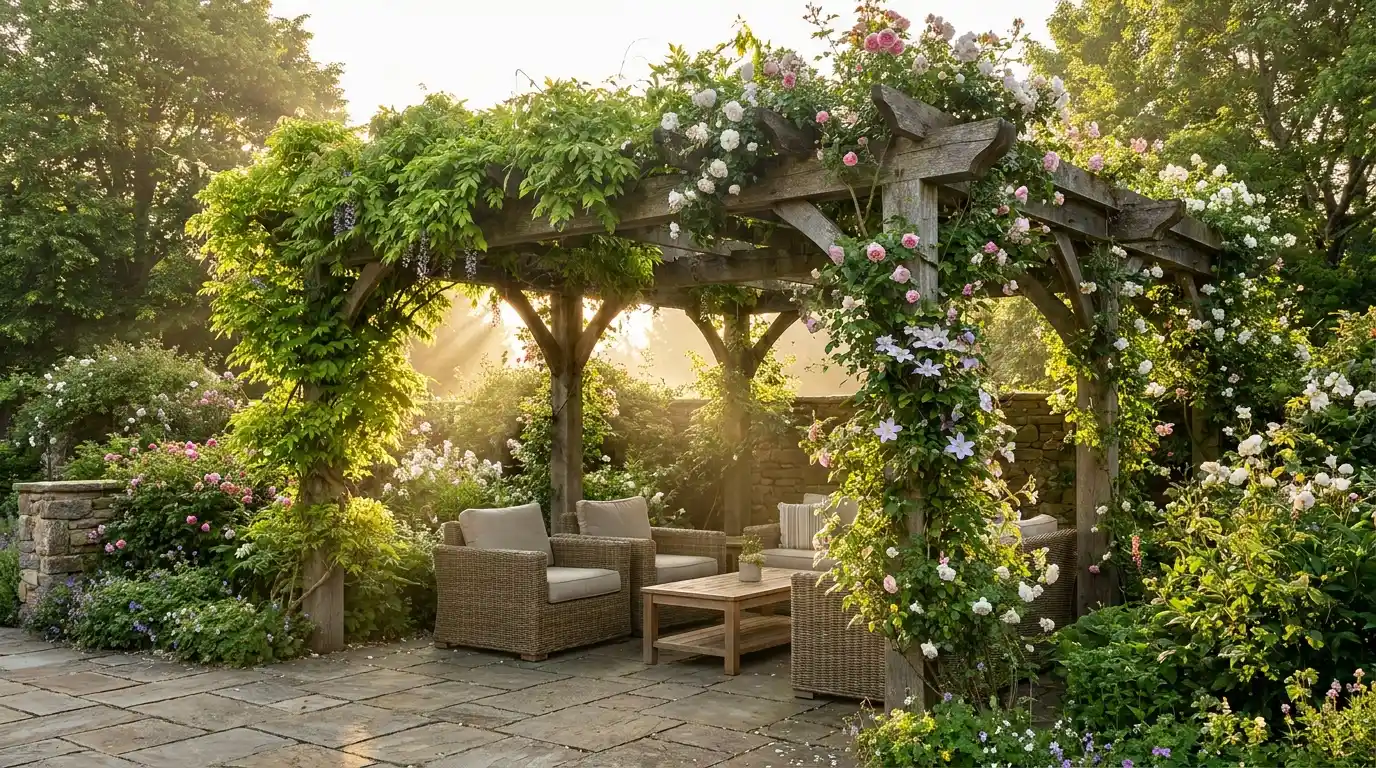
Climbing plants bring a natural, living feel to your pergola while also improving shade over time. Popular choices include wisteria, jasmine, roses, and grapevines because they grow well and look attractive.
However, it’s important to match plants with your local climate and ensure they don’t become too heavy for the structure. Regular pruning is needed to control growth and prevent damage. Over time, they can turn your pergola into a green, shaded retreat.
3. Pergola With Curtains
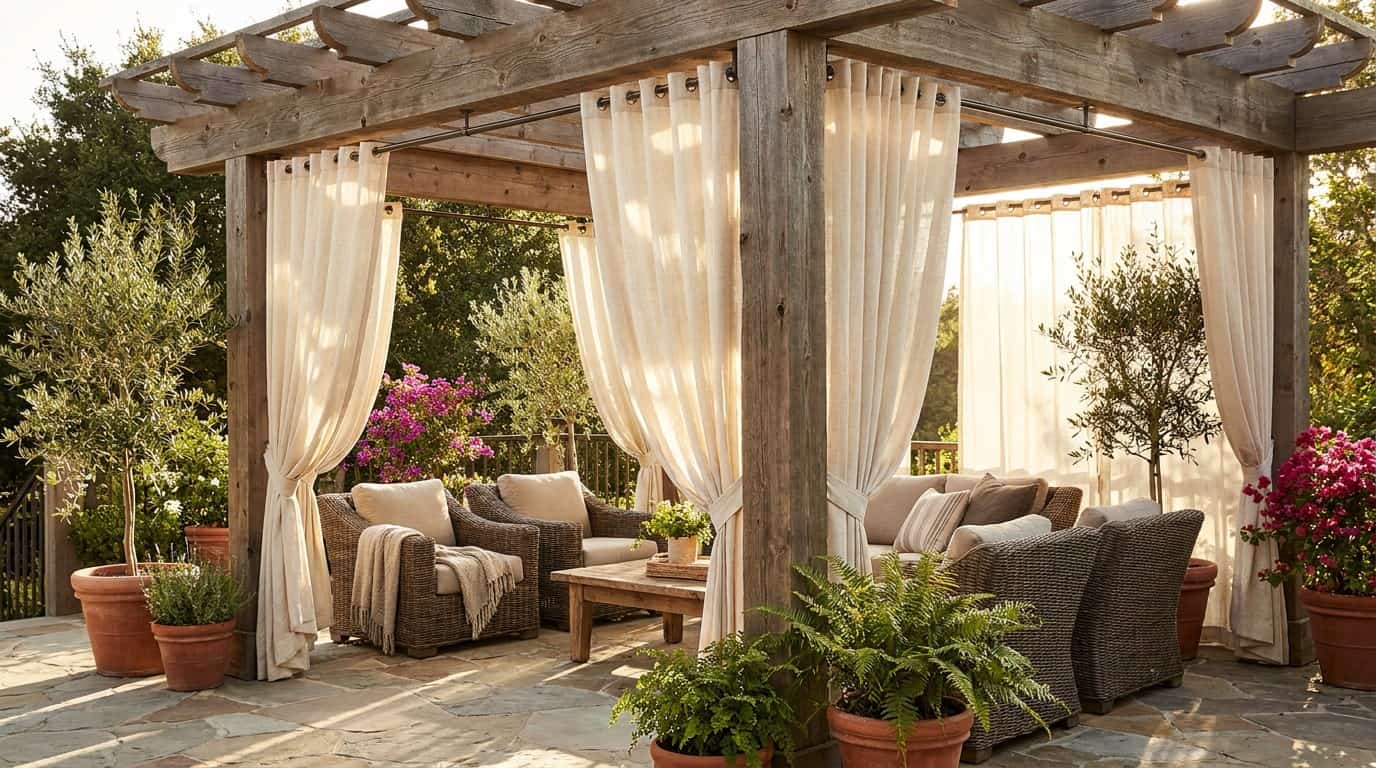
Outdoor curtains add both style and function by making your pergola feel more private and comfortable. They help block harsh sunlight, reduce wind, and create a cozy, enclosed space when needed.
Always use weather-resistant fabric that can handle outdoor conditions without fading or tearing. Strong rods or cables are necessary to support movement. This setup works especially well for patios, seating corners, or hot tub areas where privacy and shade are important.
4. Modern Minimal Pergola

A modern minimalist pergola focuses on clean structure, simple lines, and uncluttered design. Instead of heavy decoration, it relies on shape, proportion, and material finish.
Dark wood stains or neutral paint tones often work best for this style. Furniture and lighting should stay simple and functional to maintain a balanced look. This design fits well with contemporary homes and creates a calm, organized outdoor space without feeling overly decorated or busy.
How to Maintain Your DIY Pergola
A DIY pergola needs simple care to stay strong, clean, and good-looking. Regular cleaning and quick checks can help prevent damage over time.
- Clean it regularly: Wash the pergola once or twice a year with mild soap, water, and a soft brush.
- Remove debris: Clear leaves, dirt, vines, and buildup from the top so moisture does not sit on the wood.
- Check for damage: Inspect posts, beams, bolts, and rafters for cracks, rot, rust, or loose fasteners.
- Tighten hardware: Tighten loose bolts, screws, and brackets as needed to keep the structure stable.
- Reseal the wood: Apply stain or sealer when the wood looks dry, faded, or weather-worn.
- Trim plants: Cut back climbing plants before they get too heavy or start pulling on the pergola.
- Control water exposure: Keep sprinklers from spraying the posts every day to reduce moisture damage.
A little maintenance helps your DIY pergola last longer and look better. If you care for it annually, you can avoid more extensive repairs later.
Common Pergola Building Mistakes to Avoid
Small mistakes can make yourDIY pergola weaker, uneven, or harder to maintain. Knowing what to avoid helps you build safer and cleaner from the start.
- Skipping permit checks: Always check local permits, property lines, and utility locations before digging. Skipping this can lead to fines, delays, or forced changes later.
- Using weak posts: Thin posts may wobble under weight or wind. For most backyard pergolas,6×6 posts are stronger than 4×4 posts.
- Poor post depth: Shallow posts can shift after rain, frost, or strong winds. Follow local depth rules to create a stable base.
- Uneven rafter spacing: Mark rafter positions before installing them. Even spacing gives your pergola a cleaner roof pattern and better finished look.
Avoiding these common mistakes keeps your pergola stronger, safer, and better looking. A little prep before building can save time, money, and repairs later.
Frequently Asked Questions
Can you build a pergola on grass?
Yes, you can build a pergola on grass, but the posts still need strong footings. Do not place posts directly on soil. Use concrete footings or approved anchors to keep the structure level, stable, and protected from ground moisture.
What direction should pergola rafters face?
Pergola rafters should usually run in the direction that gives the shade you want most. If you need afternoon shade, first study how the sun moves across your yard. The right rafter direction can make the space more comfortable.
Can a pergola handle strong winds?
A pergola can withstand wind if it is well anchored, built with strong posts, and secured with proper hardware. Open roofs allow some wind to pass through, but weak footings or loose connections can make the structure unsafe during storms.
Can you add a roof to a pergola later?
Yes, you can add a roof later, but the pergola must be strong enough to carry the extra weight. Solid panels, shade covers, or clear roofing may need stronger framing. Always check the structure before adding anything heavy.
How long does a wooden pergola last?
A wooden pergola can last many years if it is built with outdoor-rated lumber and maintained well. Regular cleaning, sealing, and hardware checks help extend its life. Weather, moisture, insects, and sun exposure all affect how long it lasts.
Final Thoughts
A pergola can turn a plain outdoor spot into a space you actually want to use. I like that you can plan it around your yard, budget, and skill level instead of forcing a design that does not fit.
You now know how to choose the right plan, gather materials, lay a strong foundation, build the frame, avoid common mistakes, estimate costs, and maintain it over time. These steps matter because a DIY pergola should not only look good, but also stay safe and useful for years.
When you take your time and follow each part carefully, the whole project feels easier. Try these tips in your own build, and check out more related blogs for extra ideas.