


The first time I cleaned our kitchen cabinet doors with a Magic Eraser, I thought I was being efficient. I came away with a dull, flat patch right in the center of the door that looked nothing like the surrounding finish.
That patch is still there. Knowing how to clean painted cabinets the right way starts with understanding what painted surfaces can and can’t handle, because most of the damage people cause happens before the grease is even gone.
This is a low-difficulty task, but it’s easy to do wrong. Here’s what the whole job involves before you start:
| Difficulty | 1 out of 5 — patience matters more than skill |
| Time | 10 minutes for a quick wipe-down; 30–45 minutes for a full deep clean |
| Cost | $5–$20 for supplies most people already have at home |
| Tools Needed | Microfiber cloths, mild dish soap, warm water, white vinegar (optional), soft detail brush |
| Skill Required | Beginner — no experience needed beyond knowing how to wring out a cloth properly |
The steps below follow one rule: start with the gentlest method, check whether it worked, and only move to something stronger if it didn’t. That order protects the finish every single time.
What Goes Wrong Before You Even Start
Most finish damage on painted kitchen cabinets happens in the first 60 seconds of cleaning. These are the three failure points worth knowing before you pick up anything.
Using the wrong tool. Magic Erasers are a very fine abrasive. On matte or eggshell painted finishes they dull the sheen and can strip thin layers of paint with almost no pressure. Rough sponges and regular dishcloths can leave visible scratch patterns on softer finishes. Microfiber cloths only — this is non-negotiable.
Leaving the surface wet. Painted wood doesn’t respond well to moisture sitting on it for even a few minutes. The wood underneath can swell, the paint can soften at the edges, and corners begin to peel. Every single cleaning step in this guide ends with a dry cloth. That step is not optional.
Jumping straight to strong cleaners. Bleach, ammonia-based sprays, and oven cleaners can strip or discolor a painted finish in one use. The instinct when you see heavy grease is to reach for something powerful — but dish soap and warm water will handle most of it. Degreaser only comes in when that fails.
How to Clean Painted Kitchen Cabinets: Step-by-Step
Different problems need different levels of cleaning. Work through these in order and stop as soon as the problem is resolved. Escalating to something stronger than you need is how most finish damage happens.
1. Everyday Marks and Fingerprints
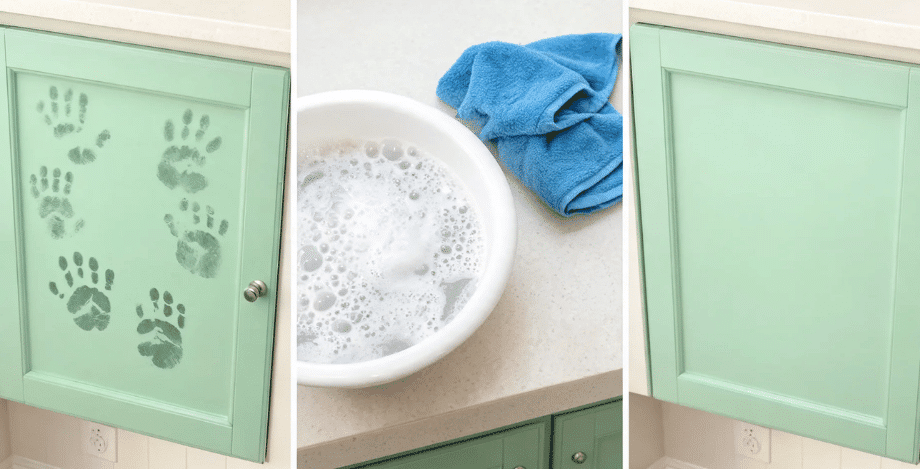
Fresh fingerprints and light marks on painted cabinet doors come off with the lightest method first.
Step 1: Dampen a microfiber cloth with warm water. Wring it well — damp, not dripping.
Step 2: Wipe the marked area in small, even strokes without pressing hard or scrubbing in the same spot repeatedly.
Step 3: If the mark stays, mix a few drops of mild dish soap into warm water until it lightly suds.
Step 4: Wipe again with the soapy cloth, then remove any soap residue with a second cloth dampened with clean water only.
Step 5: Dry the painted surface immediately with a dry cloth. Do not let any moisture sit.
| Pro Tip: Avoid scrubbing back and forth in the same spot. Short strokes in one direction reduce friction on the painted finish and protect the sheen over time. |
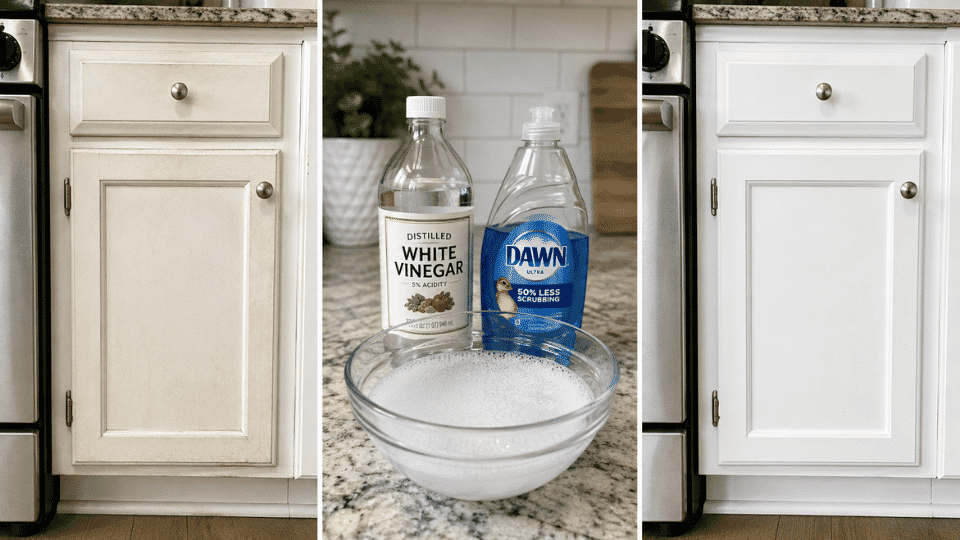
2. Grease Buildup on Painted Cabinet Doors
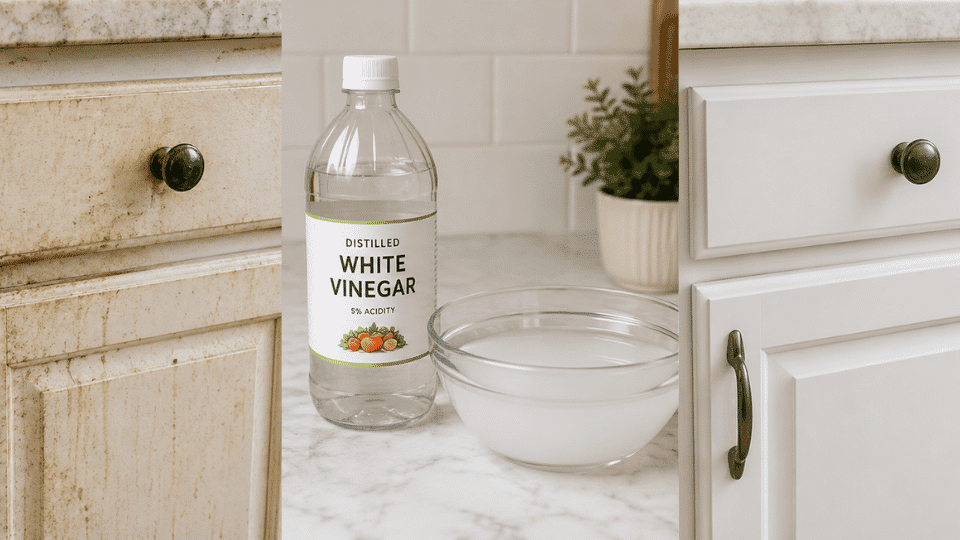
Grease needs something that cuts residue without being harsh on the paint. Dish soap handles most of it — reach for vinegar only if soap doesn’t work after one attempt.
Step 1: Mix a few drops of mild dish soap into warm water until it lightly suds.
Step 2: Wipe the greasy cabinet area gently with a damp microfiber cloth. Pay attention to the area around handles and directly below hinges, where buildup concentrates first.
Step 3: Rinse with a second cloth dampened with clean water only — this removes soap residue that can dull the finish if left behind.
Step 4: Dry the surface immediately with a soft dry cloth.
Step 5: For sticky grease that didn’t respond, try a 50/50 mix of warm water and white vinegar. Apply, wipe, rinse, and dry right away.
| Pro Tip: Test vinegar on a hidden area first — inside the door frame or behind a lower cabinet — and wait 5 minutes before applying it more broadly. Some painted finishes react to the acidity. |
3. Yellowing on White or Light-Painted Cabinets
Yellowing on painted cabinets is two different problems that need an honest look before you start scrubbing. Surface yellowing from grease film and cooking residue is cleanable. Paint that has chemically yellowed from age, heat, smoke, or sunlight is not fixable through cleaning — no product will reverse it. Before you start, run a fingertip across the surface. If it picks up a slight waxy or oily film, cleaning will help. If the surface is smooth but still yellow, that’s the paint itself.
Step 1: Wash the yellowed area with warm water and mild dish soap on a damp microfiber cloth.
Step 2: Wipe in small sections. Keep the cloth damp, not soaking wet.
Step 3: Rinse with a clean, damp cloth to remove soap and any loosened residue.
Step 4: Dry immediately before moisture settles into the edges or seams of the cabinet door.
Step 5: If the yellow is still visible after drying, try diluted white vinegar on the same area. Rinse and dry right away.
| Note: If the paint has yellowed from age, prolonged heat near the stove, or smoke, cleaning will not restore it. Touch-up paint or a full cabinet repaint is the honest next step. If you’re weighing whether it’s worth the cost, see our breakdown of the cost to paint kitchen cabinets before deciding. |
4. Stubborn Buildup That Needs a Cabinet Degreaser
If the painted surface near the stove is tacky, visibly darkened, or has a thick film that doesn’t respond to soap or vinegar, you’re dealing with baked-on grease. This is the last escalation before repainting, and the product and dilution both matter.
Original Krud Kutter, diluted at roughly one part product to three parts water, is the one I’d use here. Apply it to the cloth first — never directly to the cabinet. Work in small sections, follow with a rinse cloth, and dry immediately. Never let any degreaser sit on a painted surface without wiping it off quickly.
| Pro Tip: Always test a diluted degreaser on a hidden spot — the inside face of a lower cabinet door works well — and give it 5 minutes before applying to a visible area. Even gentle degreasers can dull certain painted finishes. |
The Faster Way to Clean Painted Cabinets After the First Time
Here’s what I figured out after doing this a second time: most of the hard cleaning only needs to happen once. What actually keeps painted kitchen cabinets clean long-term is wiping them down quickly — about 30 seconds with a lightly dampened microfiber cloth — twice a week around handles and below the stove hood. Grease that’s been sitting for three days comes off easily with water and soap. Grease that’s been baking on near the stove for three months is the cleaning problem that sends people looking for degreasers and wondering whether the cabinets need repainting.
A dedicated microfiber cloth kept near the stove, used specifically for cabinet wipe-downs, makes this automatic. You don’t need soap every time — warm water on the cloth and a quick pass over the high-touch areas is enough between deeper cleans. The full dish-soap routine becomes a monthly task instead of a weekly emergency.
Products Worth Using (and What to Skip)
The best cleaner for painted kitchen cabinets is almost always the simplest one you have available. Moving to something stronger only makes sense when the gentler option has genuinely failed — not just because the grease looks bad.
What I’d Use
- Dawn Dish Soap — A few drops in warm water handles most everyday grease and fingerprints on painted cabinet surfaces. This is the first tool, not a last resort.
- Original Krud Kutter — Useful for heavy, baked-on grease near the stove. Always dilute it well (1:3 with water) and test on a hidden spot before using it broadly on painted cabinetry.
- Distilled White Vinegar — Mixed 50/50 with warm water, a good step up from dish soap for greasy film on painted wood cabinets. Rinse and dry immediately after every use.
- E-Cloth or Scotch-Brite Microfiber Cloths — The only cloths worth using on painted cabinetry. Rough sponges and regular dishcloths leave micro-scratches that accumulate over time and dull the finish.
- OXO Soft Detail Brush — Useful for cleaning around hardware, hinges, and trim grooves where a cloth won’t fit without applying awkward pressure.
What I’d Skip
Some of these look like reasonable cleaning choices. On a painted wood surface, they cause more damage than the grease they were meant to remove.
- Magic Eraser: A very fine abrasive. Dulls or visibly strips painted finishes, especially on matte and eggshell cabinet paint. I found this out the hard way — that dull patch is still there.
- Steel wool or abrasive scrub pads: Will scratch and roughen the painted surface permanently.
- Bleach or ammonia-based sprays: Too harsh for most painted finishes — risk of discoloration and chemical damage to the paint layer.
- Oven cleaner or powdered abrasive cleaners: Made for completely different surfaces. These will damage cabinet paint quickly and visibly.
- Oil polish or wax: Leaves a film that attracts dust and creates a maintenance cycle that makes the cabinetry harder to clean over time, not easier.
Keeping Painted Cabinets Clean: Do’s and Don’ts
These habits are worth more than any deep clean you’ll do twice a year. Grease wiped off within 24 hours takes 30 seconds. Grease baking near the stove for six months is the cleaning problem that tests every method in this guide.
| Do | Don’t |
|---|---|
| Wipe spills the same day they happen | Let water sit on the cabinet doors |
| Use a soft microfiber cloth | Use rough scrub pads or a Magic Eraser |
| Wipe around handles twice a week | Wait until the grease turns tacky and dark |
| Dry cabinet surfaces after every cleaning | Leave soap or vinegar residue on the surface |
| Test any new cleaner on a hidden area first | Apply a strong product directly to a visible area |
| Keep steam and heat away from cabinet doors | Position appliances so heat blows onto the cabinetry |
| Do quick, frequent wipe-downs | Skip regular maintenance until buildup forces a deep clean |
The entry that matters most is wiping the area around handles and directly below the stove hood twice a week. That single habit catches grease before it has time to bond to the paint. Everything else on the list is supporting maintenance.
Frequently Asked Questions
These are the questions that come up most once people have already tried dish soap and are wondering what to do next.
What is the best way to clean painted kitchen cabinets?
Warm water and a few drops of mild dish soap on a microfiber cloth, applied gently, rinsed with a second damp cloth, and dried immediately. This handles most everyday cleaning on painted kitchen cabinets without any risk to the finish. Move to vinegar or a diluted degreaser only if that doesn’t work.
What to clean painted cabinets with to avoid damaging the paint?
Microfiber cloths, mild dish soap, warm water, and diluted white vinegar are the safest options in that order. Avoid Magic Erasers, abrasive pads, bleach, ammonia-based cleaners, and anything oil-based. The cloth type matters as much as the product you use.
How do I clean painted kitchen cabinets with grease buildup?
Start with dish soap and warm water. If that doesn’t remove the grease, try a 50/50 vinegar and water solution, rinse, and dry right away. For heavy, baked-on buildup near the stove, use Original Krud Kutter diluted 1:3 with water — always test on a hidden area first.
How do I clean white painted cabinets that have yellowed?
Wash with dish soap and warm water first. If the yellowing improves, it was surface grease or residue. If it doesn’t change after cleaning and drying, the paint has chemically yellowed from age, heat, or smoke. No cleaner reverses that — touch-up paint or a full repaint is the realistic fix.
What to use to clean painted kitchen cabinets without stripping the finish?
Dish soap, warm water, and a microfiber cloth. Keep the cloth damp rather than wet, use light pressure, and dry immediately after cleaning. Avoid bleach, Magic Erasers, and concentrated degreasers on any painted wood cabinet surface.
How do you clean painted wood cabinets near the stove?
Wipe them down with a damp cloth after every few cooking sessions — that’s the actual answer. For existing buildup, use diluted white vinegar or a diluted degreaser, test first, and dry immediately. Preventing grease from baking on causes far less finish damage than cleaning it after the fact.
How do you remove sticky residue from painted cabinets?
Start with warm water and dish soap. If stickiness persists after cleaning and drying, try diluted vinegar. Note that newly painted cabinets can feel tacky for up to 30 days while the paint finishes curing — that stickiness is normal and will resolve on its own without cleaning.
How often should you clean painted kitchen cabinets?
A quick wipe-down around handles and near the stove twice a week with a barely-damp cloth. A full soap-and-water clean once a month. Cleaning with soap more frequently than that accelerates finish wear. Frequent light wipe-downs are a better habit than infrequent heavy cleans.
Final Verdict
If I were starting this again, the Magic Eraser wouldn’t come anywhere near our cabinet doors.
Dish soap and warm water on a microfiber cloth solves most of what you’ll actually encounter when learning how to clean painted cabinets. Grease that doesn’t respond to that gets a 50/50 vinegar solution, rinsed and dried right away. Heavy, baked-on buildup near the stove and only that gets a diluted degreaser, tested on a hidden spot first.
If you’re dealing with yellowing that doesn’t lift after cleaning, the paint has aged past what any cloth can fix; at that point, understanding what painting cabinets actually involves is a more useful next step than buying another cleaning product.
Start gentle, dry everything immediately, and stop before you reach for something that can’t be undone.


