

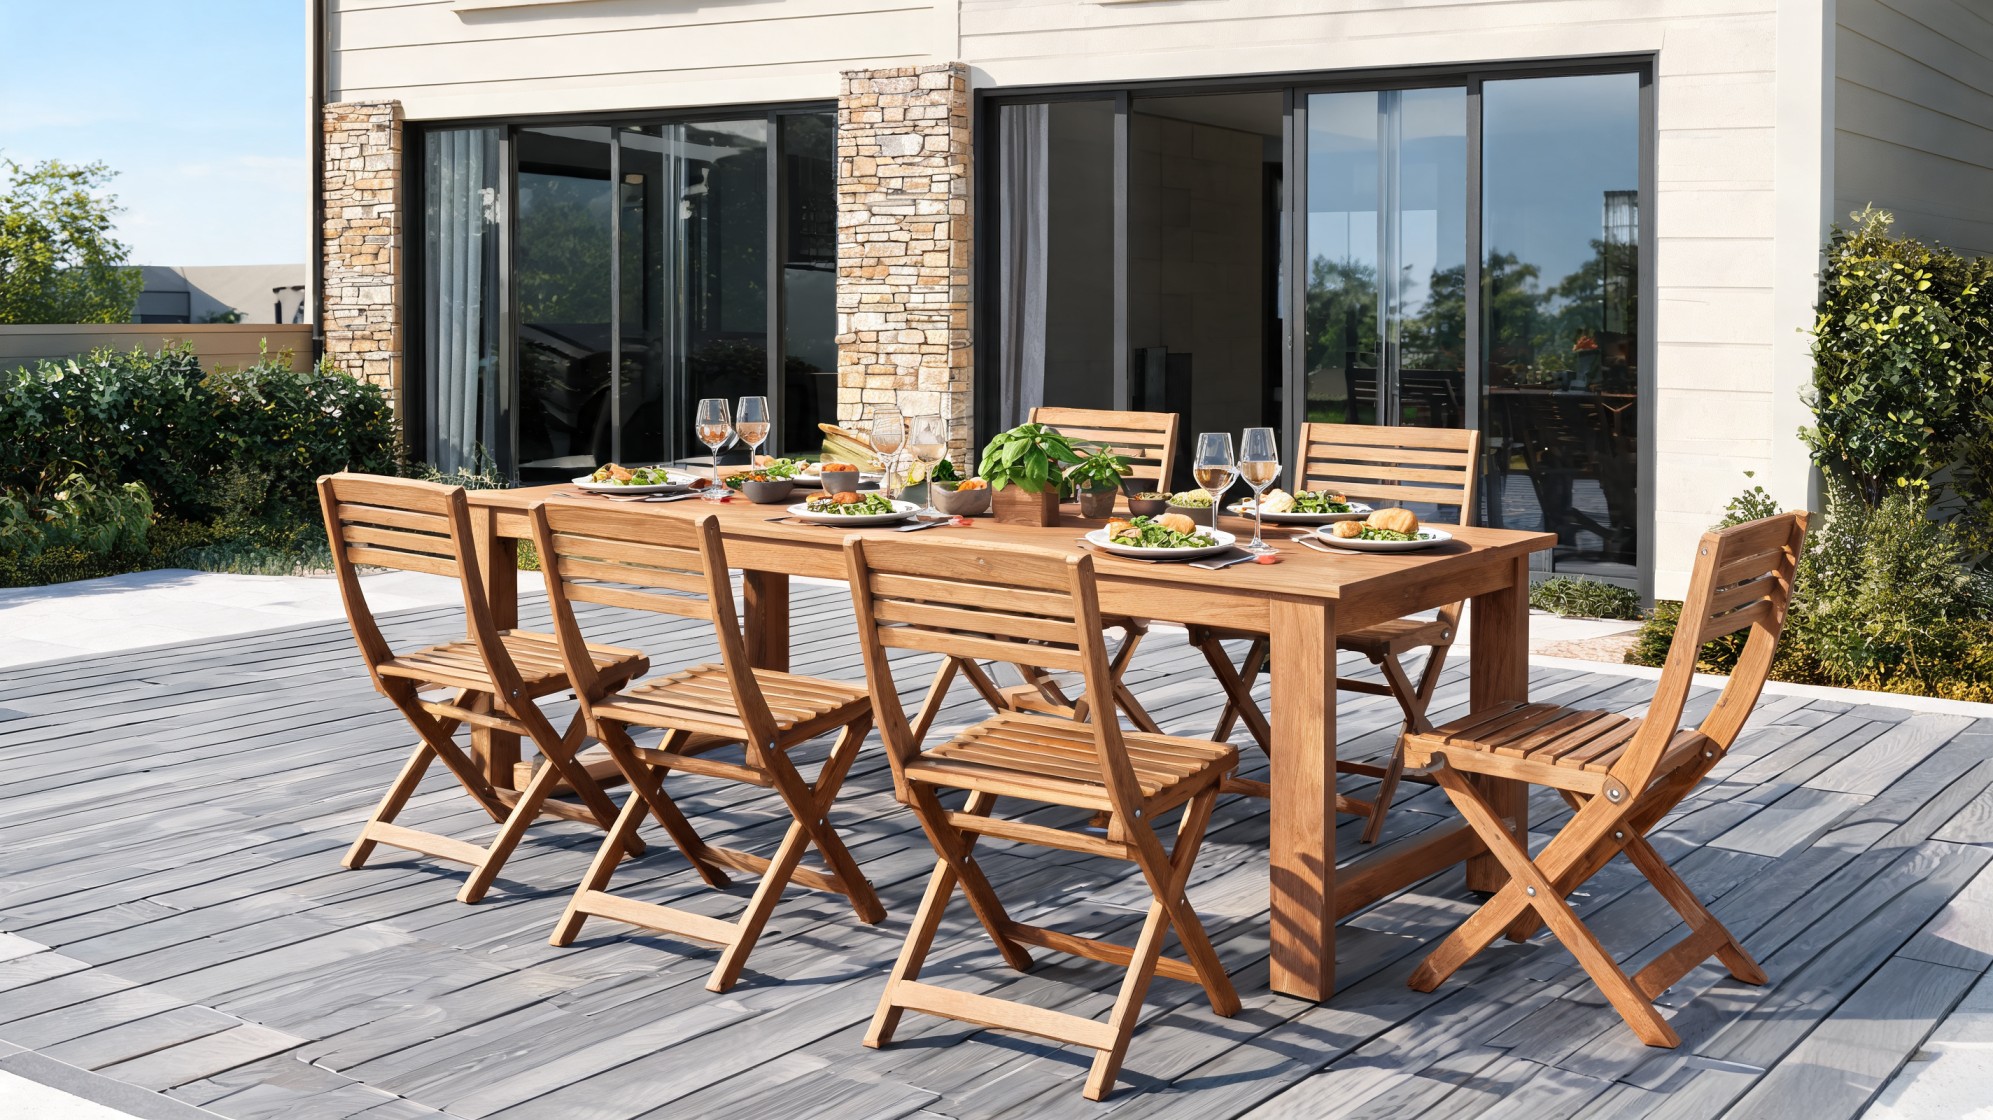


DIY outdoor furniture is a beginner-friendly project that costs $150–$300 in materials, takes one to two weekends, and gets harder to justify skipping once you’ve seen what patio chairs cost at a furniture store.
I’ve built this chair-and-table set twice, once badly, and once much better, and everything I learned the second time is in this guide. The build uses 2x4s, basic screws, and a drill. No router, no biscuit joiner, no specialist tools.
| Difficulty | 2/5, straight cuts, basic joinery, no angles required for this build |
| Time | 1–2 weekends (build day 1, finish day 2) |
| Cost | $150–$300, depending on wood species and whether you add cushions |
| Tools Needed | Circular saw, or miter saw, drill, square, tape measure, clamps, sandpaper |
| Skill Required | Beginner, if you can measure and drive a screw straight, you can finish this |
Before cutting a single board, measure your cushions. That one step prevents the most common mistake in this build — a seat that’s too narrow or too deep for the cushion you buy later.
Where Most DIY Outdoor Furniture Builds Go Wrong First
The failure point isn’t the joinery. It’s the cushion problem. People cut the seat boards, assemble the frame, and only then discover that the 20 x 20-inch seat cushion they ordered online doesn’t fit a seat that ended up 18 inches wide.
You’re either sanding everything apart or buying different cushions. Measure the cushion before you cut anything, and use that measurement to set your seat board length and chair width. Everything else in this build flows from that number.
The second thing that goes wrong is the use of indoor screws. Outdoor furniture needs exterior-rated, coated deck screws — the kind that won’t rust out and stain the wood after the first wet season. The price difference is minimal. The performance difference over two years is not.
Best Wood for DIY Outdoor Furniture
The choice of wood matters more than most first-timers expect, not just for durability but also for how easily it takes screws and how it behaves when it gets wet and dries out repeatedly over the summer.
Cedar, redwood, pressure-treated lumber, and pine all behave differently outdoors; the types of wood for furniture cover how each species holds up over time, which is worth reading before you buy anything.
- Cedar: My first choice for this project. It’s naturally rot-resistant, takes screws cleanly without splitting badly, and smells great while you’re cutting it. Expect to pay $1.50–$2.50 per linear foot for 2x4s at most lumber yards. It’s worth it.
- Redwood: Better looking and longer-lasting than cedar in wet climates, but harder to find and more expensive, often $3–$5 per linear foot. Worth it for a long-term piece you plan to keep for a decade.
- Pressure-treated lumber: The cheapest option and easy to find at any home improvement store. Sand it well and seal it before use, the surface is rough and the chemicals used in treatment mean you want a barrier coat before anyone sits on it regularly.
- Pine: Works fine if you seal every surface, including the cut ends. Unsealed pine will absorb water at the end grain and swell, which eventually splits the joints. If you’re building for a covered patio and you’re on a tight budget, pine is acceptable. If the furniture is left outside year-round without cover, skip it.
Other DIY Outdoor Furniture Projects to Build Next
Once you’ve finished this chair-and-table set, you have the core skills for almost everything else on this list. The tools are the same. The decision-making, measuring before cutting, piloting before screwing, and sealing every surface is identical. These aren’t full tutorials; they’re the next things worth planning.
1. Outdoor Bench
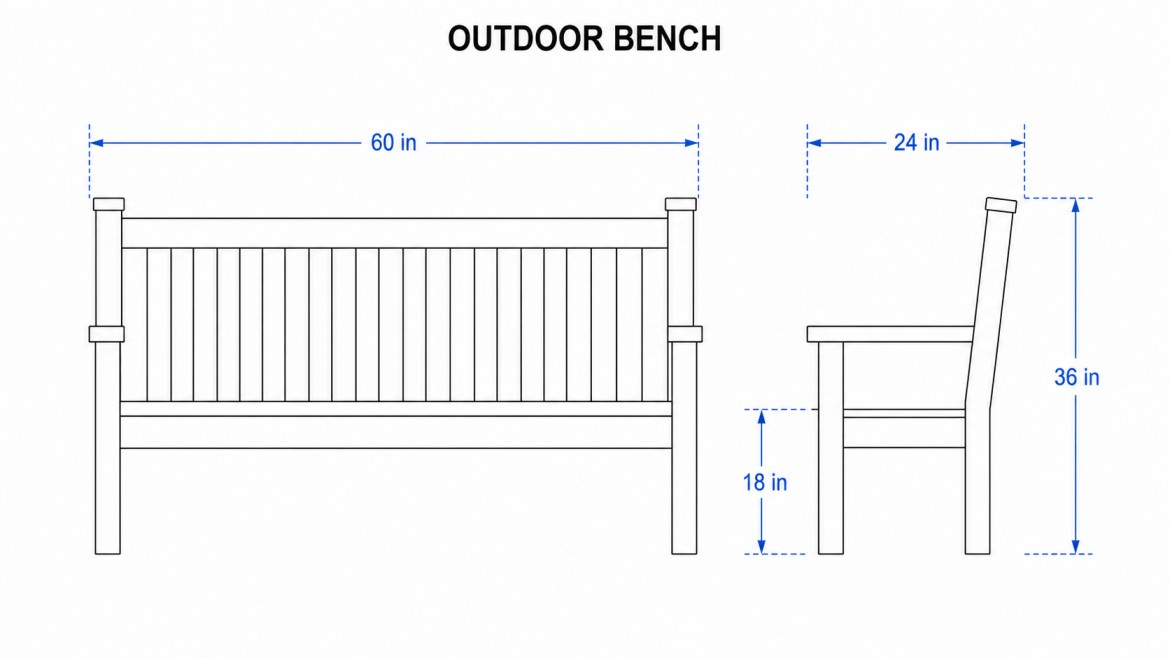
A bench is the easiest next project after this build. The frame logic is the same, two side assemblies connected by cross supports, with no armrests to fit. Plan around the bench length first, then set leg angle and seat height.
A slight backward lean on the backrest, if you add one, makes a bench feel like a place people actually want to sit rather than a surface for setting down bags.
2. Patio Coffee Table
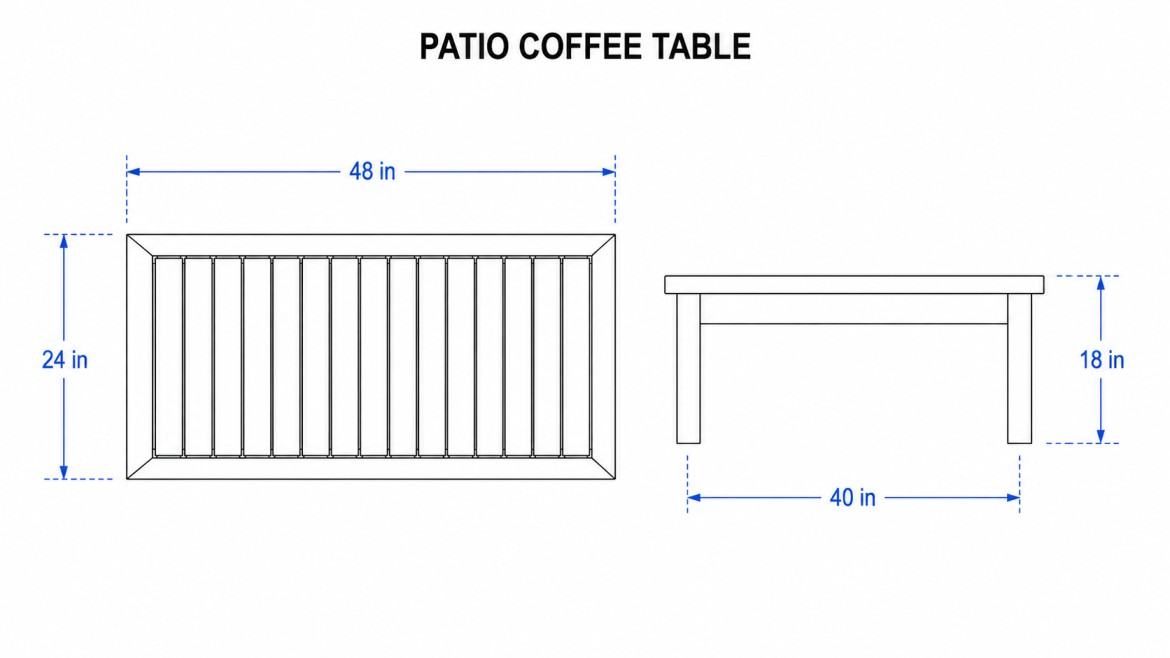
A coffee table is the most useful addition after the chair set; it pulls the seating area together and gives you somewhere to put drinks without having to hunt for a flat surface. Build it from leftover 2x4s or 2x6s if you have them.
Keep the design simple: four legs, a rectangular frame, and a slatted top. Plan the height around the chair armrests; a table that sits 2–3 inches below the armrest height is the most comfortable.
3. Outdoor Sofa
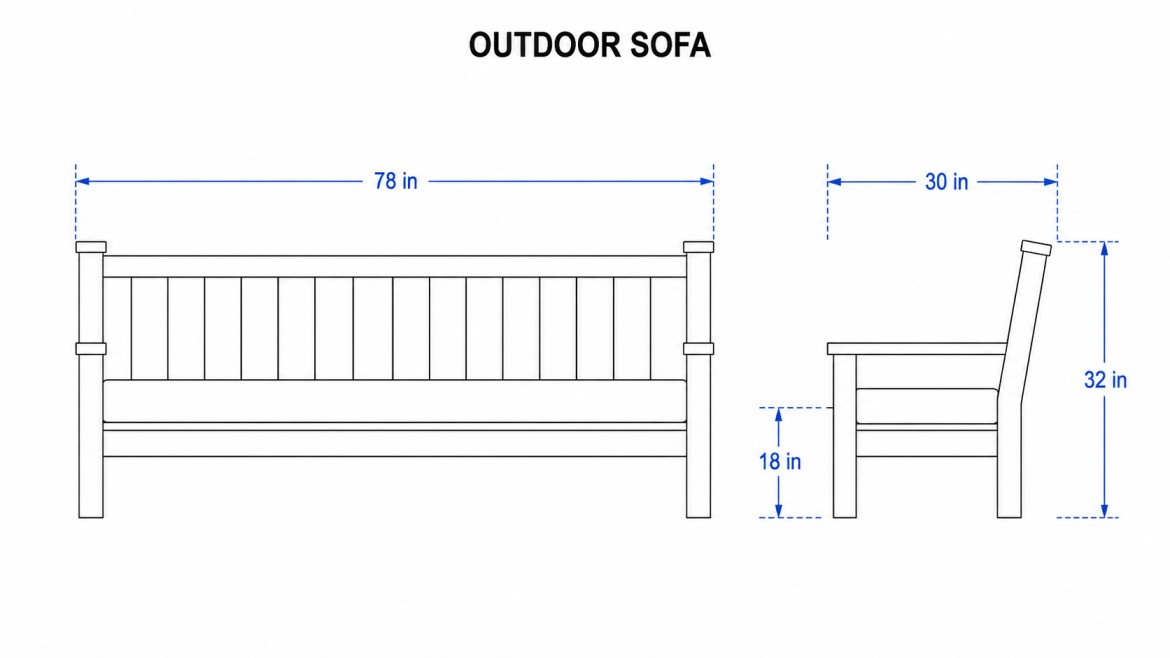
An outdoor sofa is essentially two or three of these chair builds merged into a single wide frame. Plan around cushion size first — buy the cushions or measure them before cutting a single board.
Seat depth and back height drive the whole layout; get those right, and the rest of the build is straightforward.
4. Outdoor Sectional
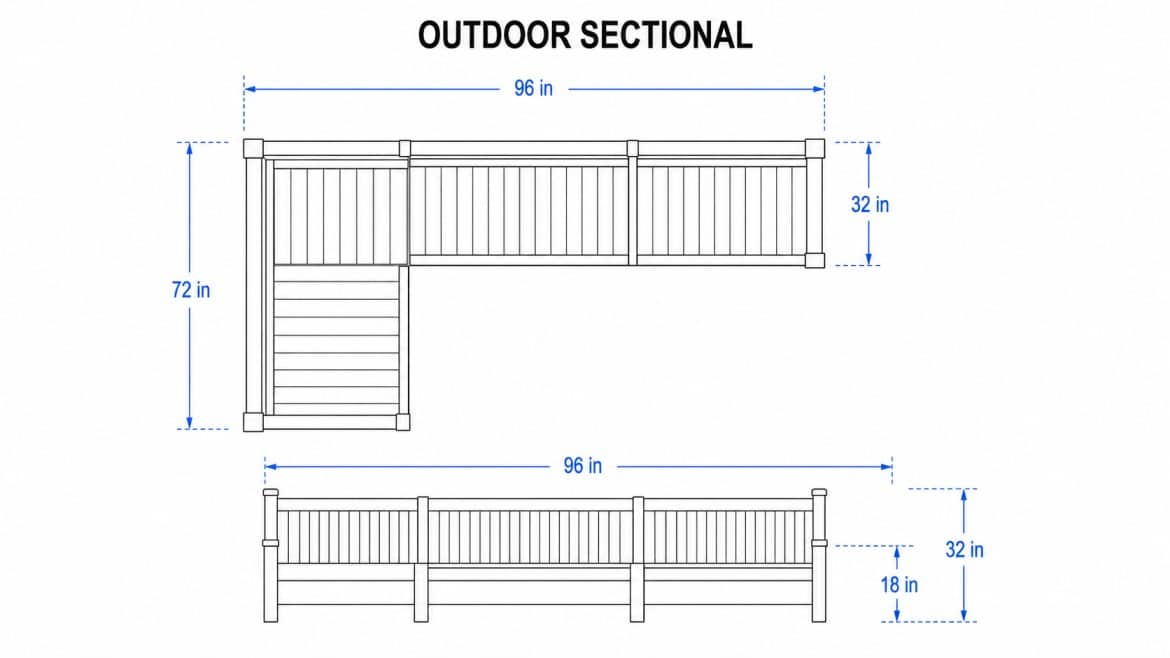
A modular sectional is the best choice for a large patio where the layout changes seasonally. Build individual units, corner, armless, left-arm, right-arm, that can be rearranged rather than one fixed piece.
Plan each unit size around a standard outdoor cushion and keep all seat heights identical so the units sit flush when pushed together.
5. Adirondack Chair
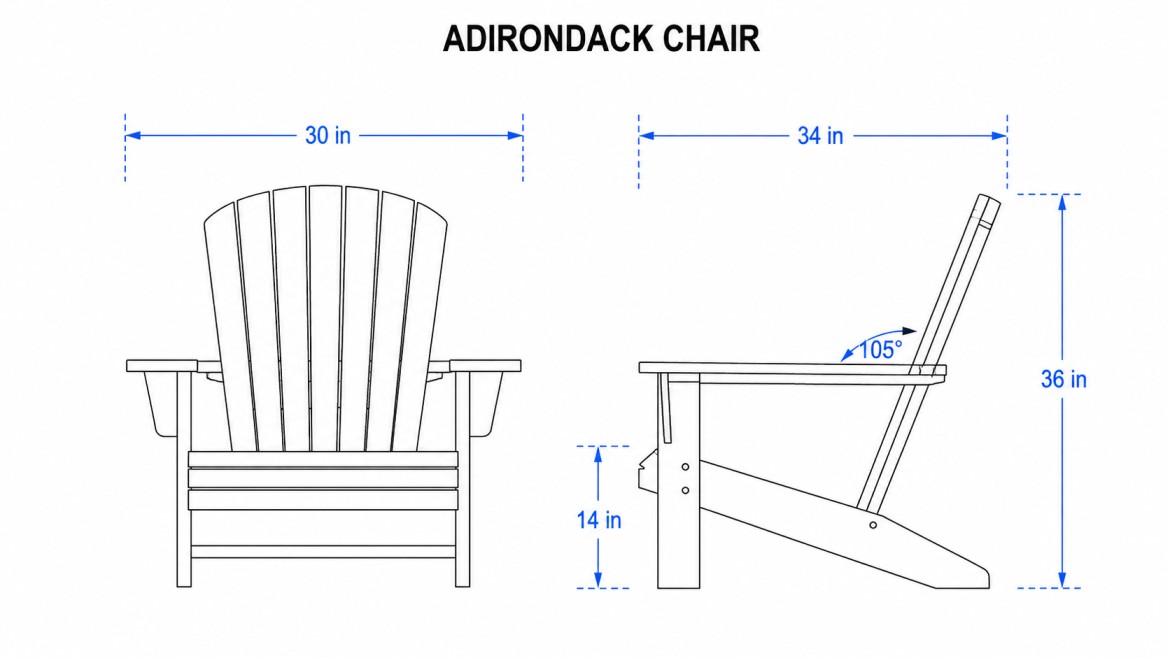
An Adirondack chair is a step up from this build in terms of planning; the angled back, wide arms, and curved seat slats all need more careful layout than a straight-cut chair.
It’s a weekend project for someone who has first finished one or two simpler builds. The comfort payoff is worth the extra planning work.
6. Picnic Table
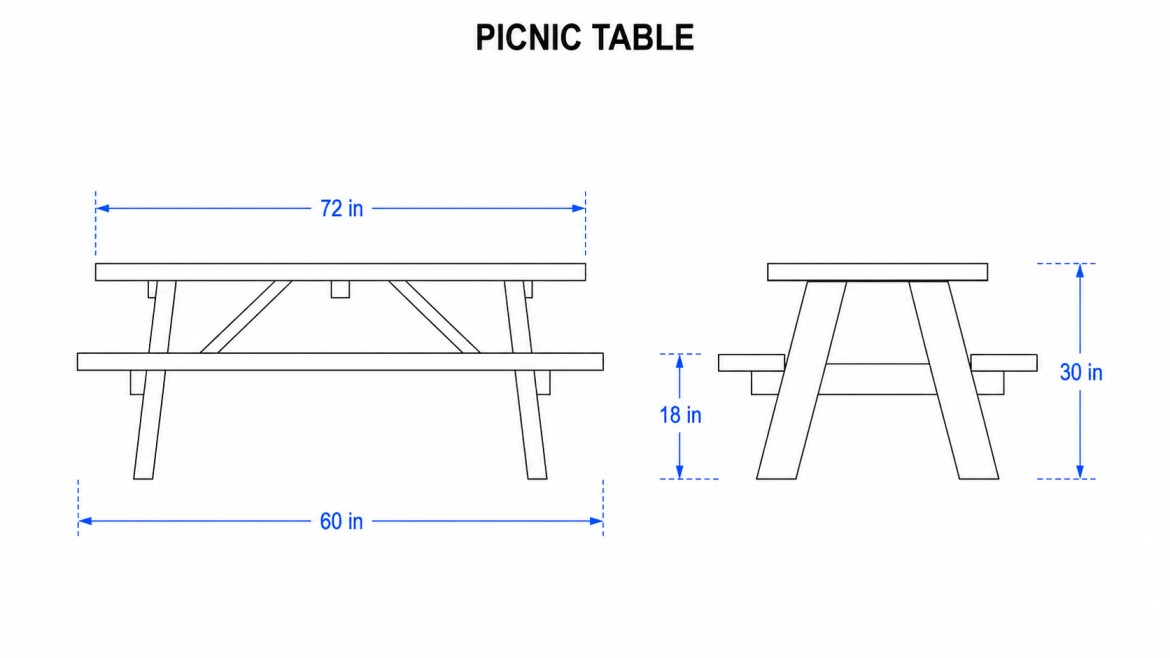
A picnic table is a heavier build, with more boards, more screws, and the leg bracing needs to be solid because picnic tables take a lot of use. The payoff is that you get seating and a table in one project.
Keep the diagonal leg braces tight; that’s the part that determines whether the table will wobble in two years or still sit flat.
7. Outdoor Dining Table
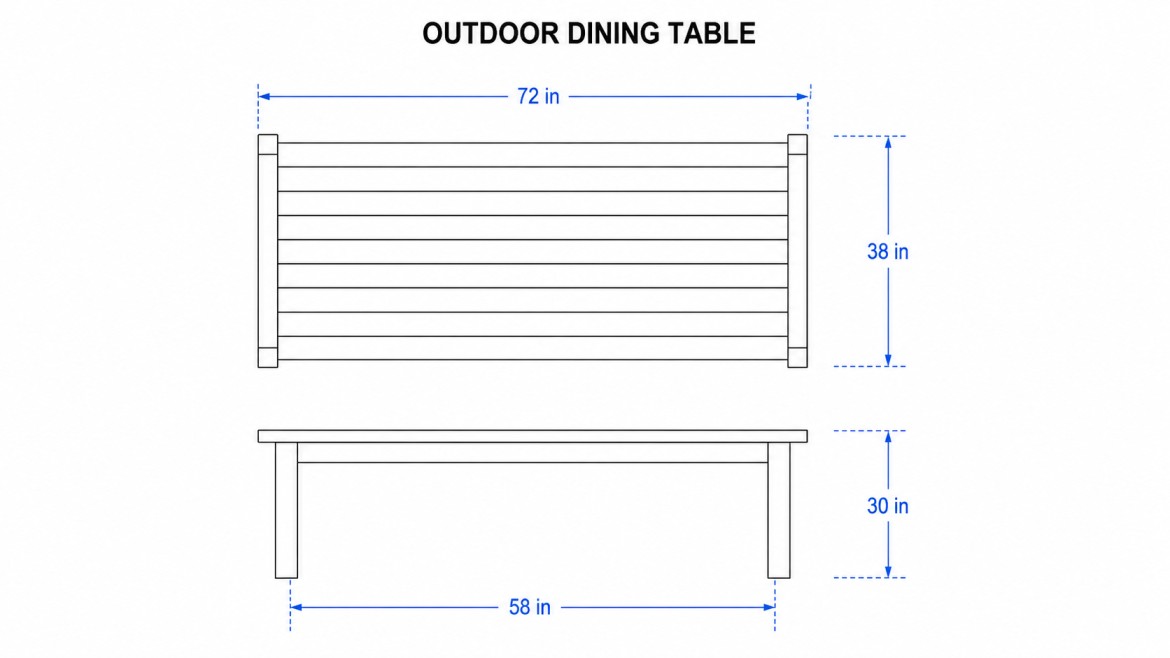
A full outdoor dining table is the right project once you’re comfortable with this chair build. Plan for the number of people first; a table width of 24 inches per seat is the minimum.
Here’s a cleaner rewrite:
If you already have an indoor dining table that feels worn but still has a solid frame, refinishing may be better than replacing it. The same sanding, staining, and sealing steps used in dining table makeover ideas can also apply to outdoor furniture projects.
8. Garden Chair
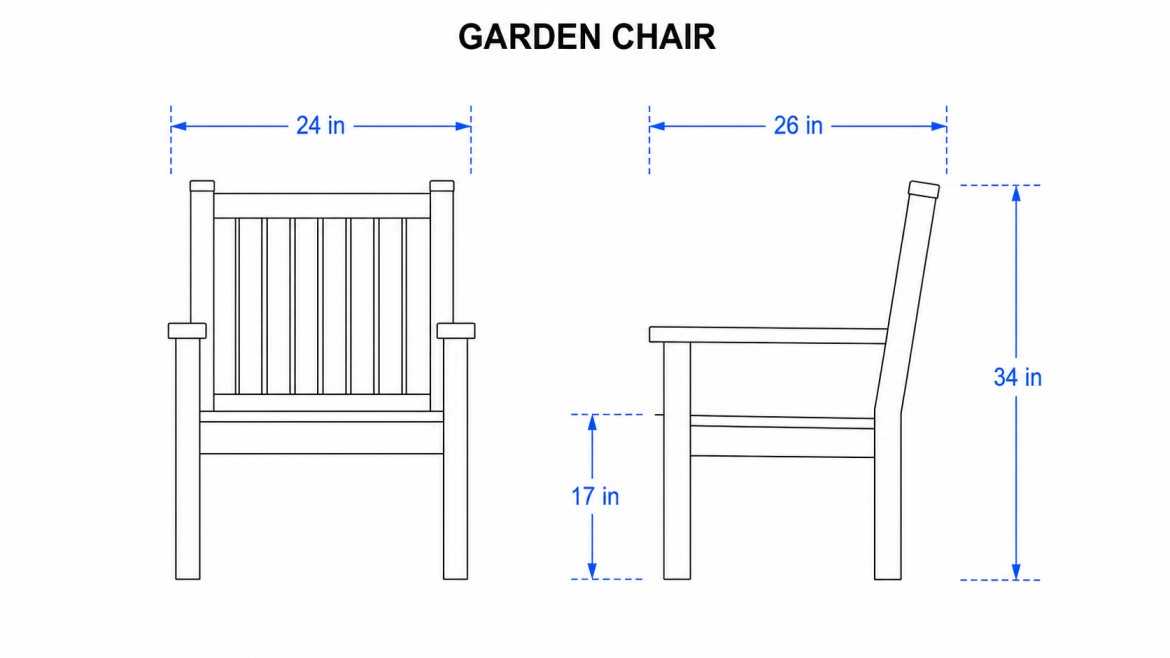
A garden chair is lighter and simpler than the patio chair in this guide, with a smaller footprint, lower weight, and easier to move. Cedar or sealed pine both work well here.
Focus on seat angle, back height, and keeping the overall width small enough to fit through a gate without turning it sideways.
9. Potting Bench
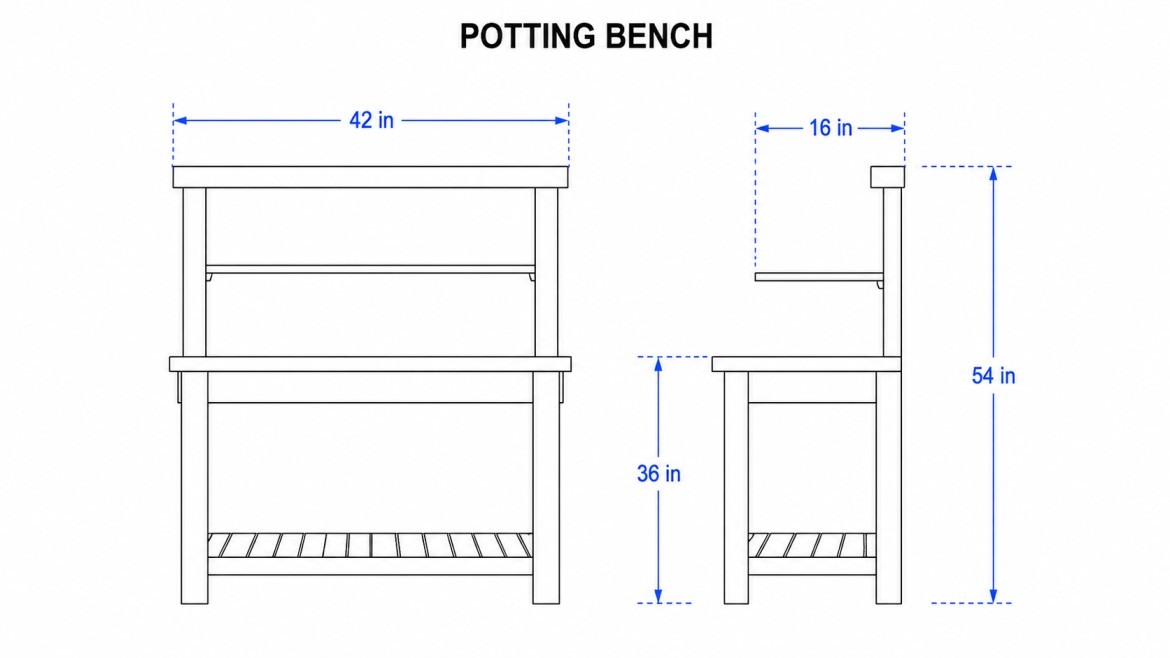
A potting bench is more functional than decorative; the worktop height matters most, and it should be at a comfortable working height of around 34–36 inches for most people.
Add a lower shelf for pots and soil bags and a back rail with hooks for hand tools. Pressure-treated lumber is fine here since you’re not sitting on it.
10. Outdoor Storage Bench
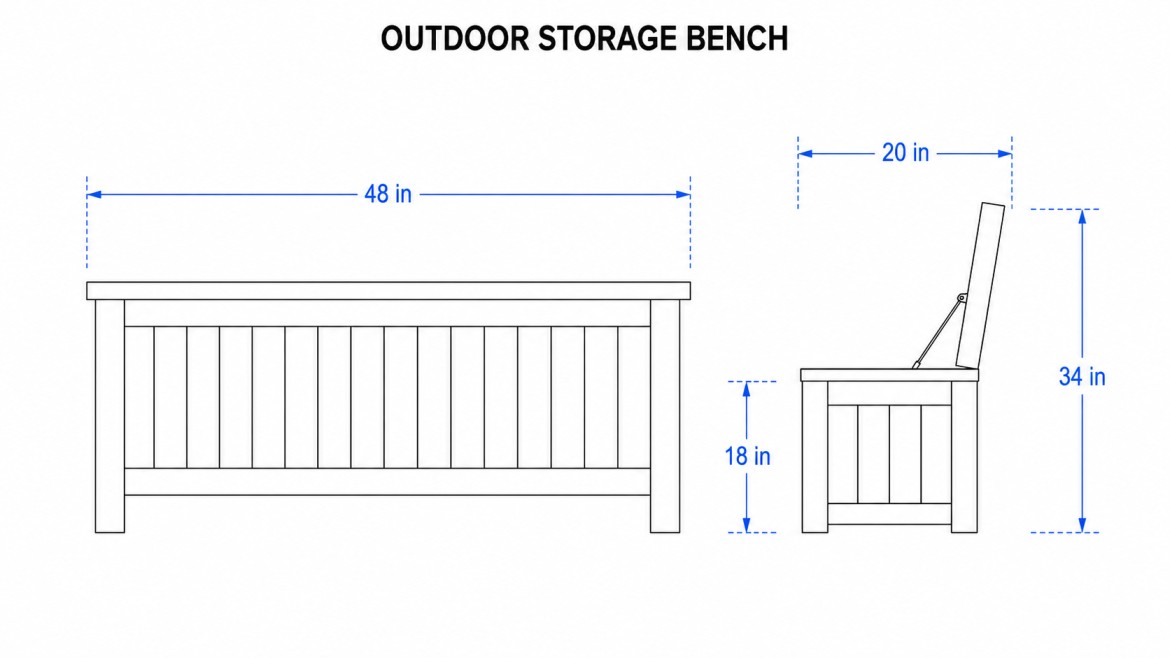
A storage bench gives you seating and a weatherproof box in one build. The lid needs to carry body weight without flexing, and the hinge placement determines whether it opens cleanly or fights you every time.
Leave small ventilation gaps in the box walls so cushions and pool gear don’t come out smelling like a sealed cooler.
11. Outdoor Bar Cart
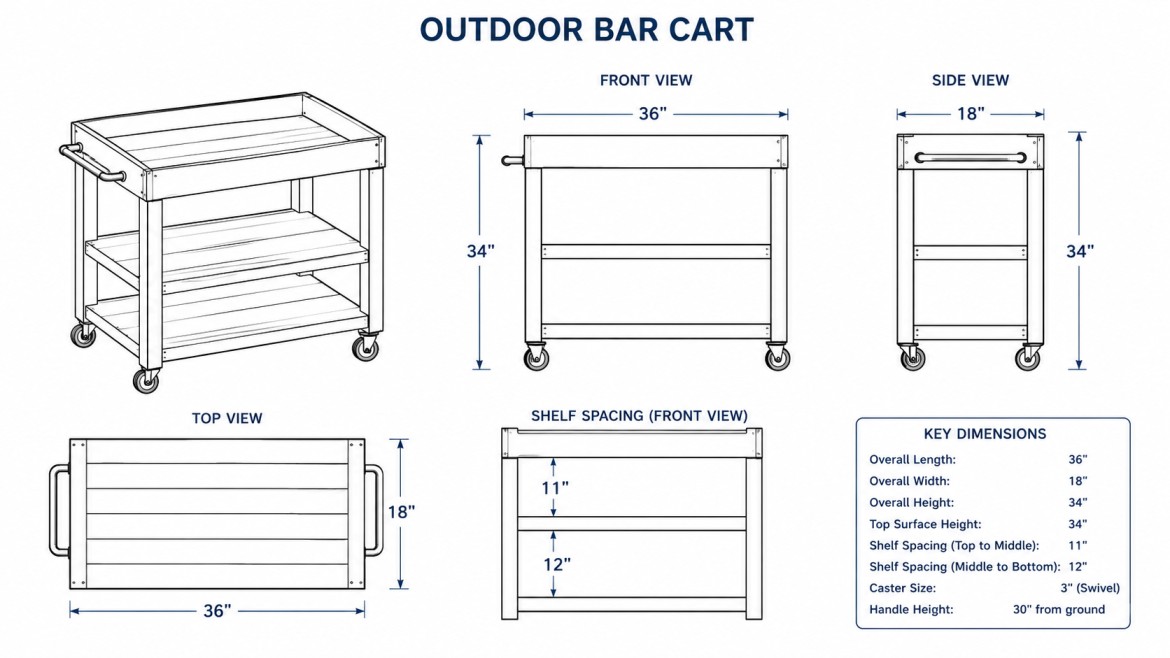
A bar cart is a fun project if you host outside regularly. Add locking casters so it stays put when you want it to and rolls when you don’t. Keep the footprint narrow enough to pass through a standard 32-inch door opening; it lives permanently on the patio, whether you want it there or not.
If you’re drawn to repurposing materials rather than building from scratch, the whiskey barrel project ideas show a different approach to the same serving-station concept.
12. Hammock Stand
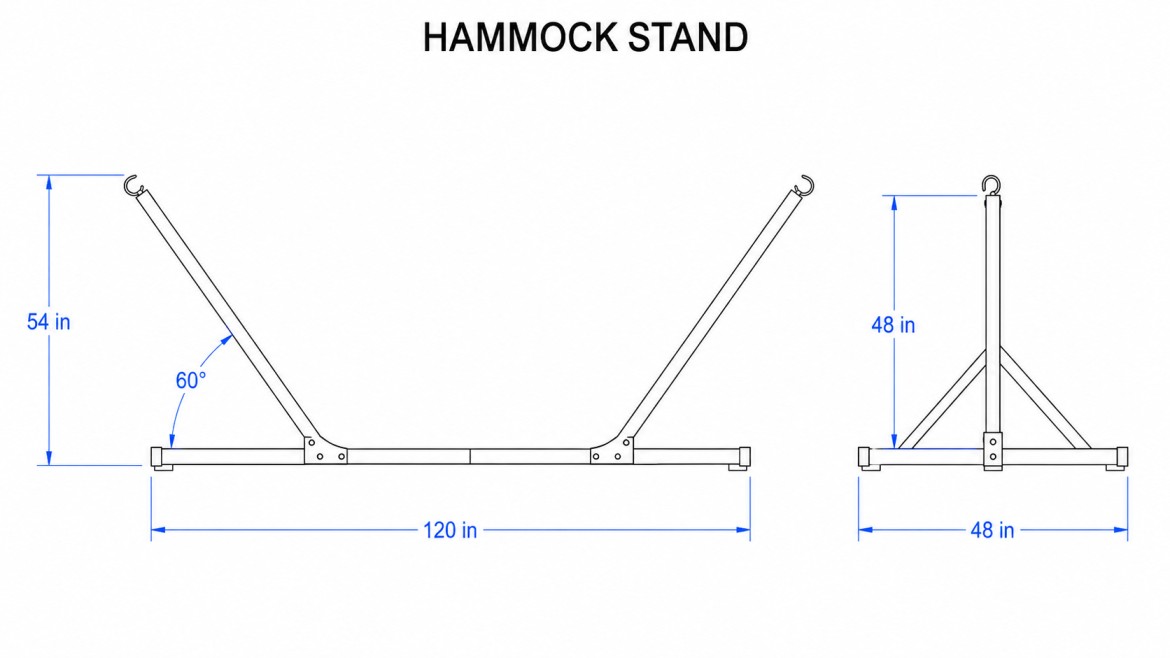
A hammock stand is the one project on this list where I’d say don’t skimp on the hardware. The base length determines stability, most hammock stands need a minimum of 13–15 feet to resist tipping under an adult’s weight.
Use the heaviest exterior hardware you can find for the hooks, and check it before every use in the first season.
Tools and Materials
- 2×4 boards (cedar or pressure-treated)
- 2×6 boards (for seat boards and armrests)
- Exterior-rated deck screws (2-inch and 3-inch)
- Pocket hole screws (optional, but speeds up assembly)
- Outdoor wood glue
- 80-grit and 120-grit sandpaper
- Outdoor stain or deck sealer
- Patio cushions (measure these before buying lumber)
Cut List: Chair-and-Table Set for Two
This cut list assumes a seat depth of approximately 18 inches and a seat width that matches a standard 20 x 20-inch seat cushion. Adjust widths if your cushions differ.
Cut matching pieces to the same length so they stay identical in length. The most common assembly problem comes from pieces that are 1/8 inch off.
| Board Size | Quantity | Part Name |
|---|---|---|
| 2×4 | 4 | Chair front and back legs |
| 2×4 | 4 | Lower seat supports |
| 2×4 | 4 | Upper side frame supports |
| 2×4 or 2×6 | 3–5 | Seat boards |
| 2×4 | 2–3 | Back support boards |
| 2×6 | 2 | Chair armrests |
| 2×4 | 4 | Table legs |
| 2×4 | 4 | Table frame boards |
| 2×4 or 2×6 | 3–5 | Tabletop boards |
Group the chair pieces and table pieces in separate piles before you start drilling anything. On my first build, I mixed them and ended up with two armrests that belonged in the table frame. Label each piece with masking tape if that helps.
Step-by-Step: Building the Chairs
Follow these simple steps to build sturdy deck chairs, from cutting the wood to assembling, sanding, and finishing each piece.
Step 1: Measure and Cut the Wood
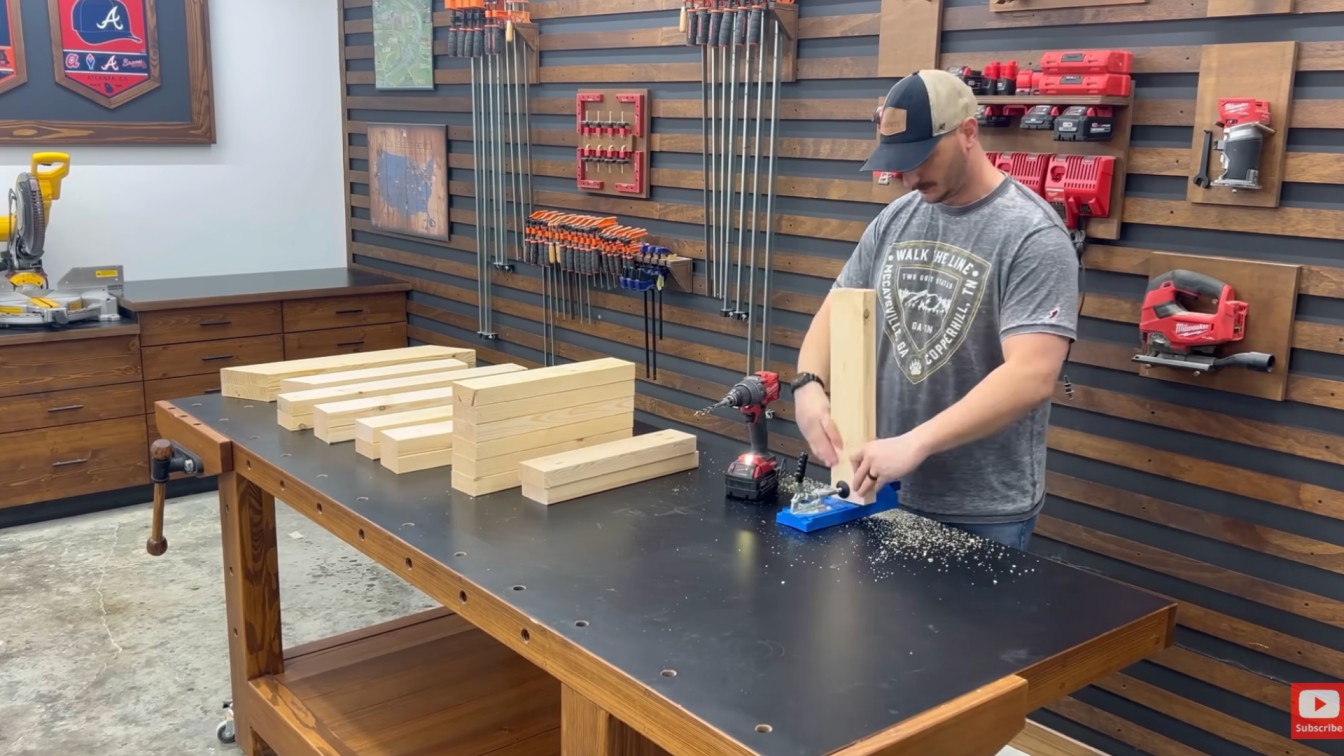
Mark every cut with a pencil and a square, not by eye. Lay matching pieces side by side and cut them together where you can; this keeps paired legs, supports, and boards the same length without measuring twice.
After cutting, set each group in its own pile before touching the drill.
Step 2: Build the Chair Side Frames
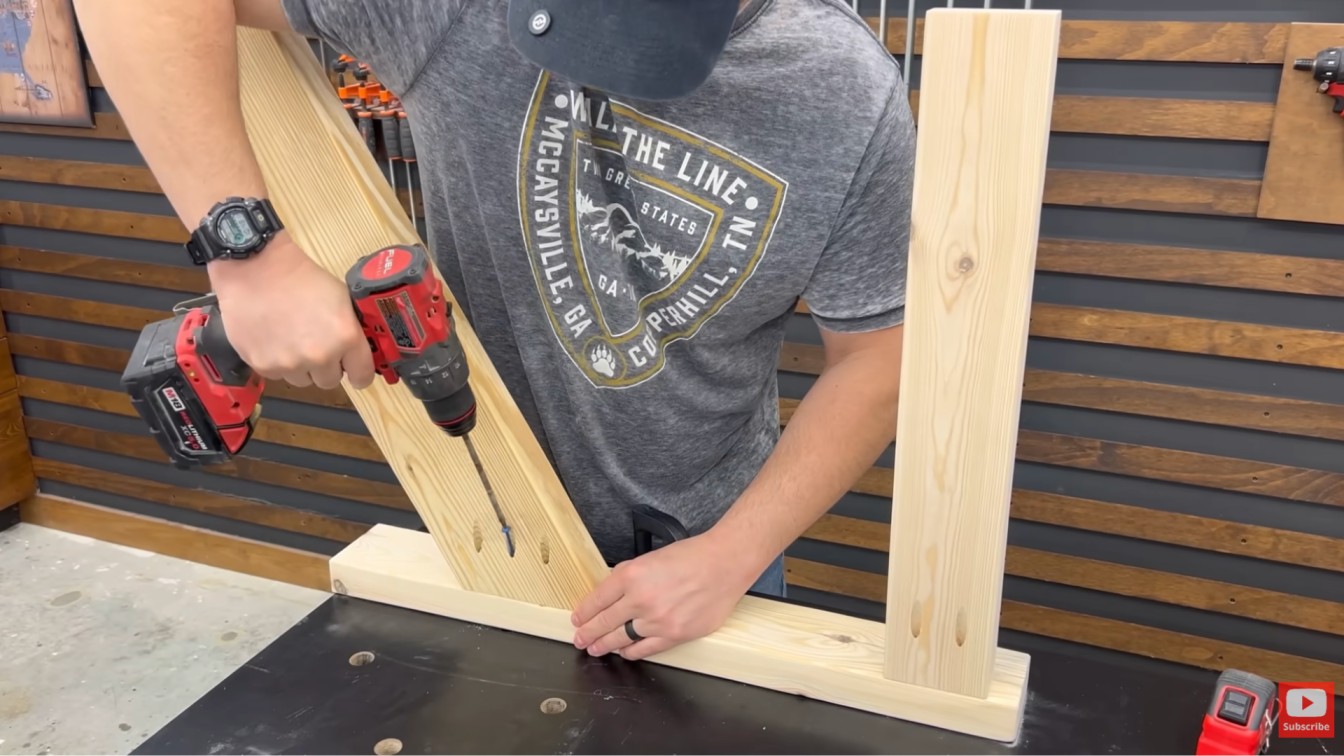
Lay out one side frame flat on the workbench: front leg, back leg, lower seat support, upper arm support. Use a square to check each corner before drilling anything. Clamp the pieces if they shift.
Drill small pilot holes first, this prevents splitting, especially in cedar, then drive the screws. Build the second side frame using the first as a template; hold them up together before moving on and check that the legs are identical in height.
Step 3: Attach the Seat Boards and Back Support
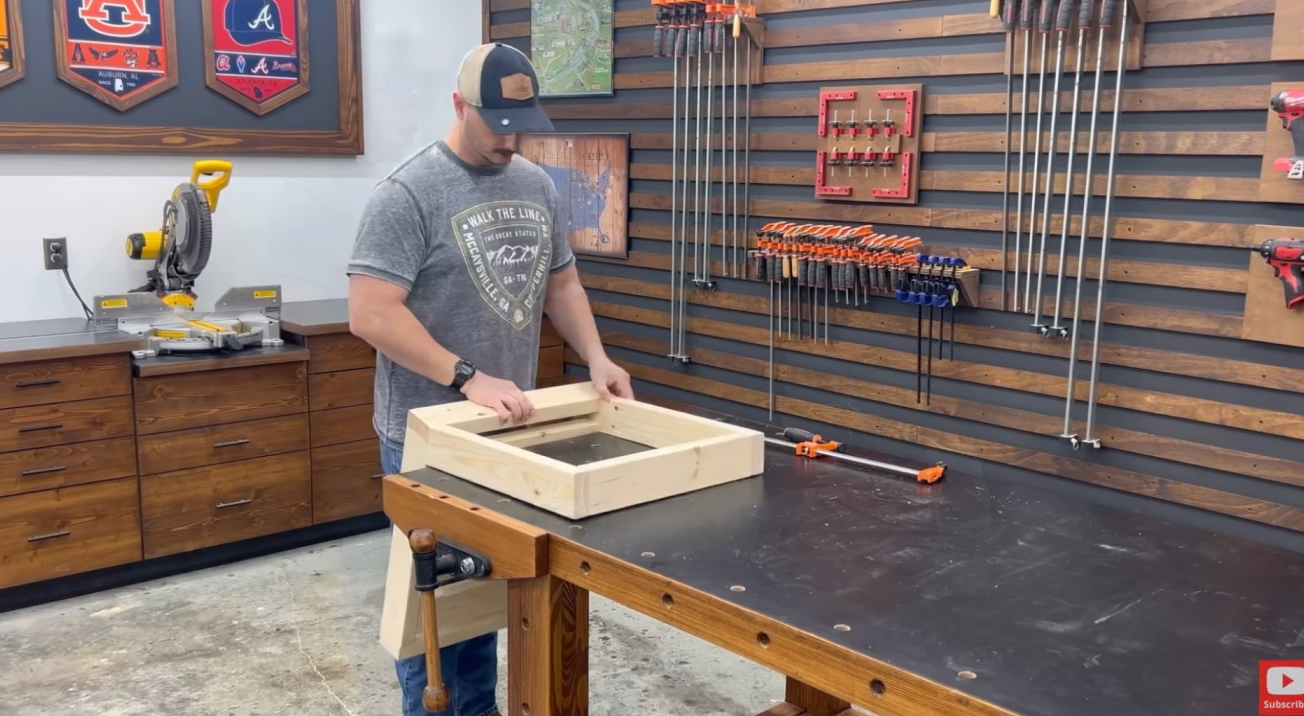
Run the seat boards across the lower supports with a 1/4-inch gap between each board. That gap is not decorative,, it’s where rainwater drains instead of pooling on the wood surface.
Set the cushion on top before driving any screws to confirm the width is right. Then attach the back boards, checking the lean before you commit. A slight backward angle, around 5 degrees if you want to measure it, makes a real difference in comfort over a two-hour session outside.
Step 4: Connect the Chair Frames
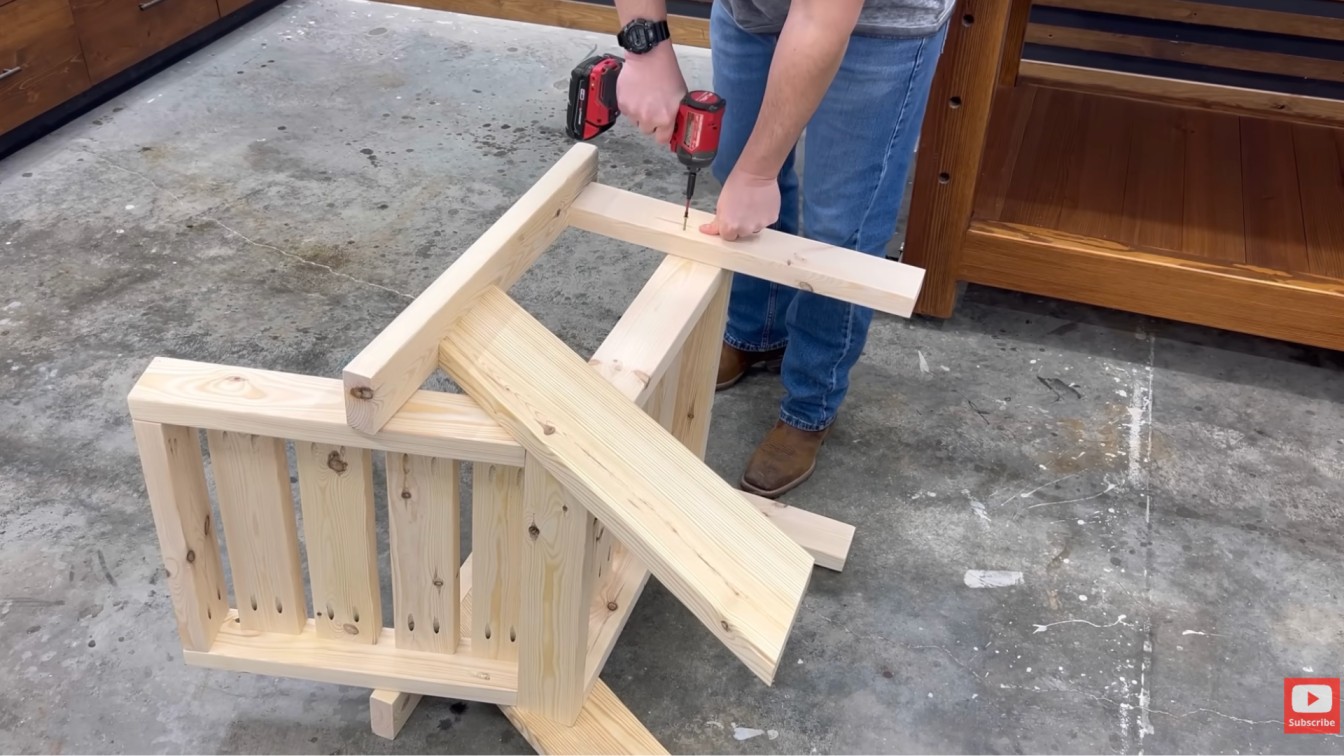
Stand both side frames upright and connect them front and back with the cross supports. Check the seat opening against your cushion width one more time before driving the final screws. This is the last easy moment to adjust.
If the frame feels twisted when you sight down it, loosen the last screw, press the frame flat, and re-drive.
Step 5: Attach the Armrests
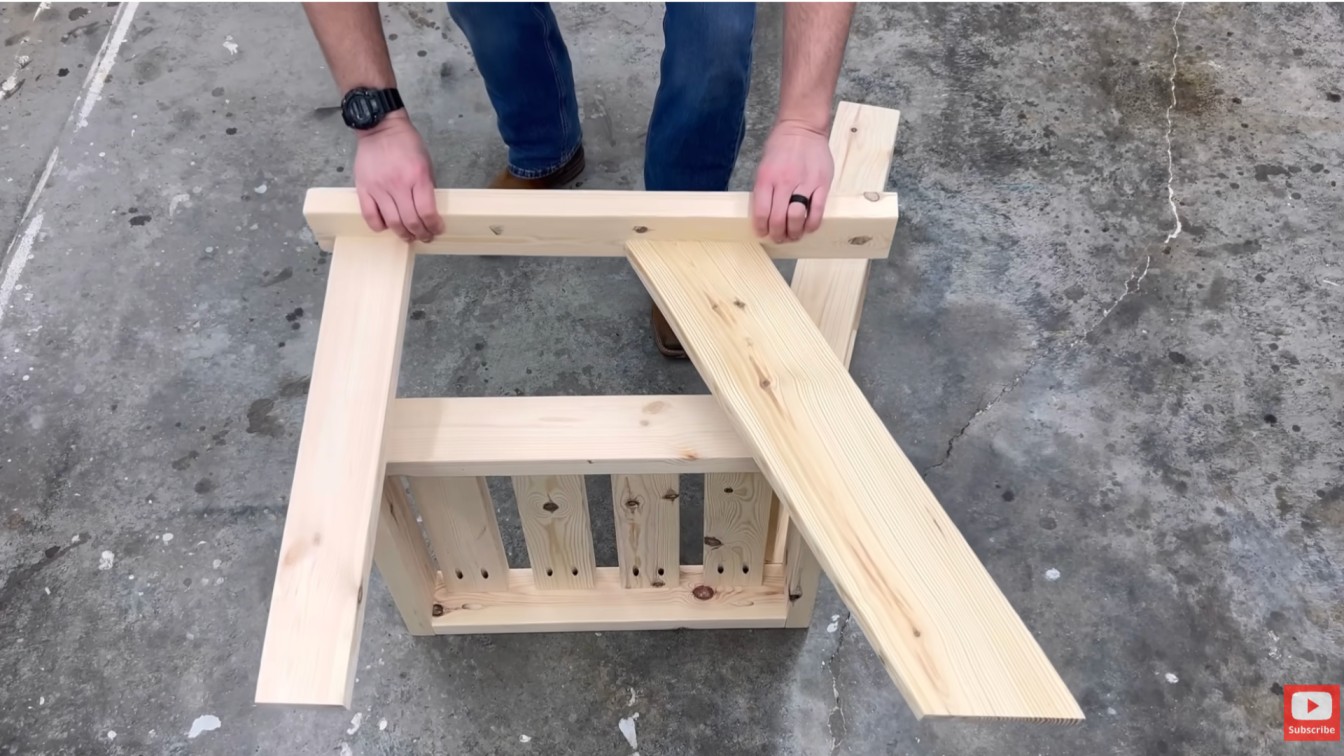
The armrests are the widest parts of the chair, and they complete the overall look. Align each one with the front of the frame and the top of the back leg, check that both sides sit at the same height before driving screws, and sand the top edges smooth before or immediately after attaching them.
You’ll rest your forearms there constantly, and rough edges get noticed fast.
Step-by-Step: Building the Table
Build a sturdy outdoor table by cutting, assembling, sanding, and finishing each part for a clean, long-lasting deck setup.
Step 6: Cut and Lay Out the Table Pieces
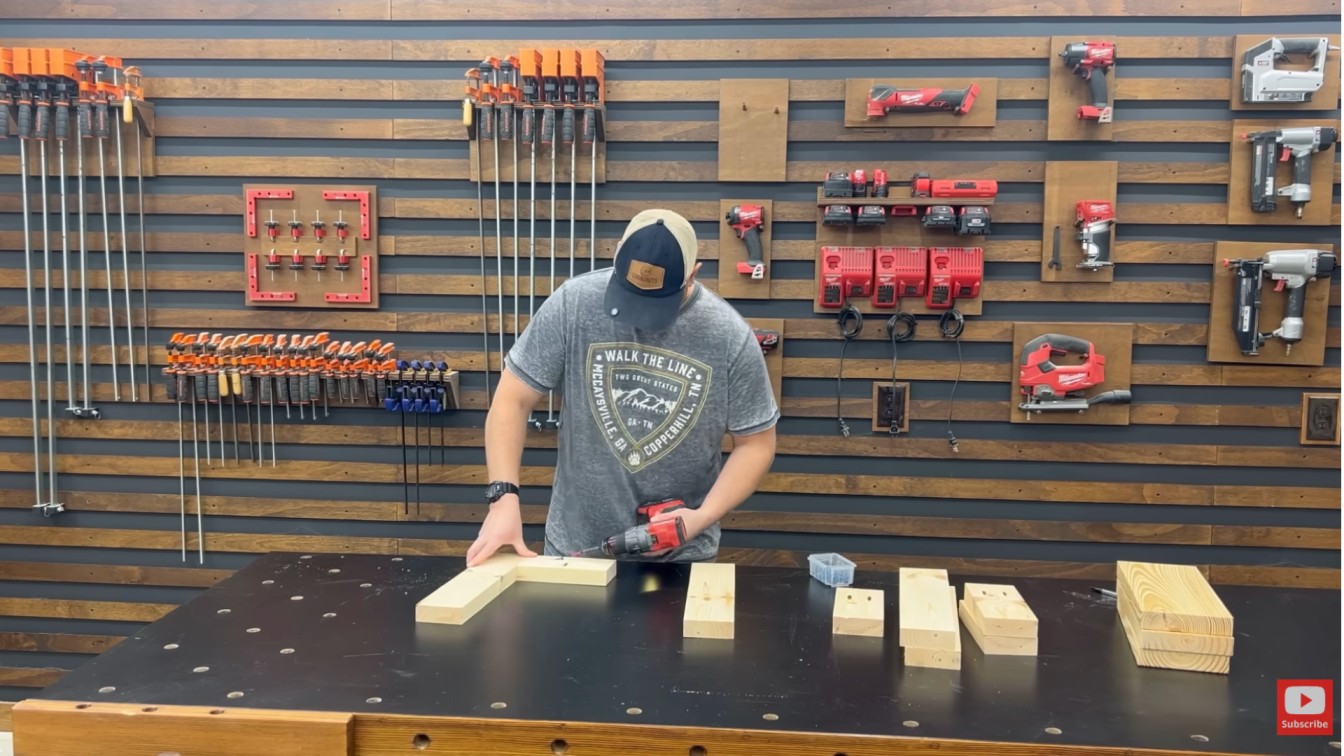
Cut the table legs, side frames, and top boards from the same lumber as the chairs. The table height should sit even with or just slightly below the finished chair armrest.
Hold the assembled chair beside your table mock-up and check before cutting. Keep the table pieces in a separate pile from the remaining chair parts.
Step 7: Build the Table Frame
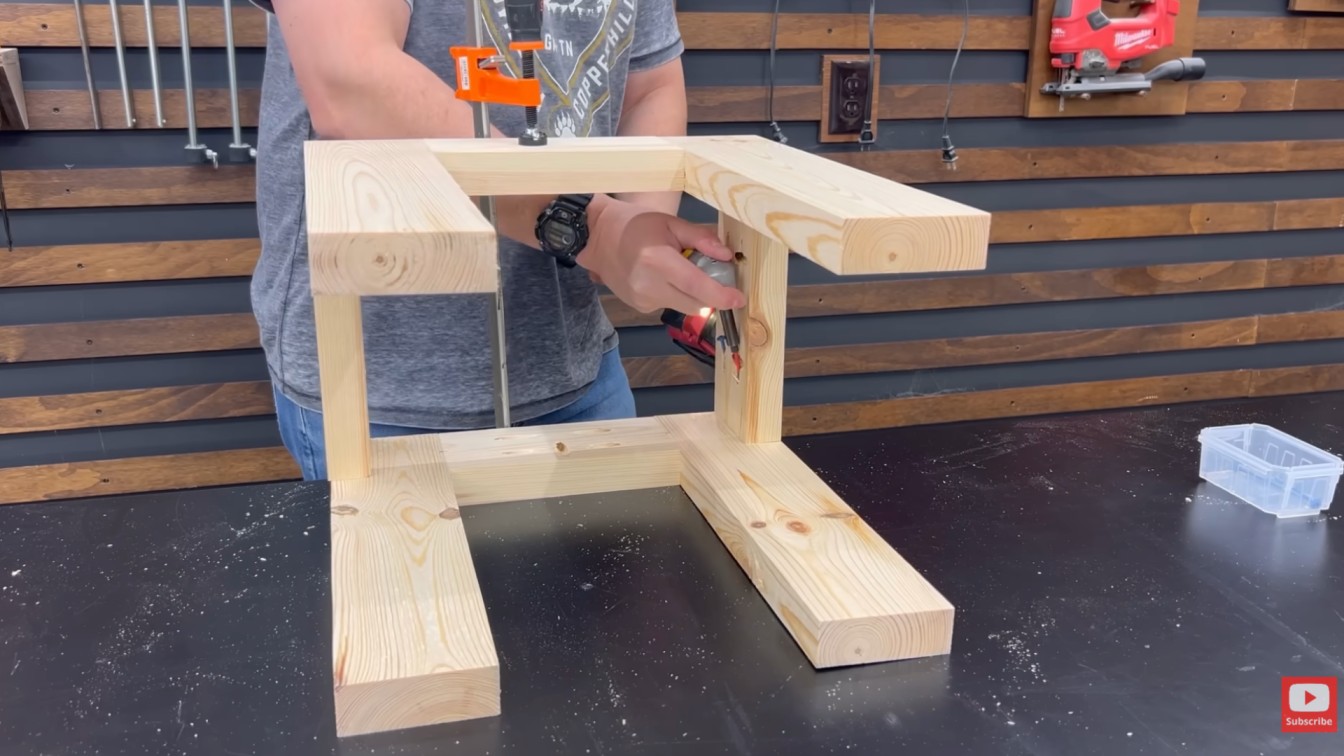
Build two side frames first: two legs connected by a side support board. Then stand them up and connect the front and back. Use your square at every corner and check for wobble before the glue sets.
Pilot holes are especially important on table legs because you’re driving screws near the end grain, which is where splits happen.
Step 8: Add the Tabletop Boards
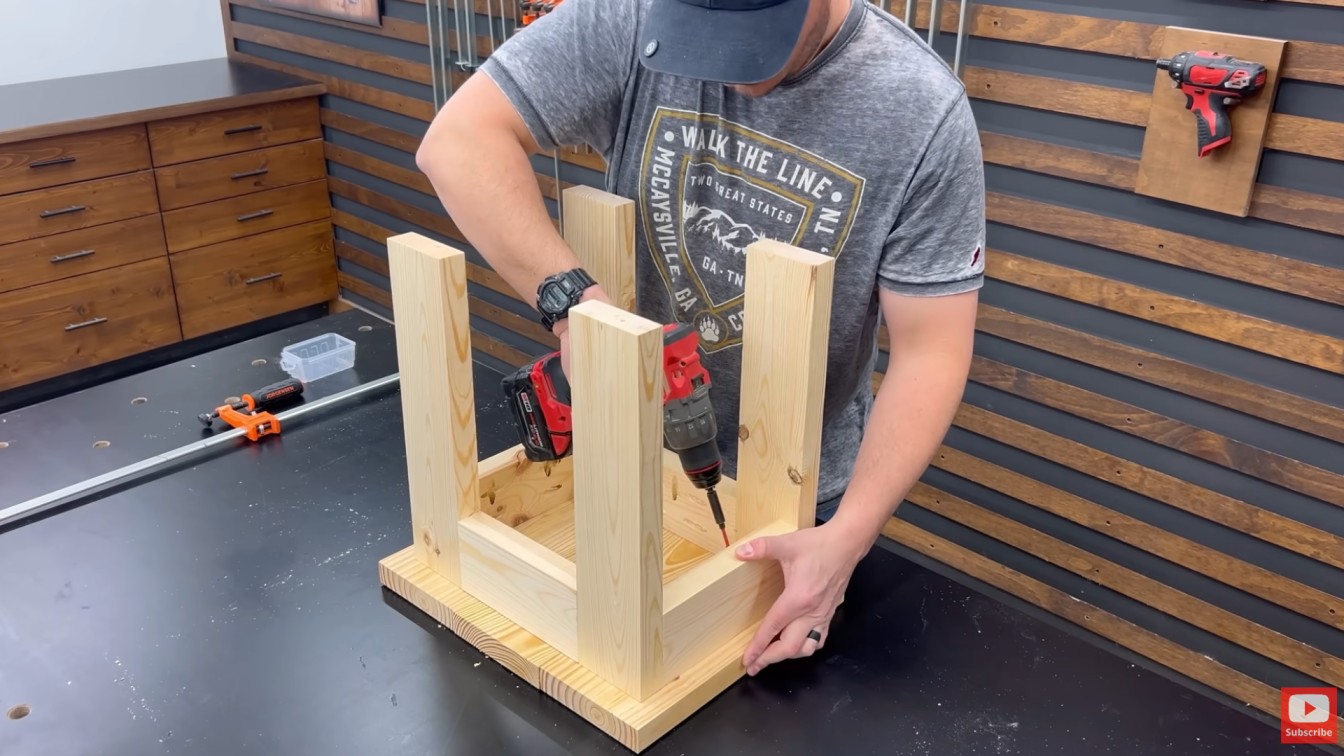
Lay the top boards across the frame with the same 1/4-inch gap between them that you used on the seat. Check that the front edge is flush before driving screws. Run your hand across the finished surface; any raised corner or rough edge will catch cups and plates.
The shape of the tabletop edge also affects how comfortable the table feels in daily use; different table edge profiles and styles suit different builds, and a simple eased or chamfered edge is usually the right call for outdoor lumber. Sand it flat before calling it done, then set the table between the chairs to check the height and spacing.
Step 9: Finish the Furniture
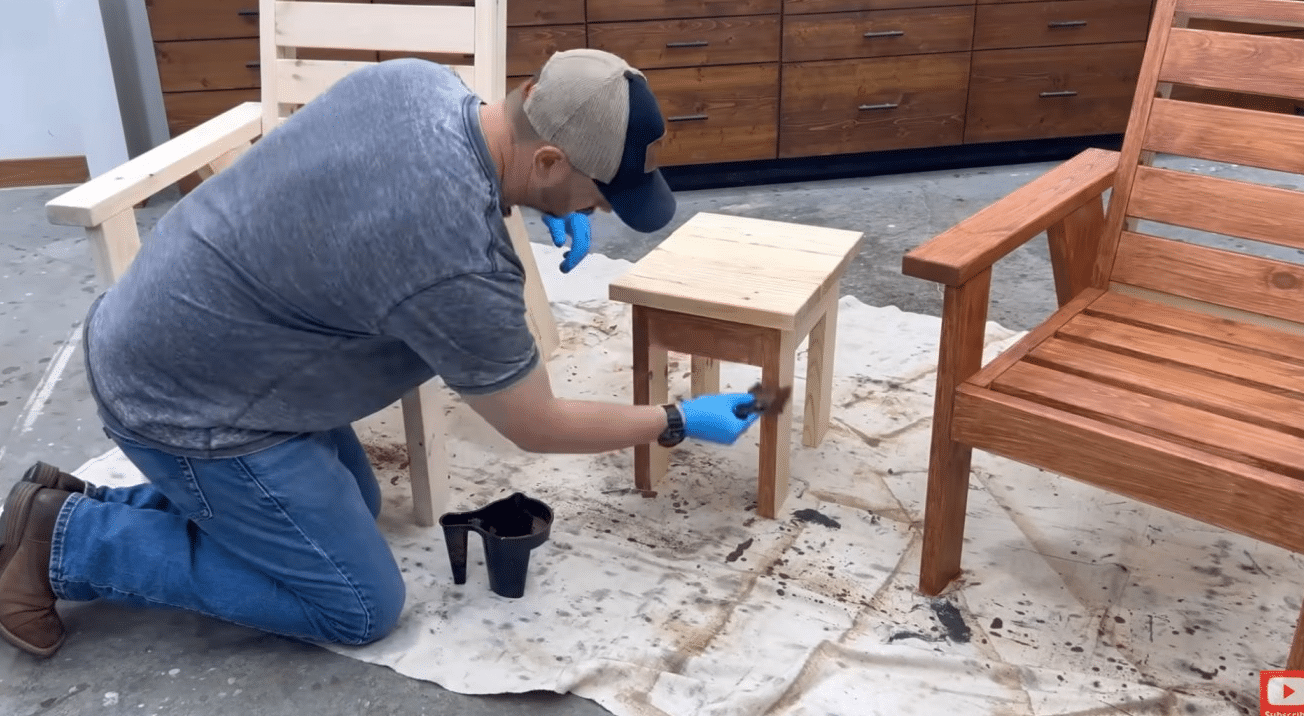
This is the step people rush through, and it’s the one that determines how long the furniture actually lasts. Sand everything to 120-grit before applying any finish, including the undersides and the ends of the boards, which soak up moisture fastest.
Apply the finish in thin coats and let each coat dry fully before adding another. Don’t skip the second coat to save an afternoon.
| Faster the second time: On my first build, I applied the stain the same day I finished assembly. The screws were still off-gassing, and the wood hadn’t fully dried after the light rain two days earlier. The stain bubbled in one spot on a seat board, and I had to sand it back and redo it. Wait at least 24–48 hours after final assembly before applying any finish coat, and check the forecast. |
For a video walkthrough of the complete build process, the embedded tutorial below covers the key assembly steps from frame to finish.
Best Finishes for DIY Outdoor Furniture
The right finish depends on the wood, the climate, and how much maintenance you’re willing to do in year two. Here’s a straight comparison so you can pick before you buy anything.
| Finish Type | Best For | Reapplication Frequency |
|---|---|---|
| Outdoor stain | Cedar, pine, pressure-treated; shows the grain | Every 1–2 years |
| Exterior paint | Any wood; hides grain; adds color | Every 3–5 years with light sanding |
| Clear outdoor sealer | Redwood, cedar; preserves natural look | Annually in wet climates |
| Deck sealer | Heavy-use pieces; maximum water protection | Every 1–2 years |
Clear sealer is the most maintenance-intensive option in wet climates; it keeps the natural look but wears through faster than pigmented stain does. If you’d rather do a touch-up every two to three years instead of every year, a semi-transparent outdoor stain is a better long-term choice for most builds.
How to Choose the Right Project for Your Skill Level
The table below is honest about where each project sits in terms of difficulty. If you’ve never built anything before, start at the top. The skills compound quickly once you’ve finished one build.
| Skill Level | Best Project Ideas | Why It Fits |
|---|---|---|
| Beginner | Bench, coffee table, simple 2×4 chair | Straight cuts, basic shapes, fewer pieces — the margin for error is forgiving. |
| Intermediate | Adirondack chair, sectional, dining table | More pieces, tighter tolerances, some angles — worth attempting after one successful beginner build. |
| Advanced | Curved designs, folding furniture, storage bench with a hinged lid | Moving parts, shaped cuts, and fit-and-finish details that punish rushed work. |
If a project on this list feels just slightly beyond where you are right now, that’s usually the right one to attempt. The ones that feel obviously too easy won’t teach you anything new.
DIY Outdoor Furniture Budget: What Things Actually Cost
The numbers below reflect 2025 lumber prices at national home improvement retailers. Cedar costs roughly $1.50–$2.50 per linear foot for 2x4s; pressure-treated runs about $0.80–$1.20 per linear foot. Cushions and hardware can add $50–$150 depending on quality.
| Budget Level | Project Ideas | Rough Material Cost |
| Low ($50–$100) | Simple bench, garden stool, basic side table | Pressure-treated pine, no cushions |
| Mid ($150–$300) | Chair-and-table set, storage bench, coffee table | Cedar, exterior screws, one set of cushions |
| Higher ($400–$700+) | Outdoor sectional, dining table set, Adirondack set | Cedar or redwood, full cushion set, stain or paint |
| Cost Note: Figures above are estimates based on 2025 national lumber averages. Actual costs vary by region, retailer, and whether you need to buy tools. Verify current lumber prices at your local home improvement store before budgeting. |
Free vs. Paid DIY Outdoor Furniture Plans
Free plans work well for benches, coffee tables, and basic rectangular builds where the geometry is simple. Paid plans earn their cost on chairs, sectionals, Adirondack builds, and anything with angles — the detailed cut lists and 3D diagrams prevent the expensive mistakes that come from a vague schematic. If the project involves any piece that isn’t a straight rectangle, a paid plan usually costs less in the end than the lumber you’d waste figuring it out yourself.
Common Mistakes to Avoid
- Skipping the cushion measurements: Buy the cushions first, or measure the ones you plan to use. This single step prevents the most common rebuild in this project.
- Using indoor screws: They rust out and stain the wood within one wet season. Exterior-rated deck screws cost almost the same and last years longer.
- Not sealing the end grain: The cut ends of boards soak up water faster than the face grain. Seal them with an extra coat and the wood will last significantly longer.
- Skipping drainage gaps: Quarter-inch gaps between seat and tabletop boards let rain run off. Without them, water pools and rots the wood from below.
- Rushing the finish: One thin coat applied in a hurry performs worse than two thin coats applied with 24 hours between them. Wait for full drying before the second coat.
These questions come up most often once people are partway through the build — here are the answers that would have saved me an afternoon on my first attempt.
Frequently Asked Questions
Is it cheaper to build your own outdoor furniture?
Usually yes — a two-chair-and-table set in cedar typically costs $150–$300 in materials, compared to $500–$1,000+ for comparable store-bought pieces. The savings increase on larger projects like sectionals or dining sets.
What is the easiest DIY outdoor patio furniture to build?
A simple bench or a basic 2×4 side table. Both use straight cuts, require no angles, and can be finished in a single afternoon with a drill and a saw.
What is the best wood for DIY outdoor furniture?
Cedar is the best all-around choice for most climates — naturally rot-resistant, easy to work with, and takes stain or sealer well. Pressure-treated pine is the budget alternative if you seal it thoroughly before use.
How do I waterproof DIY patio furniture?
Sand all surfaces to 120-grit, then apply outdoor stain or deck sealer in two thin coats, including on the undersides and cut ends of each board. Let each coat dry fully between applications.
Can you leave DIY outdoor furniture outside in the rain?
Well-sealed cedar or pressure-treated builds can handle rain, but they’ll last longer if you cover cushions and keep furniture off wet ground. Check screws and the finish coat at the start of each season.
How long does DIY outdoor furniture last?
A cedar build that’s well sealed and maintained with a fresh coat of stain every 1–2 years can last 10–15 years. Unsealed pressure-treated pine in a wet climate may show significant wear in 3–5 years.
What screws should I use for outdoor furniture?
Exterior-rated, coated deck screws — either stainless steel or ACQ-compatible coated screws. Standard zinc-coated screws corrode in outdoor conditions, stain the wood, and eventually work loose.
How do I build a 2×4 patio chair?
Build two side frames, connect them front and back with cross supports, add seat boards with 1/4-inch drainage gaps, attach back boards at a slight lean, then mount the armrests. Sand everything and seal before use.
Final Verdict: Is This Chair-and-Table Set Worth Building?
If I were doing this project again — and I have — the one thing I’d change is measuring the cushions before buying a single board, not after. Everything else in this build is forgiving. The cushion fit is not. Start there, build the chair frames around that measurement, and the rest of the project is genuinely manageable in a weekend. The finished set costs a fraction of what comparable store-bought patio furniture runs, and it fits your specific space rather than the showroom floor. The same weekend-project thinking translates well indoors too — the painted DIY bookshelf build on this site uses the same beginner-level approach at a similar cost.
About the Author: Ava Brooks has been doing home improvement projects for over 8 years, learning most of what she knows by doing them herself, making the mistakes, and finding the faster way the second time. Her focus is on projects real people can finish on a weekend, without specialist tools or a contractor on speed dial.





