


Learning how to build a bookshelf is a useful project because it gives you storage, display space, and room to play with color.
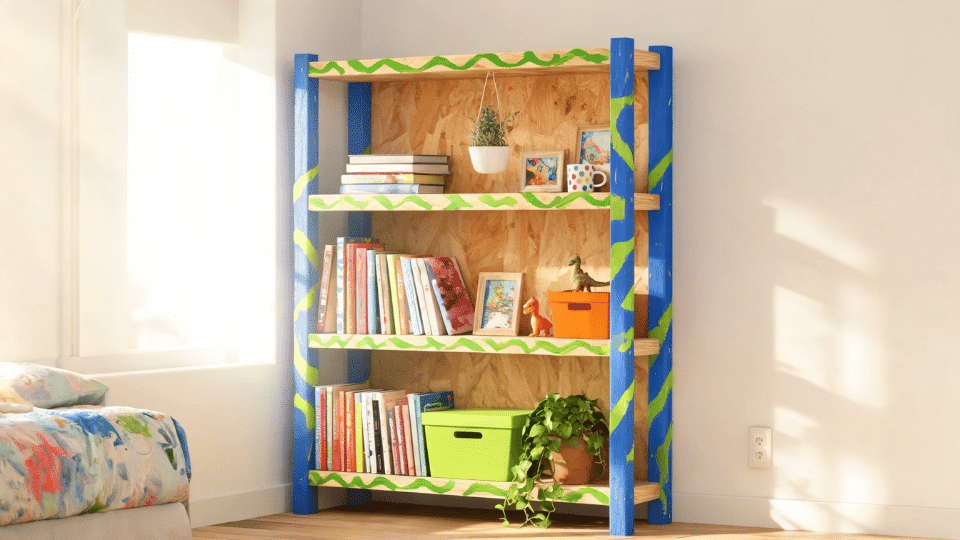
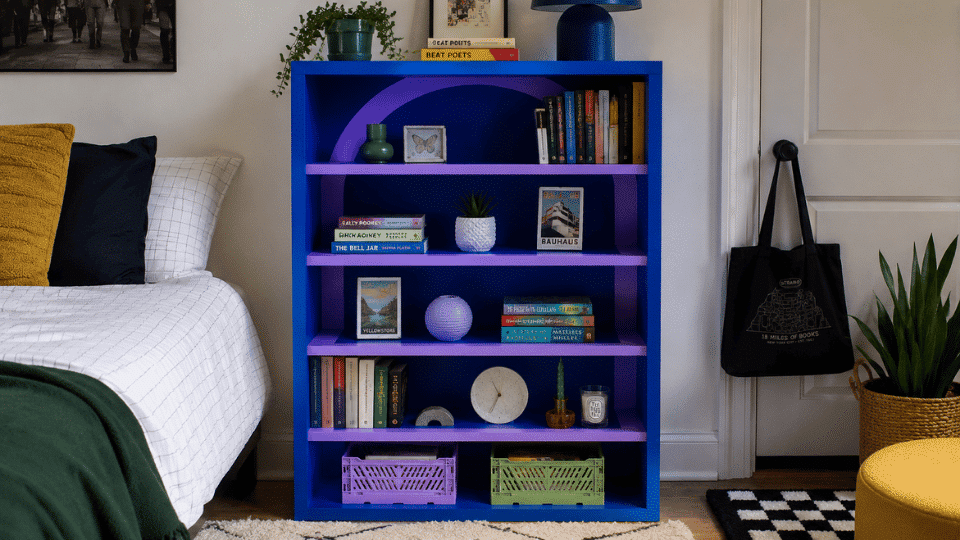
This DIY bookshelf is a small wooden piece with open shelves and a bold two-color painted pattern, made for a pop maximalist bedroom.
I’m keeping the structure simple, but the finish will feel fun, expressive, and personal. My version uses basic boards, screws, glue, primer, and paint.
You’ll get the final size, supplies, cut list, build steps, paint plan, beginner tips, design variations, and common questions before starting.
What You’re Getting Into Before You Build a Bookshelf
This DIY bookshelf takes a weekend, costs $70–$100 in materials if you already own a drill, and sits at a solid beginner level. I’ll be straight with you: the build itself is not hard.
The part that trips people up is the paint pattern at the end, and only because they rush it. Get that right, and you’ll have something that looks intentional, not just assembled.
The finished piece is 36 inches high, 28 inches wide, and 10 inches deep, with two fixed middle shelves giving you three open storage bays. It’s sized for a bedroom reading corner or desk area, not a wall-to-wall statement, but a real, practical piece you can actually fill.
| Difficulty | 2 out of 5, straight cuts, basic joinery, beginner-friendly |
| Time | One weekend (4–6 hours build, drying time between) |
| Cost | $70–$100 with tools already owned; $150–$200 if buying a drill and clamps |
| Tools Needed | Drill, saw or store cutting service, measuring tape, speed square, clamps, sandpaper, paintbrush or small roller, painter’s tape |
| Skill Required | Beginner, no joinery experience needed |
The most common failure point with this build is buying warped boards and not checking them before you leave the hardware store. Look down each board lengthwise before it goes in your cart. A twisted side panel will fight you at every step. That’s the thing I’d go back and tell myself first.
Tools and Materials Needed to Build a Bookshelf
You only need basic supplies for this build. Keep the wood simple, use the same board depth throughout, and let paint create the main personality.
Supplies and Tools
| Item | Why You Need It |
|---|---|
| Measuring tape | To measure boards and shelf placement |
| Pencil | To mark cuts, shelf lines, and screw spots |
| Saw or store cutting service | To cut the boards to size |
| Drill | To make pilot holes and drive screws |
| Speed square | To keep shelf lines and corners straight |
| Clamps | To hold boards steady while attaching them |
| Paintbrush or small roller | To apply primer, paint, and pattern details |
| Painter’s tape | To create clean color blocks or stripes |
| Wood glue | To strengthen the joints |
| Wood screws | To hold the bookshelf together |
| Wood filler | To cover screw holes before painting |
| Sandpaper | To smooth cut edges and fill holes |
| Primer | To help paint cover evenly |
| Interior paint | To create the two-color maximalist finish |
| Clear topcoat | Optional, for extra protection |
Lumber and Paint Quantities
For this build, you need three 6-foot 1×10 pine boards. From those three boards, you’ll cut: two side panels at 36 inches, one top and one bottom panel at 28 inches each, and two middle shelves at 26.5 inches. The middle shelves are shorter because they sit inside the two side panels — account for this before you cut. The back panel is thin plywood cut to fit the full rear of the frame.
| Material | Quantity | Size or Notes |
|---|---|---|
| 1×10 pine boards | 3 boards | 6 feet long each |
| Side panels | 2 pieces | 36 inches each |
| Top panel | 1 piece | 28 inches |
| Bottom panel | 1 piece | 28 inches |
| Middle shelves | 2 pieces | 26 1/2 inches each |
| Wood screws | 1 box | 1 1/4-inch screws |
| Primer | 1 small can | Enough for one thin coat |
| Paint color 1 | 1 quart | Main bookshelf color |
| Paint color 2 | 1 sample pot or small can | Pattern or accent color |
Pine is the right call for a first build: it’s widely available, easy to cut, and takes paint well. Just know that softer pine dents more easily than plywood under heavy loads. If you’re planning to store a full collection of hardbacks across all three shelves, plywood panels would give you more sag resistance over time.
For the mix of books, decor, and boxes that most bedroom shelves hold, pine handles it well. To learn more about how different wood species behave under load over time, the guide to the best types of wood for furniture breaks it down by species.
How to Build a Bookshelf Step by Step
This tutorial keeps the build simple but provides enough detail for beginners to avoid guessing. Follow the order carefully so the frame stays correct, the shelves sit level, and the painted finish looks intentional.
Step 1: Cut and Label the Boards
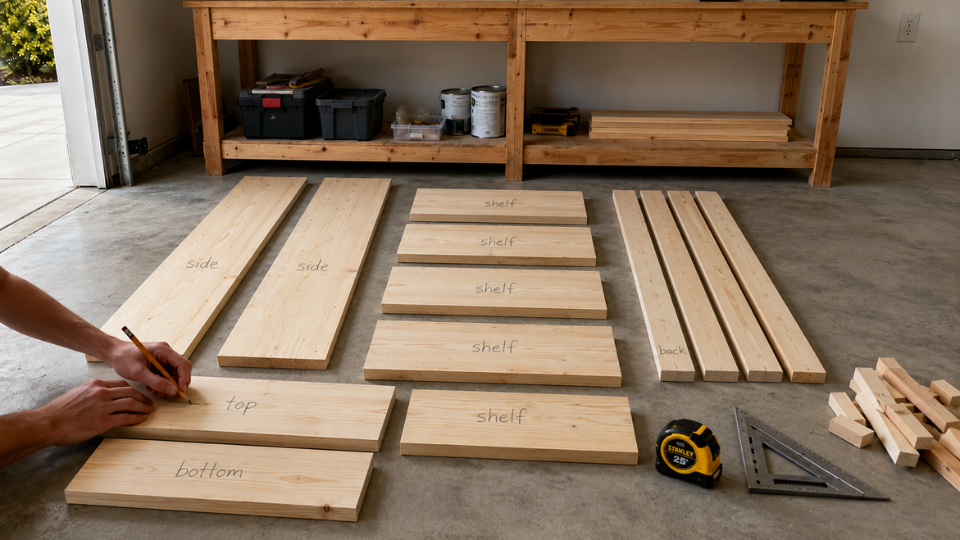
Cut the boards using the cut list, or ask the hardware store to cut them for you. You’ll need two side panels, one top panel, one bottom panel, two middle shelves, and one thin plywood back panel.
Once the pieces are ready, label each one with a pencil on the inside face. Mark the side panels, top, bottom, shelves, and back panel. This keeps the build organized and prevents mixing up similar pieces during assembly.
Step 2: Mark the Shelf Placement
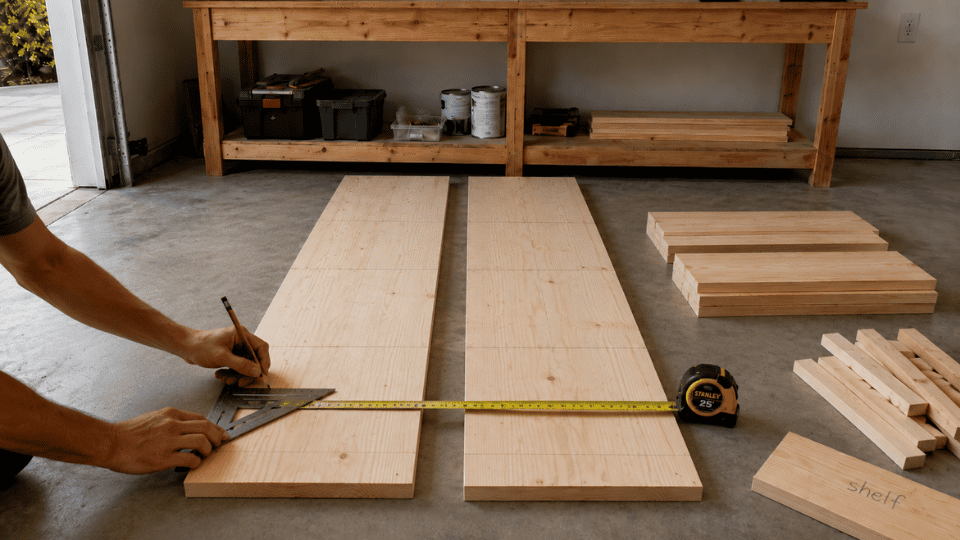
Lay both side panels next to each other on a flat surface, with the bottom ends lined up. Use a measuring tape to mark the positions of the bottom, top, and two middle shelves.
Draw straight guide lines across both panels with a speed square. Marking both side panels together helps the shelf heights match.
Keep the shelf openings close to 10 inches so the finished bookshelf can hold books, boxes, and decor.
Step 3: Drill Pilot Holes
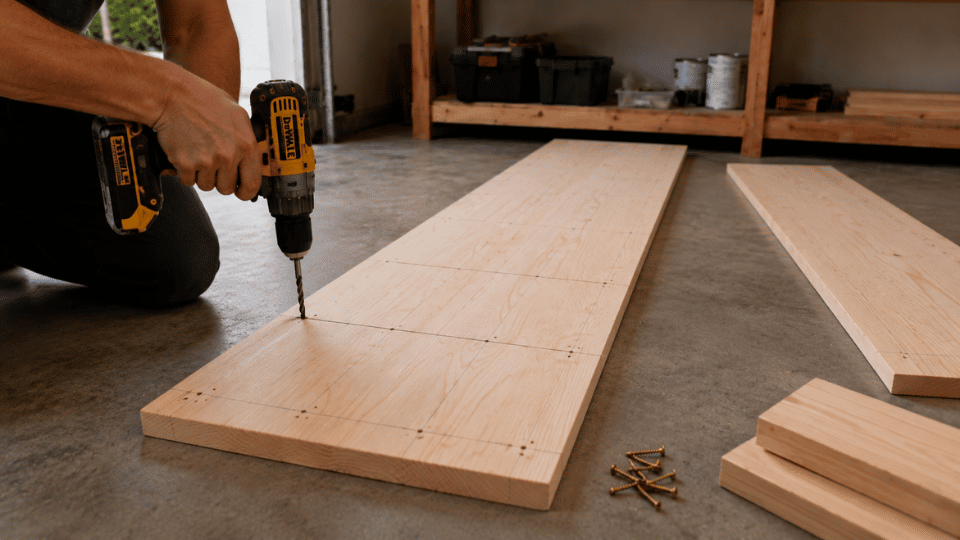
Drill pilot holes through the side panels where the top, bottom, and middle shelves will attach. Line the holes up with the center of each board end, and keep them away from the very edges.
Pilot holes help guide the screws and reduce splitting, which is helpful when working with pine. They also make assembly easier because the screws will pull the boards together more smoothly and with less force.
Step 4: Build the Outer Rectangular Frame
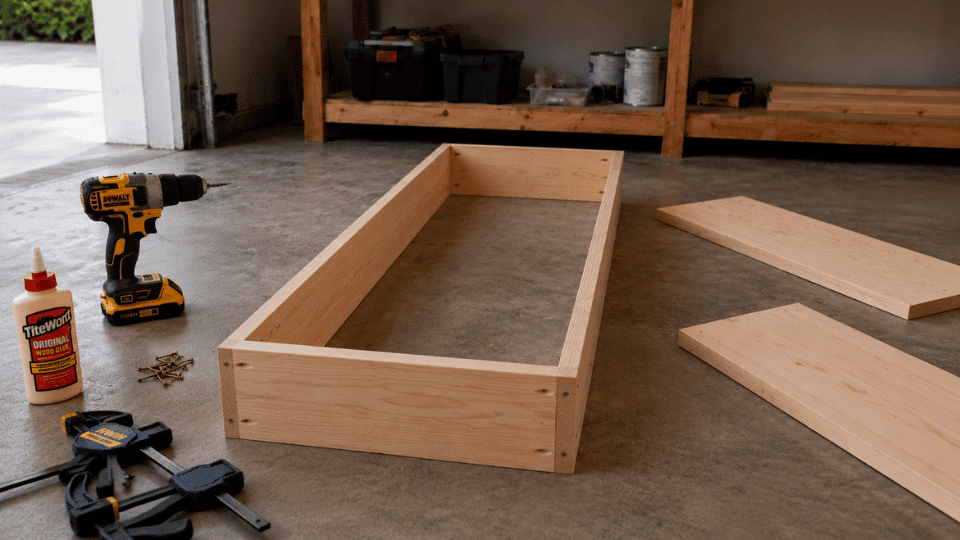
Attach the top and bottom boards between the two side panels to create the outer rectangular frame.
Add a thin line of wood glue at each joint, then drive screws through the side panels into the ends of the top and bottom boards.
Work on the floor or a large table so the frame stays steady. Tighten the screws slowly, and make sure the board edges stay flush as the rectangle comes together.
Pro Tip: Measure both diagonals of the outer frame after the screws are in. If they match, the frame is square. If they don’t, loosen the screws slightly, nudge the frame until the diagonals are equal, then re-tighten.
Step 5: Attach the Middle Shelves
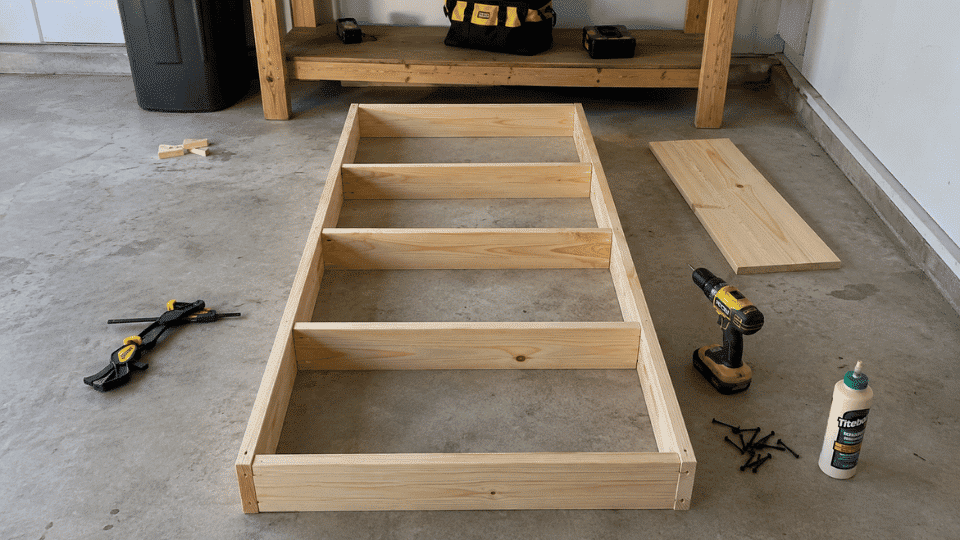
Slide the first middle shelf into place along the marked guidelines. Add wood glue to both ends, then hold or clamp the shelf to prevent it from shifting.
Drive screws through the side panels and into the shelf ends. Repeat the same process for the second shelf. Before fully tightening the screws, check that each shelf lines up with the pencil marks. Wipe away extra glue with a damp cloth before it dries.
Step 6: Attach the Plywood Back
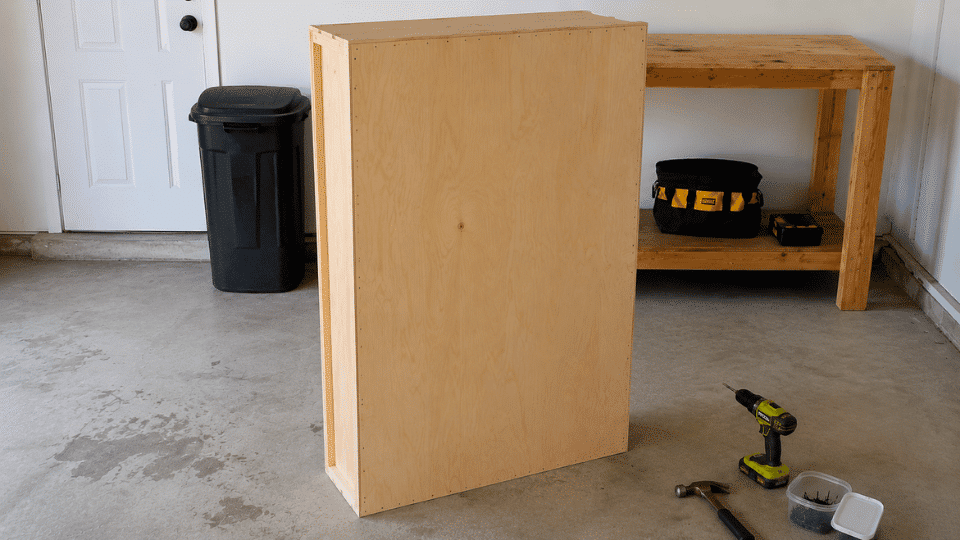
Turn the bookshelf carefully so the back side faces up. Place the thin plywood back panel over the rear of the frame and line it up with the outside edges.
Attach it with small screws or finishing nails around the outer frame and into the shelf backs. This back panel helps the bookshelf feel more finished and reduces side-to-side movement. Make sure the panel sits flat before adding the last few fasteners.
Step 7: Fill, Sand, and Prime the Bookshelf
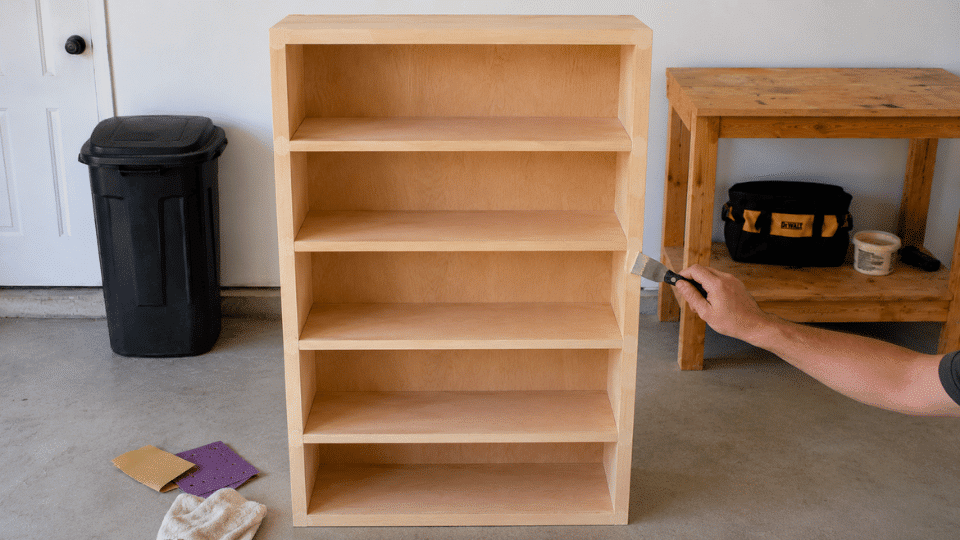
Fill screw holes, nail holes, and small gaps with wood filler. Let it dry fully, then sand those areas smooth. Sand the cut edges and any dried glue marks. Wipe dust off with a dry cloth. Apply one thin coat of primer across the entire piece, sides, shelves, front edges, and plywood back- and let it dry completely before painting.
Skipping primer on bare pine usually shows up as uneven coverage on the first paint coat, especially on end grain, and it matters even more if the wood has any prior stain or finish, since paint over stained wood behaves differently than bare pine.
Step 8: Paint the Main Color and Add the Pattern
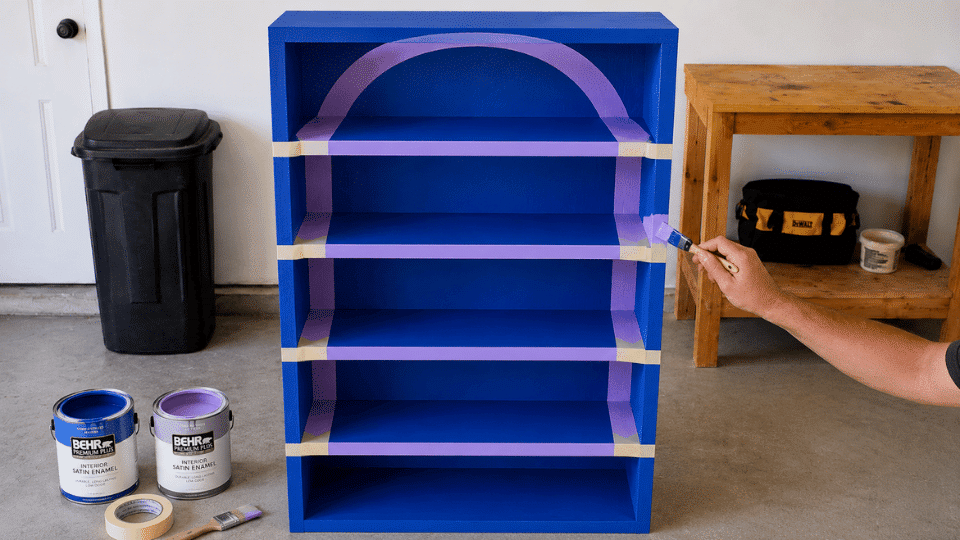
Paint the bookshelf with your main color first. Use two thin coats instead of one heavy coat, and let each coat dry before adding the next. Once the base color is dry, add the second-color pattern.
You can use painter’s tape for wide stripes, checkerboard blocks, or clean shelf borders. For waves or arches, draw a light pencil guide first. Keep the pattern bold but controlled, so the final piece feels playful and intentional.
Step 9: Seal, Cure, and Place the Bookshelf
A clear topcoat is optional, but worth adding on a bedroom shelf that will hold books with sharp spines or boxes that slide in and out regularly. Apply in thin layers and let each cure fully. After painting, give the piece at least 24–48 hours before loading it.
Fresh paint scuffs even when it feels dry to the touch. When placing it, put the heavier books on the bottom shelf for stability, use a wall anchor if children or pets are in the room, and take your time when you decorate the finished shelves. The styling is what makes the paint pattern pay off.
How Much Does It Cost to Build a Bookshelf?
The cost depends mostly on whether you already own a drill and clamps. The materials alone, including wood, fasteners, primer, and paint, run about $70–$100 for this size. Add $50–$80 if you need to buy basic tools.
| Line Item | Low End | High End | What Drives the Variation |
| Pine boards (3 boards, 6 ft) | $25 | $45 | Grade, knot count, and regional lumber pricing |
| Plywood back panel | $10 | $20 | Whether you buy a full sheet or a cut-off |
| Screws, glue, and wood filler | $10 | $18 | Brand and whether you already have some |
| Sandpaper | $4 | $8 | Pack size |
| Primer | $8 | $15 | A small can is enough for one thin coat |
| Paint (2 colors) | $15 | $30 | A quart for the main color, a sample pot for the accent |
| Clear topcoat (optional) | $10 | $25 | Brand and finish type |
| Estimated total (tools owned) | $82 | $161 | Lower end is realistic if you already own a drill |
The biggest variable most guides skip: store cutting fees. If you don’t own a saw and the hardware store charges per cut, budget an extra $5–$15 depending on the number of pieces. Most big-box stores cap the fee or offer the first few cuts free — it’s worth asking before you assume you need to buy a saw for a single project.
Beginner Tips for a Better Bookshelf
These tips are not extra steps. They are simple checks that help the bookshelf come together cleaner, straighter, and safer.
- Choose straight boards. Look down each board before buying it. Avoid boards that twist, curve, or have deep cracks.
- Keep the design one size. Use the same board depth for the whole build. This makes measuring and assembly much easier.
- Mark both side panels together. This keeps the shelf lines even and helps prevent one side from sitting higher than the other.
- Do not skip pilot holes. They reduce splitting and make screws easier to drive straight, especially near board ends.
- Use glue and screws together. Glue adds strength, while screws hold the bookshelf firmly in place as it dries.
- Paint in thin coats. Thick paint can drip, stay tacky, or hide your pattern edges. Thin coats look cleaner.
- Let the paint cure before styling. Books can scratch fresh paint, even when the surface feels dry.
- Keep heavy items low. Put larger books and storage boxes on the bottom shelf so the bookshelf feels more stable.
Design Variations for the Same Bookshelf
These ideas use the same basic bookshelf build, but the finish and styling change the mood. Not every version needs to be maximalist.
1. Literature-Heavy Bookshelf
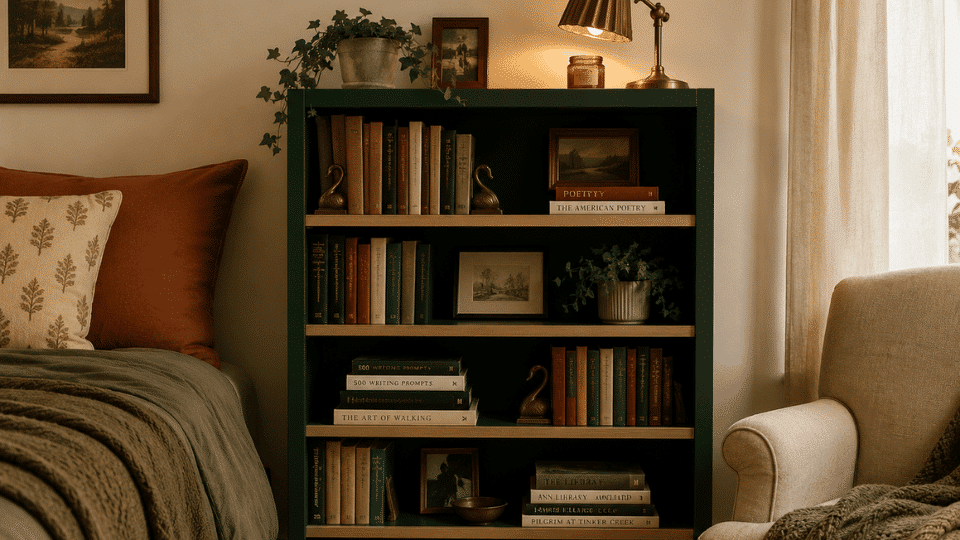
For a book-focused version, use a deep color like forest green, oxblood, navy, or warm brown. Keep the paint finish more classic, with maybe one contrast color on the shelf edges or inside panels.
Style it with novels, poetry, essays, annotated paperbacks, brass bookends, and a small reading lamp. This version feels full and personal, but more library-inspired than loud or playful.
2. Mystic Bookshelf
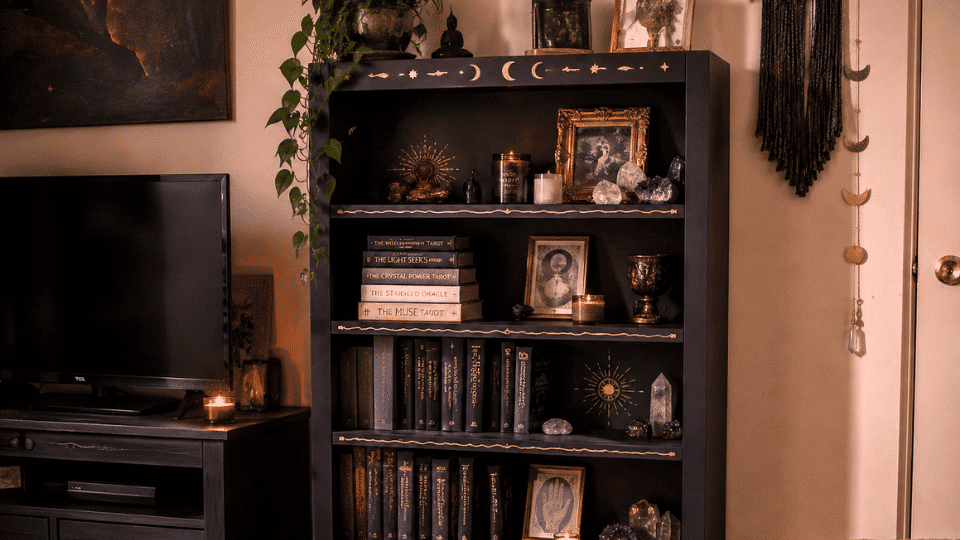
For a mystic version, choose a dark base color like plum, midnight blue, charcoal, or black-green. Add small painted details, such as moons, stars, arches, or soft waves, using gold, silver, lilac, or teal.
Style it with tarot decks, candles, crystals, astrology books, incense holders, and metallic frames. This version feels moody, layered, and calm rather than bright pop maximalist.
3. Pop Maximalist Bookshelf
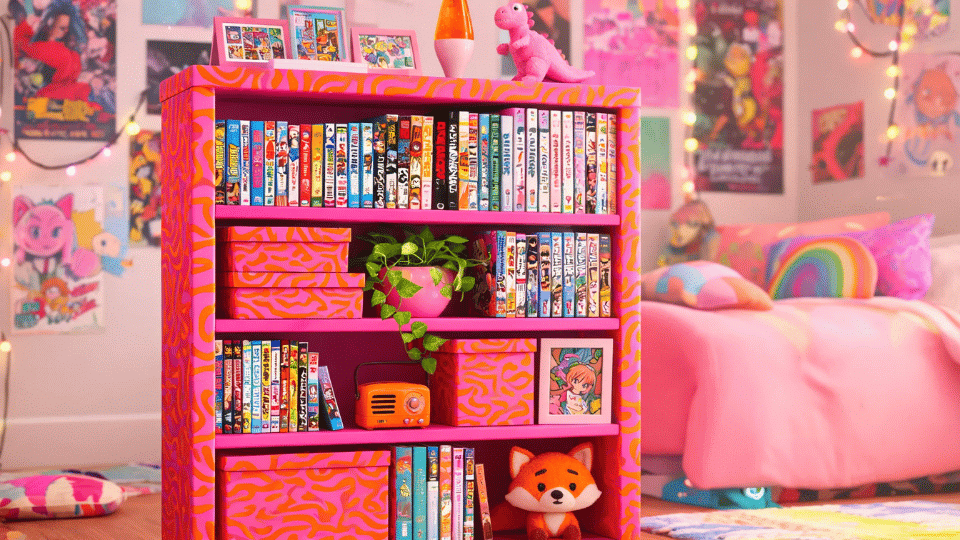
For the main pop maximalist look, use a bold base color and a strong second-color pattern. Try hot pink with orange waves, cobalt with lime stripes, or lilac with red checkerboard corners.
Style it with graphic novels, colorful book spines, glossy decor, framed postcards, and patterned boxes. This version should feel playful, bright, and expressive while maintaining a single clear paint pattern.
4. Soft Colorful Bookshelf
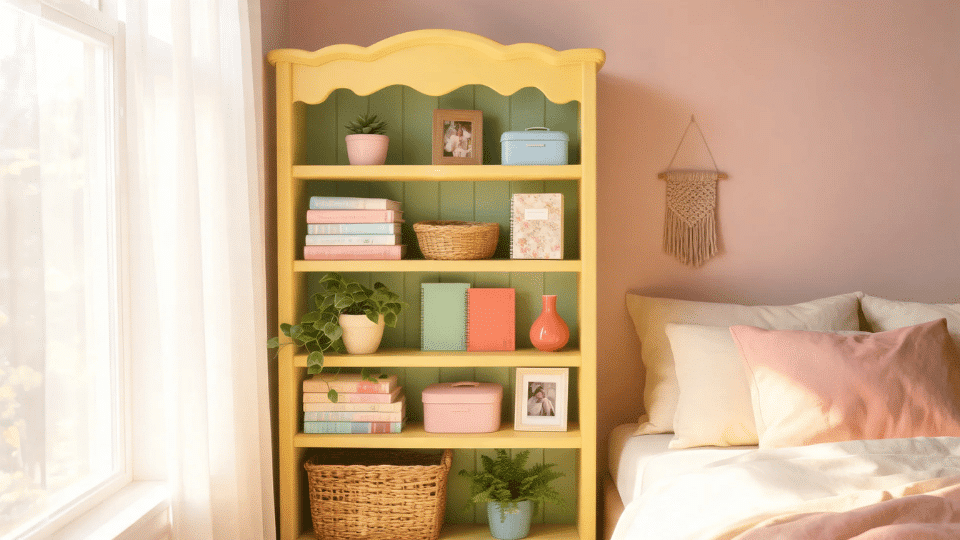
For a softer version, choose colors like butter yellow, sage, coral, powder blue, or warm cream. Add a small painted detail, such as scalloped edges, shelf-border lines, or a contrast interior.
Style it with journals, romance novels, ceramics, plants, framed photos, and woven baskets. This version still feels creative, but it is gentler and easier to blend into a calm bedroom.
Common Mistakes to Avoid
These mistakes are easy to make during a first build. Checking them early can save time and make the finished bookshelf feel sturdier.
| Mistake | Why It Causes Problems | Better Choice |
|---|---|---|
| Buying warped boards | Shelves may not sit evenly | Choose straight pine boards |
| Skipping pilot holes | Wood can split near the edges | Drill before adding screws |
| Not checking the square | The frame can lean or twist | Measure both diagonals |
| Using too many paint ideas | The design can look messy | Choose one clear pattern |
| Painting too thickly | Paint may drip or stay sticky | Use thin coats |
| Loading shelves too soon | Fresh paint can scratch | Let the paint cure first |
A beginner bookshelf does not need to look machine-made. It should feel sturdy, smooth enough to use, and finished with care.
Frequently Asked Questions
How much weight can this DIY bookshelf hold?
This bookshelf can hold regular books and small decor, but it is not meant for very heavy loads. Spread weight across the shelves, and keep the heaviest items near the bottom.
Can I build this bookshelf in a rental apartment?
Yes, but protect the floor with a drop cloth while building and painting. If you cannot drill into the wall, use removable furniture safety straps where allowed.
How do I clean a painted bookshelf?
Use a soft, dry cloth for dust. For marks, wipe gently with a slightly damp cloth and mild soap. Avoid rough scrubbers because they can dull the paint.
Happy Reading
A painted bookshelf is a useful way to practice measuring, drilling, assembly, and finishing without taking on a huge project. Once you learn how to build a bookshelf, you can change the color, pattern, or shelf size in later builds.
This DIY bookshelf keeps the wooden structure simple, while the two-color paint makes it feel bold and personal. I like that it works as storage and decor at the same time.
My best advice is to choose straight boards, check the frame before adding shelves, and let the paint cure well. Try the build, then make the pattern your own.


