

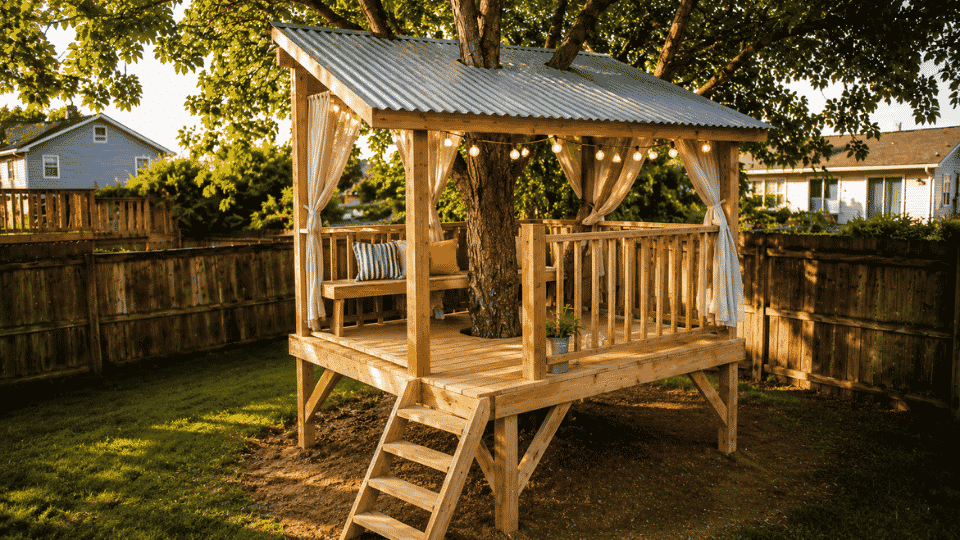


If you want to know how to build a treehouse for kids without turning it into a multi-year nightmare, start with this: difficulty is a 3 out of 5, the build runs 3–6 weekends with a helper, and the total cost lands between $1,200 and $2,500 for a platform with railings, ladder, and sloped roof. That range is real. I went in expecting a long weekend project. It took four.
The design here is an 8×8 post-supported platform; four 6×6 ground posts carry the weight, and the tree passes through the deck without bearing the structural load.
That one decision keeps the whole build manageable for a first-timer. No complex branch attachment, no TAB hardware, no arborist consultation required. The tree is there for character, not for carrying the house.
| Difficulty | 3 out of 5 — framing and post-setting require patience; roofing requires a helper |
| Time | 3–6 weekends (beginner with helper); 2–4 weekends (experienced DIYer) |
| Cost | $1,200–$2,500+ for the full build with roof |
| Tools Needed | Circular saw, drill/driver, level, socket wrench, post-hole digger, tape measure, square, clamps, ladder |
| Skill Required | Beginner — but not a solo project. A second person is non-negotiable. |
| Cost Note: Figures in this article are estimates based on national averages as of 2025. Lumber prices fluctuate significantly by region and season. Actual costs vary based on local footing requirements, roof panel choice, railing style, and hardware. Get at least two material quotes before buying. |
The Failure Point Nobody Warns You About
The post stage is where most beginner treehouse builds quietly fall apart. Not during construction — six months later, when one post has shifted, and the whole frame is no longer level. The fix after the fact is brutal.
Here’s what goes wrong: people don’t let the concrete fully cure before loading the frame, or they skip the temporary bracing and let the posts drift while the footing sets. Even a half-inch of lean at the base becomes two inches of problem by the time you reach the roof frame. Set the posts, brace them hard, and leave them alone for at least 48 hours before touching the frame boards.
The second failure point is tree clearance. I see this in almost every online build thread. People frame the trunk opening too tightly, the tree moves or grows, and within a year, the deck boards are pressing into the bark.
Leave 2–3 inches of clearance around the trunk on every side, more for larger trees. The tree will move in the wind even if it doesn’t grow much. If you frame it snug, you’ll be back out there with a saw.
| Safety Note: Check local building permit requirements before digging post holes or starting construction. Height, size, and setback rules vary by municipality. A treehouse platform over 200 square feet or above 8 feet may require a permit in many US jurisdictions. Using a healthy, mature hardwood tree, oak, maple, beech, or Douglas fir, with no rot, cracks, or dead limbs above the build zone, is a non-negotiable starting point. |
How to Build a Treehouse for Kids: Step-by-Step
Work through these steps in order. The early layout work is the least exciting part and the most important. A sloppy start means every step after it is a workaround.
Materials and Tools
Buy everything before you start. Running to the lumber yard mid-build while posts are propped and braced is how mistakes happen. The quantities below cover the standard 8×8 platform with a 9×9 sloped roof. Buy 10% extra on lumber for cuts and mistakes.
| Item | Amount / Measurement | Item | Amount / Measurement |
| 6×6 posts (pressure-treated) | 4 pieces, 10 ft | 2×8 boards | 4 pieces, 8 ft |
| 2×6 boards (floor joists) | 7–9 pieces, 8 ft | Deck boards (cedar or PT) | Enough for 64 sq ft |
| 4×4 posts (roof/railing) | 4–6 pieces | 2×4 boards | 15–25 pieces |
| Corrugated roof panels | Enough for 9×9 ft | Joist hangers + exterior screws | Per joist count |
| Platform height | 4–6 ft from ground | Railing height | 36 inches minimum |
| Joist spacing | 16 inches on center | Tree clearance | 2–3 inches minimum |
| Roof slope | 8–12 inches rise | Ladder width | 18–24 inches |
| Gravel or concrete | Per footing depth | Roofing screws with rubber washers | Per panel count |
Beyond lumber and panels, you’ll need: a tape measure, a pencil, a level, a square, a drill/driver, a circular saw, a socket wrench, a post-hole digger, clamps, two ladders (one for each side during roof work), gloves, safety glasses, structural screws or carriage bolts, and exterior deck screws.
Do not substitute indoor screws; they rust and the threads strip under the seasonal expansion and contraction of outdoor wood.
Step 1: Choose the Tree, Clear the Area, and Mark the Layout
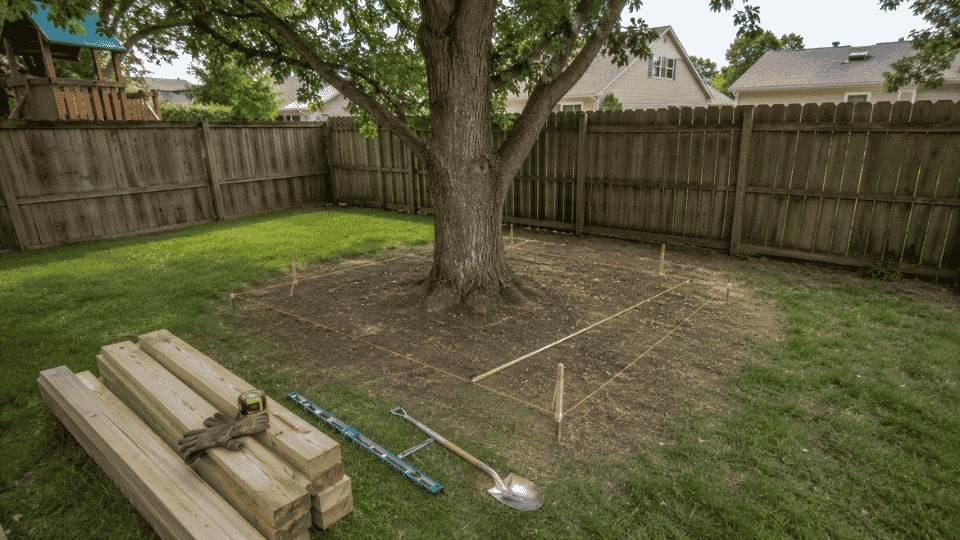
Start with the tree selection. A mature hardwood, oak, maple, beech, or Douglas fir, is the right call. Softer species like pine can work, but they need closer inspection for rot. Walk around the tree and look up: no dead branches directly above the build zone, no visible cracks, no fungal growth at the base. If anything looks uncertain, have an arborist look before you start.
- Clear rocks, weeds, and debris from the ground around the tree.
- Mark an 8 ft × 8 ft square around the trunk using stakes and string.
- Place corner stakes where the four main posts will go.
- Measure both diagonals; they should match. Adjust until they do.
- Mark one side clearly as the ladder entry opening.
Step 2: Dig and Set the Four Main Posts
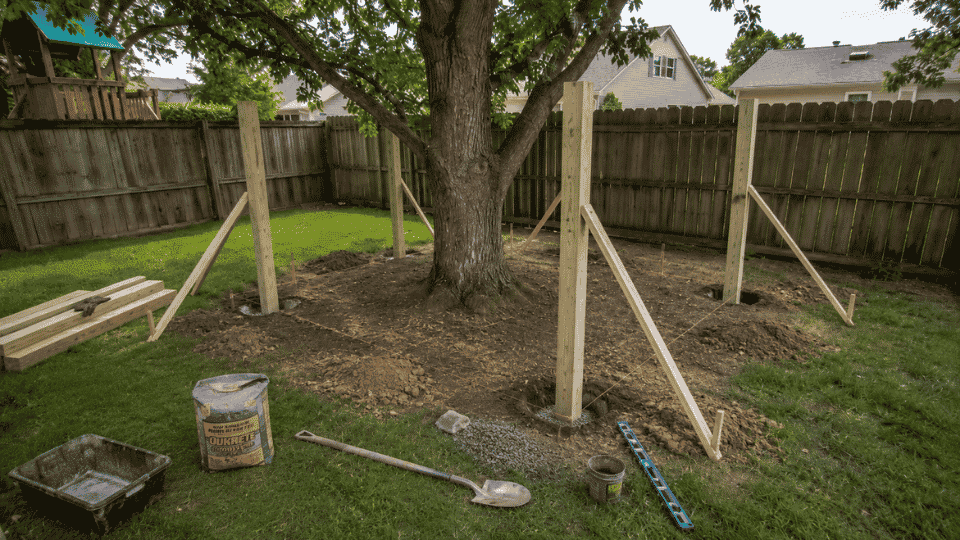
This is the step that decides whether your treehouse is still level in three years. Go slow here.
- Dig four post holes to your local frost depth, check your municipality’s requirement; most US regions need 24–48 inches.
- Add 4–6 inches of gravel at the bottom of each hole for drainage.
- Set one 6×6 pressure-treated post in each hole.
- Brace each post with temporary 2×4 diagonal braces screwed into stakes in the ground, two directions per post.
- Check plumb from two sides with a level before the concrete goes in.
- Pour concrete and let it cure fully, minimum 48 hours, 72 hours if the weather is cool, before any framework.
Step 3: Mark Platform Height and Build the Outer Frame
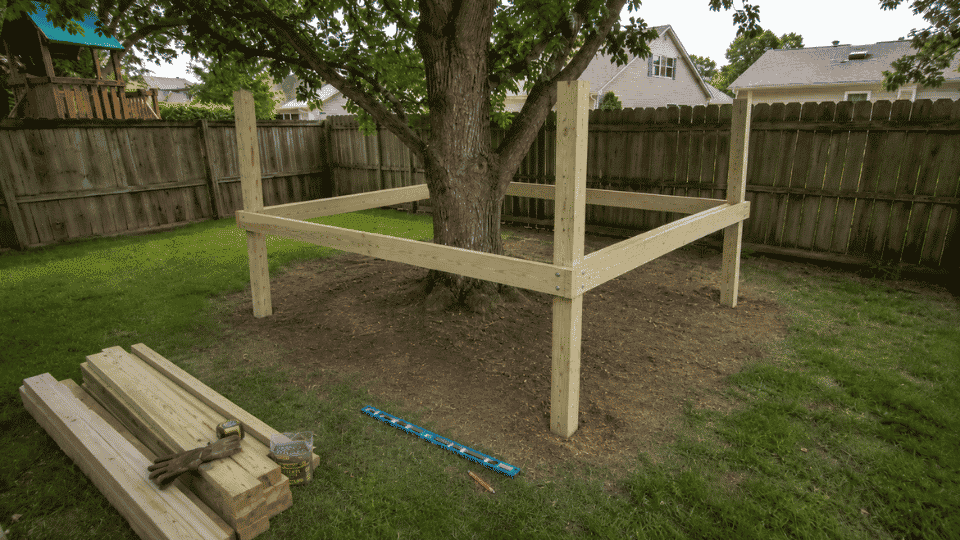
Four to six feet off the ground is the right range for a beginner build. High enough to feel like a treehouse, low enough to frame safely from the ground, and a step ladder.
- Mark the same height on all four posts using a laser level or water level, a string level introduces too much sag error over 8 feet.
- Cut the posts to the height at the marked line.
- Attach the four 2×8 outer frame boards to the posts using carriage bolts, two per connection minimum.
- Check the level on every side before fully tightening.
- Measure diagonally across the frame to confirm the square.
Step 4: Install Floor Joists and Frame the Tree Opening
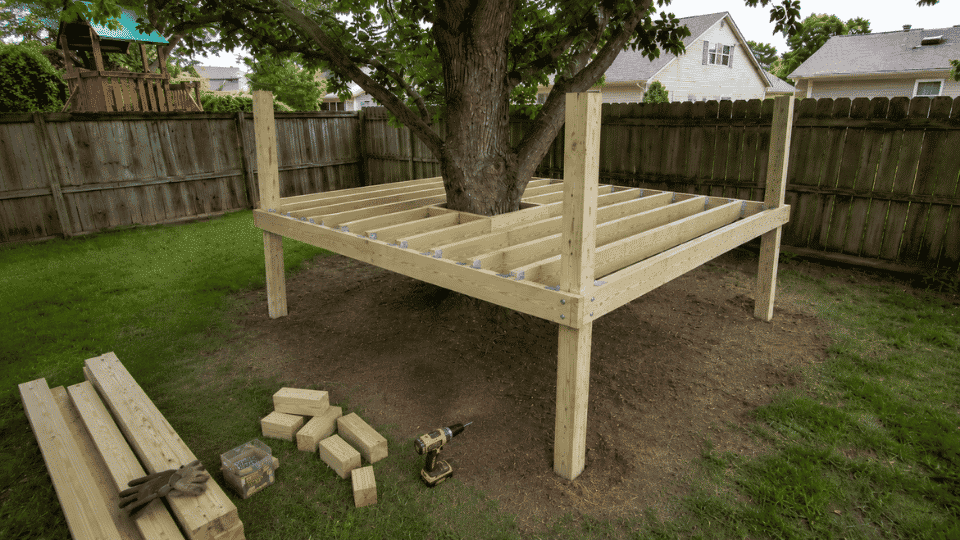
The floor joists spread the weight across the platform and transfer it down to the posts. Frame the tree opening at the same stage, don’t leave it for later, or you’ll be cutting joists you already fastened.
- Run 2×6 joists across the outer frame, 16 inches on center.
- Attach each joist with joist hangers and exterior-rated fasteners on both ends.
- Plan the tree opening before placing any joists that would need to be cut.
- Box out the opening with short framing pieces, a doubled header and a doubled sill, same as a window rough opening.
- Leave at least 2–3 inches of clearance around the trunk on every side. Measure from the bark, not the center.
Step 5: Add Diagonal Bracing
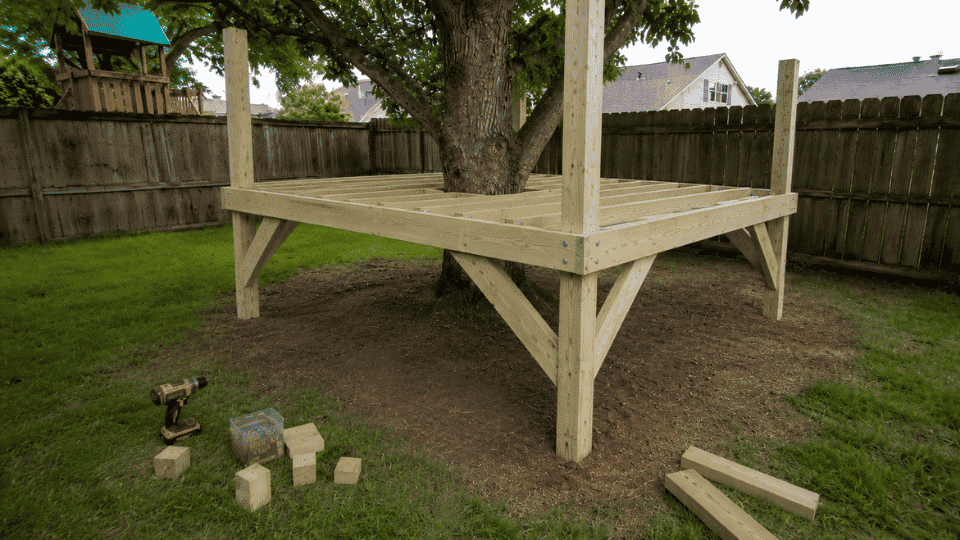
A raised platform without bracing has a noticeable sway when kids move around. It won’t fail, but it feels wrong, and over time the fasteners loosen under the repetitive lateral movement. The same principle applies to any raised deck structure — if you’ve built or plan to build a standard deck alongside this treehouse, the deck skirting guide covers how to close off the underside neatly once the frame is solid.
- Cut 2×6 diagonal braces to fit from the post to the outer frame at roughly a 45-degree angle.
- Add bracing on at least two opposite sides of the platform.
- If any sway remains, brace the remaining two sides as well.
- Fasten with structural screws or bolts, not small nails.
Step 6: Install the Deck Boards
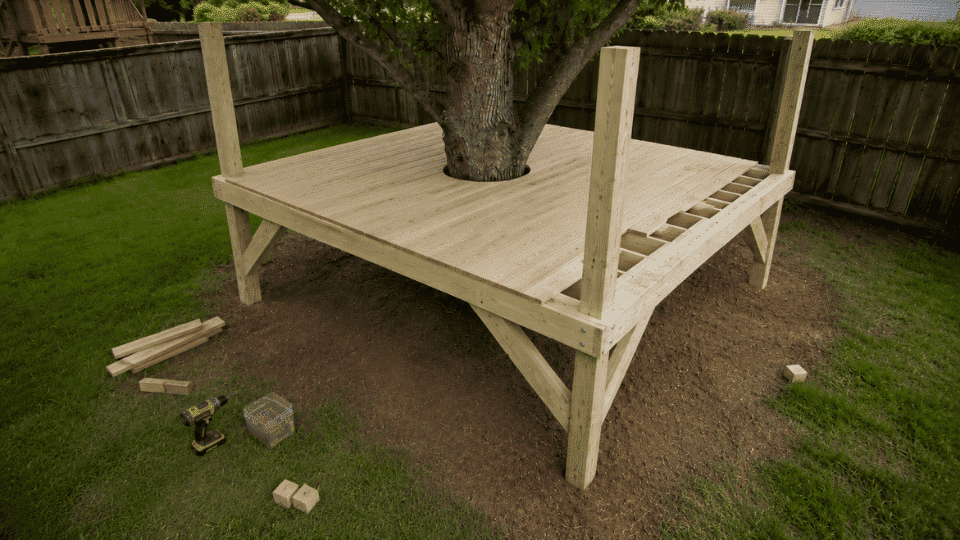
Lay deck boards perpendicular to the joists, working from one end toward the tree opening. This lets you plan the cut-around before you’re committed. If you’re thinking about what the finished platform could look like with furniture and surrounding outdoor elements, the outdoor deck ideas guide covers platform styling that scales from a simple raised deck to a full backyard setup.
- Leave 1/8-inch gaps between boards for drainage; a 16-penny nail used as a spacer works perfectly.
- Cut boards carefully around the tree opening, maintaining the clearance gap.
- Keep all screw heads flush; proud screw heads are a trip hazard on bare feet.
- Use exterior deck screws throughout. Two screws per board per joist.
Step 7: Build the Railings and Attach the Ladder
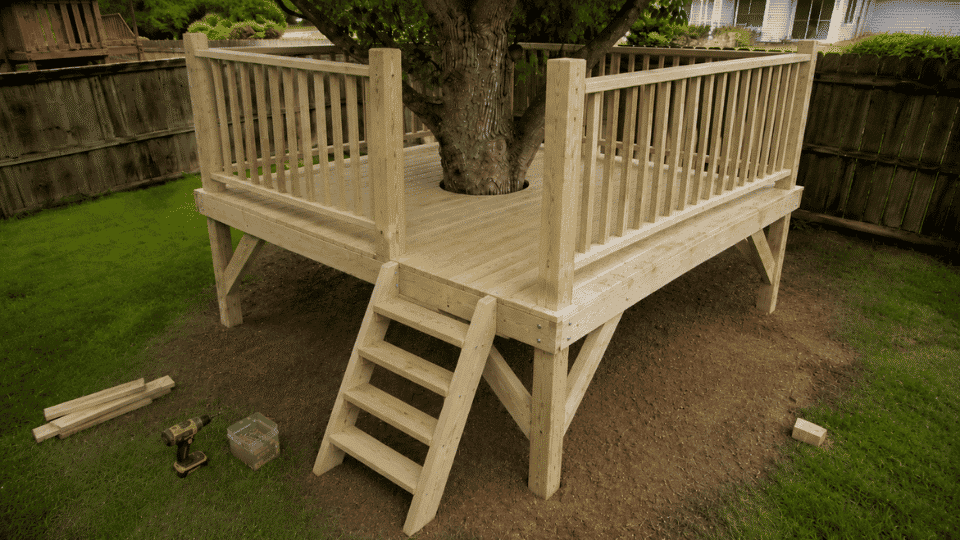
Railings go up before anyone stands on the platform. No exceptions. This isn’t an aesthetic choice; it’s a build sequence rule.
- Set 4×4 railing posts at each corner and at intervals no wider than 6 feet along open sides.
- Keep the top rail at least 36 inches above the finished deck surface.
- Space balusters no more than 3.5 inches apart is a standard requirement to prevent a child’s head from passing through.
- Leave one controlled opening only, at the ladder entry point.
- Build the ladder using two 2×4 side rails with 2×4 rungs spaced 10–12 inches apart.
- Bolt the ladder at the top to the platform frame and stake or anchor it at the bottom. A floating base shifts and slides.
Step 8: Build the Square Sloped Roof Frame
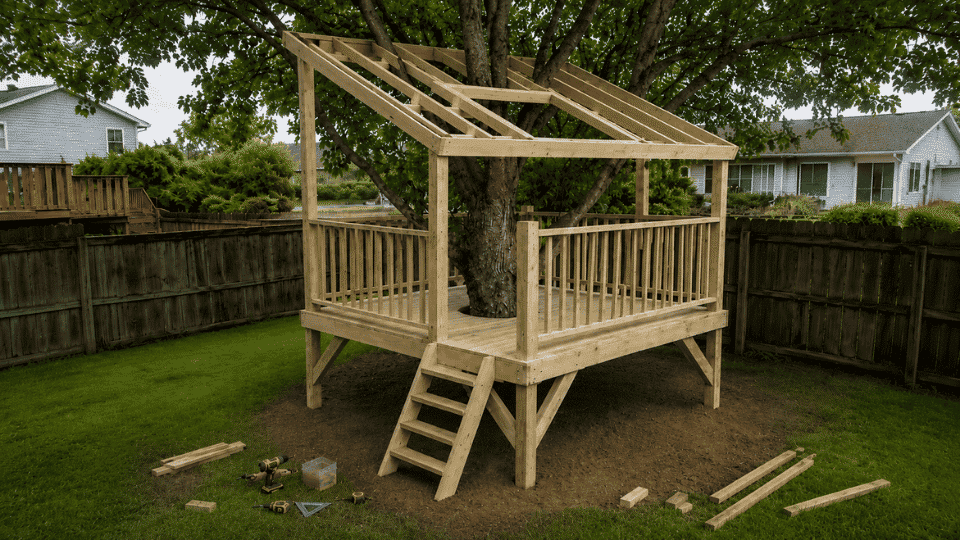
A square sloped roof is the right call for a first build. No ridge board, no rafter angle calculations, no complicated cuts. One side sits 8–12 inches higher than the other; that’s the entire design.
- Build the roof frame 9 ft × 9 ft for a 6-inch overhang on each side.
- Set 4×4 roof posts on the deck, tied into the railing posts where possible.
- Make one side of the roof frame 8–12 inches higher than the opposite side.
- Run 2×4 rafters from the high side down toward the lower side, 24 inches on center.
- Fasten the roof frame to the posts, not to the deck boards directly.
Step 9: Install the Roof Panels
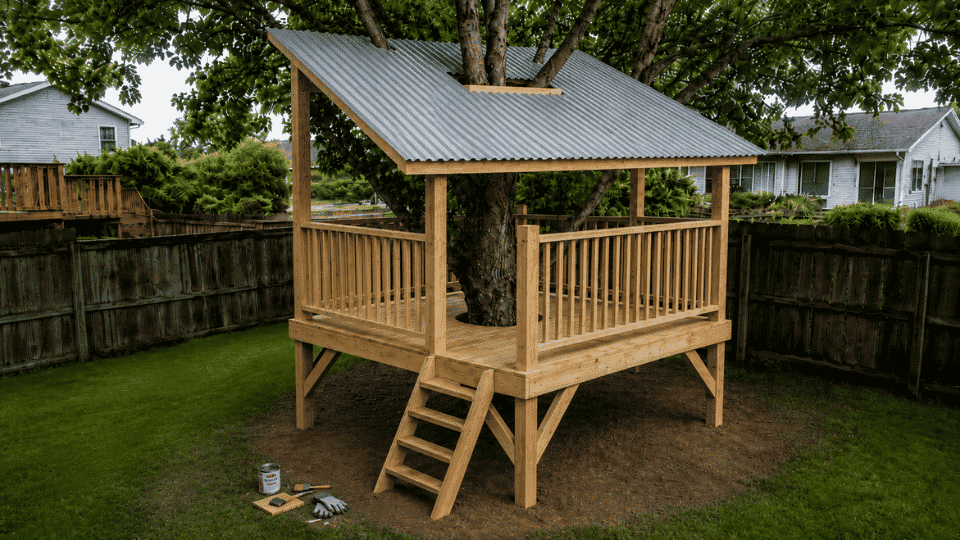
Lightweight corrugated polycarbonate or metal panels are easier to handle solo than traditional roofing. Install them so the ridges run down the slope, water follows the ridge lines, so they need to point toward the drip edge, not across it.
- Overlap each panel by at least one corrugation, follow the manufacturer’s overlap spec for that specific panel type.
- Use roofing screws with integrated rubber washers. These compress to create a seal around the fastener hole.
- Don’t overtighten polycarbonate panels; they crack. Snug, not torqued.
- Trim or file any sharp panel edges before the build is considered done.
| The Faster-Second-Time Tip: Pre-assemble as much as possible on the ground before lifting. The roof frame, ladder, and railing sections can all be built flat on the ground, then lifted into position. I built mine in place the first time and spent twice as long fighting gravity. Build down here, lift up there. |
Before Kids Use It: Finish and Final Check
The build isn’t done when the last roof screw goes in. Run through this before anyone climbs up.
- Sand rough edges on the ladder rungs, railing tops, deck boards, and the tree opening trim.
- Seal or stain all exposed wood with an exterior-rated finish. Unsealed lumber starts showing surface checks and moisture damage within one season.
- Pull on every railing post and ladder rung. Nothing should move. If it does, add a fastener or replace the connection.
- Check all roof panels; every fastener should be fully seated, with no lifted edges.
- Confirm the tree clearance gap is still clear all the way around the trunk.
- Walk the platform yourself before the kids get on it. Feel for flex, listen for creaks at the post connections.
Mistakes to Avoid
I made several of these. Most are fixable. A few are expensive.
- Building the platform too high. Above 6 feet, everything gets harder: framing, inspecting, and inspecting again in three years. Stay at 4–6 feet for a first build.
- Using wet or untreated lumber for structural parts. Wet lumber warps as it dries. Untreated lumber rots from the inside out. Pressure-treated for posts and framing, cedar or treated for deck boards.
- Framing the tree too tightly. Already covered above, but worth repeating. 2–3 inches minimum. The tree moves, it grows, and the deck boards don’t.
- Skipping railings until later. Later never comes fast enough, and someone’s on the platform before the railings are in. Build the railings in sequence, not as an afterthought.
- Building the roof completely flat. A flat roof is a bathtub. Even a small slope — 8 inches over 9 feet — keeps standing water off the panels.
- Using small nails for structural connections. Carriage bolts and structural screws for anything load-bearing. Nails work for siding, not for joints that hold kids in the air.
- Building alone. Posts need to be held plumb while the bracing is attached. Roof panels need to be held in place while the screws go in. This is not a solo project for a beginner.
What Real Builders Say
A post in the Treehouse Builders Facebook group, a parent showing his starting build for his daughter, got useful responses that go beyond the tutorial books. The consistent thread was this: leave more room around the trunk than you think you need, and treat the structure as something you’ll be inspecting every single season.
Several experienced builders in the thread flagged that even a lightweight platform feels different to a tree than it looks. The posts carry the load, but the tree still moves underneath the deck, and that clearance gap is what keeps the two from fighting each other. A treehouse that looked fine at installation can put real pressure on the bark within two or three growing seasons if the trunk gap was cut close.
The other note, and this matches my own experience, is that treehouses tend to grow. You finish the platform and immediately want walls. You add walls, and then you’re looking at a pulley system. Budget and timeline for what you’re building now, and leave the additions for when the main structure has been inspected through one full winter.
The same scoping discipline applies to any permanent outdoor structure. The sunroom addition cost guide is a useful reference for understanding how scope creep adds up on outdoor-to-indoor builds.
Cost and Time Breakdown
These figures reflect lumber and hardware costs. Prices vary by region and by whether your local footing requirements need concrete vs gravel alone. If this treehouse is part of a broader outdoor upgrade, the backyard remodel cost breakdown covers how to budget across multiple projects without letting one line item blow the whole plan.
| Build Version | Estimated Cost |
| Basic 8×8 platform only | $500–$900 |
| A platform with railings and a ladder | $800–$1,500 |
| Full build with sloped roof | $1,200–$2,500+ |
| Skill Level | Time |
| Experienced DIYer with a helper | 2–4 weekends |
| Beginner with a helper | 3–6 weekends |
| Beginner alone | Not recommended |
The biggest time variable isn’t skill, it’s the post-cure wait. Budget a full week between post-setting and frame-building if you want to be safe about it. Trying to compress that window is how the post-shift problem starts.
Seasonal Inspection Checklist
One inspection per season, or at a minimum twice a year, once in spring after the freeze-thaw cycle, once in fall before winter loads the structure. Check each item below before letting kids back on the platform after any long break.
- Posts: no visible lean, no soft spots at ground level, no new cracking
- Post-to-frame connections: bolts still tight, no rust staining on the wood below
- Diagonal braces: fasteners tight, no bowing or cracking in the lumber
- Deck boards: no soft spots, no lifted screws, no significant gapping
- Railings: all posts solid when pushed hard, no wobble at connections
- Ladder: top and bottom attachments secure, no rung movement
- Roof panels: no lifted edges, no cracked sections, no fasteners backing out
- Tree clearance: bark still clear of all framing and deck trim
Frequently Asked Questions
These are the questions that come up in every build thread I’ve read, and the ones I had myself when I started.
What kind of wood is best for a kids’ treehouse?
Pressure-treated lumber for posts, framing, and any wood near or in the ground. Cedar or redwood for deck boards and visible trim, both resist decay naturally and are safer for bare-skin contact than pressure-treated surfaces. Avoid untreated pine for any structural or outdoor-exposed part.
How much space do you need around the tree trunk?
At minimum 2–3 inches of clear gap between the trunk and any framing, decking, or trim on every side. Larger trees with faster growth rates may need 4–6 inches. The gap accounts for both growth and the natural sway the tree produces in the wind.
Can one person build a kids’ treehouse alone?
An experienced builder can manage some stages solo, but a beginner should not attempt this alone. Post-setting, frame lifting, roof panel installation, and railing work all require a second person for safety and accuracy. Working alone also means no one is spotting errors from the ground.
Do you need a permit to build a backyard treehouse?
It depends on your municipality. Many US jurisdictions don’t require a permit for structures under a certain height and square footage, but rules vary widely. Check with your local building department before starting — finding out after the fact is a much worse conversation.
How do I make a treehouse safe for kids?
Keep the platform low (4–6 feet), use 36-inch railings on every open side, space balusters no more than 3.5 inches apart, secure the ladder top and bottom, add diagonal bracing, and inspect all connections before use. Sand rough edges and seal the wood. Adult supervision is part of the safety system — it doesn’t replace structural integrity, but it catches problems before they become incidents.
What should I inspect each season in a treehouse?
Posts, post-to-frame connections, diagonal bracing, deck boards, railings, ladder attachments, roof panels, and the tree clearance gap. Look for rust, rot, soft spots, loose fasteners, cracked lumber, and any contact between the structure and the bark. One missed loose bolt at a railing post is how injuries happen.
How high should a kids’ treehouse platform be?
4–6 feet from the ground is the right range for a beginner build and for children’s safety. Above 6 feet, the framing and inspection work becomes significantly harder, and fall consequences increase. Expert recommendations from licensed contractors consistently land in the 6–8-foot maximum range, even for professionally built structures.
Final Verdict:
A safe build starts with a clear plan, not complicated features. The platform height, post support, diagonal bracing, railing height, tree clearance, and roof slope each do real structural work in this design.
Getting those right matters far more than any decorative detail. Once the main frame is solid and inspected, small upgrades can make the treehouse feel special without overloading it.
This DIY tree house plan is my practical starting point for anyone learning how to build a treehouse for kids, structured enough to follow, simple enough to actually finish.
Try each step carefully, and drop your questions or photos in the comments below.





