

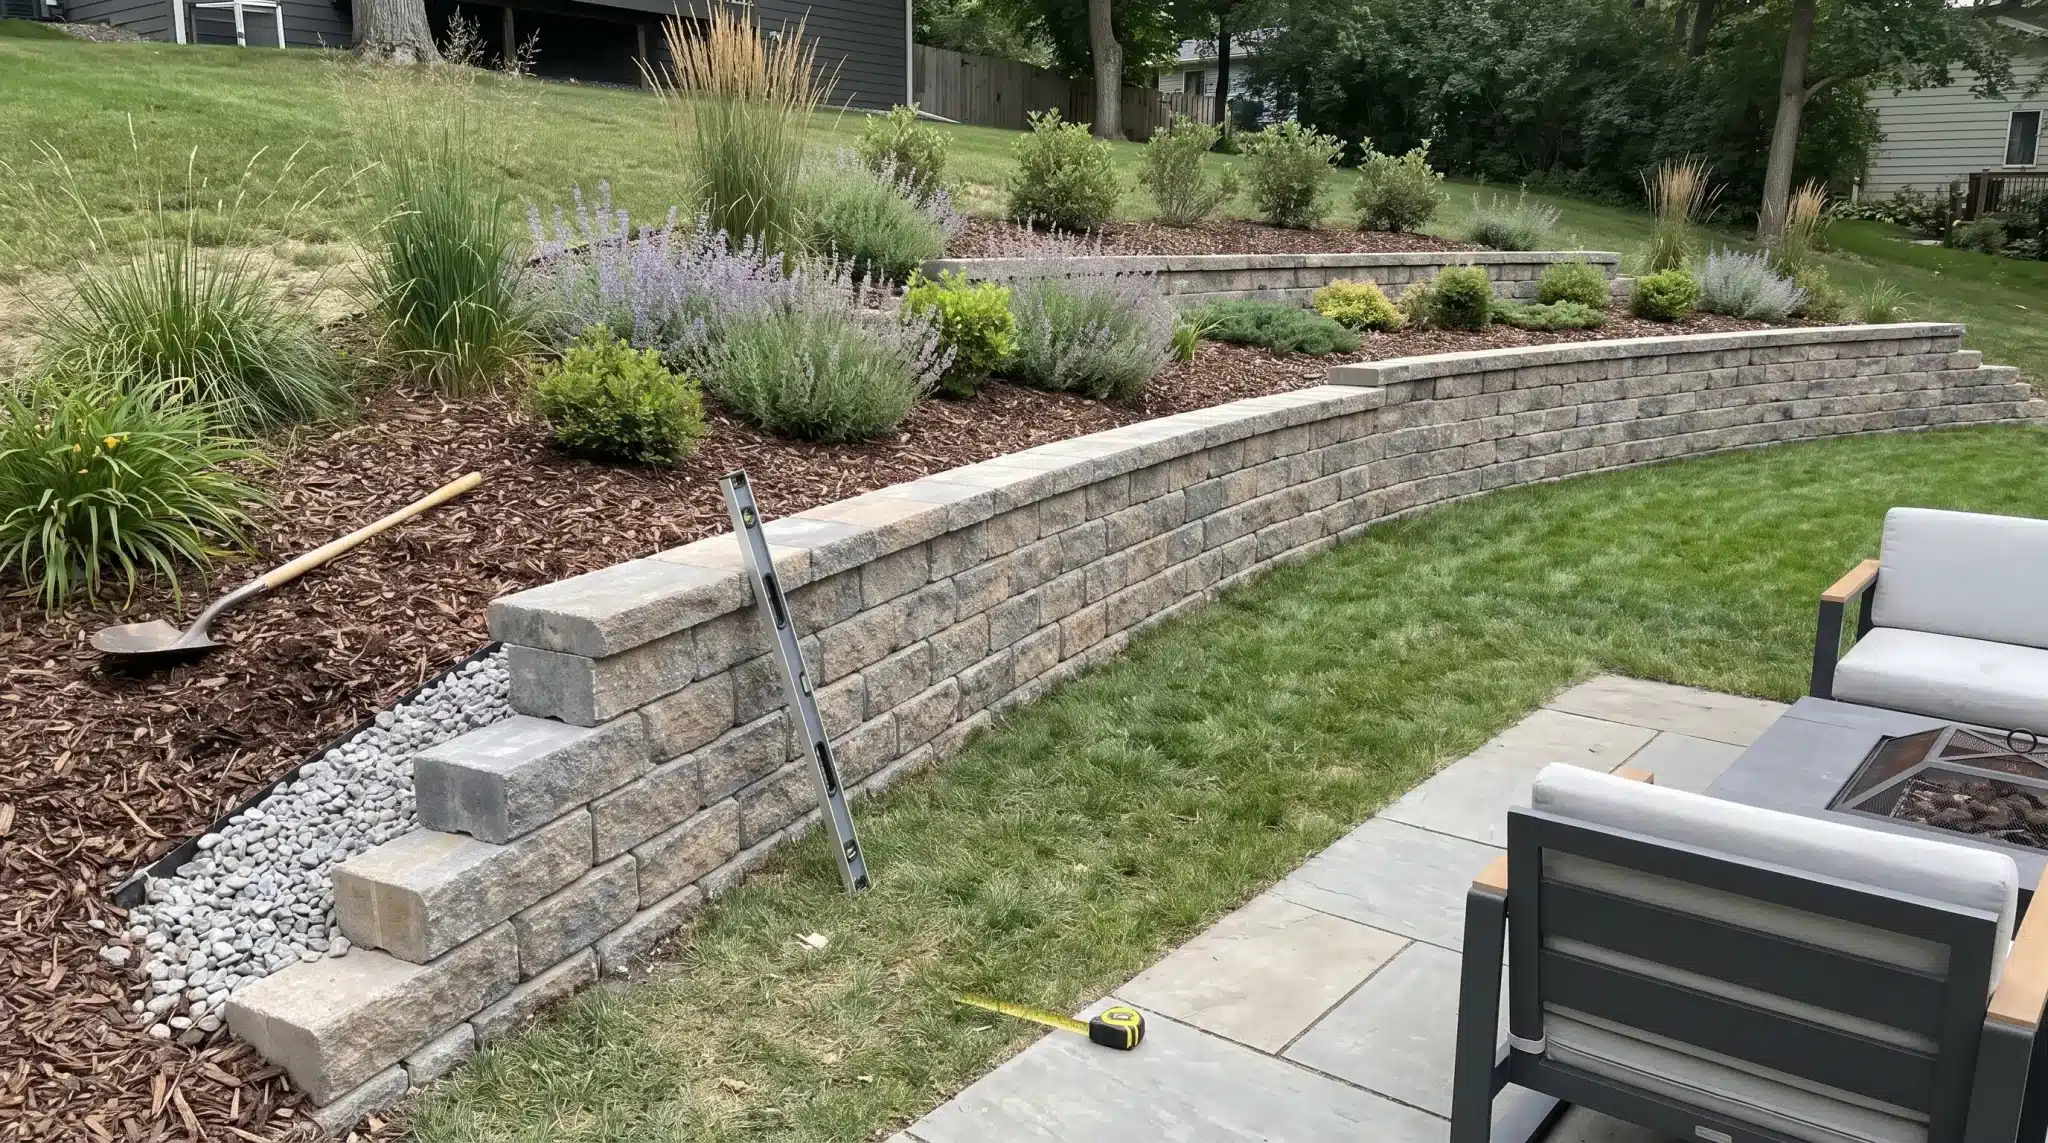


| Quick Answer: A retaining wall requires a stable base, proper drainage, and correct block placement. Prepare the trench, compact the base, install blocks, and add backfill in layers. Interlocking blocks work well for small DIY walls, but always check soil, loads, and local requirements first. |
Building a retaining wall looks easier than it really is. The blocks are only the final layer of the work. What happens beneath them determines whether the wall stays stable after heavy rain and seasonal changes.
For a small backyard wall, careful planning and the right installation steps can make the project manageable. This blog covers preparation, materials, and the building process, and explains when a project is better left to a professional.
How to Plan a Retaining Wall Before Installation
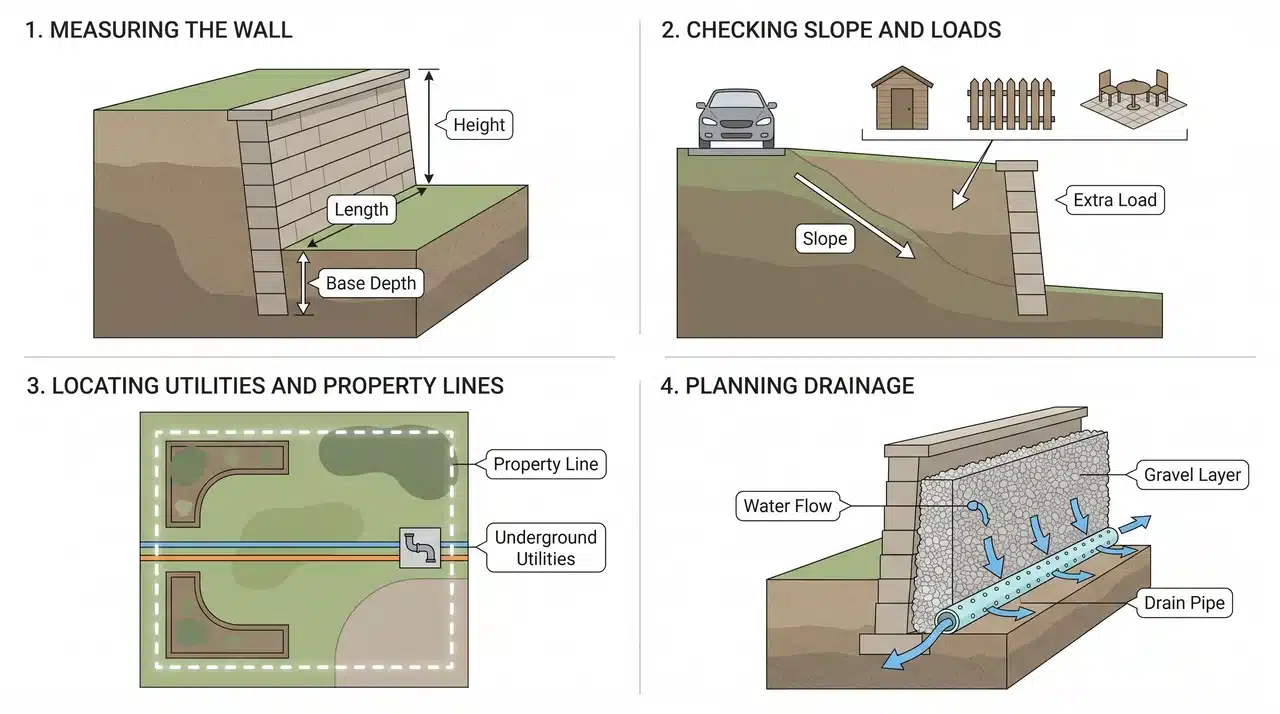
Good planning saves you from costly mistakes once you start digging.
- Measure the Wall Length and Height: Measure the full wall height and length, including the buried base. Mark corners, curves, and ends before digging, and account for block setback as each row moves back.
- Check the Slope and Nearby Loads: Inspect the area around the wall for extra weight from vehicles, patios, sheds, fences, or slopes. These loads can increase pressure and affect wall requirements. On sloped properties with multiple grade changes, a single retaining wall is rarely the whole answer, layered terracing and integrated hardscaping across the full yard are usually the more stable long-term approach.
- Locate Utilities and Property Lines: Check for underground utilities before digging and confirm property boundaries. Look for irrigation pipes, drainage lines, cables, or wiring that may need protection.
- Decide Where Water Will Go: Plan drainage before installation to prevent water buildup behind the wall. Check runoff paths, downspouts, and low spots, then create a safe outlet for water.
Tools and Materials Needed for a Retaining Wall
Gathering the right tools and materials before starting makes the installation smoother and helps avoid delays.
| Tools | Materials |
|---|---|
| Tape measure | Retaining wall blocks |
| Level | Cap blocks |
| Stakes and mason line | Base aggregate |
| Shovel | Drainage stone |
| Rake | Perforated drainpipe |
| Wheelbarrow | Filter fabric |
| Hand tamper | Backfill material |
| Rubber mallet | Concrete adhesive |
| Plate compactor | Geogrid reinforcement (if required) |
How to Build a Retaining Wall Step By Step?
Building a retaining wall starts with proper planning, a solid base, and careful placement to create a strong, stable structure that effectively holds back soil.
Step 1: Mark The Wall Layout
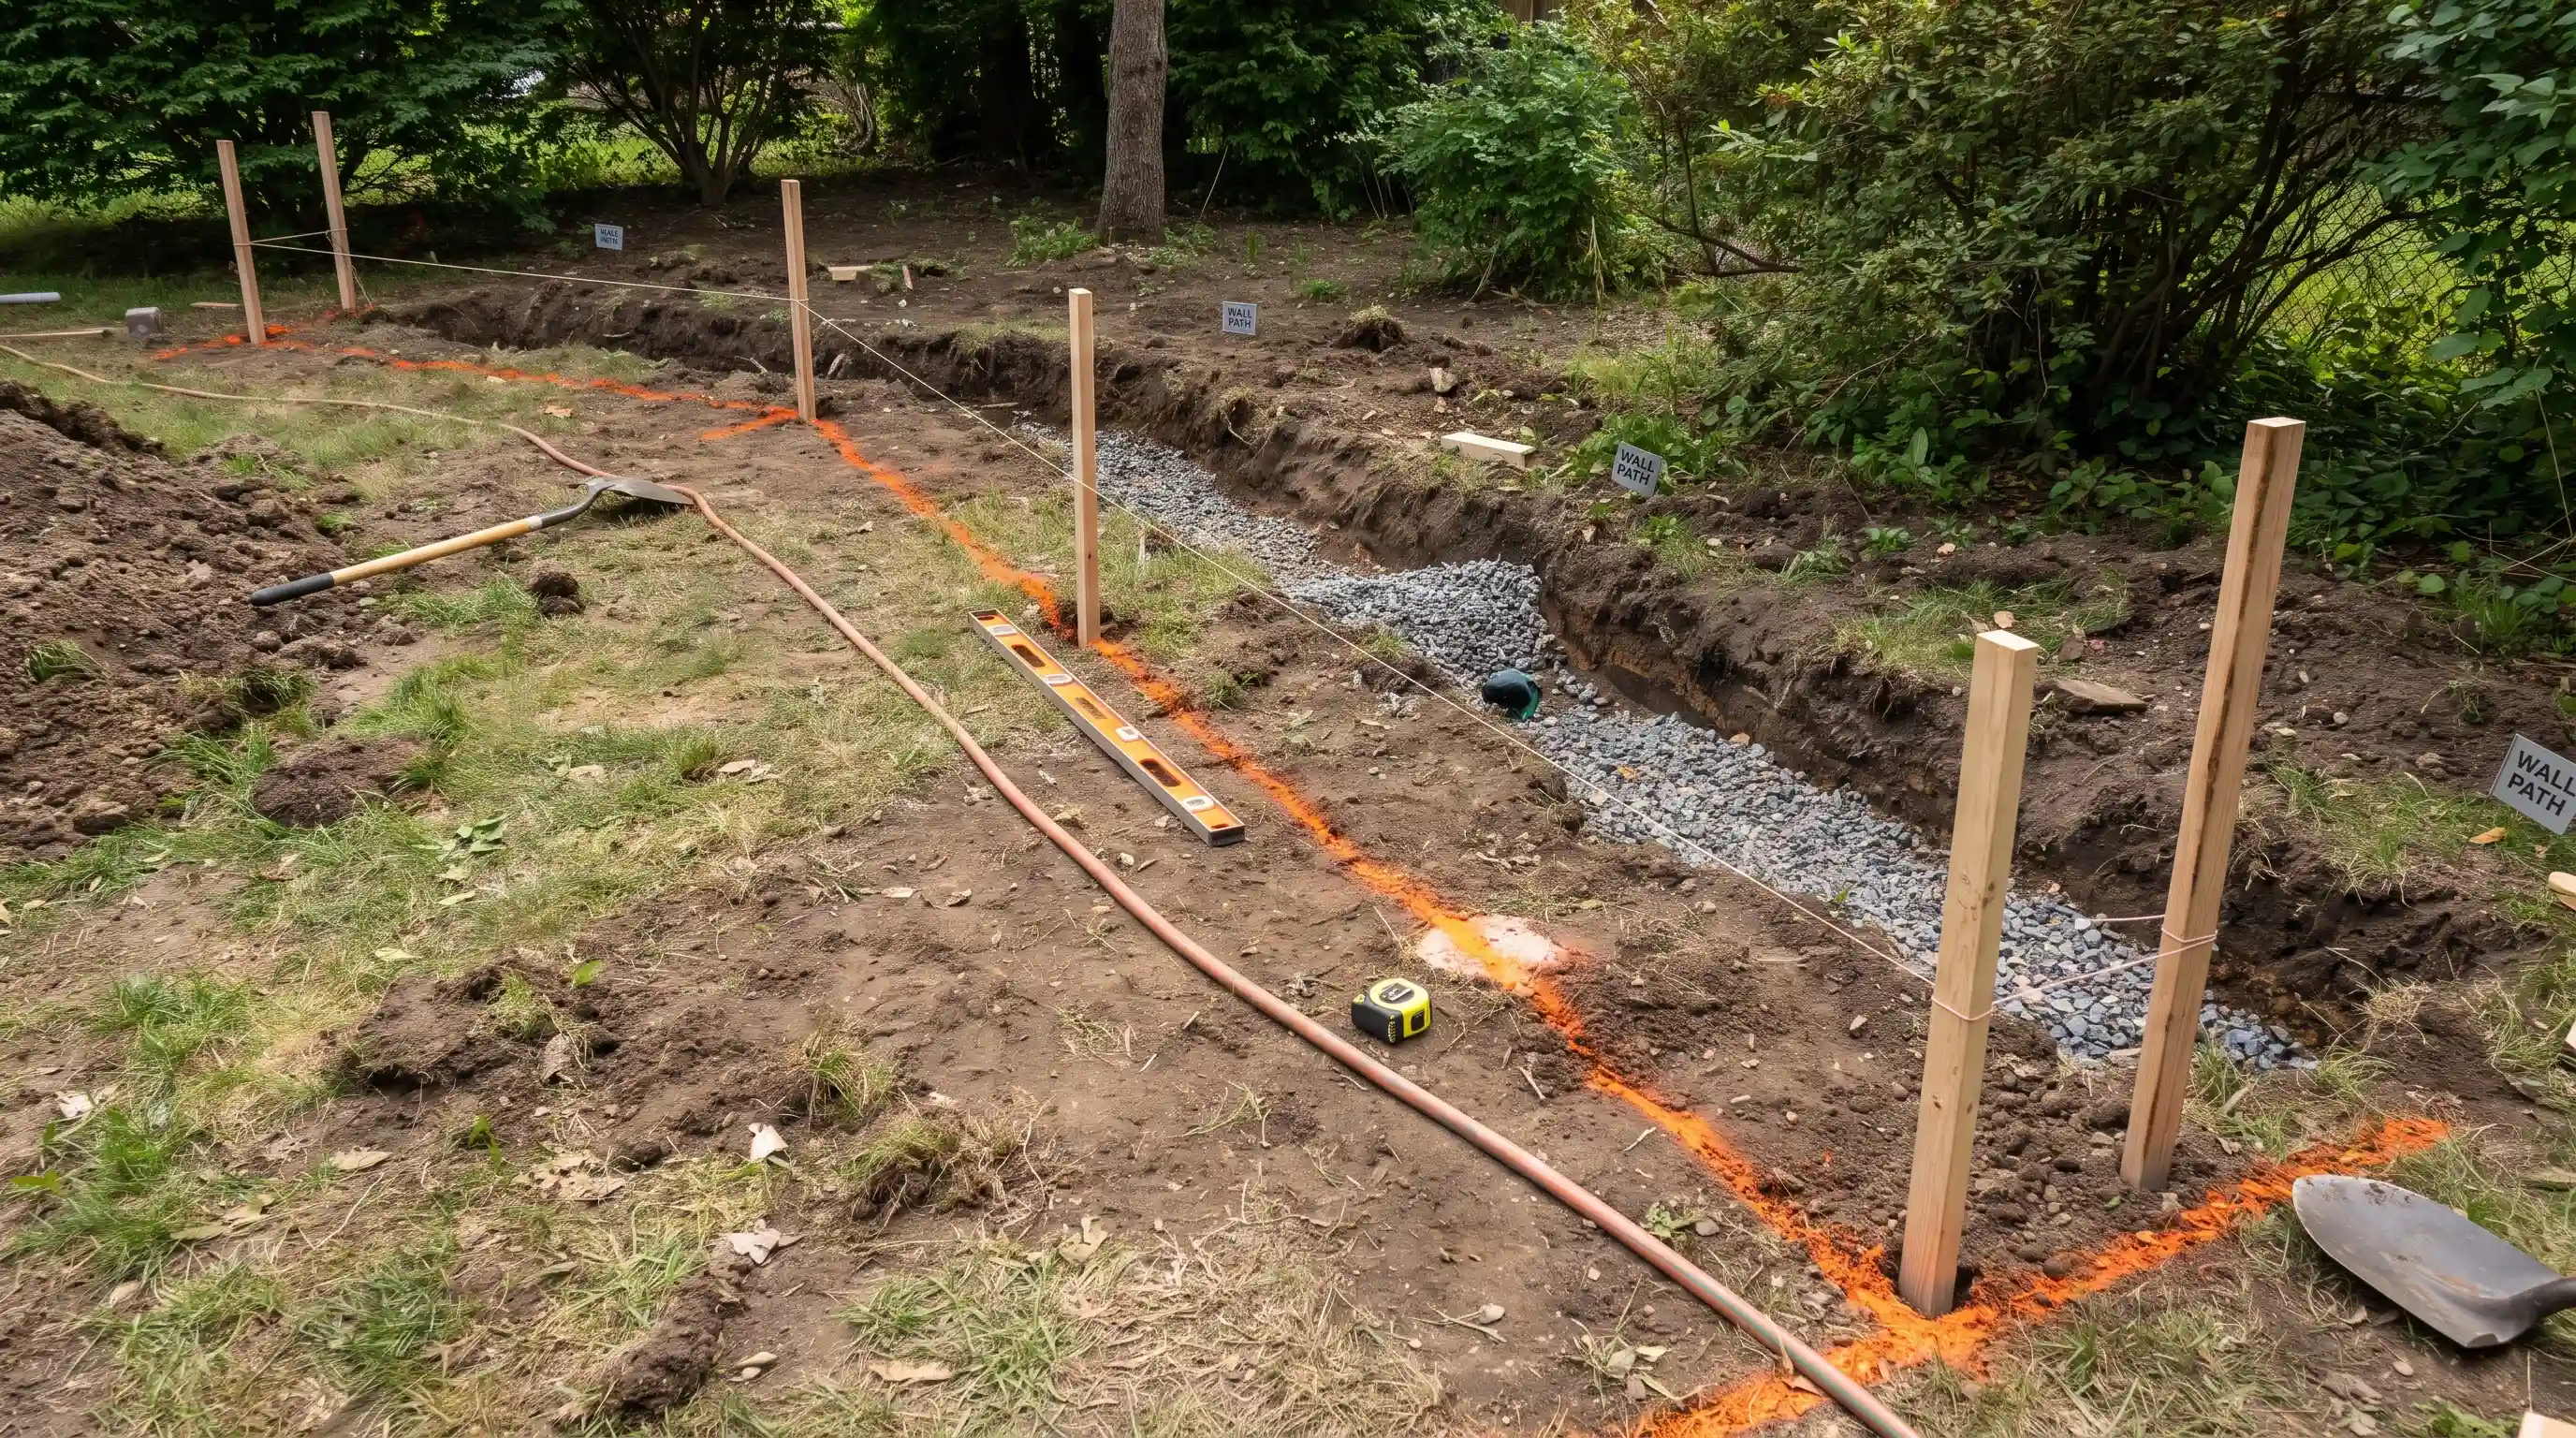
Start by marking the exact location of the retaining wall before digging. Place stakes slightly beyond both ends of the planned wall, then connect them with a mason line to create a straight reference line.
For curved sections, use marking paint or a garden hose to outline the shape. Walk around the marked area from different angles to confirm the layout looks right.
Step 2: Excavate The Trench
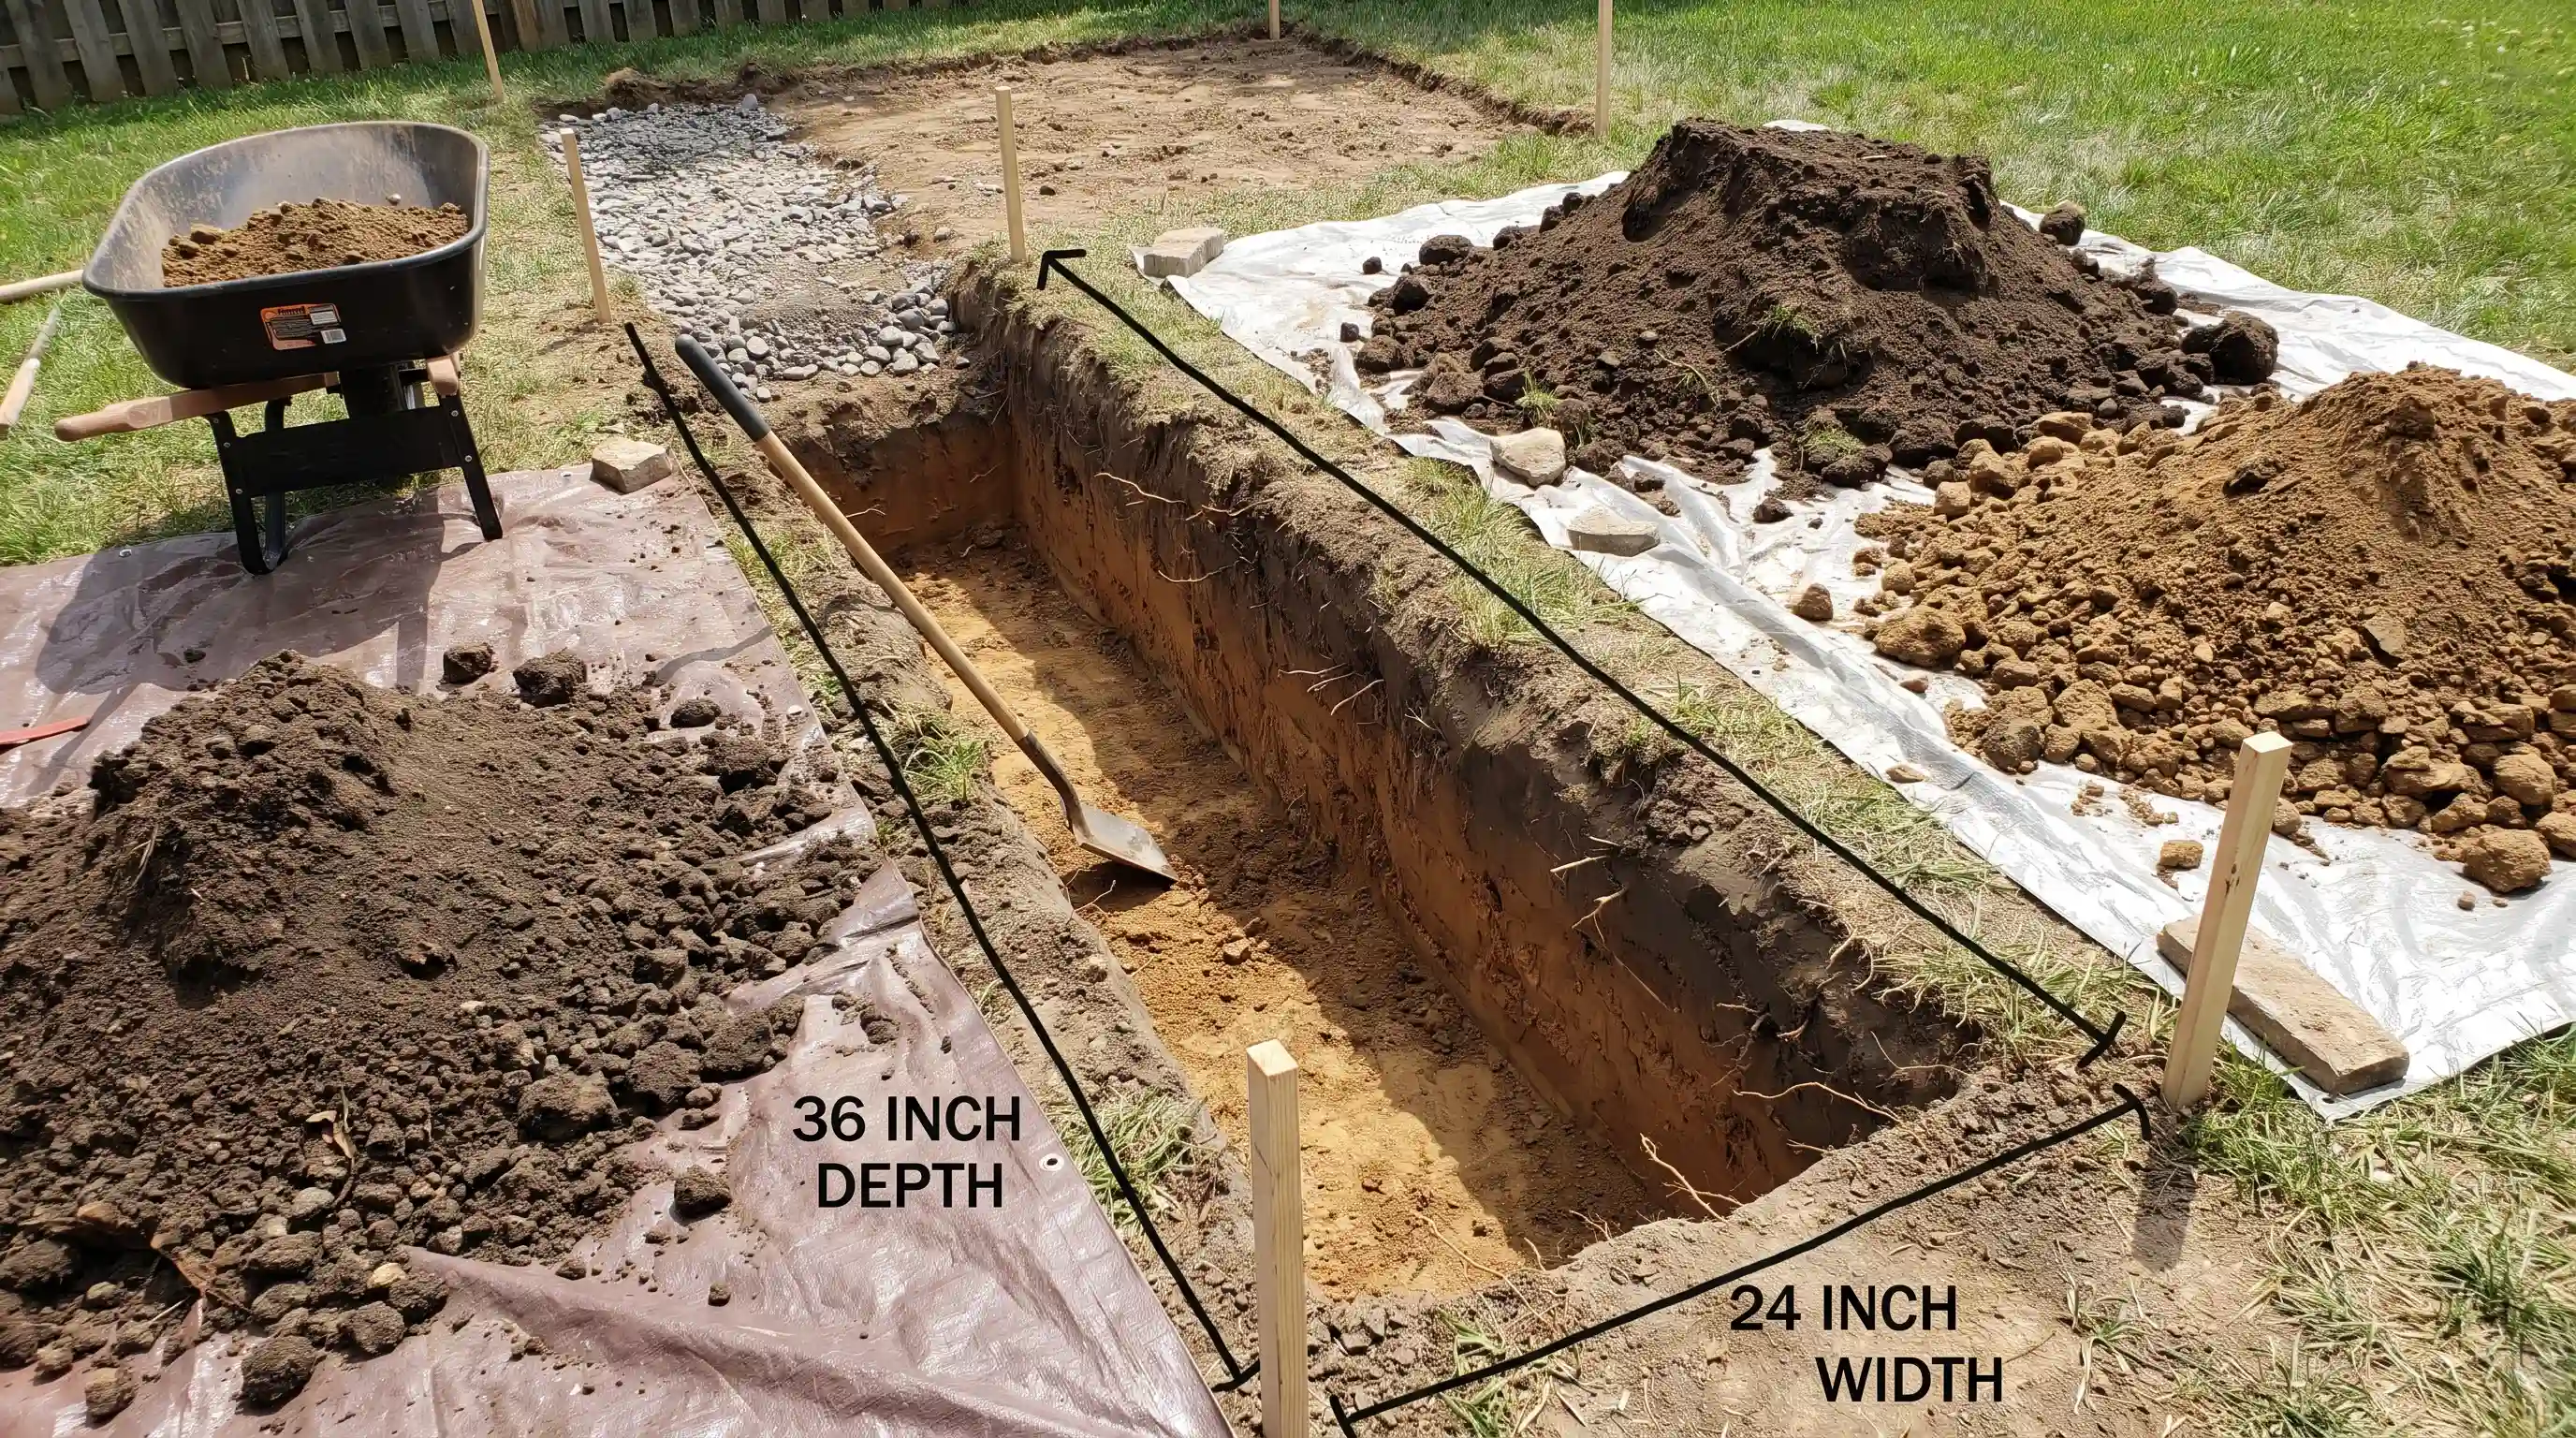
Remove the topsoil, grass, roots, and other organic material before creating the trench.
The excavation should provide enough space for the retaining blocks, drainage zone, working area, compacted base, and the portion of the first course that sits below ground.
Dig until you reach firm, undisturbed soil rather than building over loose fill, mud, roots, or frozen ground.
Step 3: Compact The Subgrade
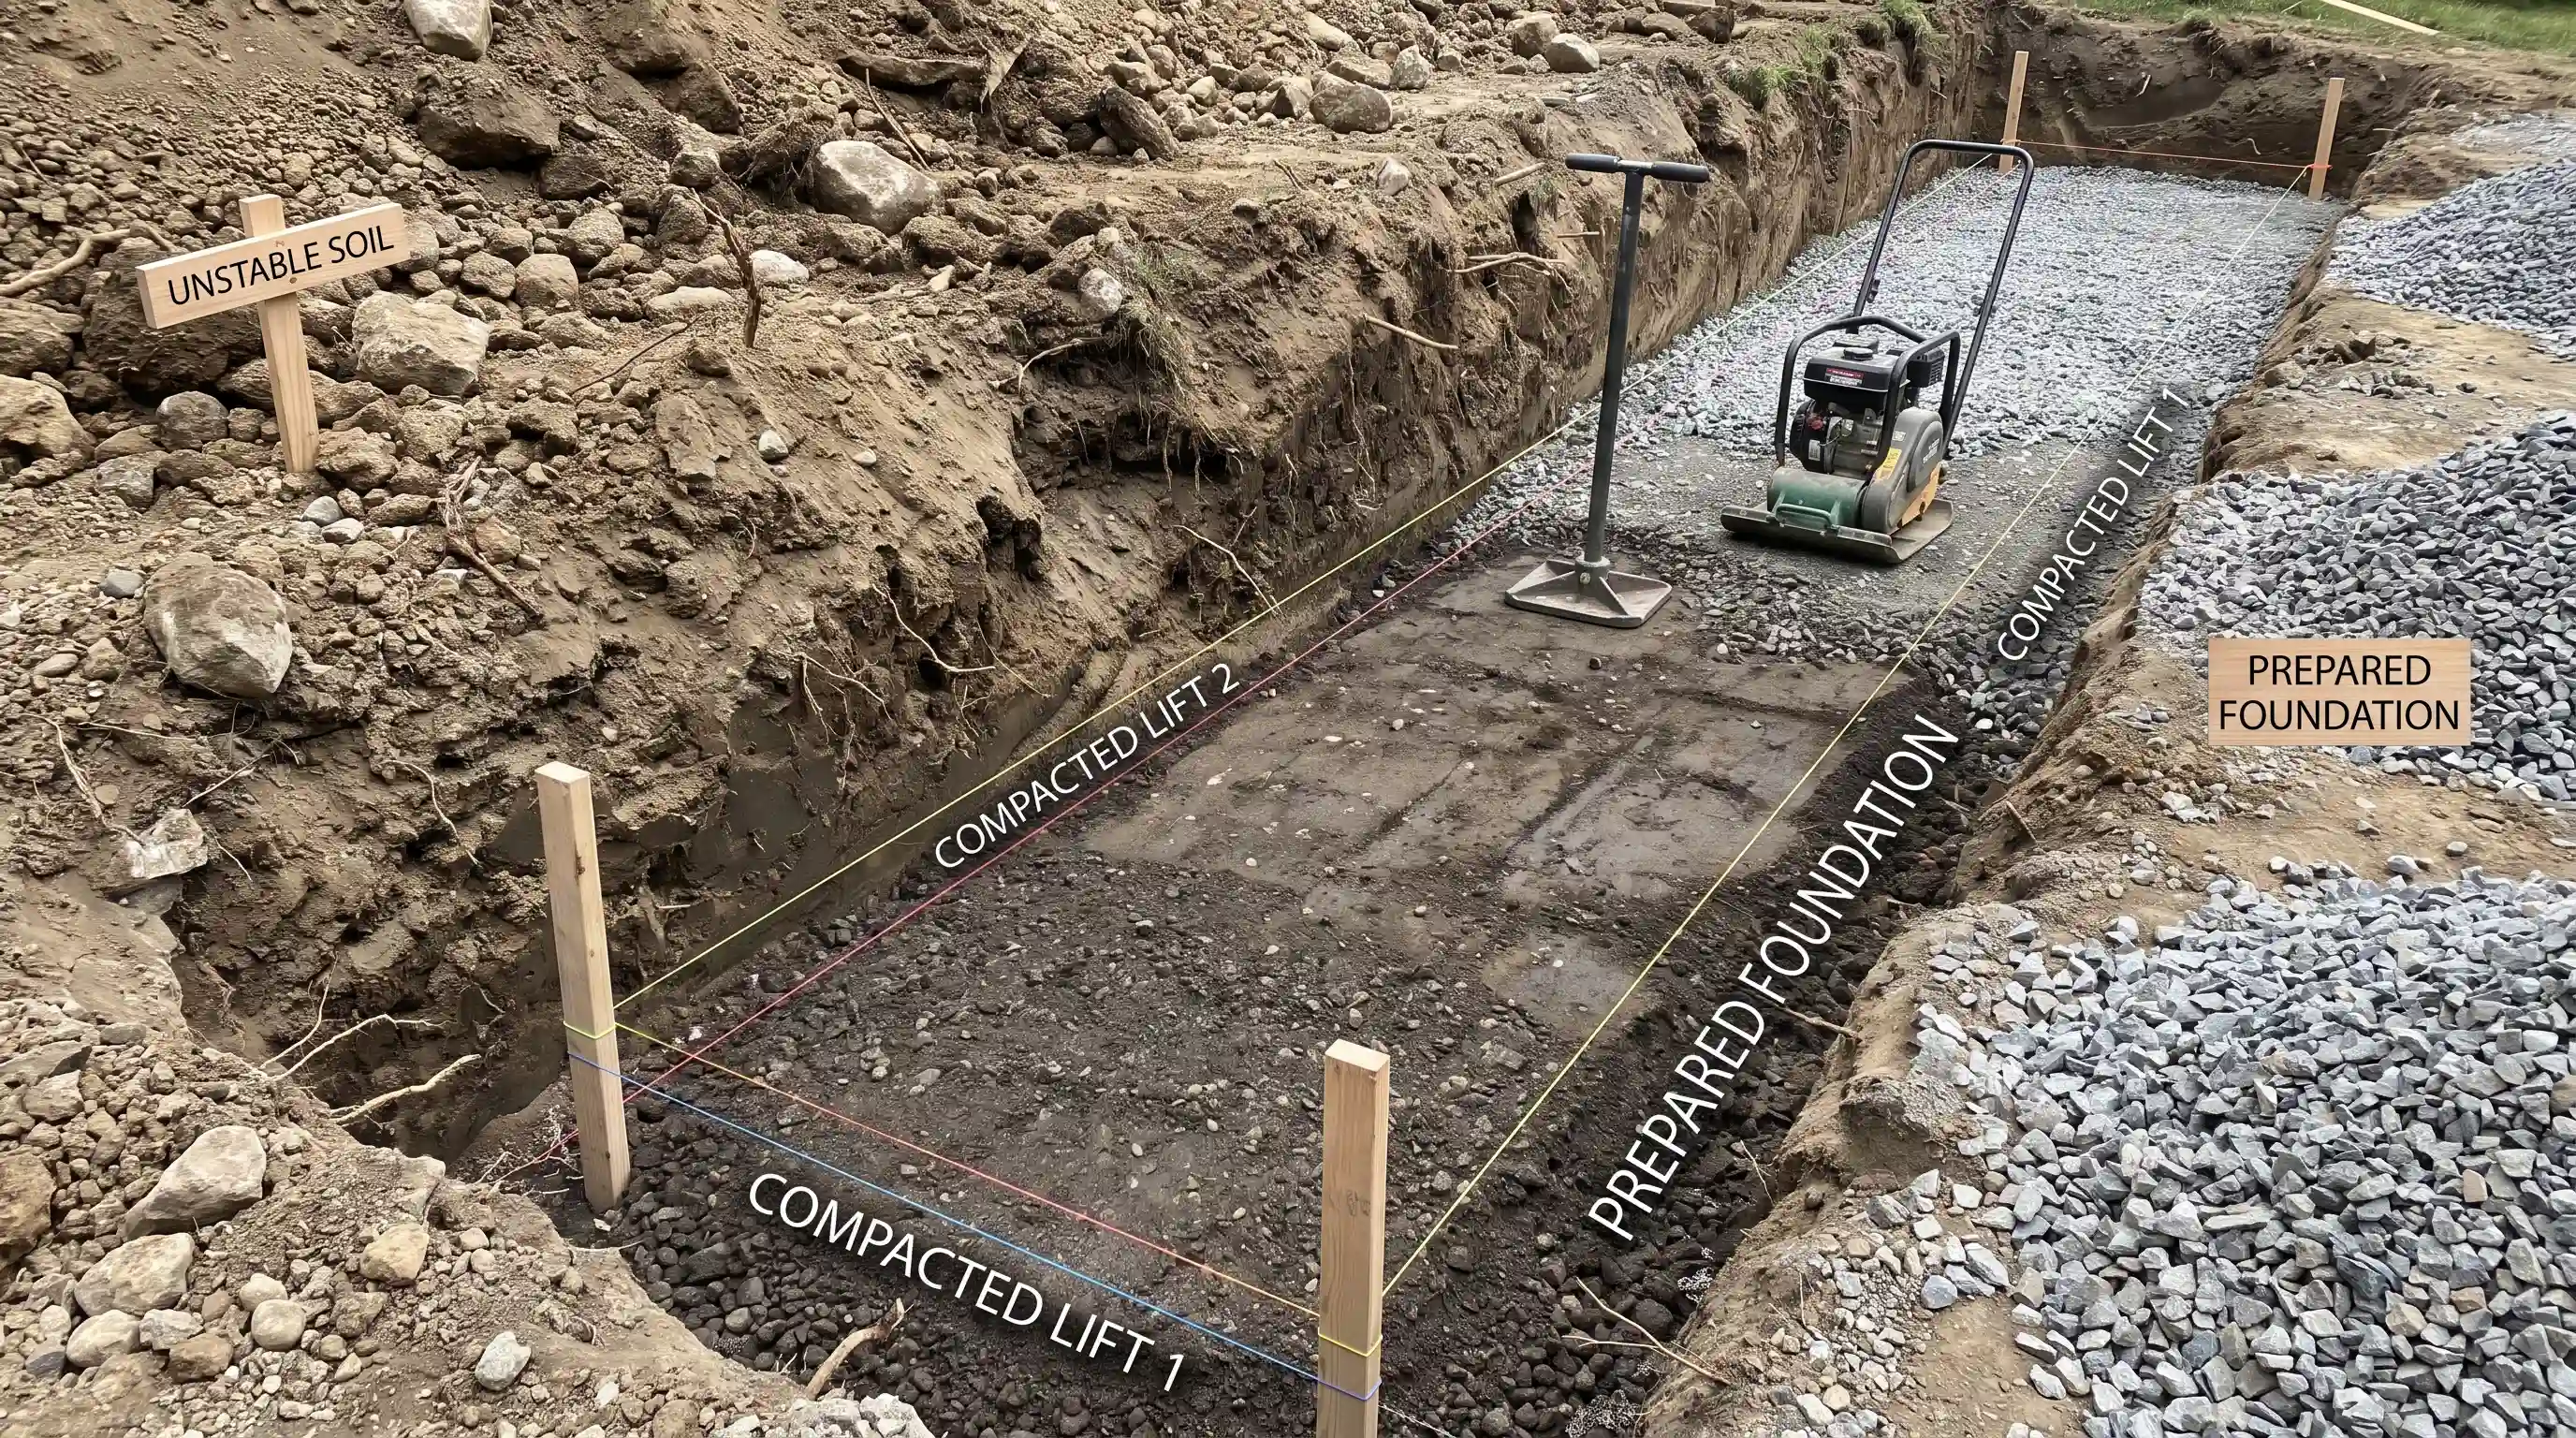
After excavation, inspect the trench bottom for weak or soft areas. Remove unstable soil and replace it with compactable aggregate when needed.
Compact the entire trench evenly to create a firm foundation for the gravel base above it. Avoid filling deep low spots with loose soil or sand because they can settle later and affect the wall’s alignment.
If water rises through the soil during compaction, address the drainage issue before continuing with construction.
Step 4: Add and Compact The Gravel Base
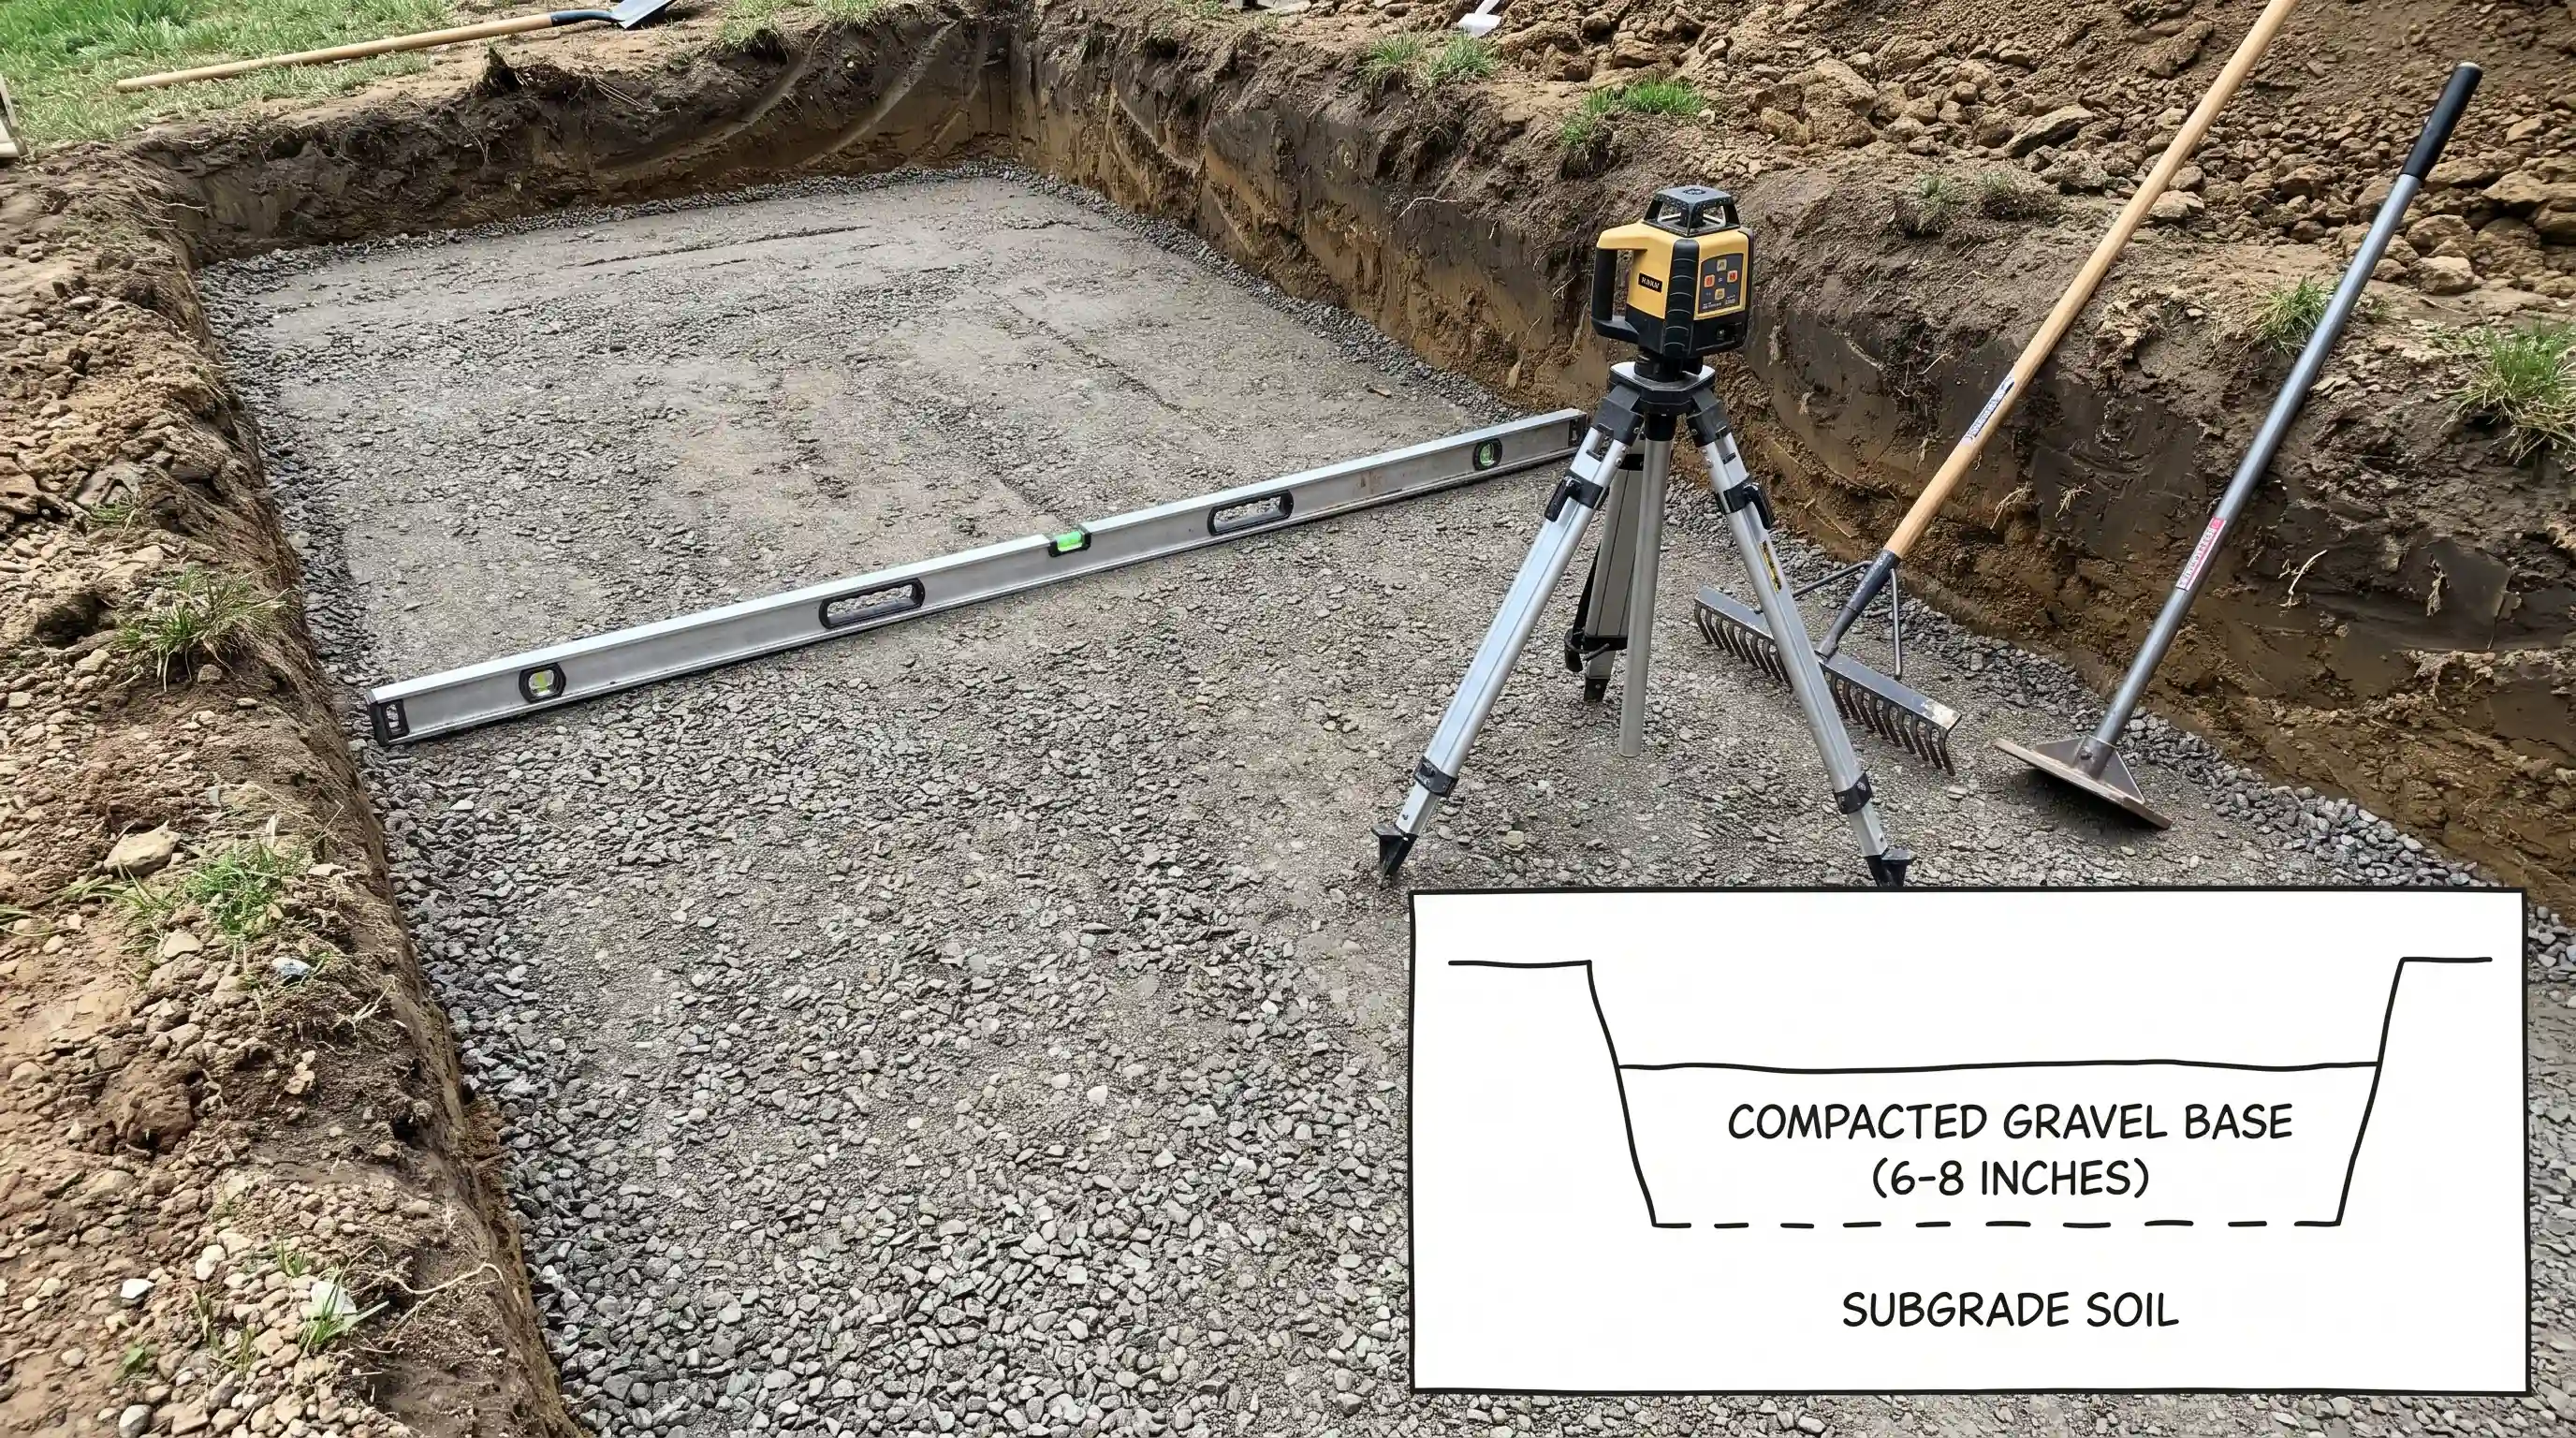
Add the approved base material in thin layers rather than applying the full depth at once. Compact each layer thoroughly before adding more material to create a stable foundation.
Once the base reaches the required depth, screed it flat and check the surface carefully. Use a level to confirm the base is even from front to back and side to side.
Correct any uneven areas before installing the first row because the accuracy of this layer affects the entire wall.
Step 5: Set The First Course
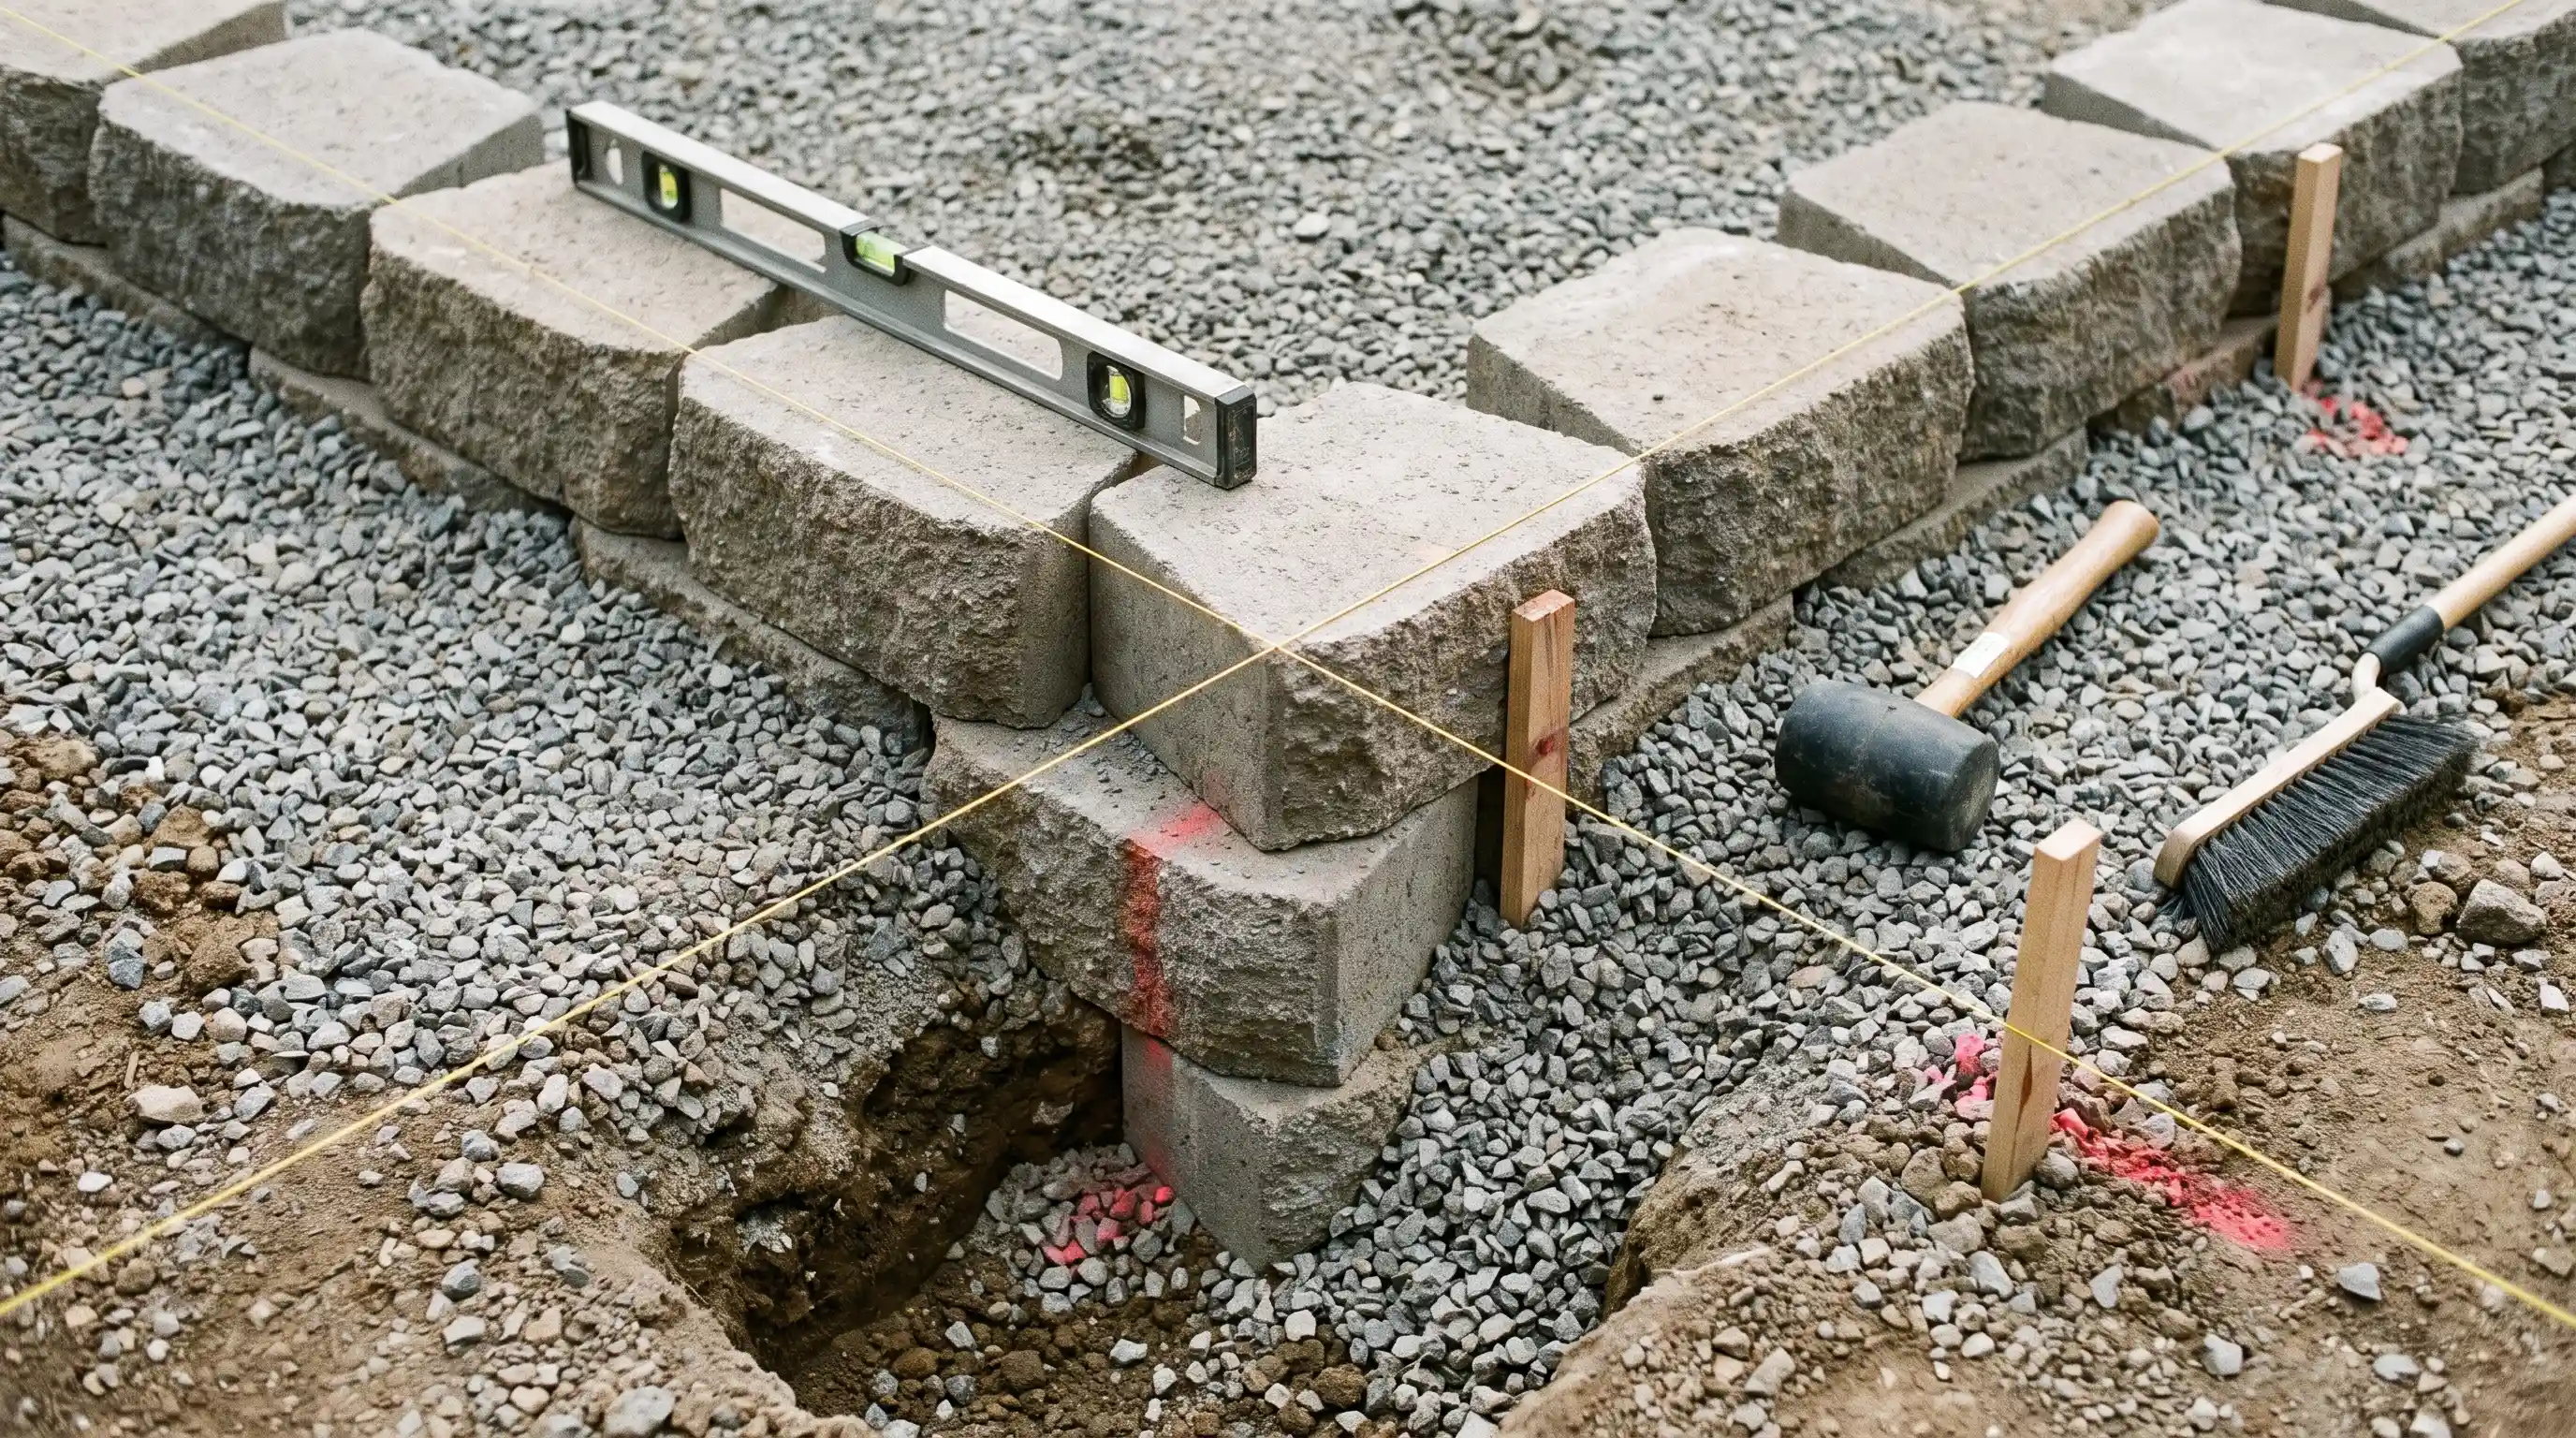
The first row of blocks is the most important part of the entire retaining wall. Begin placing blocks at the lowest point of the wall and set each unit directly on the prepared base.
Check every block individually from front to back and side to side, then use a longer level to confirm the entire row stays consistent.
Tap the blocks into position with a rubber mallet, keeping the front faces aligned with the mason line. Remove dirt, gravel, or debris from the base before placing each block.
Step 6: Install the Drainage System
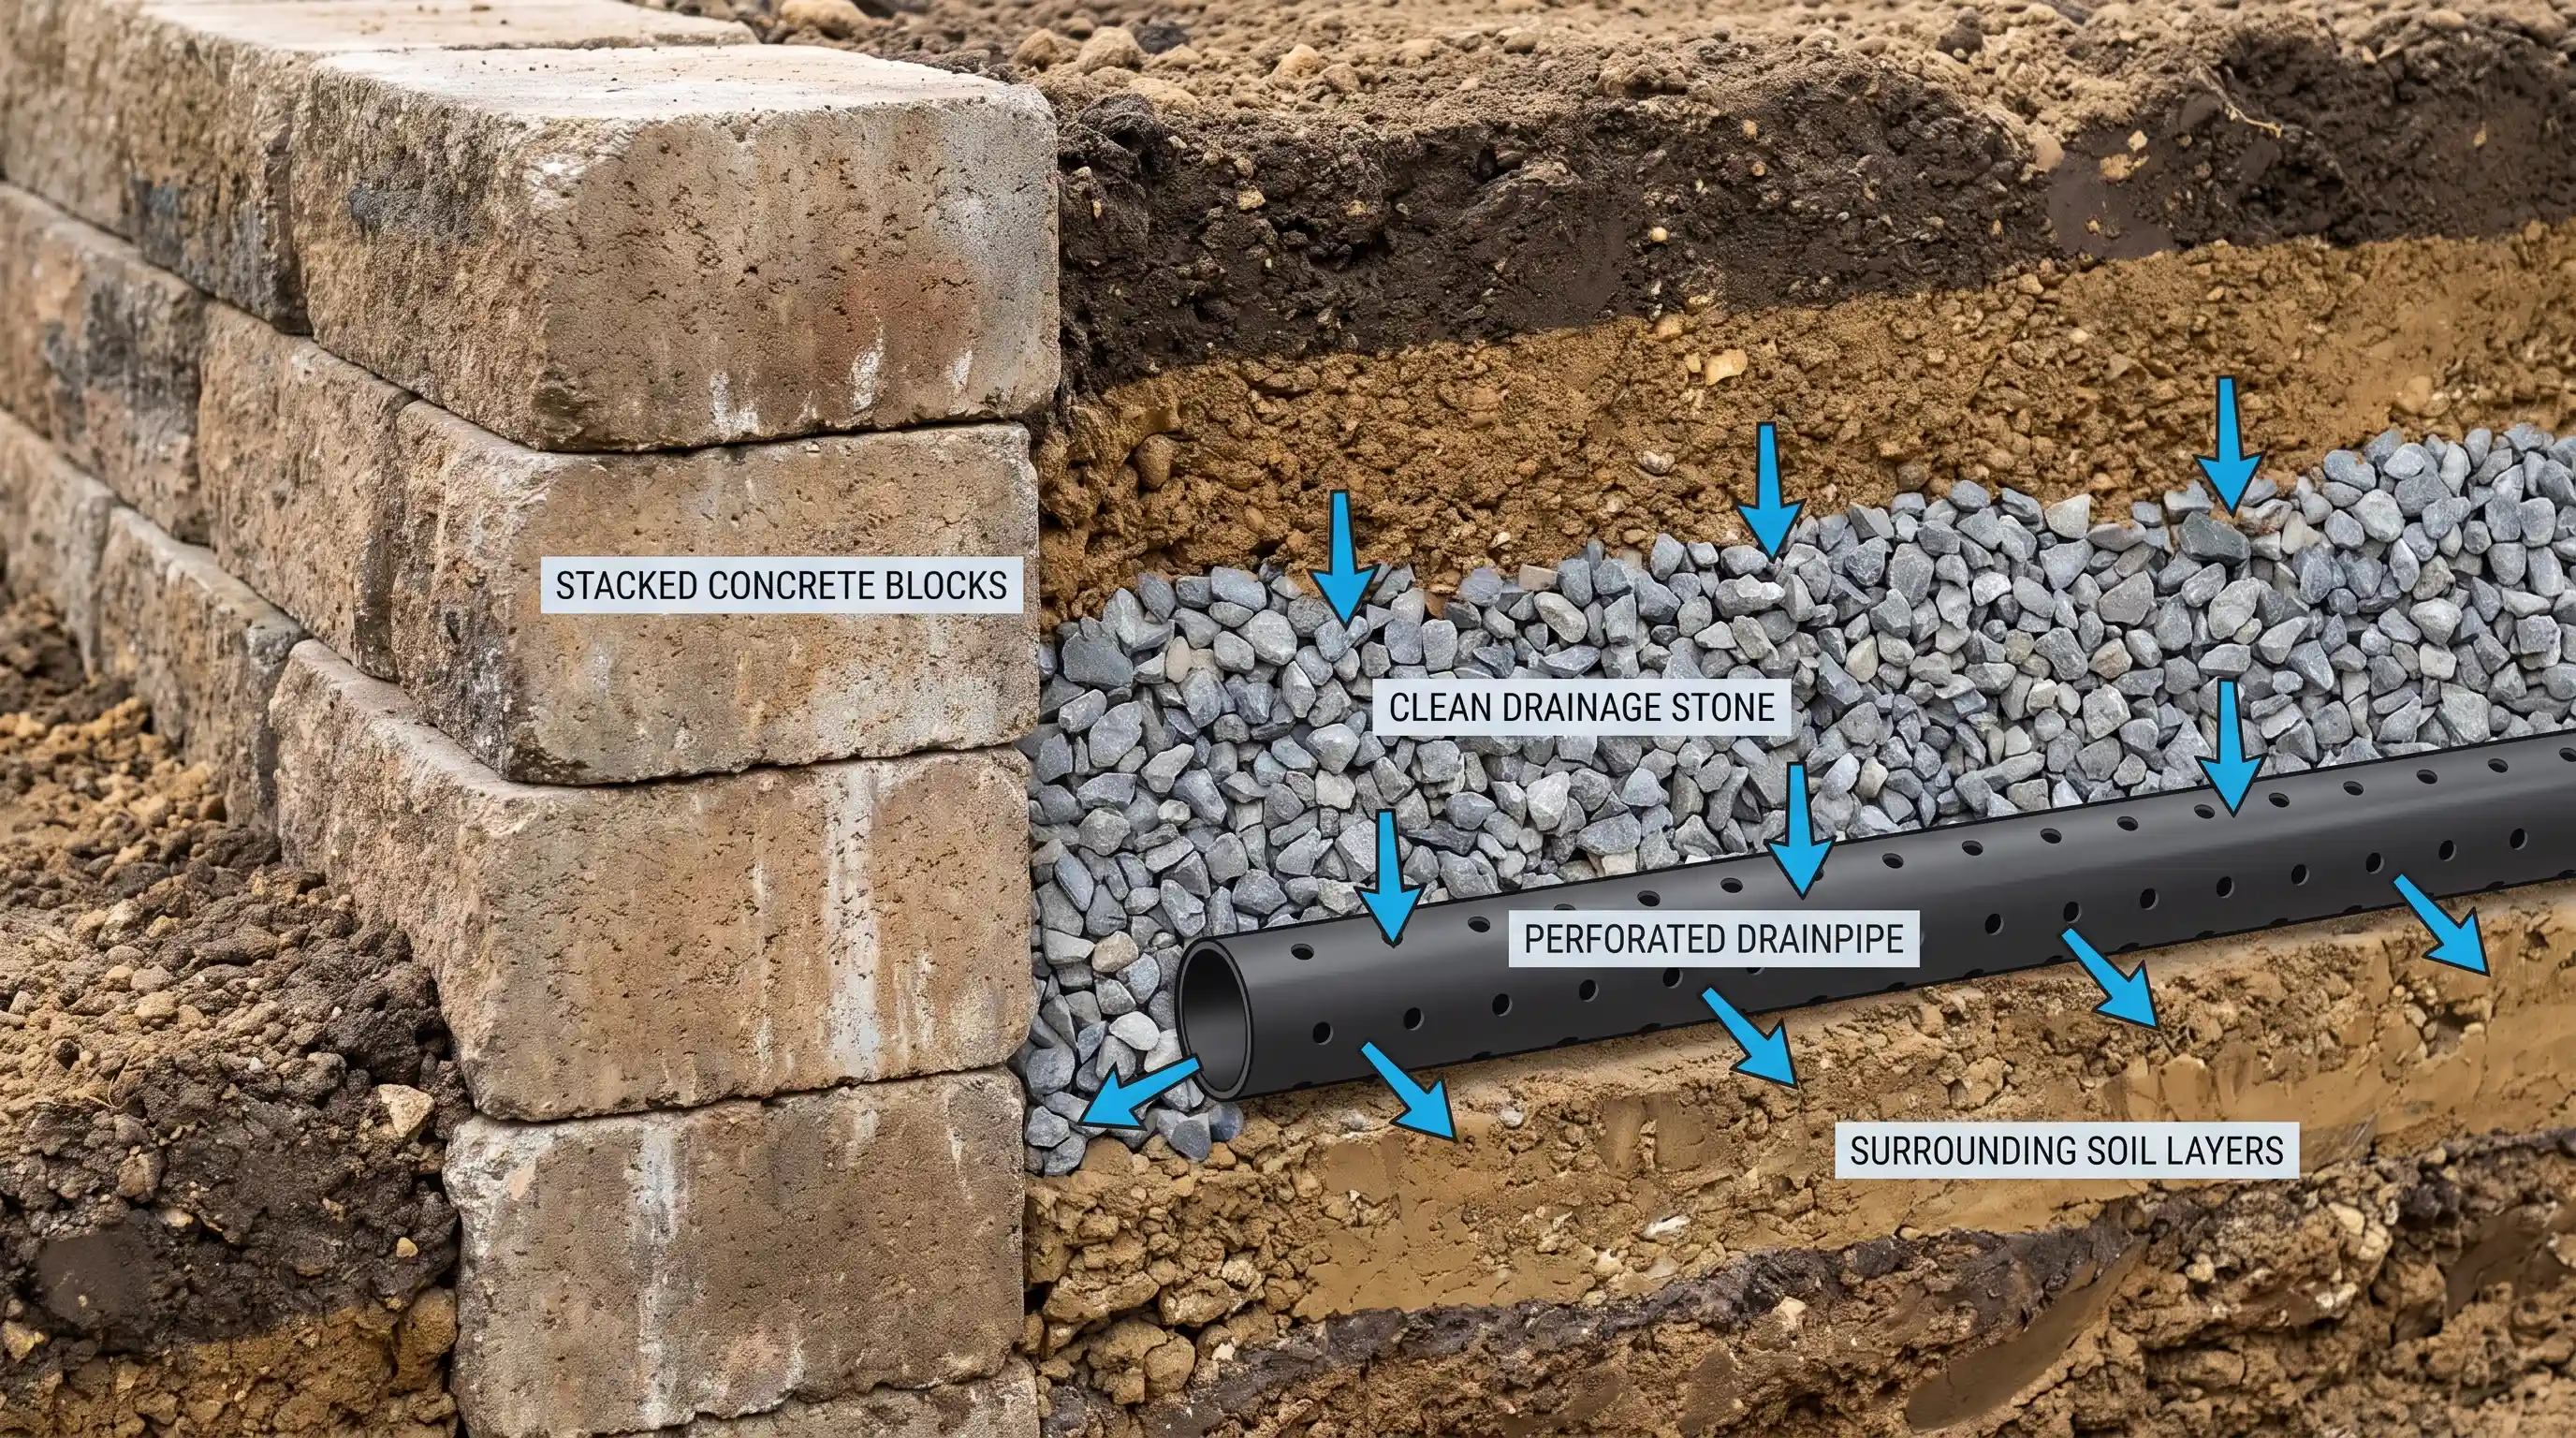
Proper drainage helps reduce pressure behind the retaining wall and protects it from water-related movement.
Place clean angular drainage stone directly behind the blocks as you build. If the wall design requires a perforated drainpipe, install it near the bottom of the wall and ensure it discharges to a safe outlet.
Do not allow the pipe to release water into an area where it can collect behind the wall. Protect drainage outlets from soil, roots, and debris so water can continue flowing properly.
Step 7: Add the Next Course
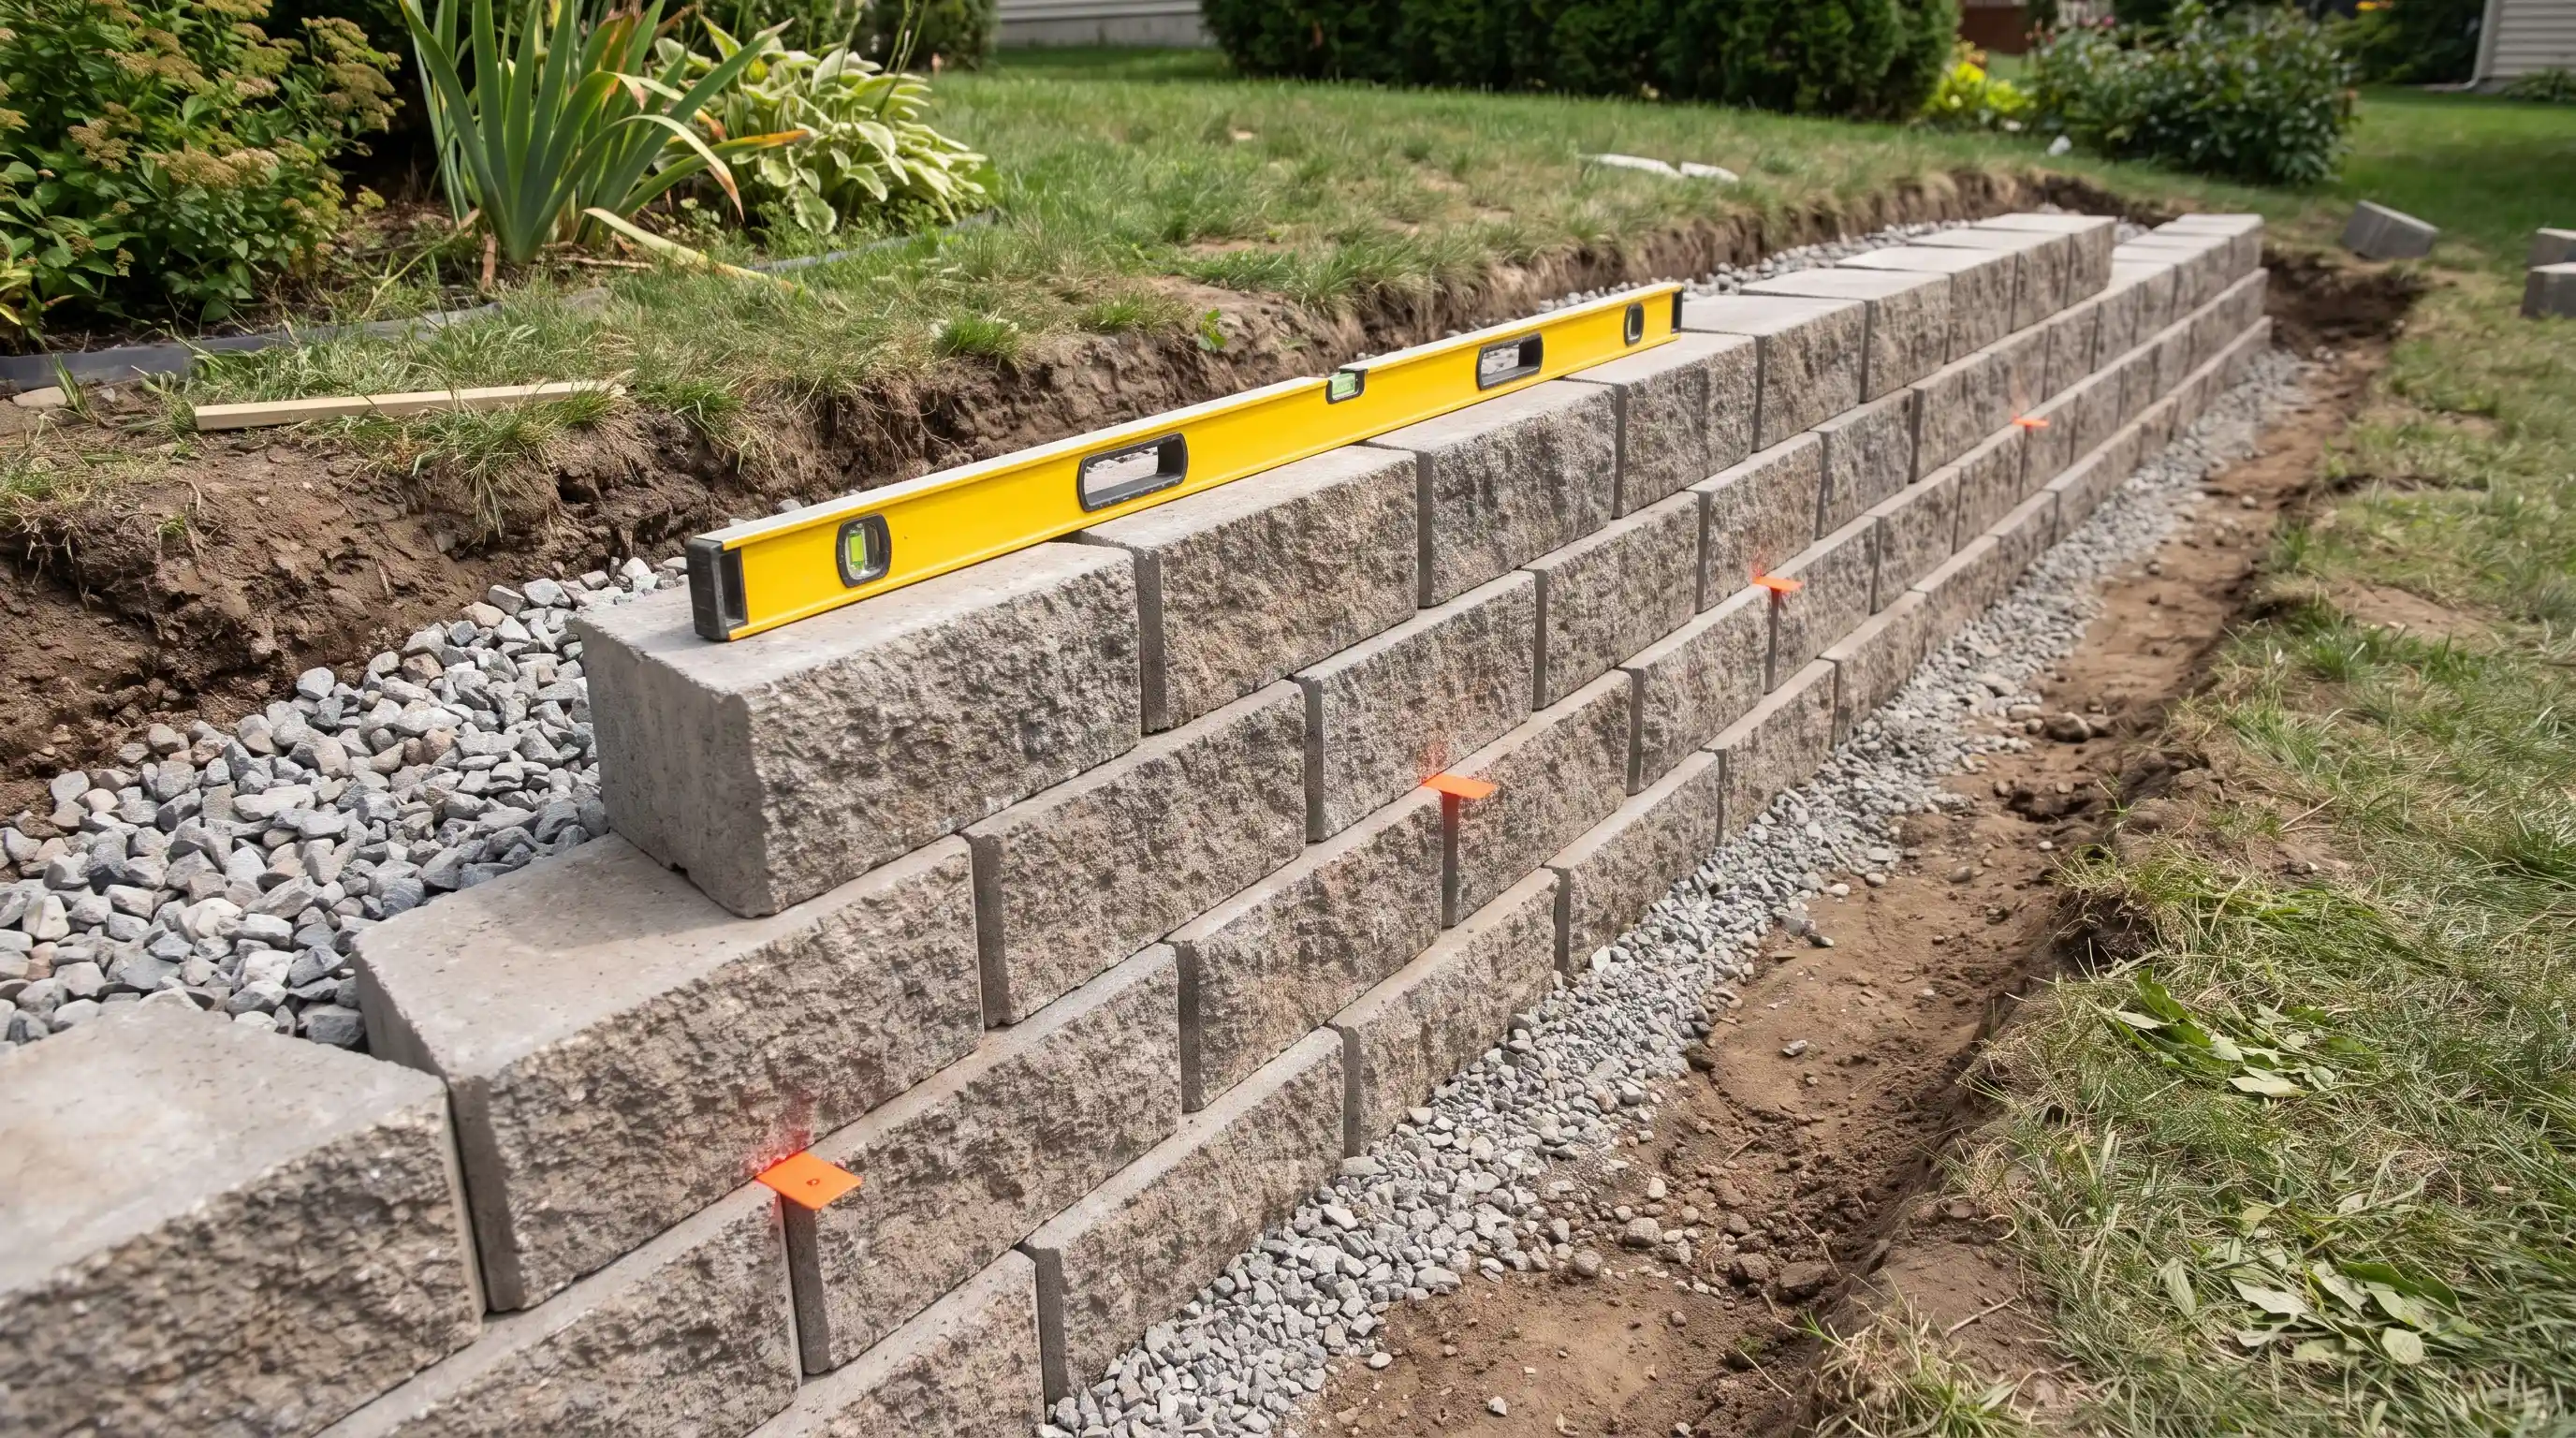
Before adding another row, sweep the tops of the blocks clean so the next course sits properly. Install each new row using the block manufacturer’s connection system, such as lips, pins, or grooves.
Stagger vertical joints between courses to improve stability and prevent continuous weak lines. Continue checking the wall for level and alignment as you work.
Fix any movement or uneven sections immediately, rather than covering them with additional rows. Avoid stacking multiple courses without adding drainage stone and backfill behind the wall.
Step 8: Backfill and Compact in Lifts
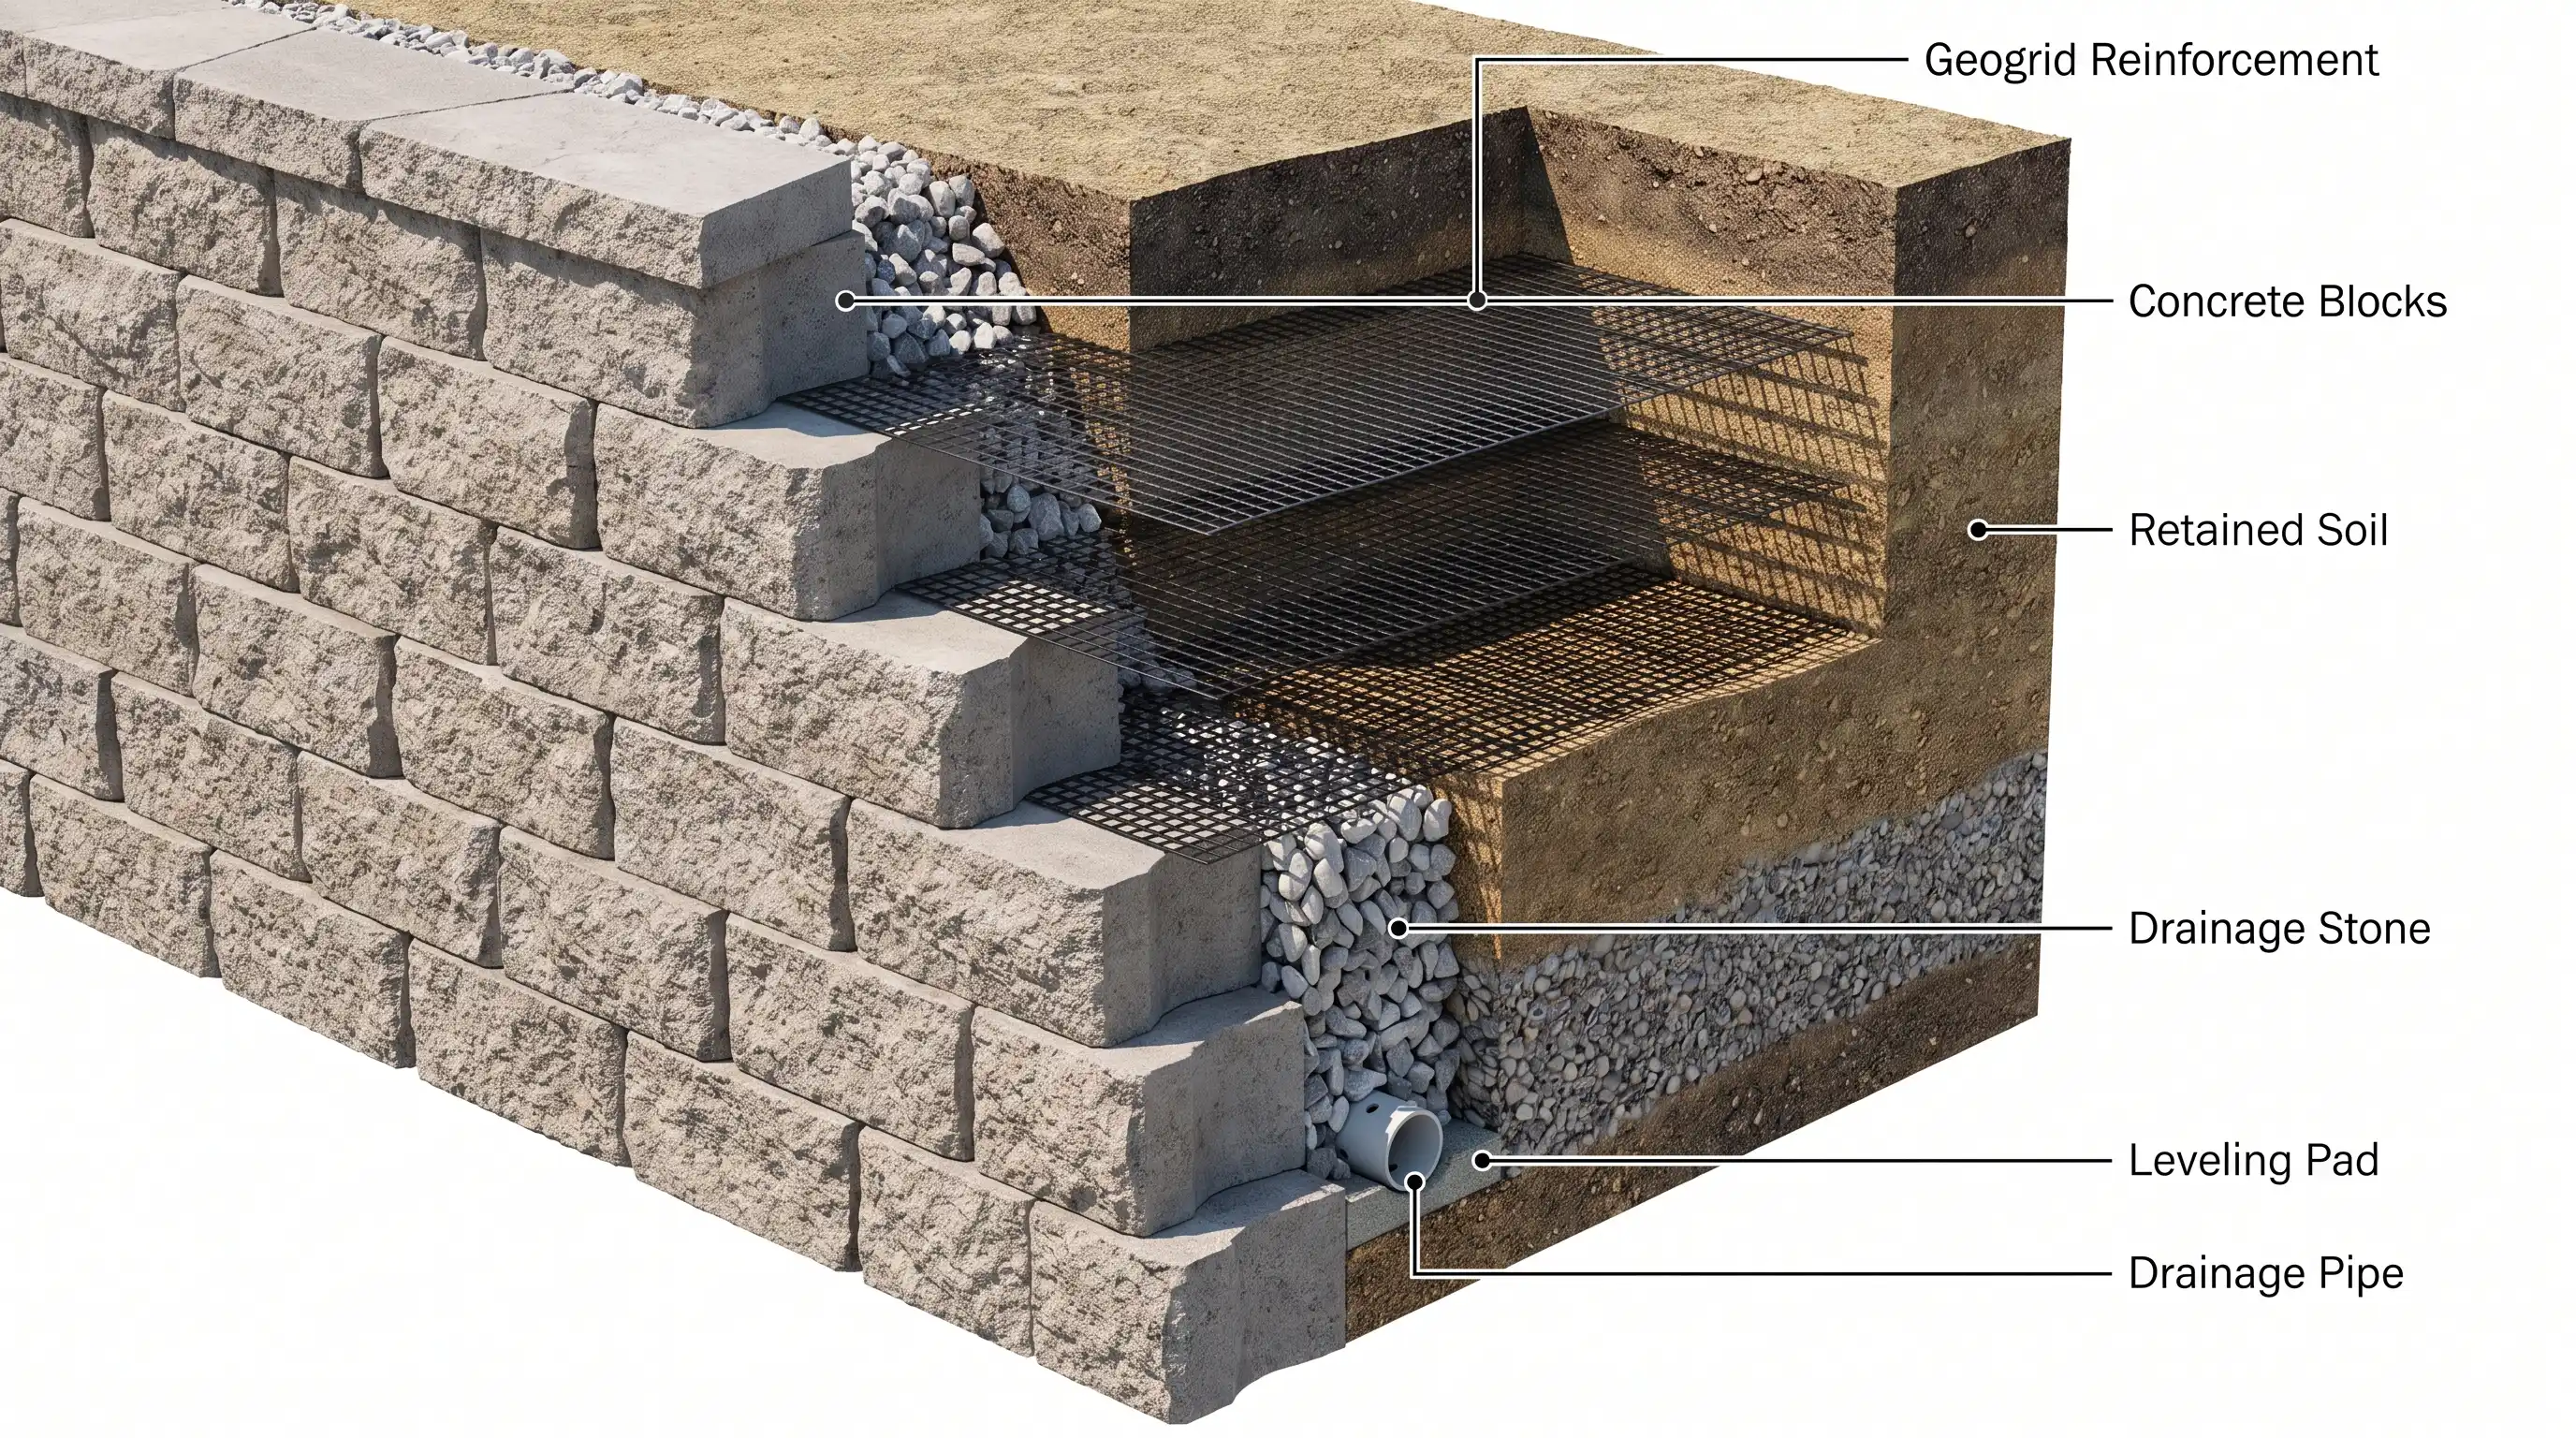
Backfill gradually as the wall rises. Place drainage stone directly behind the blocks first, then add suitable soil or a recommended sand-and-gravel mixture farther back.
Compact the fill in shallow layers rather than placing a large amount at once. Use hand tools near the wall face to avoid shifting the blocks, and keep heavy equipment away from smaller walls.
Step 9: Add Geogrid If the Design Requires It
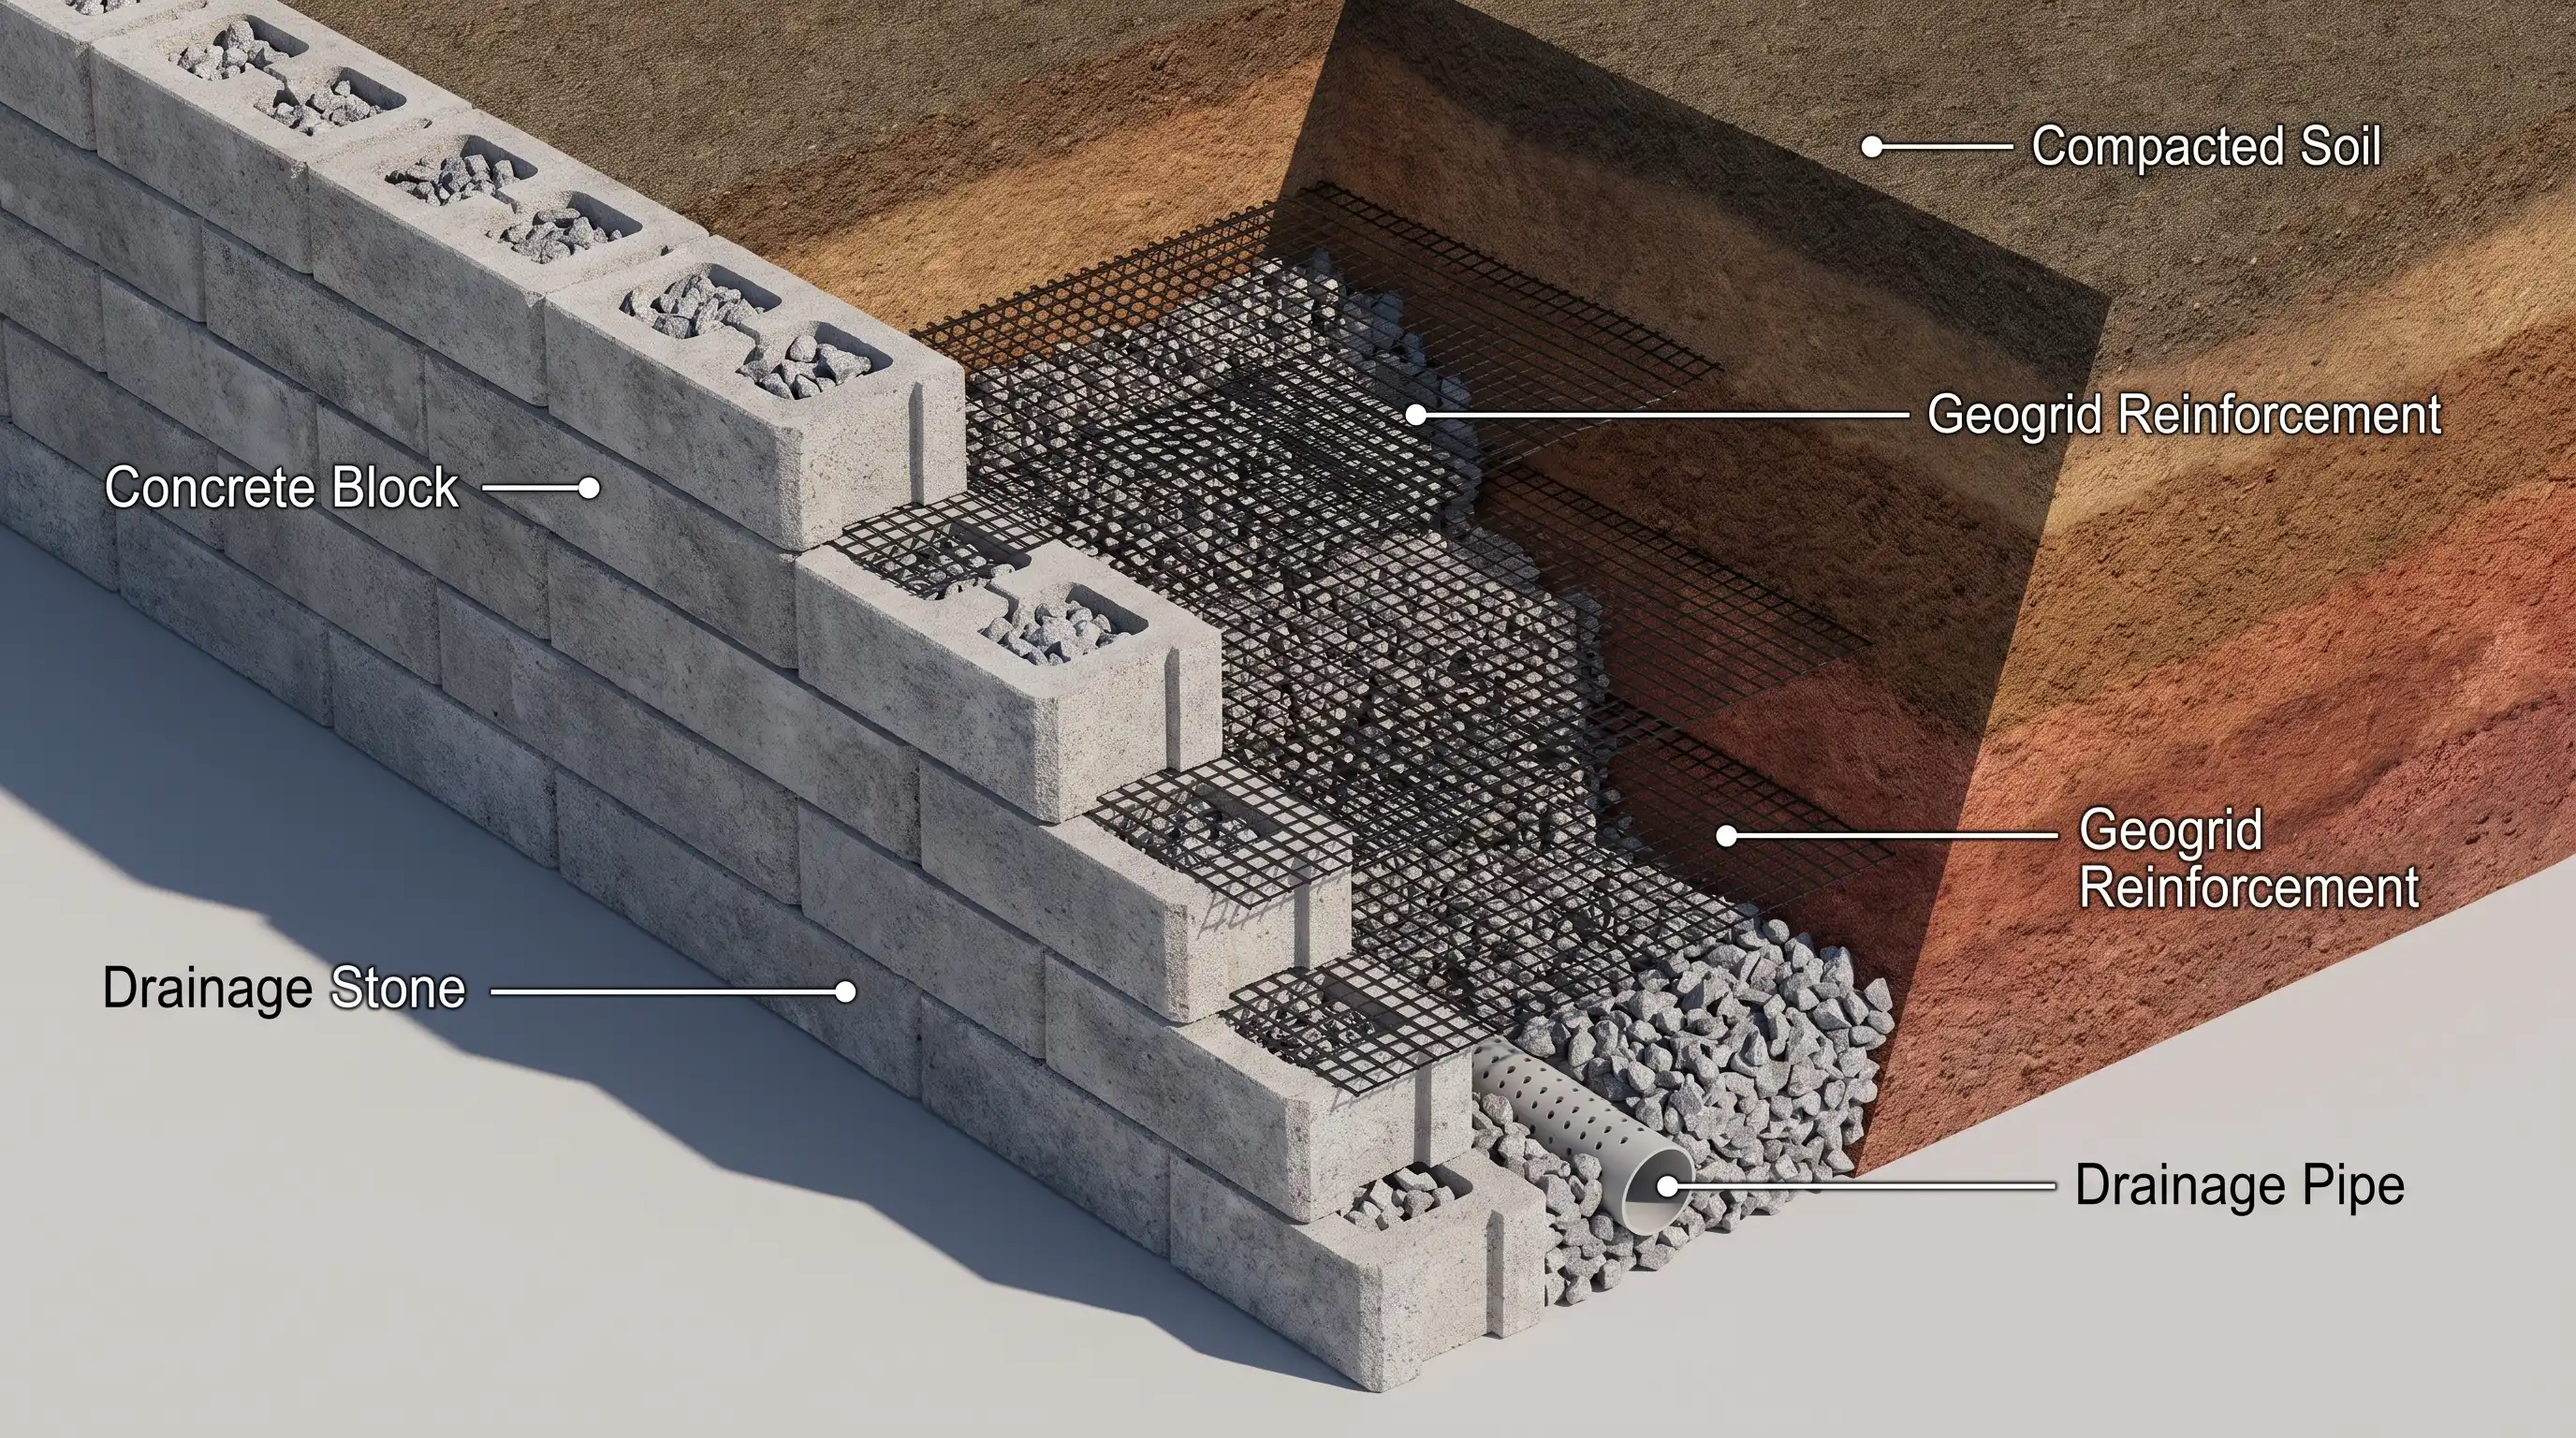
Some retaining walls require geogrid reinforcement to handle additional soil pressure.
If the design calls for it, use the exact geogrid type, placement, and spacing recommended by the manufacturer or engineer.
Install it at the correct course, extend it in the proper direction, and pull it flat before covering it with fill.
Avoid driving equipment directly over exposed geogrid and never replace structural reinforcement with landscape fabric, as they serve different purposes.
Step 10: Continue Building and Checking
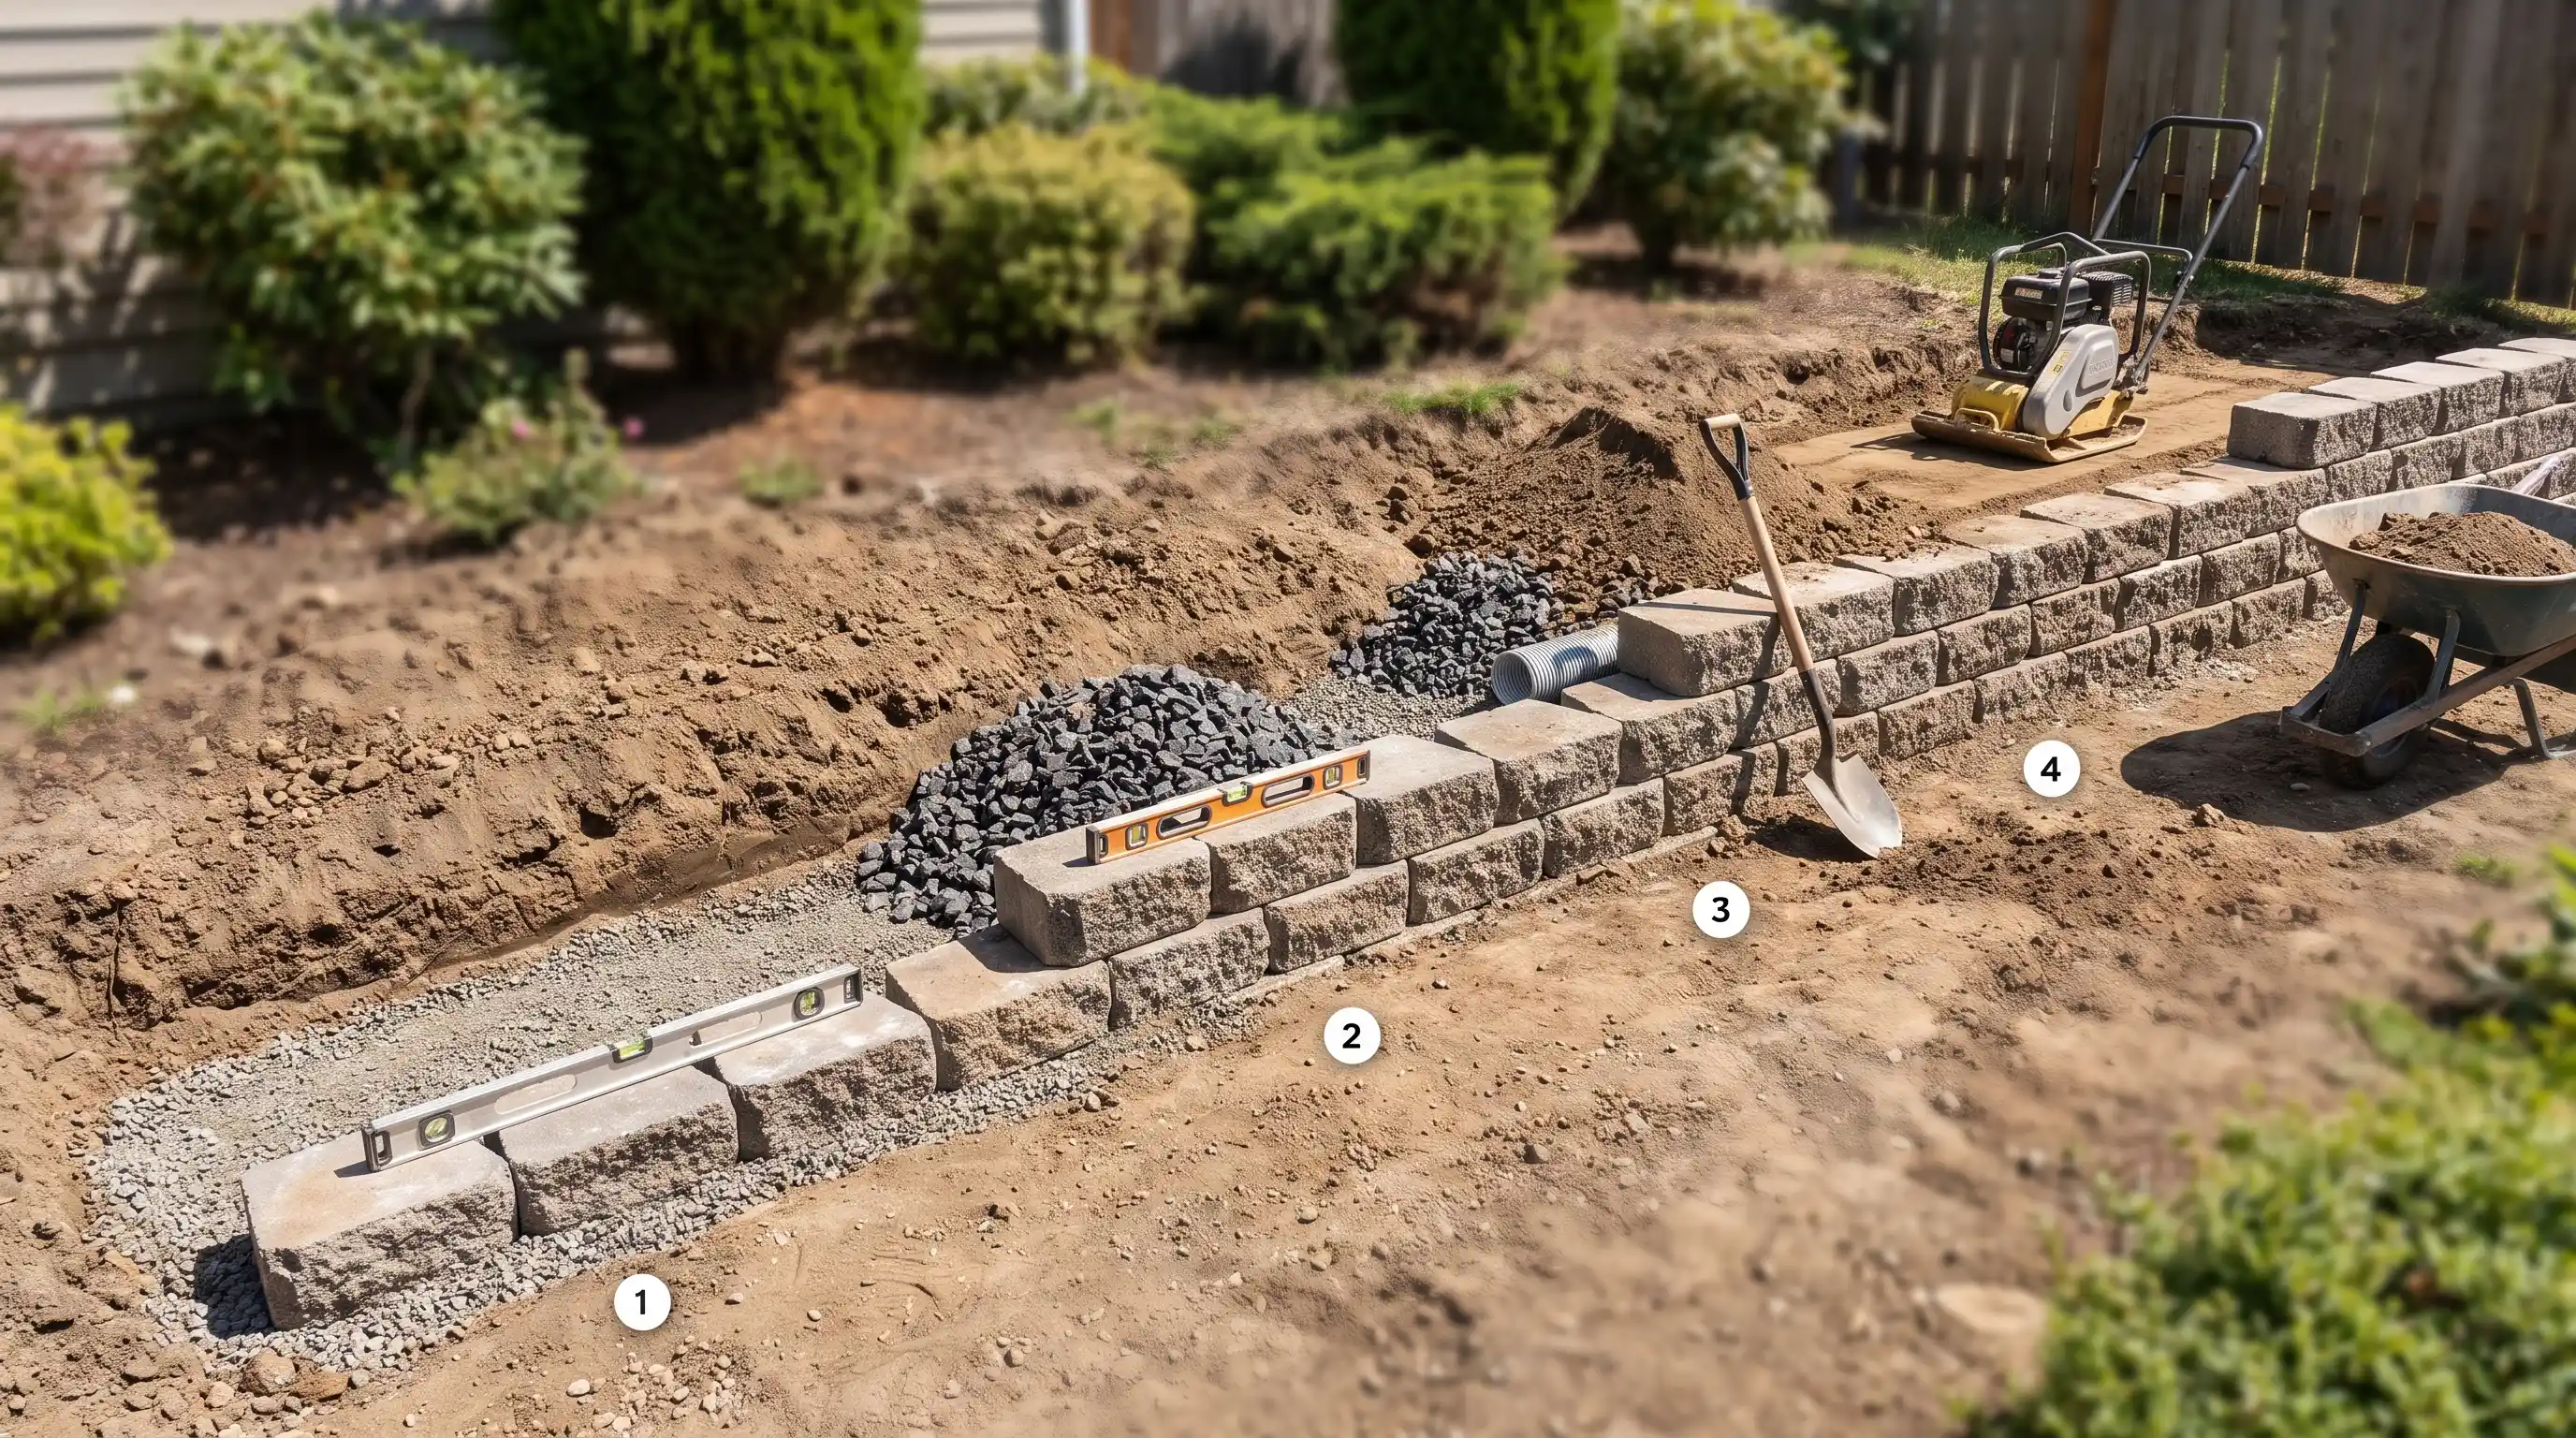
Continue construction using the same process for each course. Set the blocks, check the level and alignment, add drainage stone, place backfill, and compact before moving upward.
This repeated process keeps the wall stable and allows small adjustments before they become difficult to fix.
Step 11: Cut and Install Cap Blocks
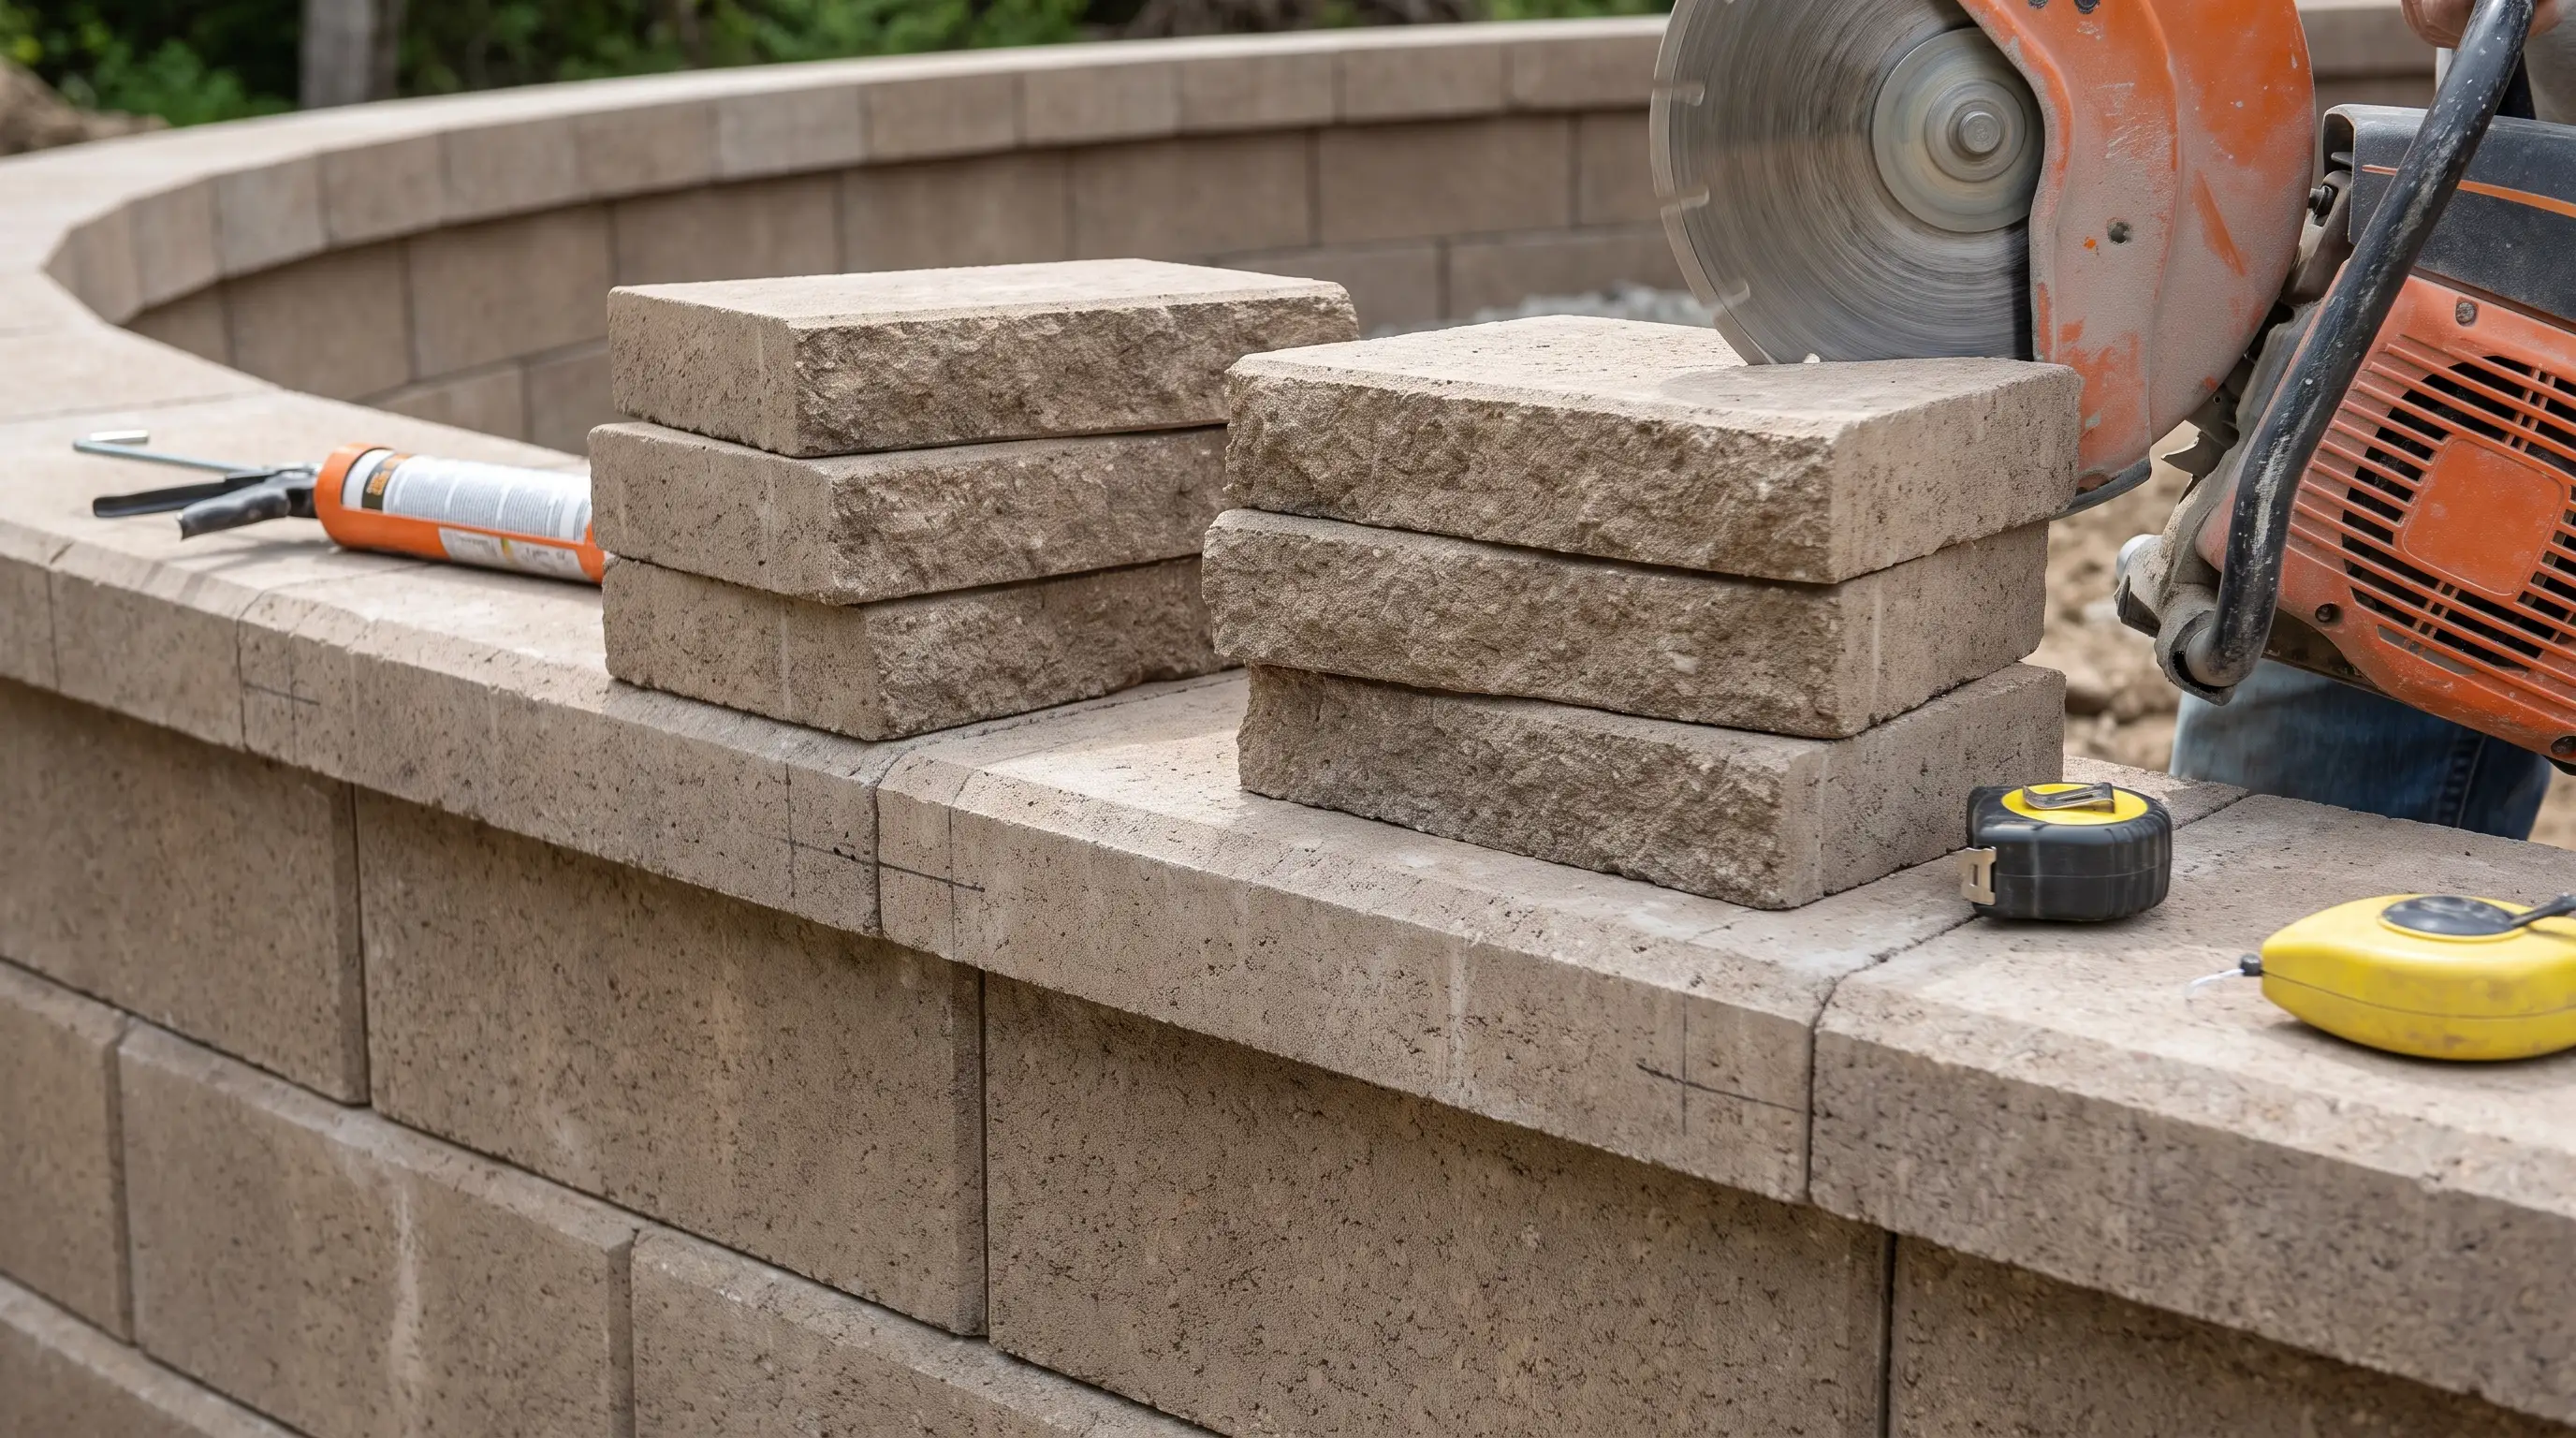
Before securing cap blocks, place them temporarily to confirm the fit and layout. Where possible, stagger cap joints from the blocks below for a cleaner finish.
Use a block splitter for a textured break, or a masonry saw for a smoother cut. Wear proper eye, hearing, and respiratory protection while cutting masonry.
Clean dust from the surface before applying an exterior-grade concrete adhesive, and keep the adhesive away from visible edges to prevent mess around the finished wall.
Step 12: Grade the Soil Above the Wall
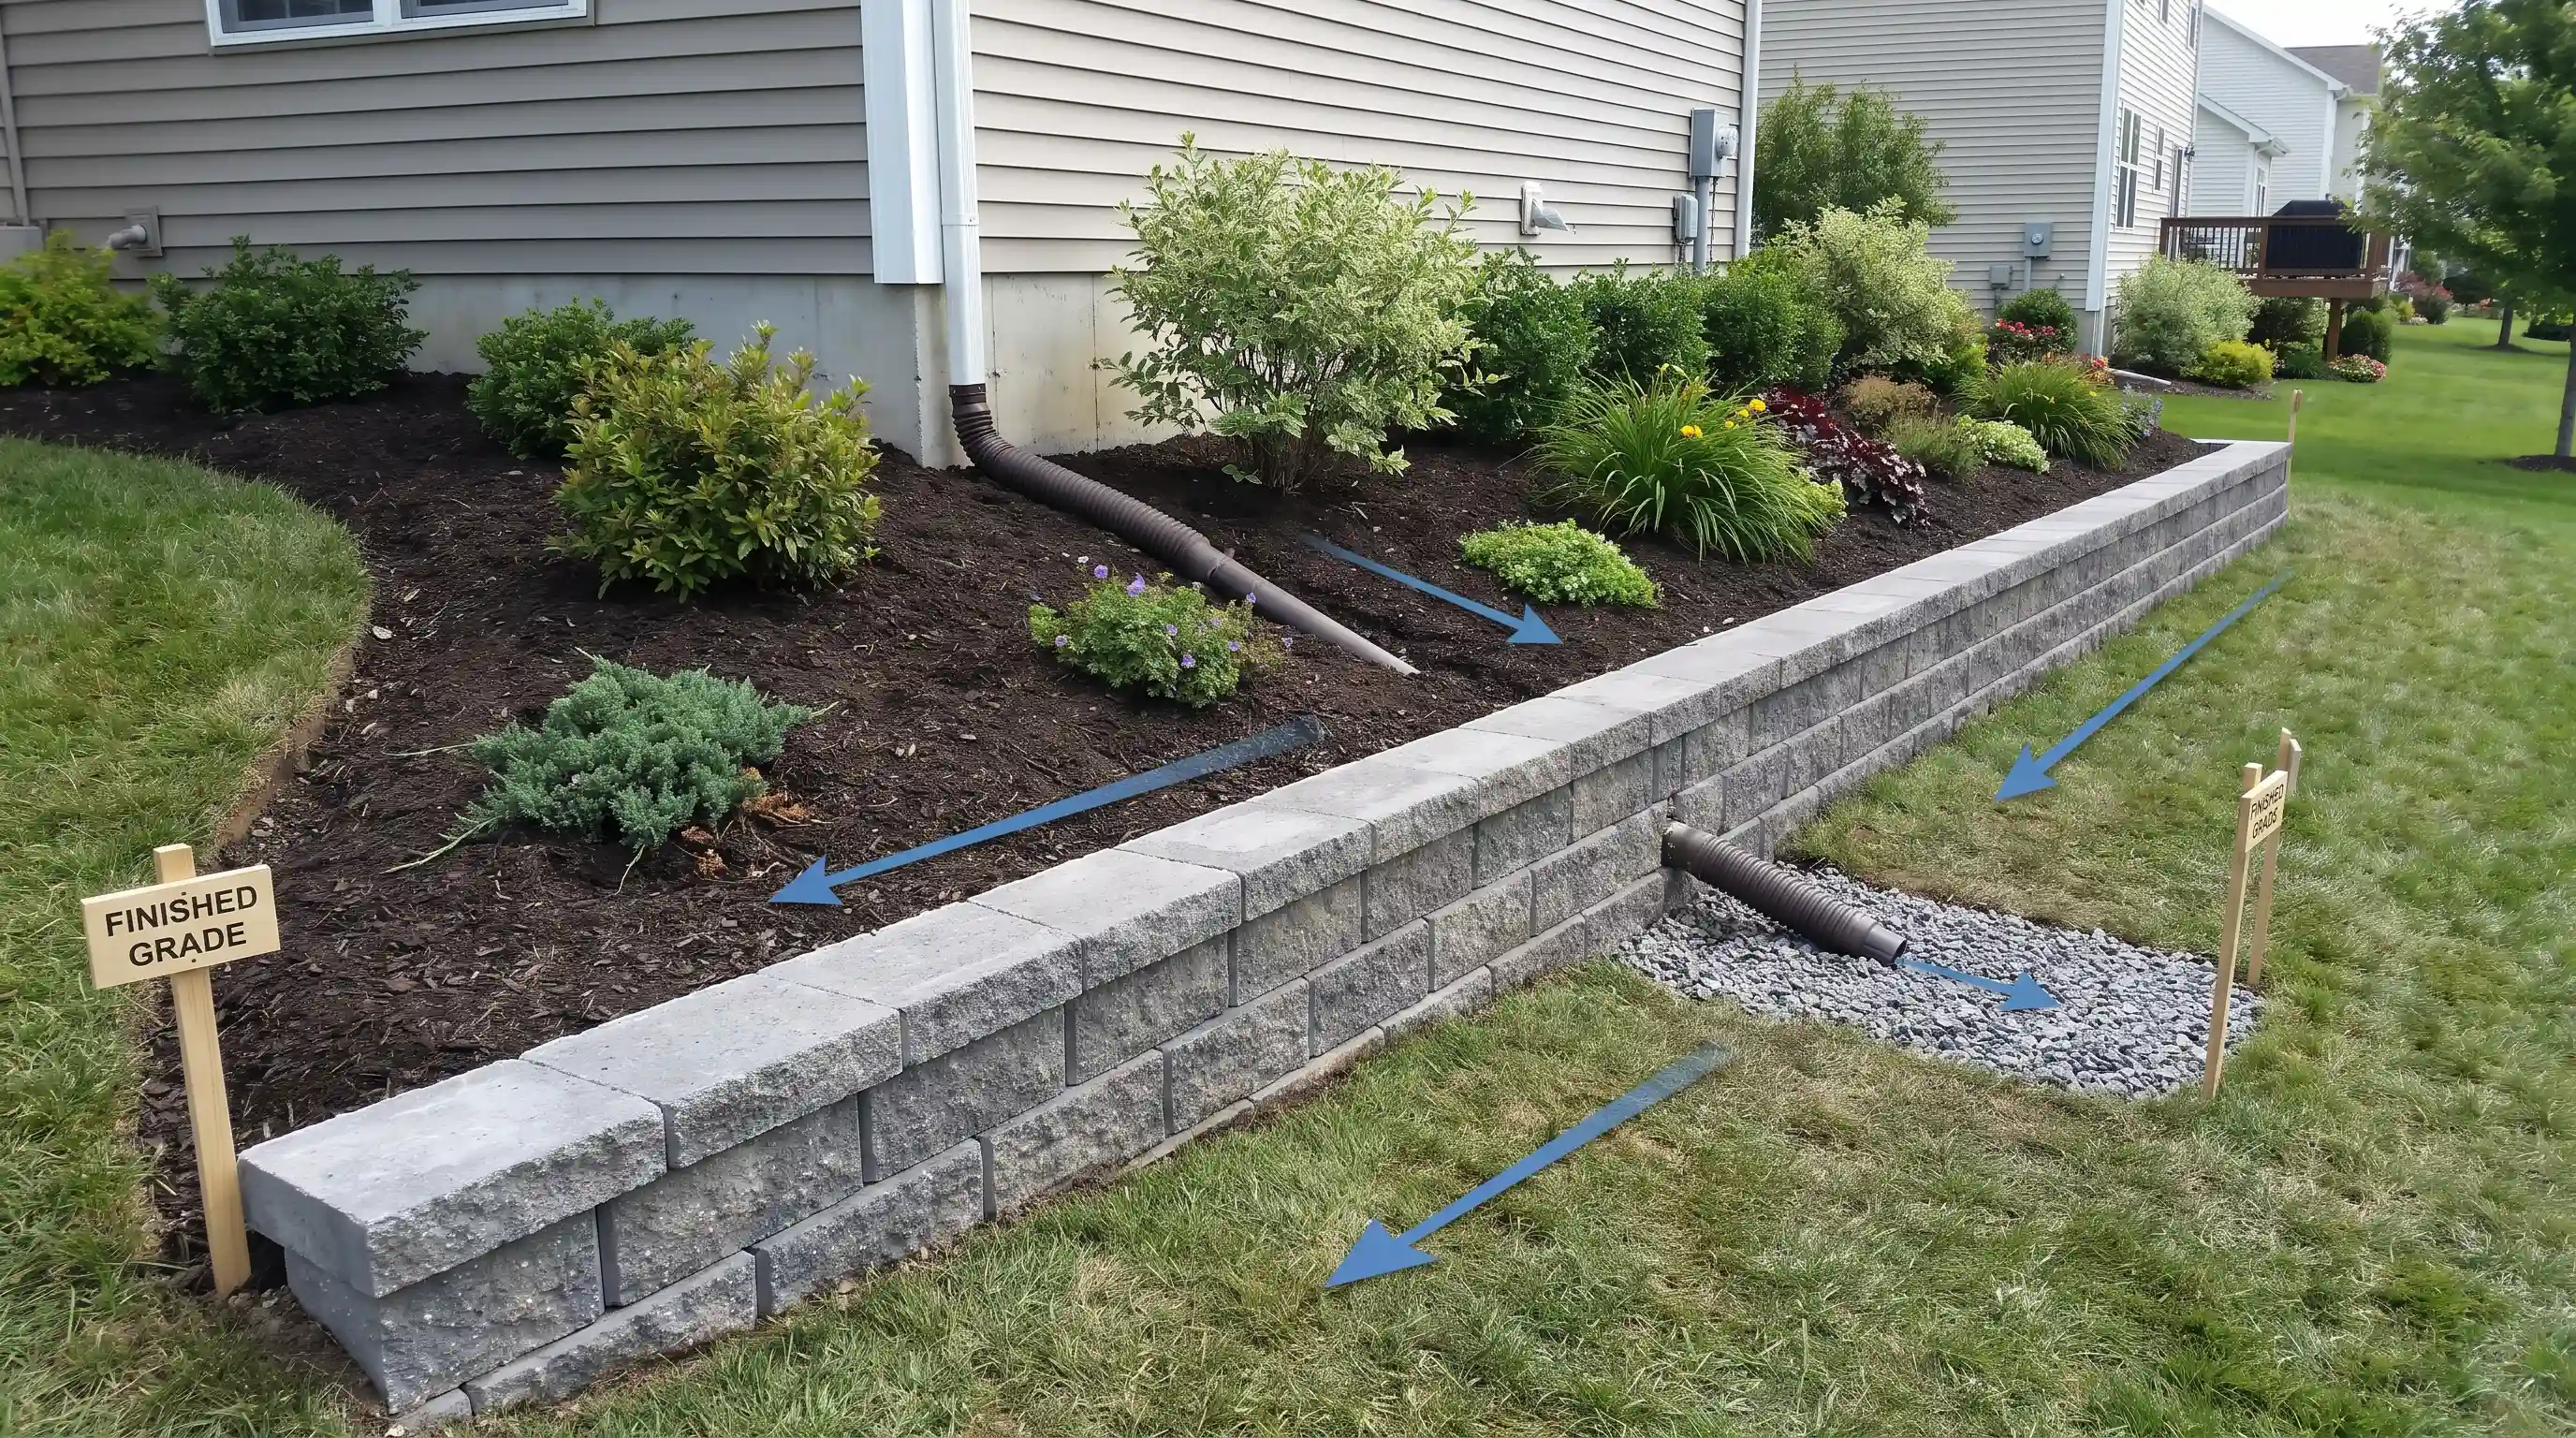
The final grading around the wall helps control future water problems. Shape the soil so that runoff flows away from the wall rather than collecting behind it.
Keep downspouts, irrigation discharge, and other water sources directed away from the structure.
If the design requires a specific surface soil type, follow those recommendations and avoid disturbing the drainage zone when planting.
Quick Tip: Inspect your retaining wall after heavy rain, freeze-thaw cycles, or nearby landscaping work. Watch for leaning, bulging blocks, cracks, drainage issues, standing water, or soil erosion. Fix the cause of the problem instead of only covering visible damage, as these signs may point to deeper issues with drainage, soil pressure, or the wall base.
How to Build Different Styles of Corners?
-
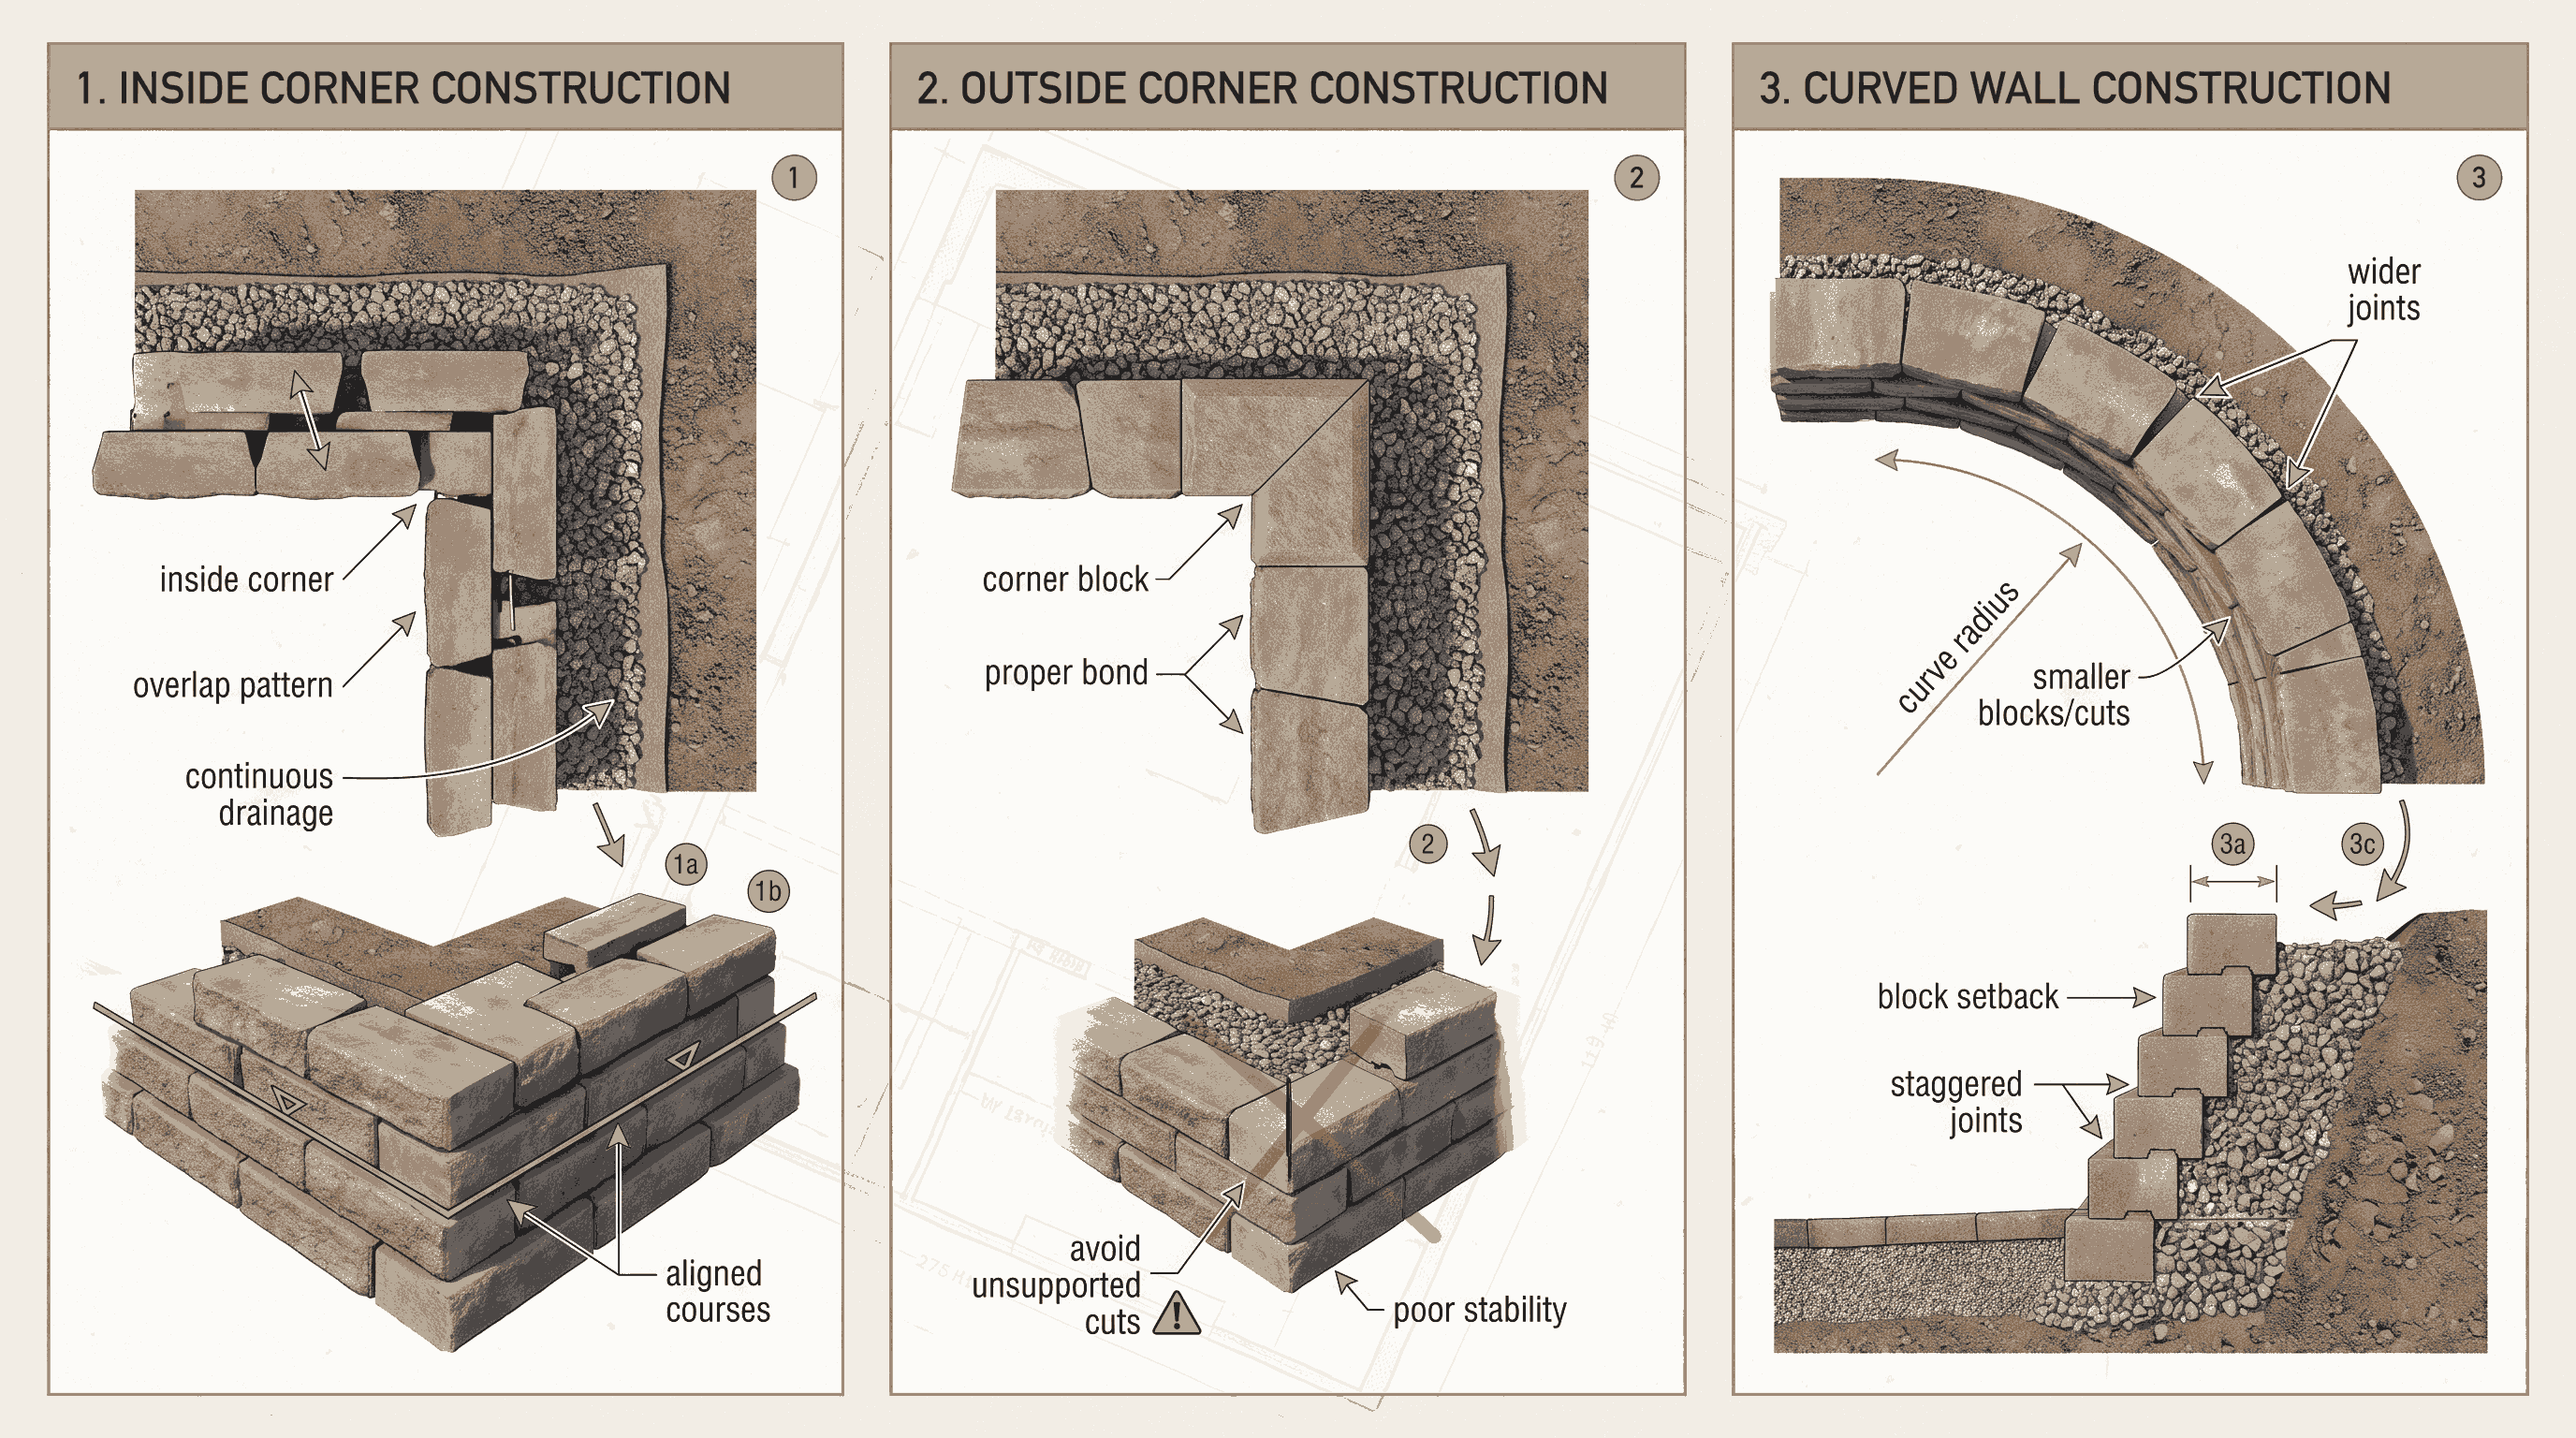
Inside corners: Place blocks carefully to keep both wall sections connected. Follow the manufacturer’s overlap pattern and alternate the direction of each wall section as you add courses. Keep the drainage stone continuous behind the corner to prevent water from becoming trapped, and check the alignment regularly, as small shifts can affect the rest of the wall.
-
Outside corners: Use matching corner blocks when available and follow the recommended bonding pattern to maintain strength. Avoid unsupported cut blocks at the corners, as they can shift over time and weaken the wall’s edge.
-
Curved walls: Plan the curve before installation, because block setbacks change the shape of each higher course. Check the minimum curve radius for the block system, expect slightly wider joints on outside curves, and use smaller blocks or approved cuts for tighter curves. Recheck the curve alignment as the wall rises to ensure the correct shape is maintained.
How Do Retaining Walls Create More Usable Space?
A retaining wall holds soil between two different elevations, preventing the higher side from shifting, eroding, or spreading into the lower area.
Once the wall is in place and the ground is level, that new flat area opens up options. A concrete patio or wood deck combination is a great next step in turning a previously sloped space into an actual outdoor living zone.
Wet conditions can increase this pressure, especially in clay soil, during heavy rainfall, on steep slopes, or with added weight from vehicles and structures.
A small garden border with little soil behind it carries far less pressure, so understanding the difference is important before planning a retaining wall project.
Final Thought
Building a retaining wall that lasts is not just about stacking blocks. The strength of the wall depends on the work below the surface, including proper excavation, a stable base, good drainage, and careful installation.
Taking time to plan the layout, choose the right materials, and follow the correct building process can prevent costly repairs later.
For smaller DIY projects, interlocking blocks can be a practical option when site conditions are suitable. However, always consider wall height, soil pressure, water flow, and local requirements before starting.
A well-planned retaining wall will not only improve your landscape but also provide reliable support for years to come.
The materials and plants you add around the wall matter just as much as the structure itself. Landscaping choices by region cover what actually holds up in your climate once the hardscaping is done.
Frequently Asked Questions
What is the Cheapest Way to Build a Small Retaining Wall?
Pressure-treated timber and interlocking concrete blocks are usually affordable options. Keeping the wall simple, using local materials, and reducing the wall height can help lower costs.
What is the 1/3 Rule for Retaining Walls?
The 1/3 rule suggests burying about one-third of the wall height for stability. Actual depth depends on soil, drainage, frost conditions, and the wall system.
Does a 2 Foot Retaining Wall Need a Footing?
A two-foot block retaining wall usually uses a compacted gravel base instead of a traditional concrete footing. Requirements vary by wall type and site conditions.
What Can I Use for a Small Retaining Wall?
Common options include concrete blocks, timber, natural stone, brick, and landscape blocks. Interlocking blocks are popular for DIY projects because they are easy to install.
What is the Easiest Retaining Wall to DIY?
A low interlocking concrete block wall is often the easiest DIY choice. It requires fewer specialized skills but still needs proper base preparation and drainage.





