
| Cost Note: Figures in this article are estimates based on national averages. Actual costs vary significantly by region, contractor, materials, and project scope. Always get at least three quotes before committing to any project above $1,000. |
If you want to know how to build an outdoor fireplace that actually draws well and holds up past the second winter, start with the footing, the firebox, and the chimney height, in that order.
Every problem I’ve seen in outdoor fireplace builds traces back to one of those three things being wrong. The finished work on top doesn’t matter if the base shifts or the smoke rolls into the seating area.
I bring to you the full build sequence: what to check before you break ground, which materials withstand direct heat without cracking, how the foundation and firebox work together, where a DIY build makes sense, and when the smart move is to call a mason. I’ll also give you real cost ranges so you’re not surprised at the lumber yard.
Can You Build an Outdoor Fireplace Yourself?
The short answer is yes, if the design is a prefab kit or a simple dry-stack system, you’re comfortable with concrete work, and your site is flat with no drainage issues. The moment you’re building full masonry from scratch, adding a gas line, or working near a roofline, the complexity multiplies fast.
| Factor | DIY-Friendly | Hire a Pro |
| Skill level | Intermediate, comfortable with concrete and basic masonry | Beginner masonry skill |
| Build type | Prefab kit or simple dry-stack | Full custom masonry with chimney |
| Time | 2–5 days for a kit, plus curing time | Faster with a crew |
| Site | Level yard, good drainage, easy access | Sloped ground, soft soil, tight access |
| Fuel | Wood-burning kit with clear instructions | Gas line, propane, or complex venting |
| Risk level | Lower if the plan is simple and code-approved | Close to structures, trees, or rooflines |
A prefab kit is the right starting point for most first-time builders. The firebox dimensions and chimney layout are already engineered; you’re handling the footing, the outer shell, and the finish.
A scratch-built masonry fireplace is a different project: it needs a mason’s understanding of firebox geometry, smoke shelf placement, and chimney draw. Getting the firebox shape wrong means the fireplace smokes badly even when the outside looks finished.
How an Outdoor Fireplace Differs from a Fire Pit
The structural difference is more significant than it looks. A fireplace has a contained firebox and a chimney that directs smoke upward.
A fire pit is open, so smoke drifts in all directions with the wind. That changes where you can put it, how you seat people around it, and what kind of base it needs.
| Feature | Outdoor Fireplace | Fire Pit |
| Main structure | Tall firebox with chimney | Open bowl, ring, or low wall |
| Smoke path | Directed upward through the flue | Moves with wind, no fixed direction |
| Build difficulty | Higher: footing, firebox, and chimney required | Lower to moderate: depending on size |
| Base requirements | Reinforced concrete footing | Gravel, pavers, or lighter base |
| Heat direction | Focused toward the front opening | Radiates around all sides |
| Seating layout | Facing the opening | Surrounding the pit |
| Permits | More likely to require review | Varies, sometimes required |
A fire pit is the simpler build. An outdoor fireplace requires more work but offers better smoke control, a taller focal point, and a more defined seating arrangement. Once you’ve made that choice, the planning below applies specifically to the fireplace build.
What to Plan Before You Build an Outdoor Fireplace
The decisions you make before the first shovel goes in set the difficulty, cost, and long-term performance of the whole project. Here’s what to nail down first.
1. Check Permits and Local Rules
Call your local building office before buying materials. Ask about permits, setbacks from structures and property lines, chimney height minimums, burn restrictions, and fuel type limitations.
HOA rules apply separately; check those too. Skipping this step can mean tearing out work you’ve already paid for.
2. Mark the Location Carefully
Use stakes or spray paint to mark the full footprint, including clearance paths, wood storage, and seating. Keep at least 10 feet of clearance from fences, structures, and overhead branches.
Check the prevailing wind direction; you want smoke moving away from the house and your seating area, not into them. The placement at the opening matters as much as the location itself.
A well-thought-out outdoor seating plan around the fireplace opening will save you from repositioning furniture every night by the fire.
3. Study the Ground
Look for soft spots, areas that stay wet after rain, visible tree roots, and drainage patterns. Clay soil expands when wet and contracts when dry, on clay, widen footings by 6 inches and go 8 inches thick rather than 4. Weak or unstable ground will shift the base over time, and a leaning chimney is not a small repair.
4. Choose Your Fuel Type
Wood gives you the real fire experience, but it also means ash cleanup, storing wood within 20 feet of the fireplace (which creates a fire risk if it’s too close), and occasional chimney checks.
Gas is cleaner and easier to start, but it requires a licensed contractor to run the line in most jurisdictions, which adds cost and scheduling time to the project.
5. Decide on the Build Method
Choose between a prefab kit, a contractor kit (unfinished block system), or a full scratch-built masonry design before buying anything.
Each significantly changes the tool list, the required skills, and the final cost. If you’re working on an existing concrete surface, check its thickness and load capacity before treating it as the base.
Most residential patios are poured for foot traffic, not the dead weight of a full masonry fireplace. Your patio surface material also affects layout, weight limits, and how the structure ties in at the base.
How to Build an Outdoor Fireplace: Step-by-Step
Each phase of this build depends on the one before it being solid and cured. Rushing any stage, especially the foundation and firebox- creates problems that show up later as cracks, smoke issues, or structural movement that can’t easily be fixed from the outside.
Phase 1: Foundation
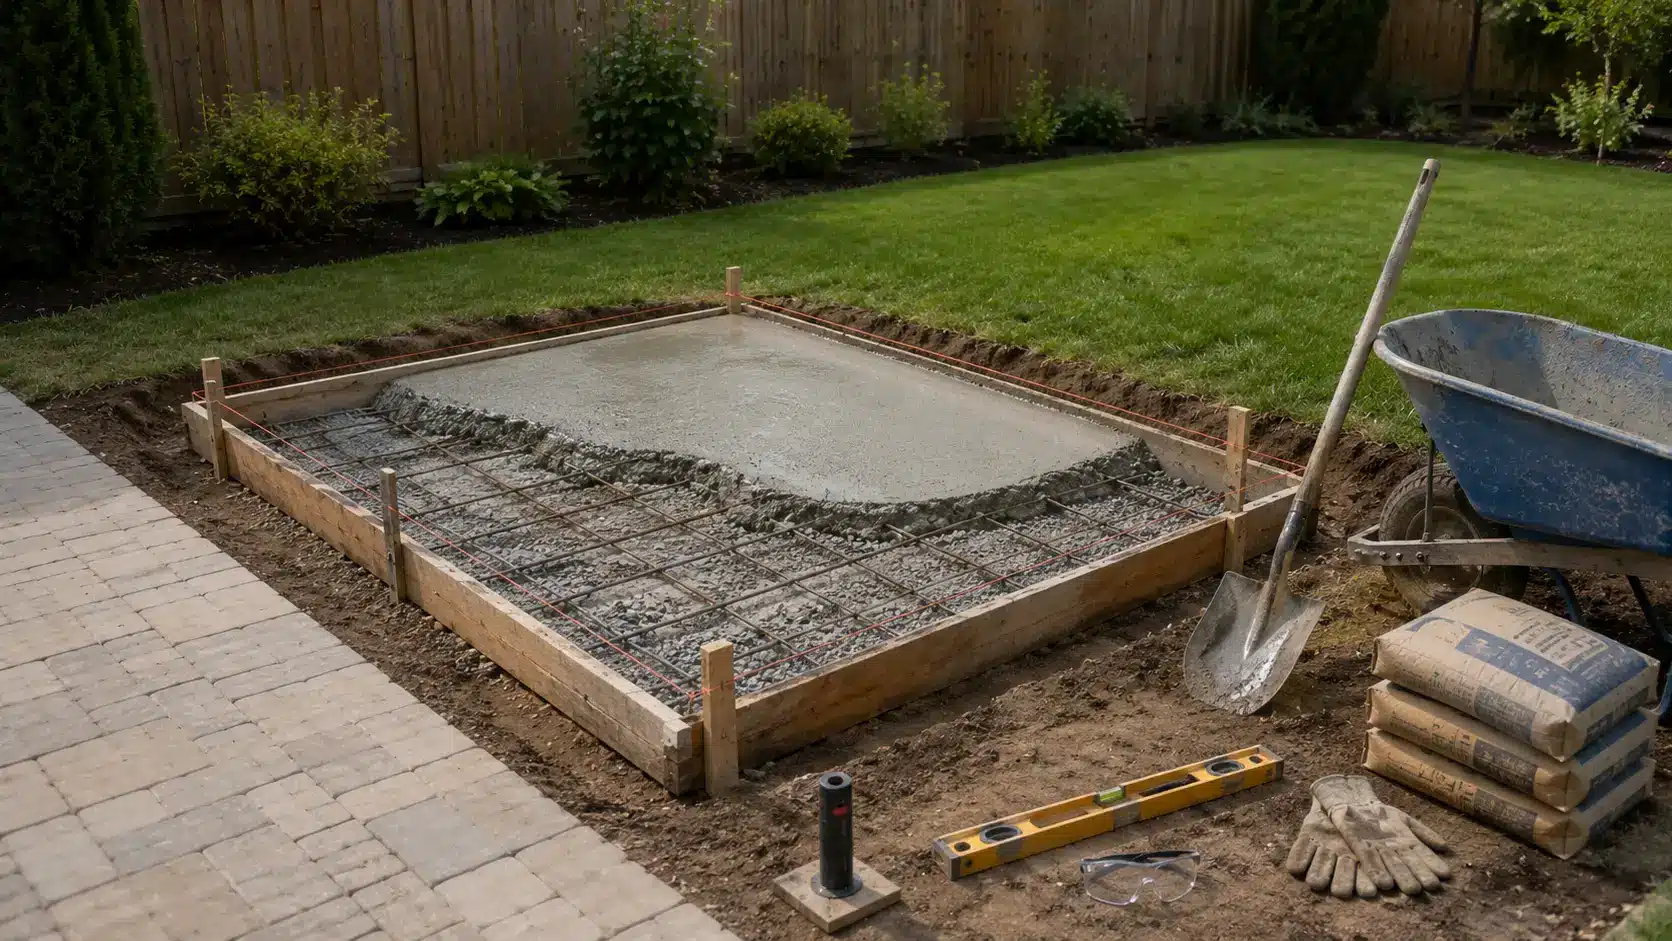
What you need: Shovel, spade, wheelbarrow, level, hand tamper, concrete forms, steel mesh or rebar, concrete mix, hose, gloves, safety glasses.
- Dig the footing. Excavate to at least 18 inches deep in most climates, deeper if you’re in a freeze-thaw zone and the frost line in your region goes lower. The excavation widens near the firebox area to distribute the load. Your local building code sets the minimum; use that as your floor, not your target.
- Compact and set forms. Tamp the soil firmly, set your concrete forms to the correct footprint, and check the level in both directions.
- Add reinforcement and pour. Place rebar or steel mesh before pouring, even where code doesn’t require it, reinforcement helps the footing resist freeze-thaw cracking. Pour, screed level, and keep the concrete moist during curing. Wait a full 48–72 hours before applying any weight to it, and don’t stack blocks until the slab has fully cured.
| Pro Tip: Don’t guess on footing depth. Frost line depth, soil type (clay vs. sandy vs. loam), and total fireplace weight can each change what your base needs. A concrete footing that moves is the most expensive fix in any outdoor fireplace build. |
Phase 2: Firebox
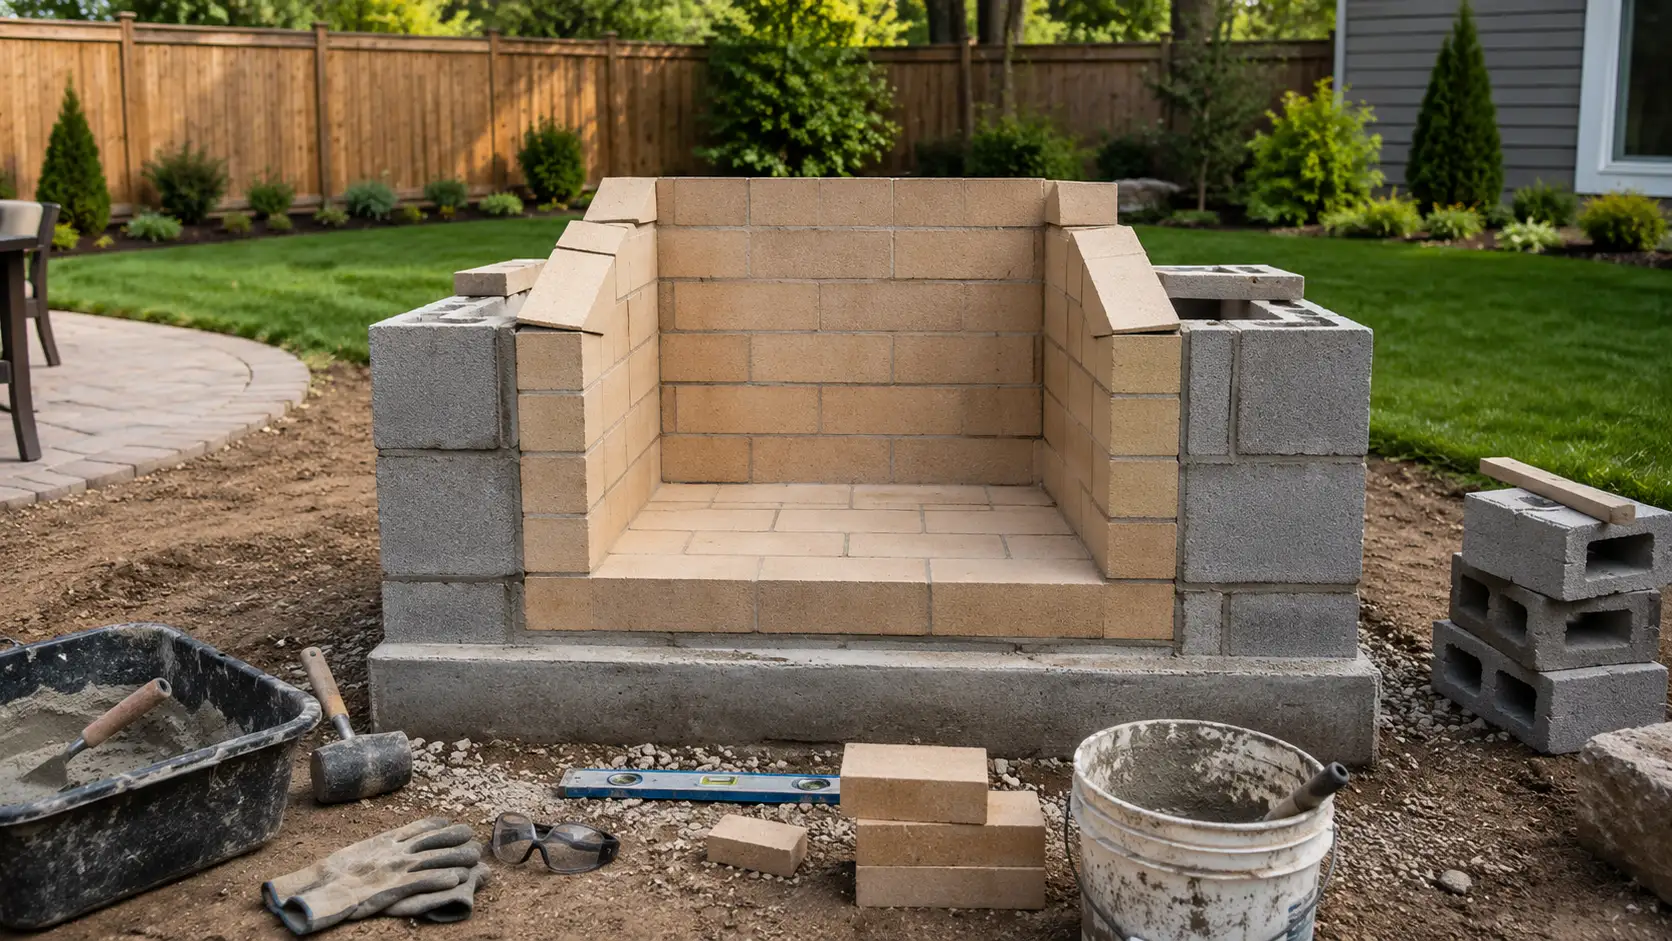
What you need: Masonry trowel, rubber mallet, level, angle grinder with masonry blade, mixing bucket, fire brick, refractory mortar, sand, gloves, safety glasses.
- Build the block support base. Once the footing has cured, lay concrete block as the support platform for the firebox. Keep it dead level; the firebox sits directly on top, and any tilt here multiplies as you build higher.
- Lay the fire brick floor and walls. Fire brick is non-negotiable in the firebox. It’s engineered to handle temperatures up to 2,000°F; regular brick cracks under that kind of repeated heat. Use refractory mortar throughout, not standard mortar. Dry-lay the first course before mortaring so you can see spacing and cuts before they’re permanent.
- Shape the firebox geometry. The sidewalls should angle outward slightly, with the front wider than the back. The back wall angles forward slightly at the top. This geometry directs smoke upward into the flue rather than letting it spill forward into the seating area. Get a piece of paper, sketch the cross-section, and understand the shape before laying the first fire brick.
- Add the smoke shelf. If your design includes one, and it should for wood-burning builds, the smoke shelf sits just above the firebox opening. It catches downdrafts and prevents outside air from pushing smoke back out the front.
| Safety Note: The firebox is the one phase where hiring a mason is worth considering, even if you’re handling the rest yourself. A firebox built with the wrong geometry will smoke badly regardless of how good the chimney is. There’s no easy fix once it’s mortared in. |
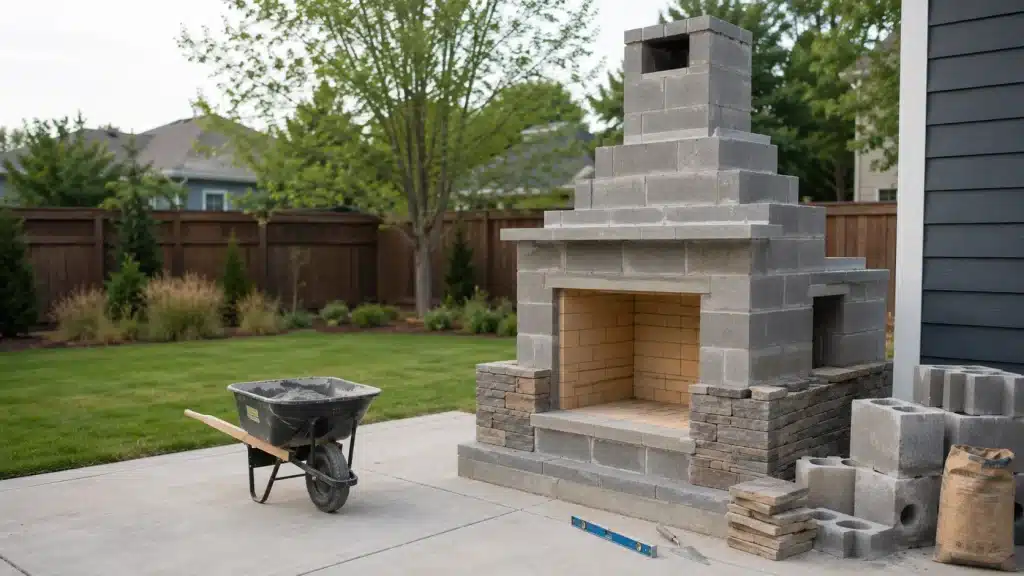
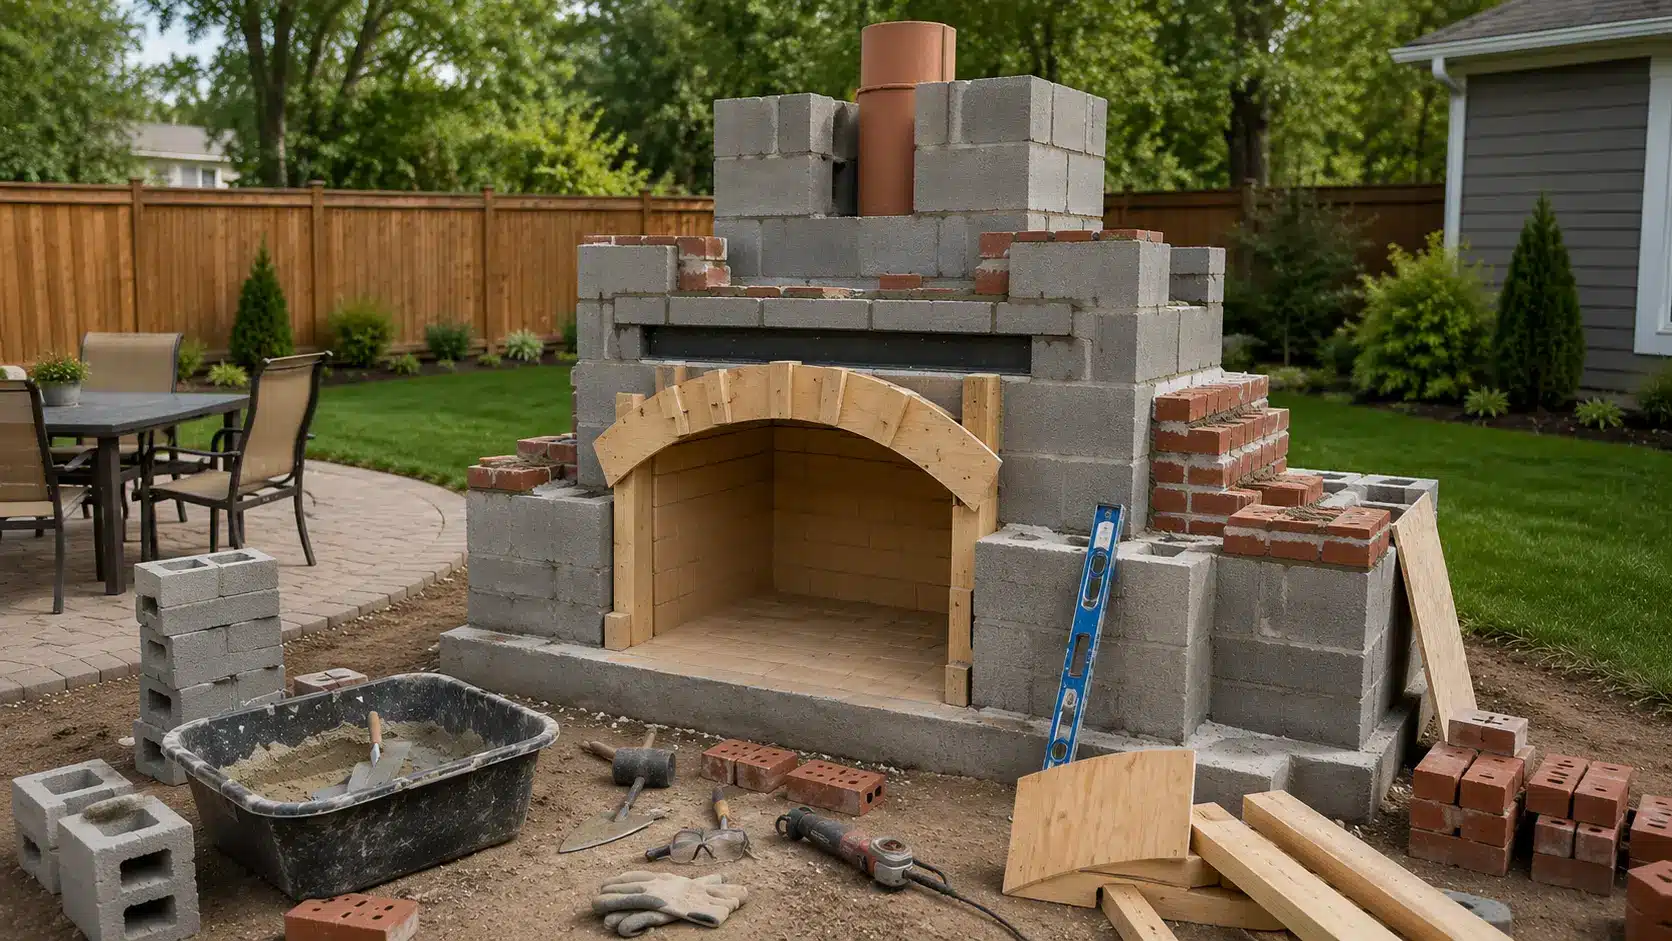
Phase 3: Outer Shell and Chimney
What you need: Masonry trowel, 4-foot level, rubber mallet, angle grinder, brick hammer, mortar tub, CMU blocks, brick, angle iron, plywood, 2x4s, flue liner, gloves, safety glasses.
- Build the outer shell. Stack concrete blocks and bricks around the firebox to form the main structure. Stagger the seams on every course, spread mortar on the edges, not just the face shells, and check plumb and level after every 2–3 courses. A small lean at the base becomes a significant offset by the time you reach chimney height.
- Support the opening. The masonry above the firebox opening needs a proper lintel. Cut angle iron to span the opening and set it in mortar before laying the courses above. This is a structural element, not an optional detail; without it, the opening will eventually crack or fail.
- Form the arch (if applicable). Build a plywood-and-2×4 template to the arch profile, lay cut brick over it, let the mortar set to initial cure, then remove the form. If you’re working from a kit that has a flat lintel instead, follow the kit design; don’t improvise an arch into a system that wasn’t designed for one.
- Install the flue liner. Set the flue liner above the firebox before filling in the surrounding block. The flue is what determines smoke draw. Chimney height matters: a taller chimney creates a stronger draft. Most outdoor fireplaces perform best at a total height of 10–12 feet, and local code will specify a minimum. Follow both your plan and the code, whichever is more demanding.
- Build the chimney to a height. Check level and plumb every 3–4 courses. The earlier you catch the deviation, the less cutting and relaying later.
| Pro Tip: A chimney that’s slightly out of plumb near the bottom looks dramatically worse at 8 feet. Check it often. Use a 4-foot level and check in both directions, front-to-back and side-to-side, at every course. |
Phase 4: Finish and Hearth

What you need: Masonry trowel, mortar bag, wire brush, angle grinder, veneer stone, mortar, hearthstones, capstone, level, gloves, and safety glasses.
- Build seating and hearth areas. If your design includes built-in bench seating or a hearth extension, build those after the fireplace body is roughed in. A lightweight CMU block works for a bench structure; brick shapes more easily for the curved hearth profile if that’s part of your design.
- Lay the stone veneer. Start at the firebox opening, the most visible focal point, and work outward. Back-butter each piece, press it firmly into the mortar, and vary the stone sizes so the joints don’t align in repetitive patterns. Manufactured stone veneer is lighter than natural stone and easier to handle on a block shell. Natural stone costs more and adds load; confirm your base can handle it before you order.
- Fill the joints. Use a piping bag or grout bag to fill mortar joints once the veneer has set enough to hold position. Slightly overfill, let it firm to thumbprint hardness, then smooth with a wire brush. Don’t let it fully harden before tooling; it gets brittle and cracks.
- Set hearthstones and capstone. Use exterior-rated stone or pavers for any horizontal surface that will hold water. The capstone at the chimney top helps deflect sparks and keeps rain from entering the flue. A metal chimney cap is an even better solution; it extends liner life and prevents debris nesting.
| Pro Tip: Every finish material needs to be exterior-rated. Outdoor fireplaces cycle through heat, rain, freezing, and UV exposure. Indoor stone or standard mortar will fail faster than you expect. Apply an exterior masonry sealer after the finish has fully cured, and plan to reapply it every 3–5 years, depending on your climate. |
Phase 5: First Fire Test
- Wait for a full cure. Let all concrete, mortar, fire brick, and finish materials cure completely before lighting anything. The minimum is 7 days from the last mortar joint. 14 days is better. Heat applied to uncured mortar creates steam pockets that crack the joints from the inside.
- Light a small fire. Burn a small amount of clean, dry hardwood, oak, maple, hickory, or ash. Watch where the smoke goes. A well-built outdoor fireplace cleanly draws smoke upward through the flue. If smoke rolls out the front, stop and diagnose before building a larger fire.
- Check the draw. Smoke rollout points to three possible causes: firebox geometry is off, the chimney is too short to create adequate draft, or wind is pushing into the opening. Identify which one before making any changes.
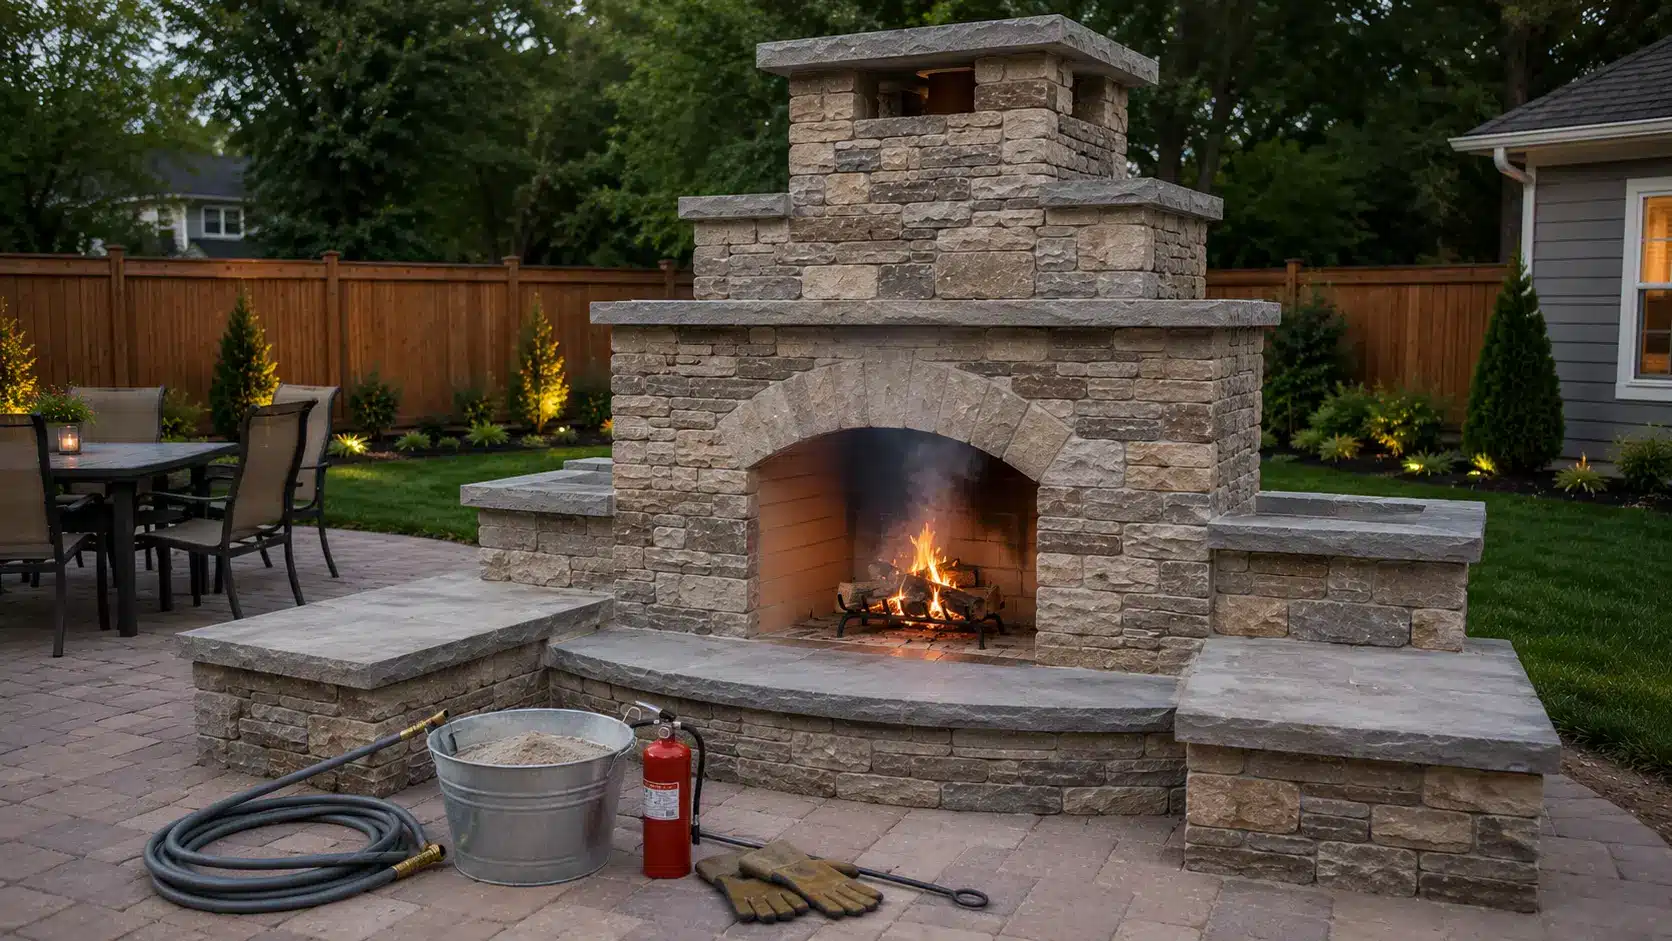
| Safety Note: Never use accelerants to start the fire. Keep a garden hose, a bucket of water or sand, and a fire extinguisher within reach during the first burn. Do not light if the mortar still looks damp, if any visible cracks have appeared in the firebox or foundation, or if a burn ban is active in your area. |
How Much Does It Cost to Build an Outdoor Fireplace?
Cost depends heavily on build type, site conditions, finish material, and whether you’re hiring any labor. A prefab kit with a basic concrete base and standard veneer sits at the lower end.
A custom masonry fireplace with built-in seating, premium stone, and gas work is a different budget conversation entirely. If the fireplace area also needs new hardscape, factor in paver installation costs before you finalize any budget; treating them as an afterthought creates cost surprises mid-project.
| Line Item | Low End | High End | What Drives the Variation |
| Prefab kit installed | $1,500 | $9,000 | Kit size, finish level, and labor market |
| Contractor kit (unfinished) | $1,000 | $4,000 | Block system size before finishing work |
| Custom masonry installed | $6,000 | $20,000 | Size, chimney height, stone type, and labor |
| Site prep | $500 | $2,000 | Clearing, grading, and drainage corrections |
| Permits | $50 | $500 | Varies significantly by municipality |
| Mason labor | $70/hr | $100/hr | Region, complexity, access |
| Gas line installation | $350 | $2,000 | Distance from source, buried vs. surface run |
| Stone veneer materials | $11/sq ft | $18/sq ft | Manufactured vs. natural, thickness |
For a mid-size DIY outdoor fireplace built from a kit, with a concrete base, basic masonry work, and a veneer finish, budget $2,500 to $6,000 in total. Add a 15–20% buffer for waste, extra mortar, cut losses, delivery fees, and the small fixes that show up in every masonry project. Prices based on 2024–2025 national averages; verify current material costs with local suppliers before finalizing your budget.
How to Finish an Outdoor Fireplace
The finish work happens after the structure is fully cured and solid. This phase is about protecting the shell, closing exposed surfaces, and giving the fireplace its final look. The finish can’t rescue weak masonry — but it can significantly extend the life of a good build.
1. Stone and Brick Veneer
Manufactured stone veneer is the most common choice for block-shell fireplaces. It’s lighter than natural stone, bonds well to a prepared CMU surface, and comes in profiles that closely resemble the real thing. Natural stone adds weight and cost but gives a denser, longer-lasting surface.
Confirm your footing can carry it before ordering. Brick veneer suits a more traditional look and is easier to lay in consistent patterns than random stone, but it still needs proper surface prep, consistent joint depth, and exterior-rated materials throughout.
2. Stucco
Stucco is a reasonable choice for a simpler outdoor fireplace build. Apply it in proper coats over a prepared masonry surface, and use exterior-rated stucco formulated for temperature variation. It’s less forgiving than veneer if the base moves, any crack in the substrate shows through stucco faster than through stone.
3. Hearth and Capstone Surfaces
Any horizontal surface, hearth extension, bench top, chimney cap, needs to handle standing water, frost, and heat cycling. Use exterior-rated stone, brick, or concrete pavers. A metal chimney cap is worth adding at the top; it keeps rain out of the flue, reduces liner deterioration, and prevents animals from nesting in the chimney between seasons.
4. Sealing
Apply a penetrating exterior masonry sealer after all finish materials have fully cured, usually 28 days after the last mortar joint. Sealer reduces water absorption, which is the primary driver of freeze-thaw spalling in outdoor masonry. Reapply every 3–5 years or whenever water no longer beads on the surface.
Safety Checks Before the First Fire
| Check | What to Do | Why It Matters |
| Full cure | Wait at least 7 days, 14 is better, before any fire | Heat on uncured mortar creates steam pockets that crack joints |
| Clear the area | Remove furniture, cushions, leaf debris, and any stored wood within 10 feet | Embers travel further than expected |
| Overhead clearance | Check for low branches, rooflines, or covered patio overhangs above the chimney | Rising heat and sparks need a clear path |
| Smoke direction | Light a small fire and watch the drawing for 10 minutes | Smoke rollout is a structural signal, not just a comfort issue |
| Safety gear | Keep a hose, fire extinguisher, sand, or water bucket nearby | First burns are the highest-risk burns |
Do not light if the mortar still looks damp, if visible cracks have appeared in the firebox or foundation, if a burn ban is active, if wind is pushing directly into the fireplace opening, or if flammable materials are too close to the structure.
Common Mistakes That Show Up Later
Most outdoor fireplace problems I’ve seen weren’t caused by bad materials; they were caused by decisions made in the first two phases of the build. The footing and the firebox are where the damage happens, even when the finish looks clean.
- Footing too thin or too small. A base that can’t carry the load cracks and shifts. Pour a reinforced concrete slab over compacted gravel. Minimum 4 inches thick, 6–8 inches for full masonry builds on clay or soft soil.
- Using regular brick in the firebox. Standard brick cracks under repeated exposure to direct heat. Fire brick and refractory mortar are required for any surface that comes into contact with the flame.
- No lintel over the opening. Masonry above the firebox opening needs structural support. Angle iron or a reinforced concrete lintel is mandatory; without it, the opening eventually cracks or drops.
- Chimney too short for the draft. A short chimney doesn’t generate enough draft to pull smoke cleanly. Follow your fireplace plan’s height spec and your local code minimum, whichever is taller.
- Skipping the permit check. Local rules affect setback, fuel type, chimney height, and spark control. Getting caught after the build is more expensive than the permit.
- Building too soon after pours. Concrete and mortar that haven’t fully cured can crack when subjected to load or heat. The waiting time feels wasteful, the repair cost doesn’t.
- Ignoring wind direction. The opening faces the wrong direction, and smoke rolls into the seating area all season. Walk the site on a calm day and check the direction of the prevailing breeze before you stake the location. For decks and outdoor deck layouts, wind direction affects where the fireplace fits relative to seating zones.
Frequently Asked Questions About Building an Outdoor Fireplace
These are the questions that come up most often once people have a plan in hand and start getting into the actual build details.
Can I build an outdoor fireplace on an existing concrete patio?
Only after checking the slab’s thickness, reinforcement, and condition. Most residential patios are poured at 3–4 inches for foot traffic, not for a structure that can weigh several tons. If the slab is thin, uneven, or cracked, pour a separate footing rather than loading the existing surface.
What is the best material for an outdoor fireplace firebox?
Fire brick laid with refractory mortar. Fire brick is engineered for temperatures up to 2,000°F. Standard brick and standard mortar crack under repeated heat cycling. Don’t substitute, even on budget builds; firebox repairs are expensive.
Why is my outdoor fireplace smoking?
Three likely causes: the firebox geometry is wrong (opening too wide relative to the flue), the chimney isn’t tall enough to generate draft, or prevailing wind is pushing into the opening. Diagnose which one to modify before anything, each has a different fix.
Can I use an outdoor fireplace under a covered patio?
It depends on overhead clearance and local code. The chimney must clear any overhead structure, and most codes require a minimum distance between the chimney top and any combustible overhead surface. A masonry fireplace under a covered patio almost always requires a permit review; don’t skip it.
Final Verdict
For most outdoor spaces, yes, if you start with a plan that matches your skill level and your site. A prefab kit build on a flat yard with a good concrete base is a project an experienced DIYer can finish in a long weekend and get right.
A custom masonry outdoor fireplace on an irregular lot, or anything involving a gas line, is a different scope: budget accordingly, pull the permit, and hire a mason for at least the firebox phase.
The foundation, firebox geometry, and chimney height are what determine whether this thing draws cleanly and lasts. Get those three right, and the finish is straightforward.
Before you buy materials, check your local permit requirements and measure the clearances; those two steps alone prevent most of the expensive mistakes I’ve seen when learning how to build an outdoor fireplace.