


Struggling to make your yard feel organized instead of random? You look at the space and nothing seems to flow or function properly.
Most outdoor spaces feel this way when structure is missing before planting starts. Strong garden layout ideas can fix that by turning confusion into a clear plan, especially when you start to plan-a-garden with structure in mind from the beginning.
I look at many yards where seating, paths, and beds compete instead of working together.
You might be dealing with narrow paths, awkward corners, or areas that never get used. This guide shows how to choose layouts that match your space, use, and conditions.
By the end, you will know what fits, what fails, and what to plan first
What Makes a Garden Layout Work Well
A garden layout works when every part of the space earns its place. Most yards I’ve worked on don’t fail because of bad plant choices. They fail because the structure was never sorted before anything went into the ground. Seating placed too close to a fence. Paths just narrow enough to feel frustrating with a watering can. Beds positioned where water sits after rain.
Scale matters as much as shape. Features need to suit the actual yard, not the one in the photo. Oversized beds overwhelm a small garden. A pergola on a 10×10 patio blocks everything it was meant to shelter. Getting the proportions right before spending a cent on materials is the single most useful thing a homeowner can do.
Good garden layout ideas also account for the practical load: drainage patterns, maintenance access, storage routes, the line a hose takes from the tap. These aren’t glamorous details, but they’re the ones that determine whether a garden gets used or quietly ignored after the first season.
What to Check Before Choosing a Garden Layout Idea
The best time to test a layout is before anything is dug, poured, or planted. Here is what I check on every outdoor job before recommending a single design direction:
- Actual daily use: Decide first whether the space is for quiet mornings with coffee, family meals, growing food, or a play area. A layout that suits all four usually serves none of them well.
- Sun timing: Check light at the time you’ll actually use the garden. A south-facing seat looks appealing on a plan but becomes unusable in July afternoon heat.
- Sight lines and privacy: Walk the yard and look at what neighbors, roads, or windows can see before placing seating. A screen added afterward costs more and rarely looks right.
- Movement width: Mark paths with string and walk them carrying a tray or tool bag. Anything under 36 inches wide creates daily friction.
- Material durability: Every surface choice should be evaluated by what it looks like after two winters, not just the day it goes in. Gravel, stone, timber, and pavers all behave differently under freeze, thaw, rain, and heavy foot traffic.
- Plant growth in year two: Sketch the planting at mature size. Shrubs that seem well-spaced at planting can close a path or shade a seating area within 18 months.
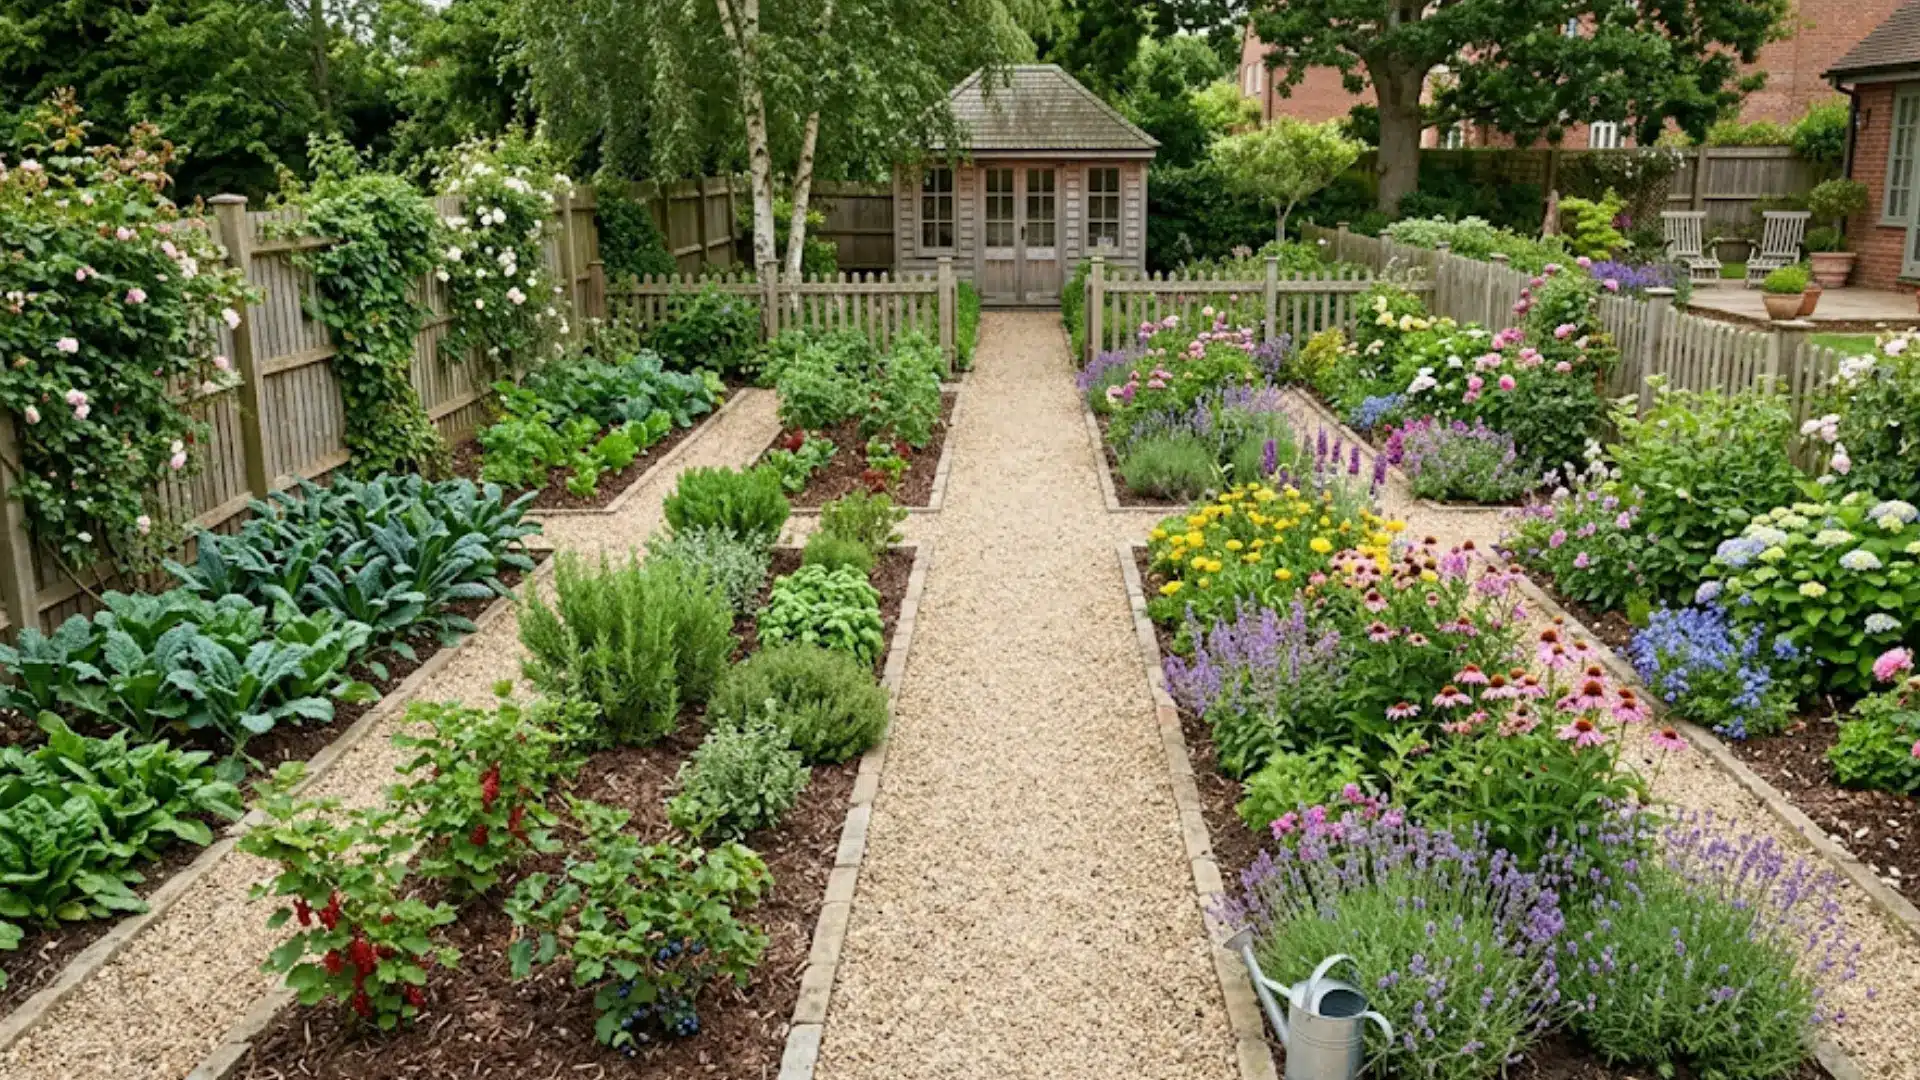
Garden Layout Ideas That Work in Real Yards
What follows are garden layout ideas drawn from real outdoor spaces, not showroom shoots. For each one, I’ve included the practical details that matter most: what fails, what holds up, and what to decide before spending anything.
| Layout Type | Best For | Main Material | Typical Cost Range | Holds Up To |
| Curved Walkway | Flat, featureless yards | Stone, gravel, brick | $8–$25 per linear ft | Heavy foot traffic |
| Courtyard | Small enclosed spaces | Pale paving, pots | $3,000–$12,000+ | Year-round use |
| Raised Bed | Poor soil, slopes | Timber, galvanized steel | $300–$1,500 per bed | Daily harvesting |
| Cottage Border | Fence and wall edges | Edging, mulch | $200–$1,500 | Seasonal growth |
| Outdoor Room | Larger yards, entertaining | Mixed surfaces | $2,000–$15,000+ | Guest use |
| Vertical Garden | Balconies, side yards | Wall fixings, planters | $500–$3,000 | Wind load |
| Island Bed | Open lawns, front yards | Edging, mulch | $300–$2,000 | Mowing clearance |
| Sunken Seating | Privacy-first spaces | Stone, concrete | $5,000–$20,000+ | Level changes, drainage |
| Water Feature | Seating-focused yards | Stone, pump, edging | $500–$8,000+ | Freeze-thaw cycles |
| Rock Garden | Dry slopes, poor soil | Mixed stone sizes, gravel | $500–$3,500 | Drought conditions |
| Shade Garden | North-facing, under trees | Foliage plants, mulch | $400–$2,500 | Low-light conditions |
| Herb Spiral | Near kitchens, patios | Stone, brick | $200–$1,000 | Daily picking |
| Wildlife Garden | Suburban yards | Native plants, water bowl | $500–$3,000 | Seasonal cycles |
| Pergola Seating | Patios, dining areas | Timber, concrete footings | $3,000–$12,000+ | Wind and snow loads |
| Container Modular | Renters, patios, rooftops | Pots, quality compost | $300–$2,000 | Seasonal mobility |
| Linear Grid Path | Narrow, rectangular yards | Gravel, pavers | $500–$3,000 | Heavy maintenance use |
| Zen Gravel | Low-maintenance courtyards | Raked gravel, stone | $800–$4,000 | Minimal upkeep |
Use the table above to match your yard’s conditions to a starting layout type before reading the full description. Cost ranges are estimates based on national averages and vary significantly by region, material grade, and labor rates. Verify current pricing with local suppliers before committing to a budget.
| Cost Note: Several layouts in this guide, including sunken seating, courtyard paving, pergola builds, and water features, commonly exceed $1,000 in total project cost. Figures shown are national estimates. Always get at least three contractor quotes before committing to any structural outdoor work. |
1. Curved Walkway Garden
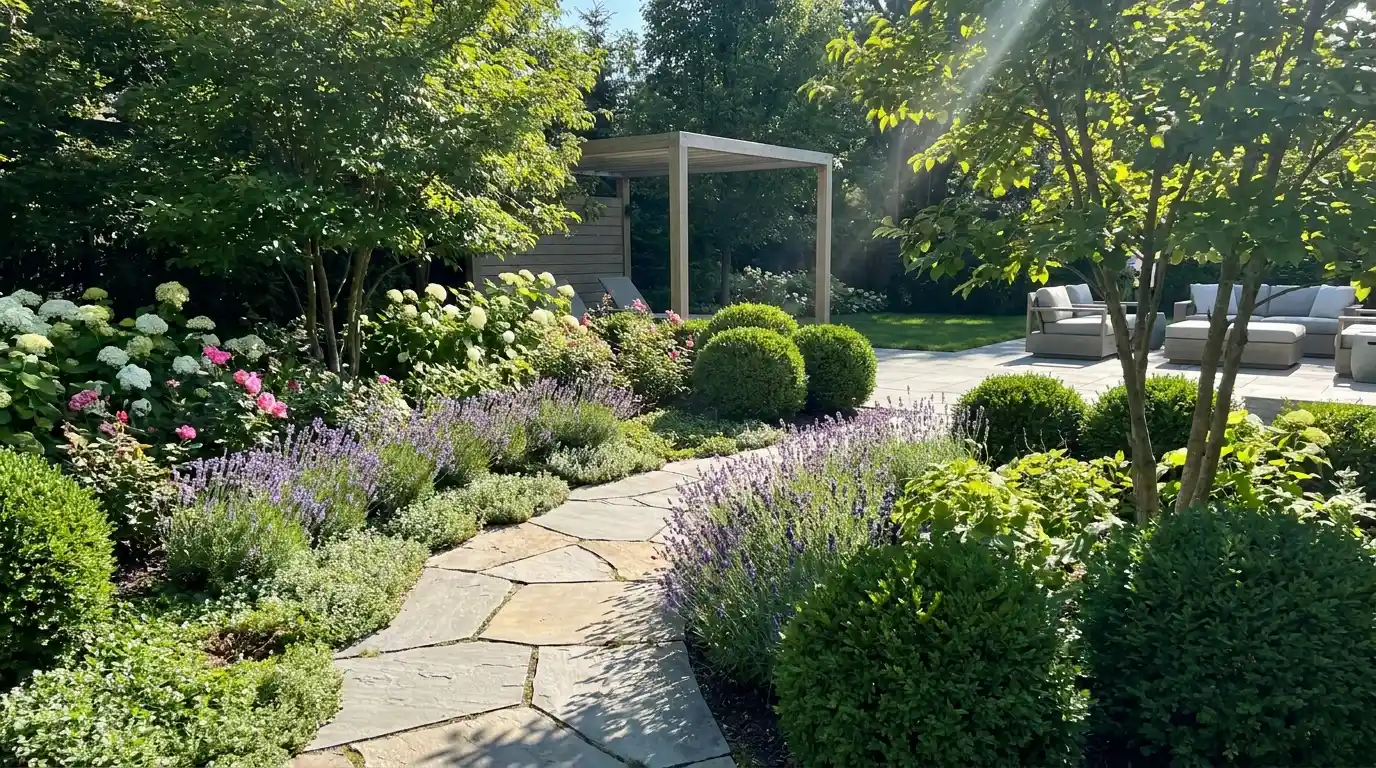
A curved walkway garden is the right call when a yard is too flat and predictable to hold attention. The curve needs a reason, though. It should lead past a planted border, toward a seating area, or around a strong focal point. A path that wanders for the sake of it just frustrates people carrying anything heavier than a phone.
Stone, brick, gravel, and stepping stones all work. What matters more than material is width. Under 36 inches, and the path starts to feel like a suggestion rather than a route. On slopes, check where water crosses the path before choosing a loose material like gravel, which can track and shift after rain.
- Turn radius: A curve tight enough to look interesting on paper becomes awkward in practice when you’re carrying a wheelbarrow or plant tray. Keep bends gradual.
- Material contrast: Gravel beside lawn, brick beside timber, or stone beside planted beds helps the path read clearly without any extra decoration.
- What fails in year two: Loose gravel migrates into planted beds on even a slight slope. Install a proper edging restraint from the start, not as an afterthought.
2. Courtyard Garden

A courtyard garden is built around a central open space, and the enclosed nature of the layout makes it feel sheltered before a single plant goes in. This works well for small urban yards, privacy-first builds, and homes where outdoor living is expected year-round rather than just in summer.
The middle holds a paved sitting area, a small tree, or a simple water feature. Around that center, use pots, wall planting, or built-in beds.
The common failure mode in courtyard gardens isn’t the planting. It’s heat. An enclosed paved space in full sun traps heat faster than any other layout type. Pale paving and partial overhead shade from a tree or structure makes the difference between a space that gets used every evening and one that empties by 2pm.
- Wall base clearance: Leave a 2-inch gap between soil and any fence or wall surface. Wet soil held against timber or masonry accelerates rot and damp penetration.
- Movable accents: Fixed pots in a tight courtyard box you in when guest numbers change or a seasonal plant needs replacing. Choose movable containers for the outer ring.
- What fails in year two: Pointing between paving units loosens under freeze-thaw cycles. Repoint any gaps in autumn before water gets under the slabs and lifts them.
3. Raised Bed Garden
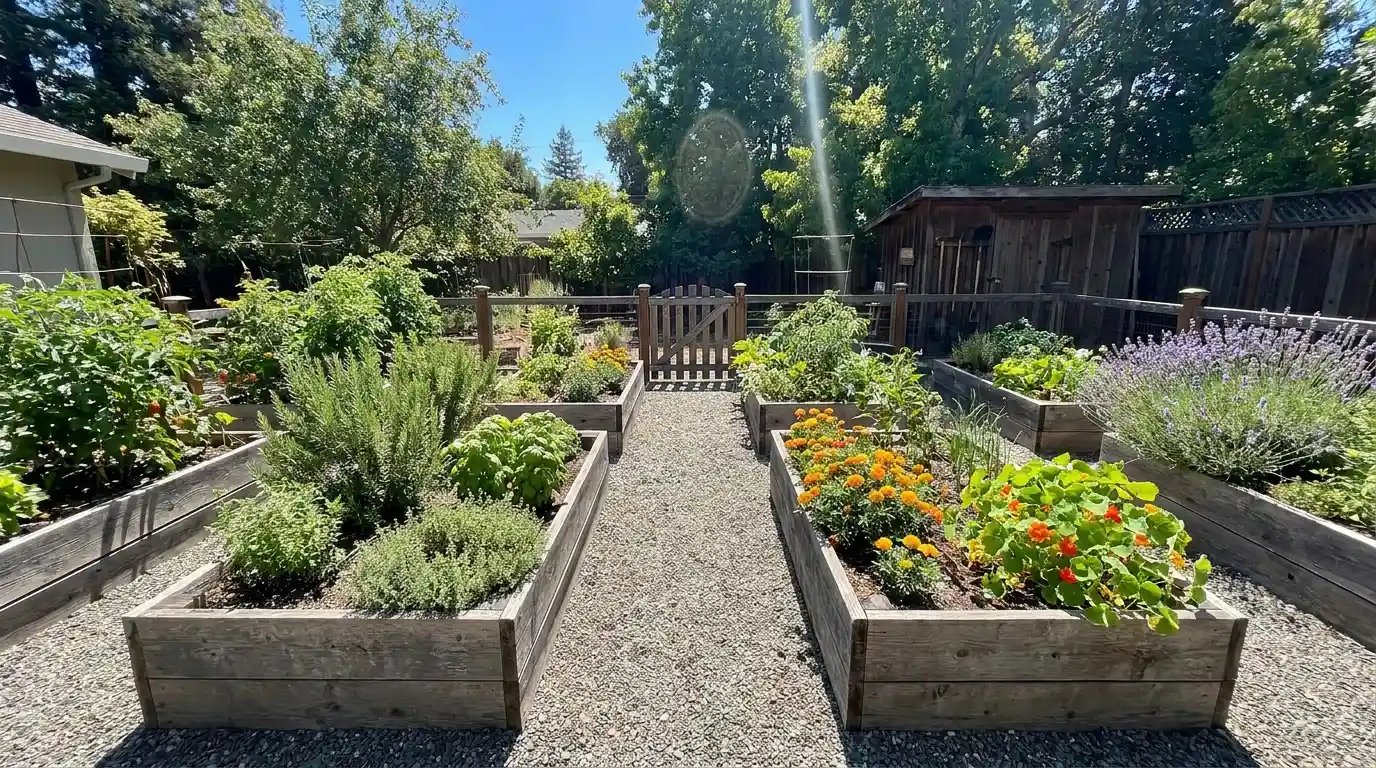
A raised bed garden makes the most sense when the underlying soil is poor, compacted, or prone to waterlogging, or when the yard has an awkward slope. The beds themselves create order without rigidity. Rows, squares, L-shapes, or block arrangements all work.
The paths between them are where most planning decisions actually matter, because paths that are too narrow (under 24 inches for a side path, 36 inches for a main route) create daily frustration by the time the plants fill in.
- Bed height by use: Set beds at 12 inches for ornamentals and 18 to 24 inches for anything you’ll harvest daily. Taller beds are significantly easier on the back.
- Corner protection: Exposed timber corners take direct hits from wheelbarrows. Galvanized steel corner brackets or a heavier timber grade at corners extends bed life by years.
- Wet zone separation: Keep thirsty crops in one section of the bed layout rather than spread across all of them. It makes targeted watering faster and keeps path surfaces drier.
- What fails in year two: Untreated softwood frames can start to show rot at the base after two wet winters. Use pressure-treated lumber rated for ground contact, or cedar and hardwood where budget allows.
4. Cottage Border Garden
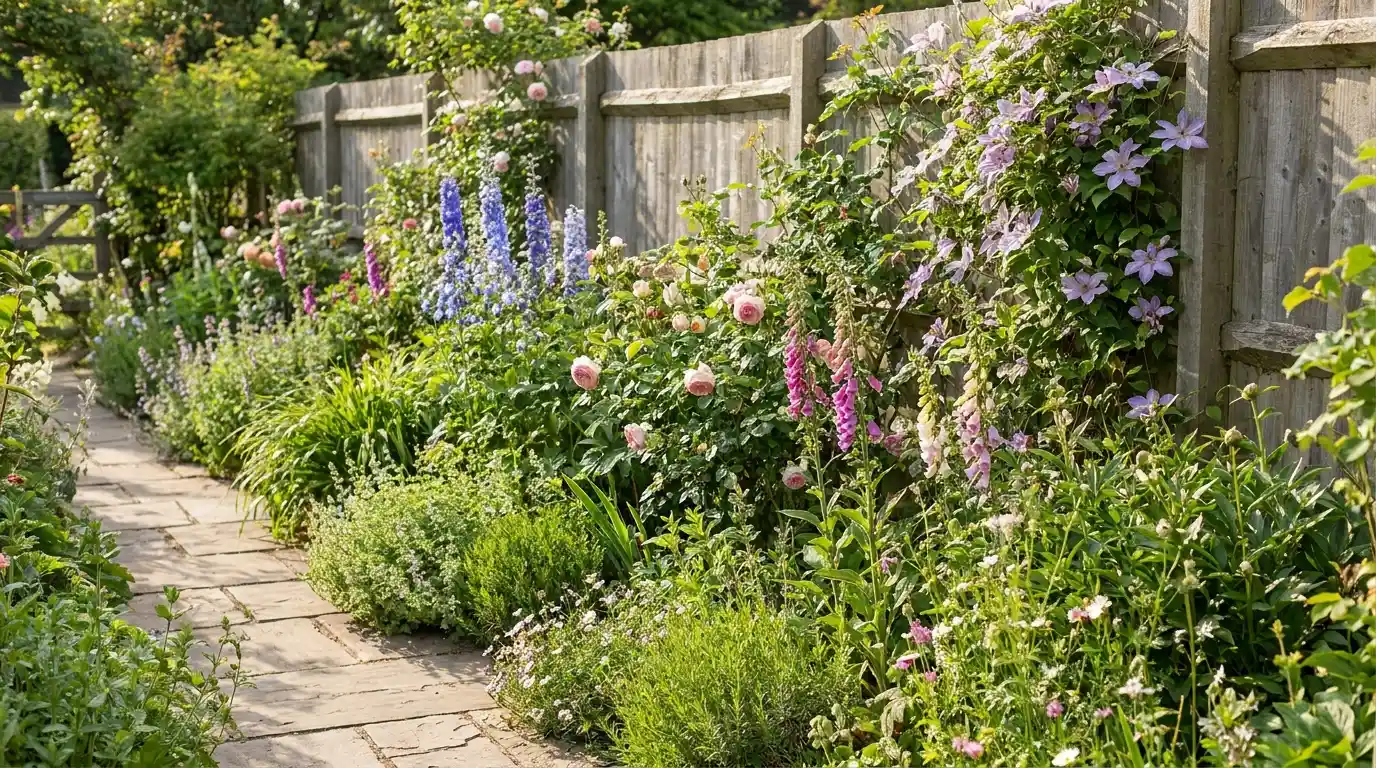
A cottage border garden works along fences, walls, or the outer edges of a yard. The key variable is depth. A thin line of planting rarely reads as a design choice. It looks like a failed attempt at coverage.
A border needs to be at least 36 inches deep to layer properly: tall plants at the back, mid-height in the middle, and low ones softening the front edge. Done with that depth, it can carry significant visual weight without looking overdone.
- Service access: Leave 12 to 18 inches between the back of the border and the fence. You’ll need this when the fence needs staining, panel replacement, or post repair.
- Repeat shapes: A border can look wild and informal inside, but repeating one or two leaf shapes or bloom colors throughout keeps it from reading as neglected.
- Front edge definition: A clean front line using edging or a mowing strip is what separates a cottage border from a messy bed. The interior planting can be as relaxed as you like.
- What fails in year two: Taller perennials at the back start to flop without staking or support structures. Install grow-through supports in spring before they’re needed, not after they’ve already fallen.
5. Outdoor Room Garden
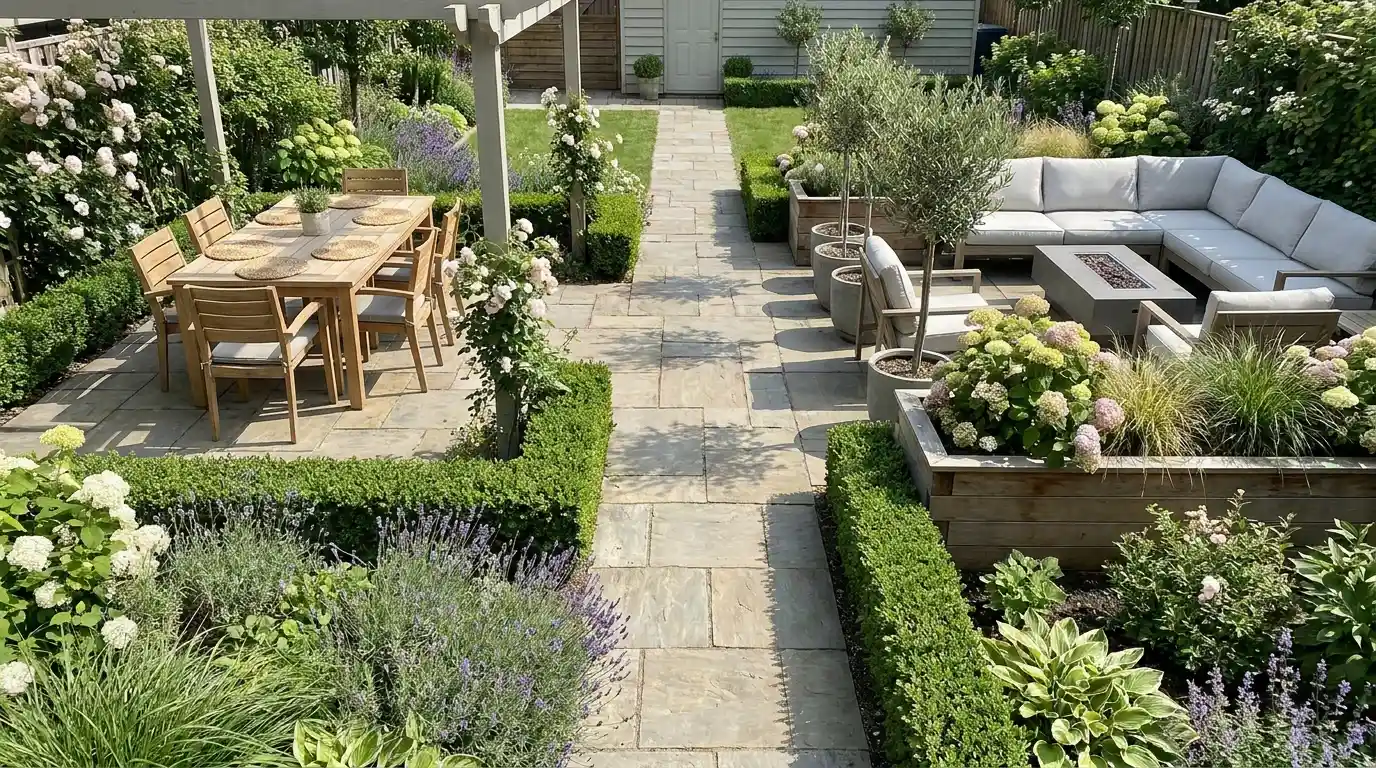
An outdoor room garden divides one larger yard into separate zones with clear purposes. This layout idea is most effective in yards over 1,000 square feet, where a single open space starts to feel undefined.
One area for dining on a firm paved surface, another for a reading chair on gravel or decking, a third for planting. The divisions can be hedges, planters, low walls, or a change in level. The risk is over-dividing. Every zone needs a reason to exist and enough space to function comfortably.
- Surface by activity: Dining needs a firm, level base. A quiet corner can sit on compacted gravel or low-budget decking. Mixing surface types between zones helps define each one without extra structures.
- Sight line management: Full-height screens create rooms but kill the feeling of space. Mixing low hedging with occasional taller elements gives privacy where it’s needed without boxing everything in.
- Material limit: No more than three paving or edging materials across the full yard. More than that and the garden starts to feel chopped up rather than intentionally zoned.
6. Vertical Garden
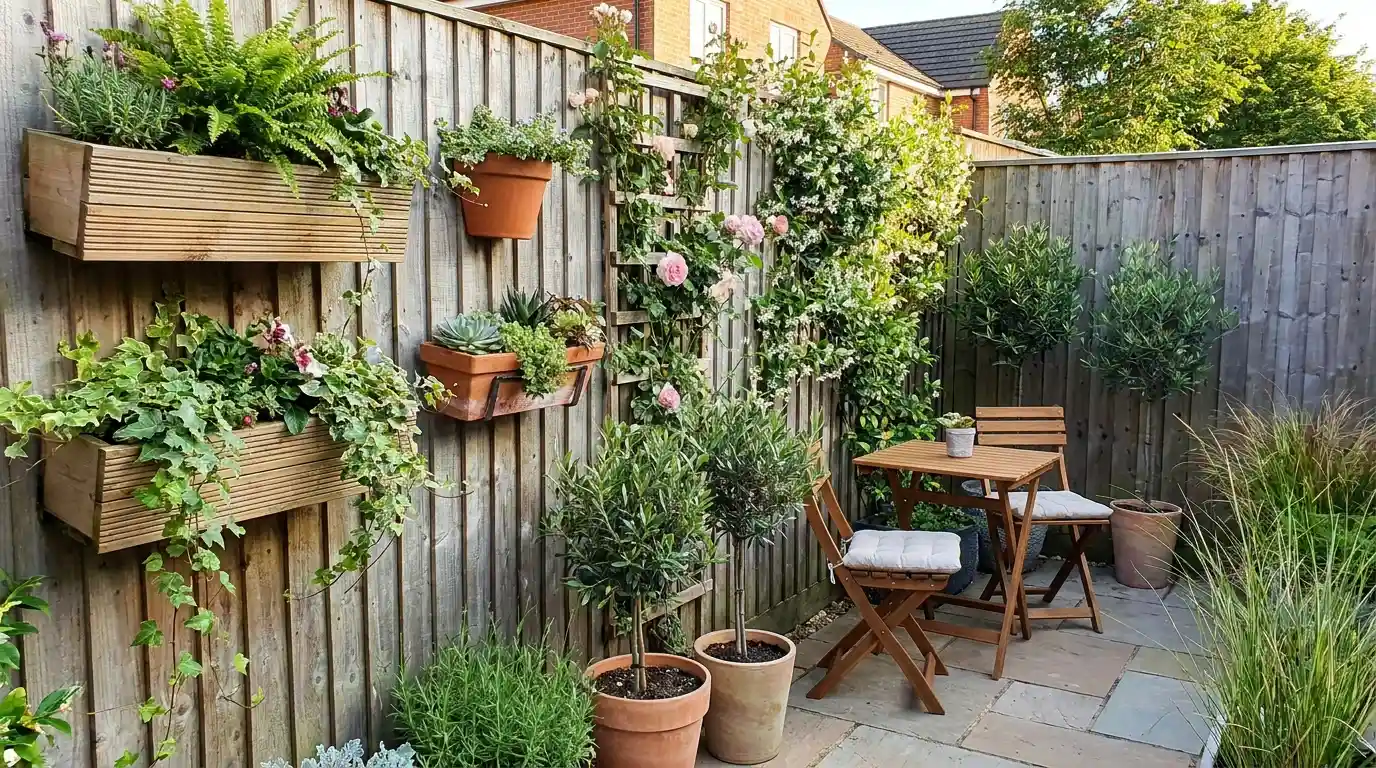
A vertical garden uses height when floor space is too limited to plant outward. This works well on balconies, patios, side yards, and fenced gardens where the ground is already spoken for.
Wall planters, shelves, trellises, and tall planters are all valid approaches. Beyond small spaces, it also adds visual height to larger gardens that feel flat and undifferentiated at ground level.
- Fixing strength: A wet planter filled with growing medium is significantly heavier than it looks dry. Fence panels rated for privacy screening are not necessarily rated for that load. Use wall fixings anchored into solid masonry or timber uprights.
- Shadow direction: Tall wall planting blocks light to anything below it. Check the sun’s path before positioning vertical features where they’ll shade kitchen herbs or lower beds.
- Drip planning: Wall-mounted planters need a watering strategy built in. Runoff stains light-colored paving and causes watermarks on rendered walls that are difficult to remove later.
- What fails in year two: Plants establish unevenly in pocket-style wall systems. Lower pockets tend to dry out faster than upper ones. Install drip irrigation from the start rather than relying on hand watering.
7. Island Bed Garden
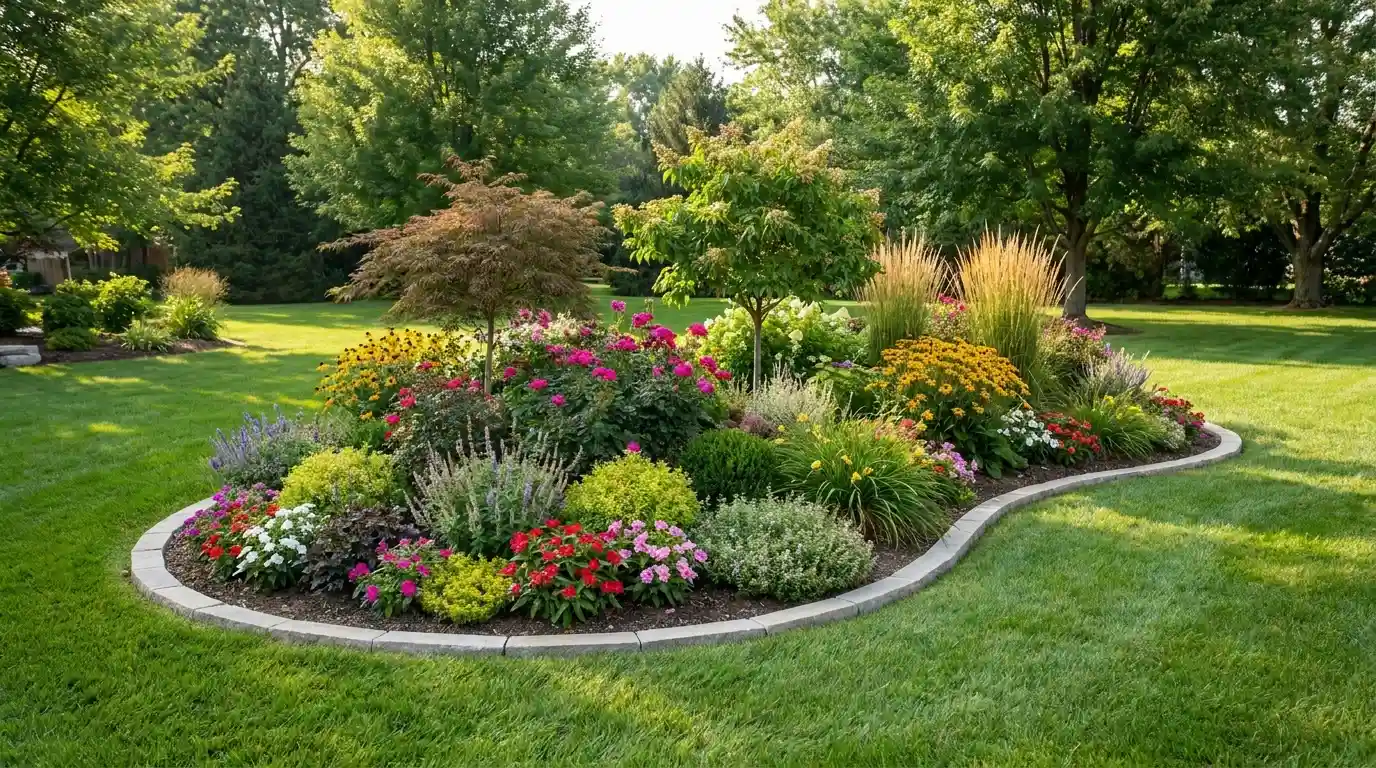
An island bed garden places a freestanding planted area in open lawn or hardstand. It’s the layout idea that makes the biggest visual improvement to the most ordinary yard for the least structural cost. Even one well-sized island bed changes how a flat space reads from the house. The shape can be round, oval, or kidney-shaped.
A small specimen tree, shrubs, grasses, and perennials can sit together inside it. The critical difference from a border bed is that an island bed needs to look good from every angle. For yards where region and climate shape the planting choices, the climate-matched landscaping approach is worth reading alongside this layout.
- Size before digging: Mark the bed outline with a garden hose and live with it for a day before removing any turf. Island beds almost always look smaller outdoors than they do on a drawn plan.
- Mowing clearance: Leave 12 to 18 inches of clear grass around the outer edge so a mower can pass without scalping curves or hitting edging material.
- Outer plant selection: The perimeter of an island bed takes more wear than the center. Hose drag, foot scuffing, and pet traffic are all concentrated on that outer ring. Use robust, low-growing plants there.
8. Sunken Seating Garden
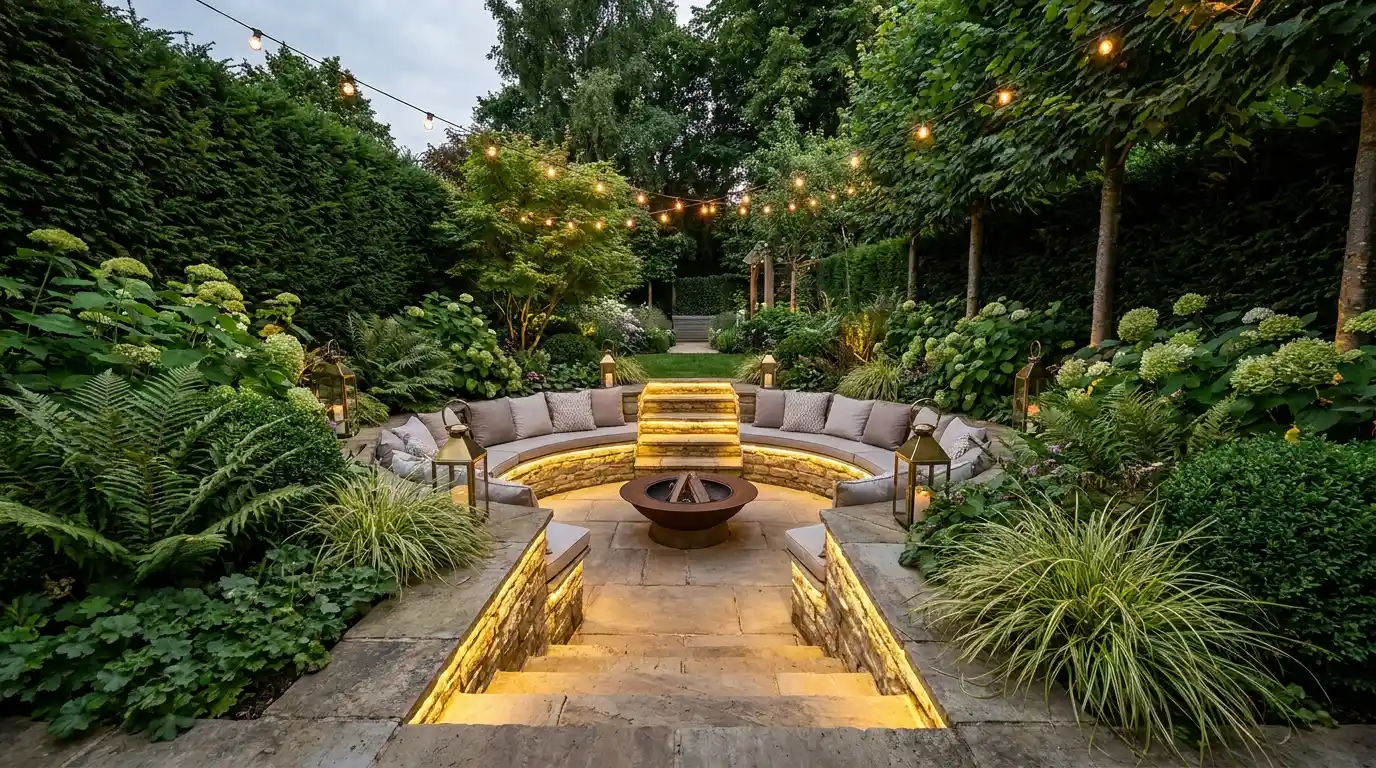
A sunken seating garden creates a lowered sitting area within the outdoor space. This layout works in yards where ground-level privacy is nearly impossible to achieve without tall screens.
By dropping the seating area 18 to 24 inches below the surrounding grade, you get a sheltered feel without blocking the views from inside the house. Low walls, built-in benches, stone steps, and planting around the rim complete the enclosure. This is a higher-investment garden layout idea, and drainage is the detail that decides whether it succeeds in the long term.
- Drainage first: A sunken area needs a proper drainage channel and outlet designed before any paving goes in. Water sitting at the base of a lowered patio is a structural and usability problem that cannot be fixed cheaply after the fact.
- Edge visibility: Step lighting, coping in a contrasting tone, or non-slip edge strips make level changes readable after dark. This is a safety detail, not a decorative one.
- Material climate match: Built-in timber seating at a lower level stays wetter than equivalent ground-level furniture. Hardwood, powder-coated steel, or polished concrete are better choices than softwood for sunken built-ins in most US climates.
9. Water Feature Garden
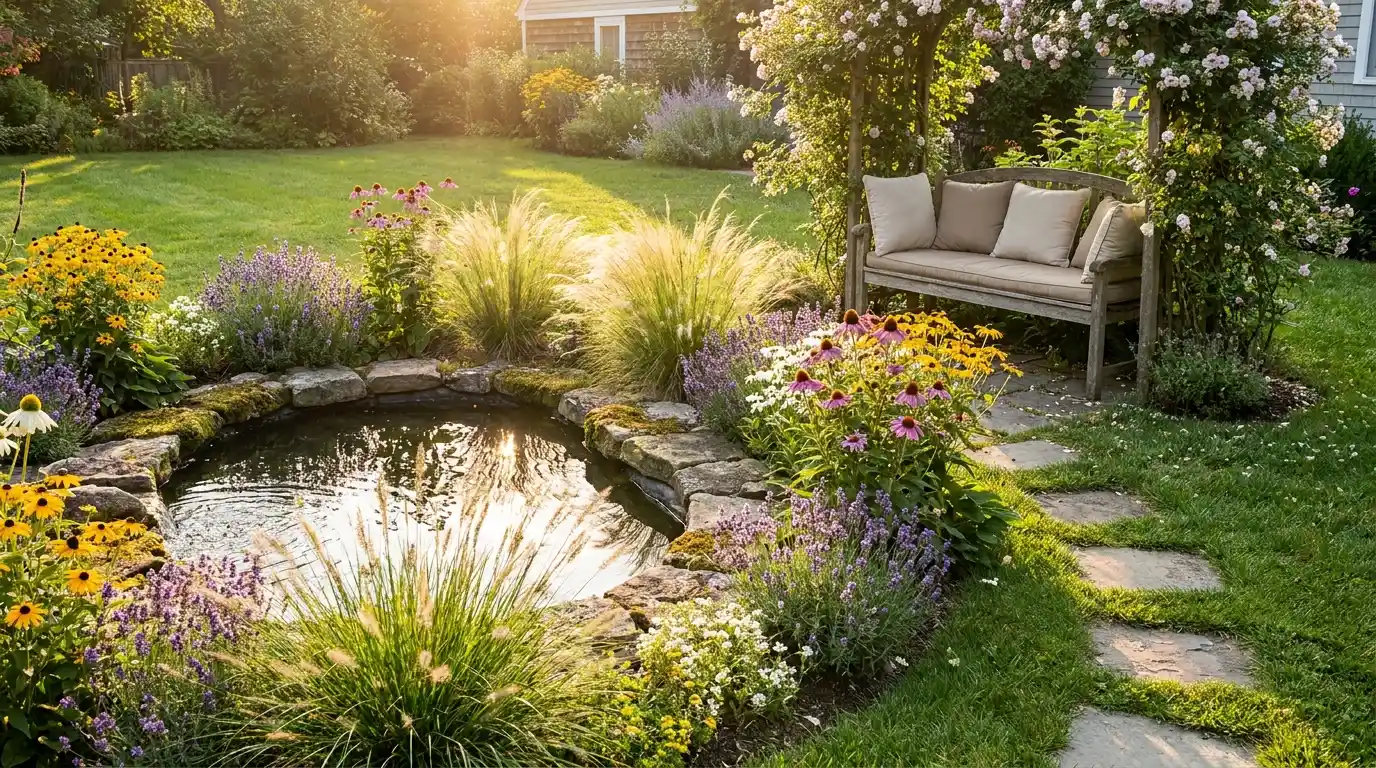
A water feature garden places moving or still water at the center of the layout design. A pond, fountain, stream, birdbath, or simple water bowl all qualify. The value isn’t primarily visual. Sound changes how people use the space.
A fountain audible from the seating area masks traffic noise and slows the pace of the garden in a way that no amount of planting does. The placement rule is simple: if you can’t hear it from the main seating area, it’s in the wrong location.
- Splash zones: Moving water wets surrounding paving. Textured or non-slip stone within 3 feet of any fountain or spillway is a practical safety requirement, not an upgrade.
- Power routing: If the feature needs a pump, the cable route has to be decided before any paving, edging, or planting is committed to. Retrofitting conduit through a finished garden is expensive and disruptive.
- Stable edging: Water draws people toward it, especially children. Any surrounding edge needs to feel firm and predictable underfoot. Loose gravel or uneven stepping stones around a pond edge are accidents waiting to happen.
- What fails in year two: Submersible pumps in small ponds clog with algae and leaf debris faster than most owners expect. A pump filter that can be cleaned without draining the feature is worth specifying from the start.
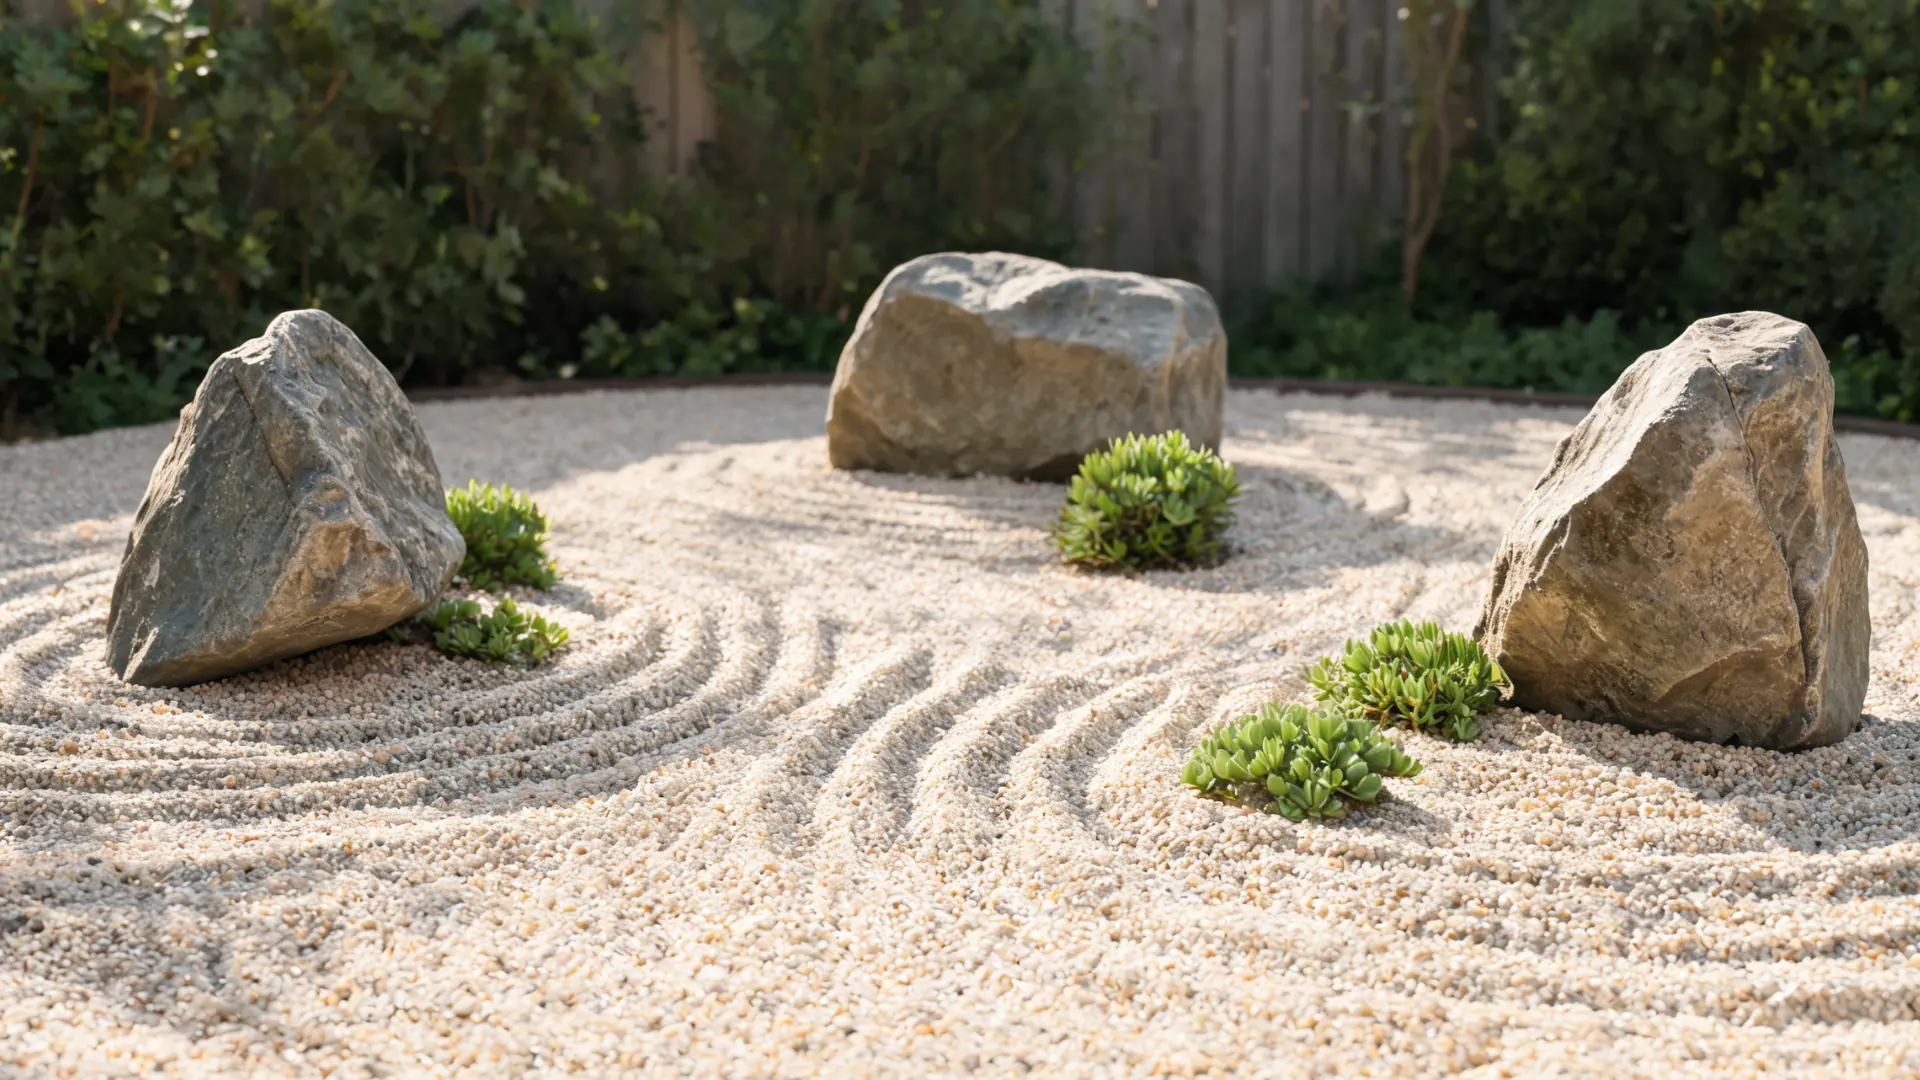
10. Rock Garden Layout

A rock garden layout works where nothing else wants to. Dry slopes, compacted poor soil, sun-baked corners, and awkward edges are all natural fits.
Rather than fighting the conditions, a well-built rock garden works with them. The structure is stone, and the planting fills the pockets between. This is one of the lower-maintenance garden layout ideas once established, but it requires careful installation to stay stable.
- Mixed stone sizes: Large anchor stones give the layout visual weight and structural stability. Smaller gravel fills gaps, locks the structure, and reduces soil erosion on slopes.
- Angle stones naturally: Stones buried one-third of their depth into the soil look settled. Stones sitting entirely on top look placed. The difference in result is significant.
- Drought-tolerant planting: Succulents, sedums, thyme, alpine plants, and ornamental grasses suit rock gardens and reduce the maintenance burden. Moisture-hungry plants in a rock garden setting tend to struggle and create gaps.
11. Shade Garden Layout
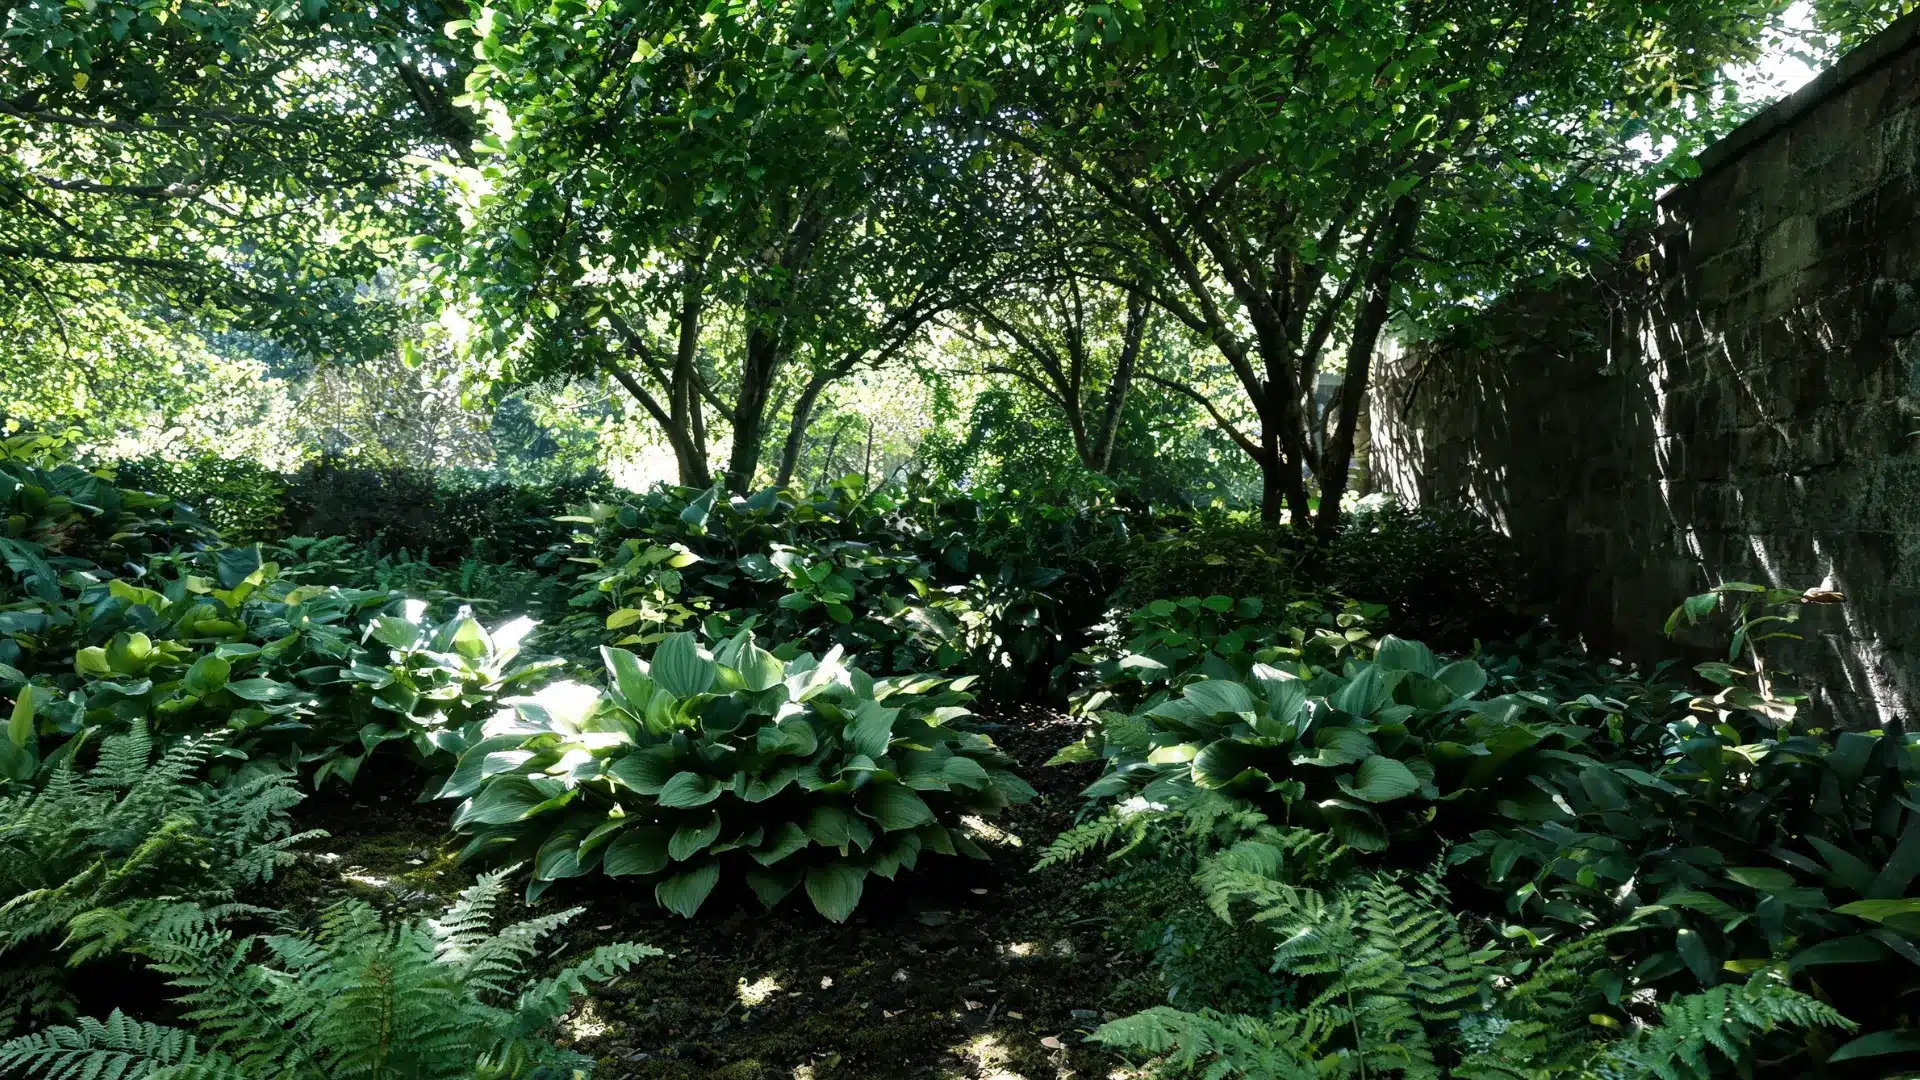
A shade garden layout is the design answer for north-facing walls, spaces under established trees, and narrow side yards that get limited direct light.
The approach here is to stop competing with the conditions and to instead build a planting palette that suits them. Foliage texture and structure carry the design through the year rather than seasonal flower color.
- Map light first: Most shaded areas still receive morning sun or filtered afternoon light through canopy gaps. Knowing exactly which areas get which quality of light changes the plant placement decisions significantly.
- Soil airflow: Dense shade retains moisture in the soil. Planting too closely in these conditions promotes fungal issues. Space plants further apart than the label suggests and mulch with a coarser material that doesn’t compact.
- Leaf texture contrast: Broad-leaved hostas, fine-textured ferns, and structured shrubs like viburnum work together to create interest without relying on bloom color, which is unreliable in low-light conditions.
12. Herb Spiral Garden
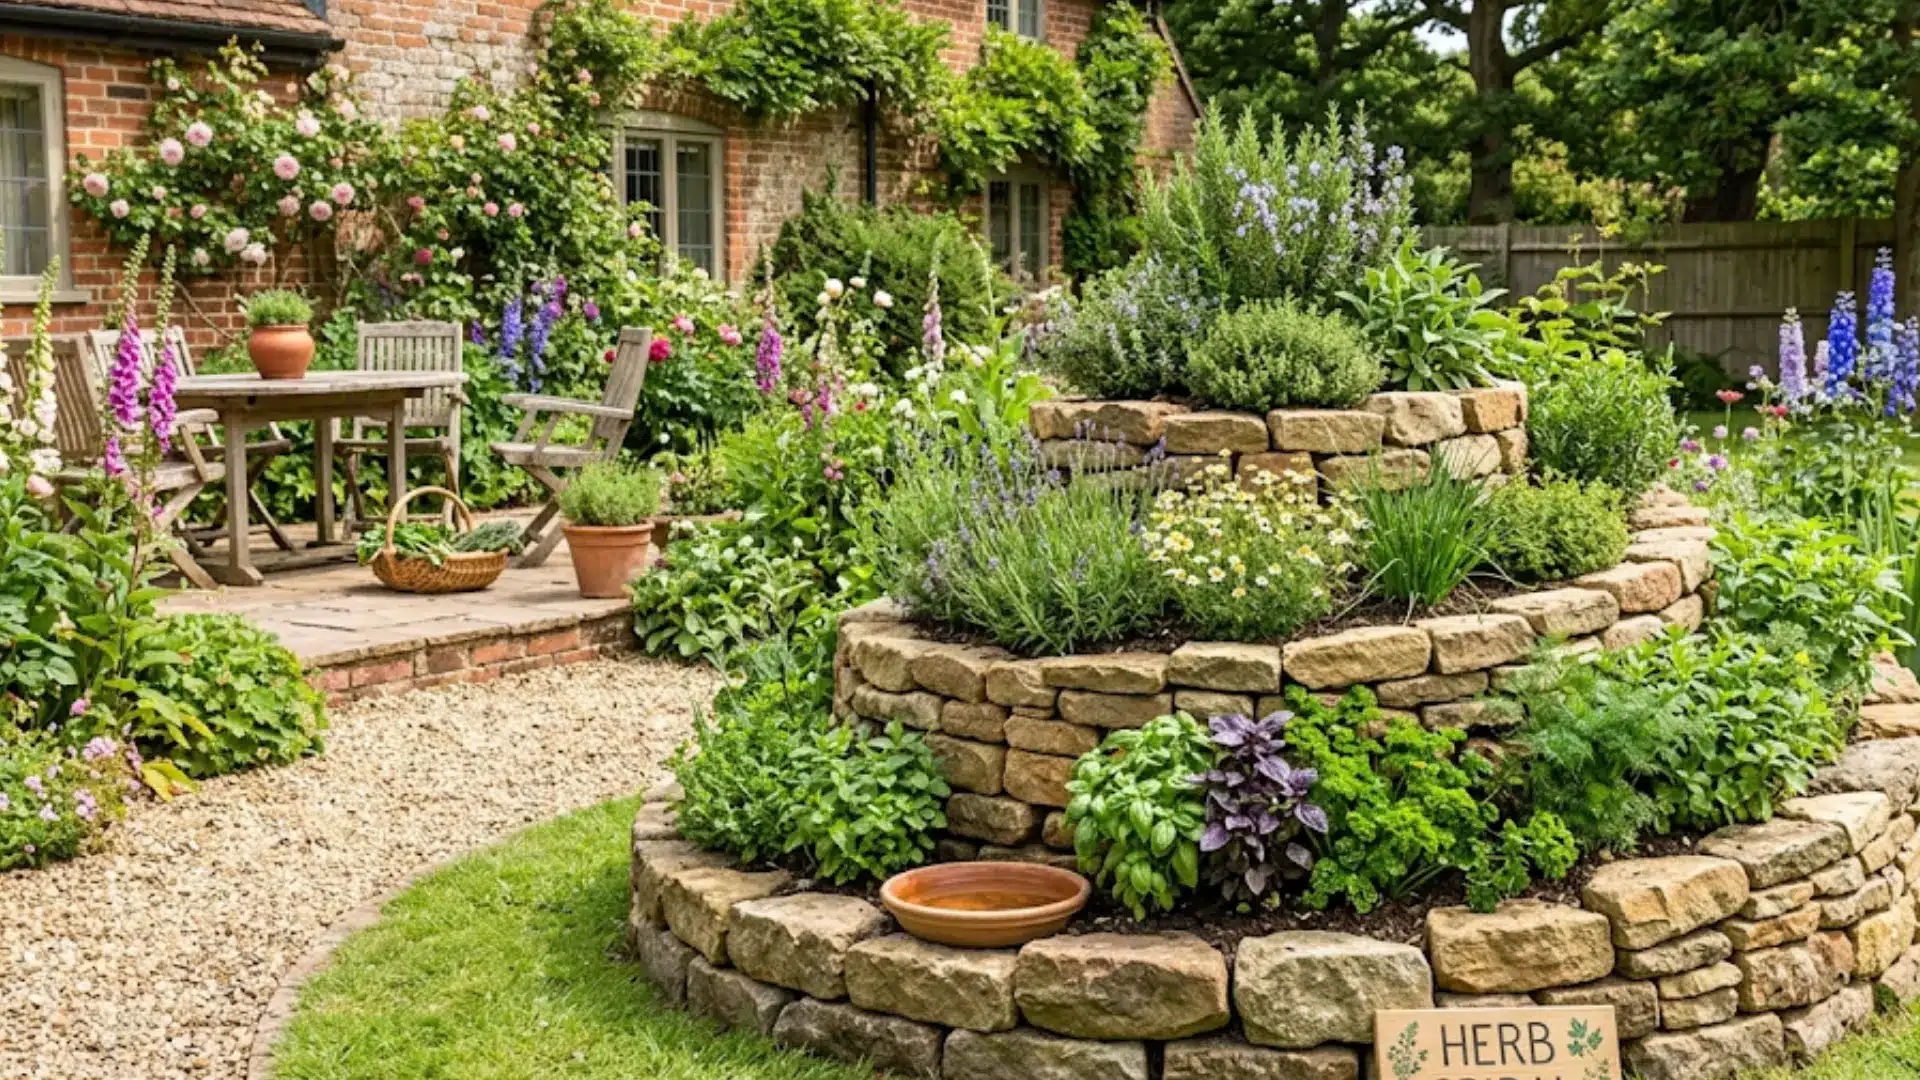
An herb spiral uses a rising circular bed to grow a variety of herbs within a compact footprint. For a yard near a kitchen door where space is limited but daily access matters, this is one of the most practical small-scale garden layout ideas available.
The spiral shape naturally creates varying moisture and sun exposure within a single structure. Drier, warmer conditions at the top and cooler, wetter conditions at the base allow for a wider plant range than a flat bed of the same area.
- Sun-loving herbs at the top: Rosemary, thyme, and oregano want the drier, warmer upper zones. Placing them there isn’t a design choice, it’s a growing condition match.
- Moisture herbs lower: Basil, parsley, and mint perform better in the cooler, slightly wetter sections at the base of the spiral.
- Build a solid base: Loosely stacked stone spirals shift within a single growing season. Compacted stone or mortared brick gives the structure the stability it needs to hold planting weight over several years.
13. Wildlife-Friendly Garden Layout
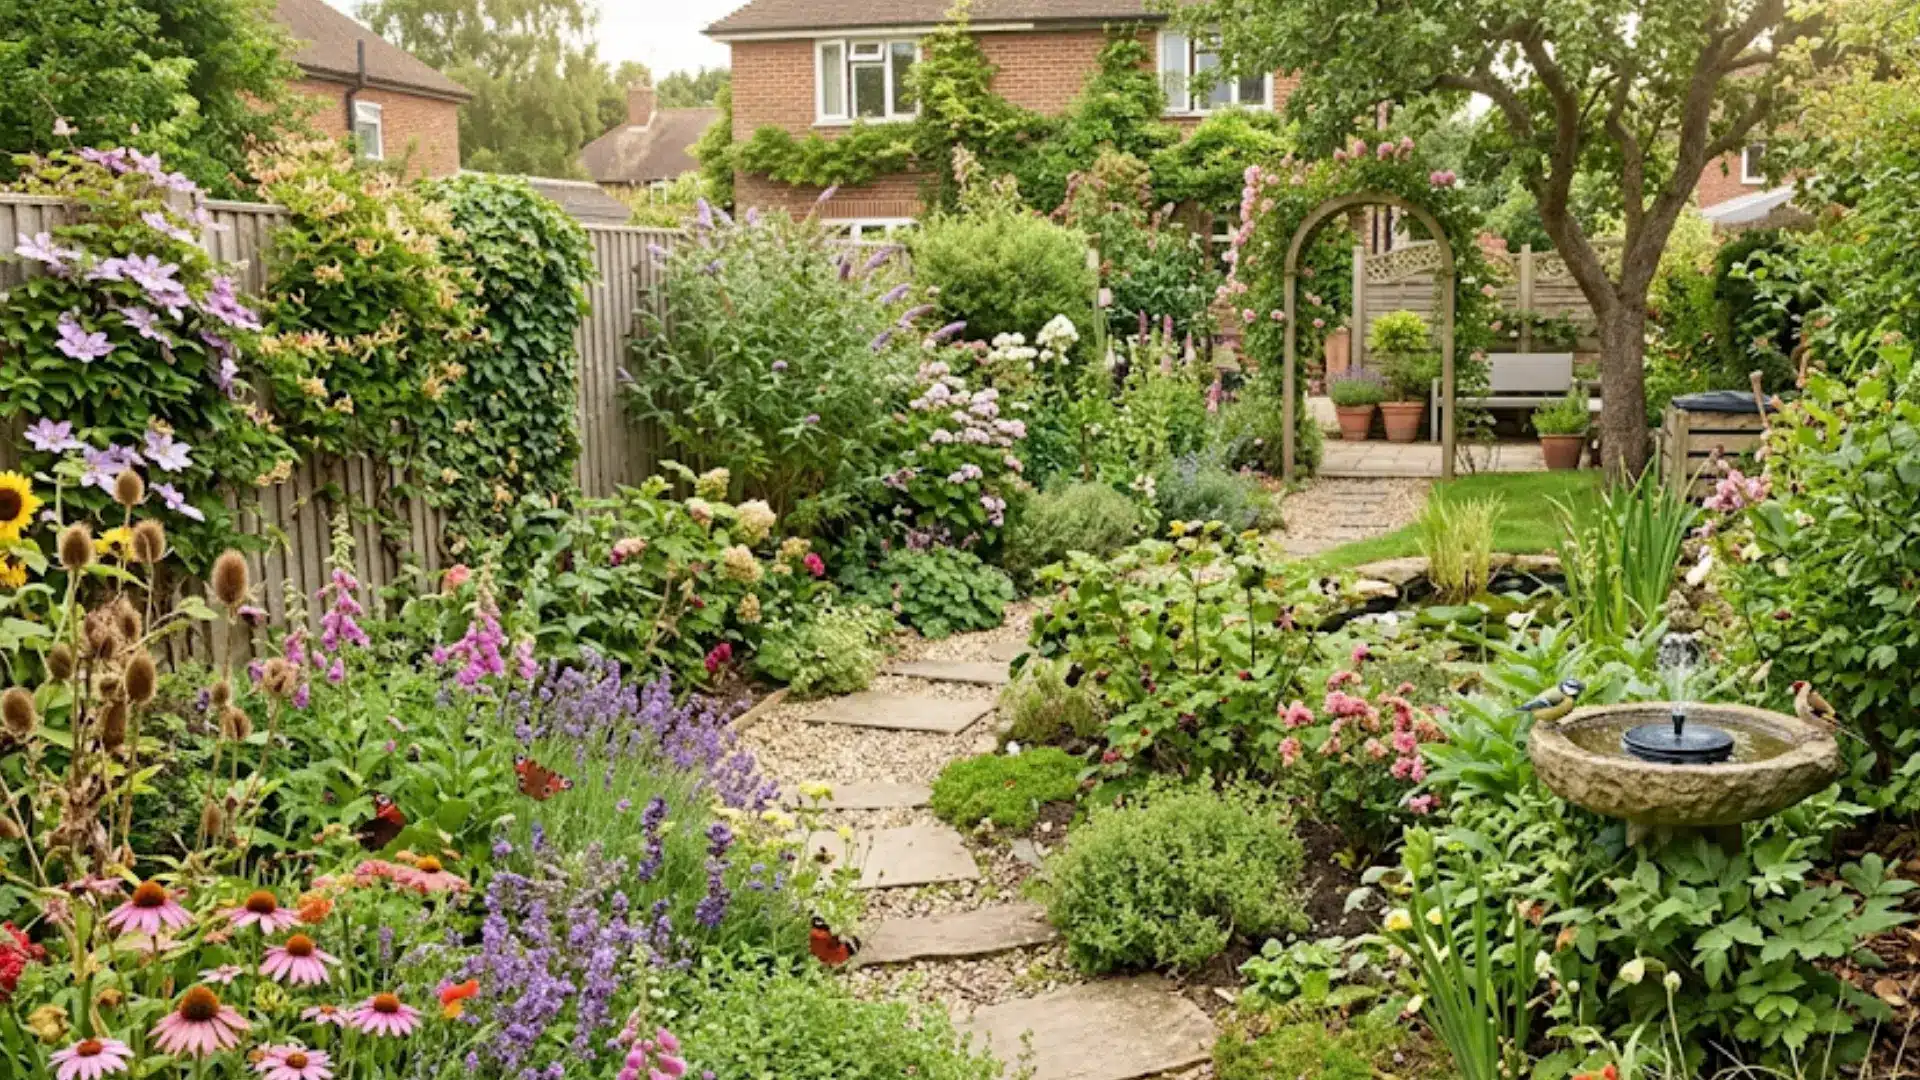
A wildlife-focused garden layout supports birds, bees, and beneficial insects without abandoning usability for the household that lives there. The distinction between a wildlife garden and an overgrown yard is structure.
Clear paths, defined zones, and deliberate planting choices give the garden enough order to feel intentional while still offering the habitat variety that matters for local ecology.
- Layered planting zones: Ground cover, shrubs at mid-height, and at least one taller element together create shelter, nesting, and feeding options for a wider range of species than any single plant layer provides alone.
- Quiet corners: An undisturbed corner with a log pile or dense ground cover is one of the highest-value additions in a wildlife garden. These areas require no maintenance and provide more ecological benefit than most planted features.
- Avoid over-clean edges: Leaving seed heads on spent plants through winter and not cutting back all growth in autumn supports seasonal feeding cycles for birds and overwintering insects.
14. Pergola Seating Garden

A pergola’s framed overhead structure defines a focused outdoor dining or lounging area.
The overhead element is what makes this layout idea work: it gives scale and shade to a seating zone without closing it in the way a full room or canopy would. This garden layout suits patios and transitional zones between the house and the rest of the yard, and it allows climbing plants to increase shade coverage as they establish over the first two growing seasons.
- Beam orientation: Position pergola beams to cut afternoon glare at the time the space will be used most. A dining area used at 6pm in summer needs shade from the west, not the south.
- Post footing depth: Posts set in concrete to the local frost depth hold in wind and shifting soil. Surface-mounted posts, even on well-anchored brackets, are a compromise on any structure over 10 feet square.
- Climbing plant guidance: Vines and climbers need attached wire or trellis from day one. Left unguided in the first season, they establish patterns that are difficult to redirect later without damage to the plant or the structure.
- What fails in year two: Untreated fir or pine joists exposed to rain and sun begin to check (surface crack) within two seasons. Specify pressure-treated timber or naturally durable hardwood for all horizontal members.
15. Container-Based Modular Garden
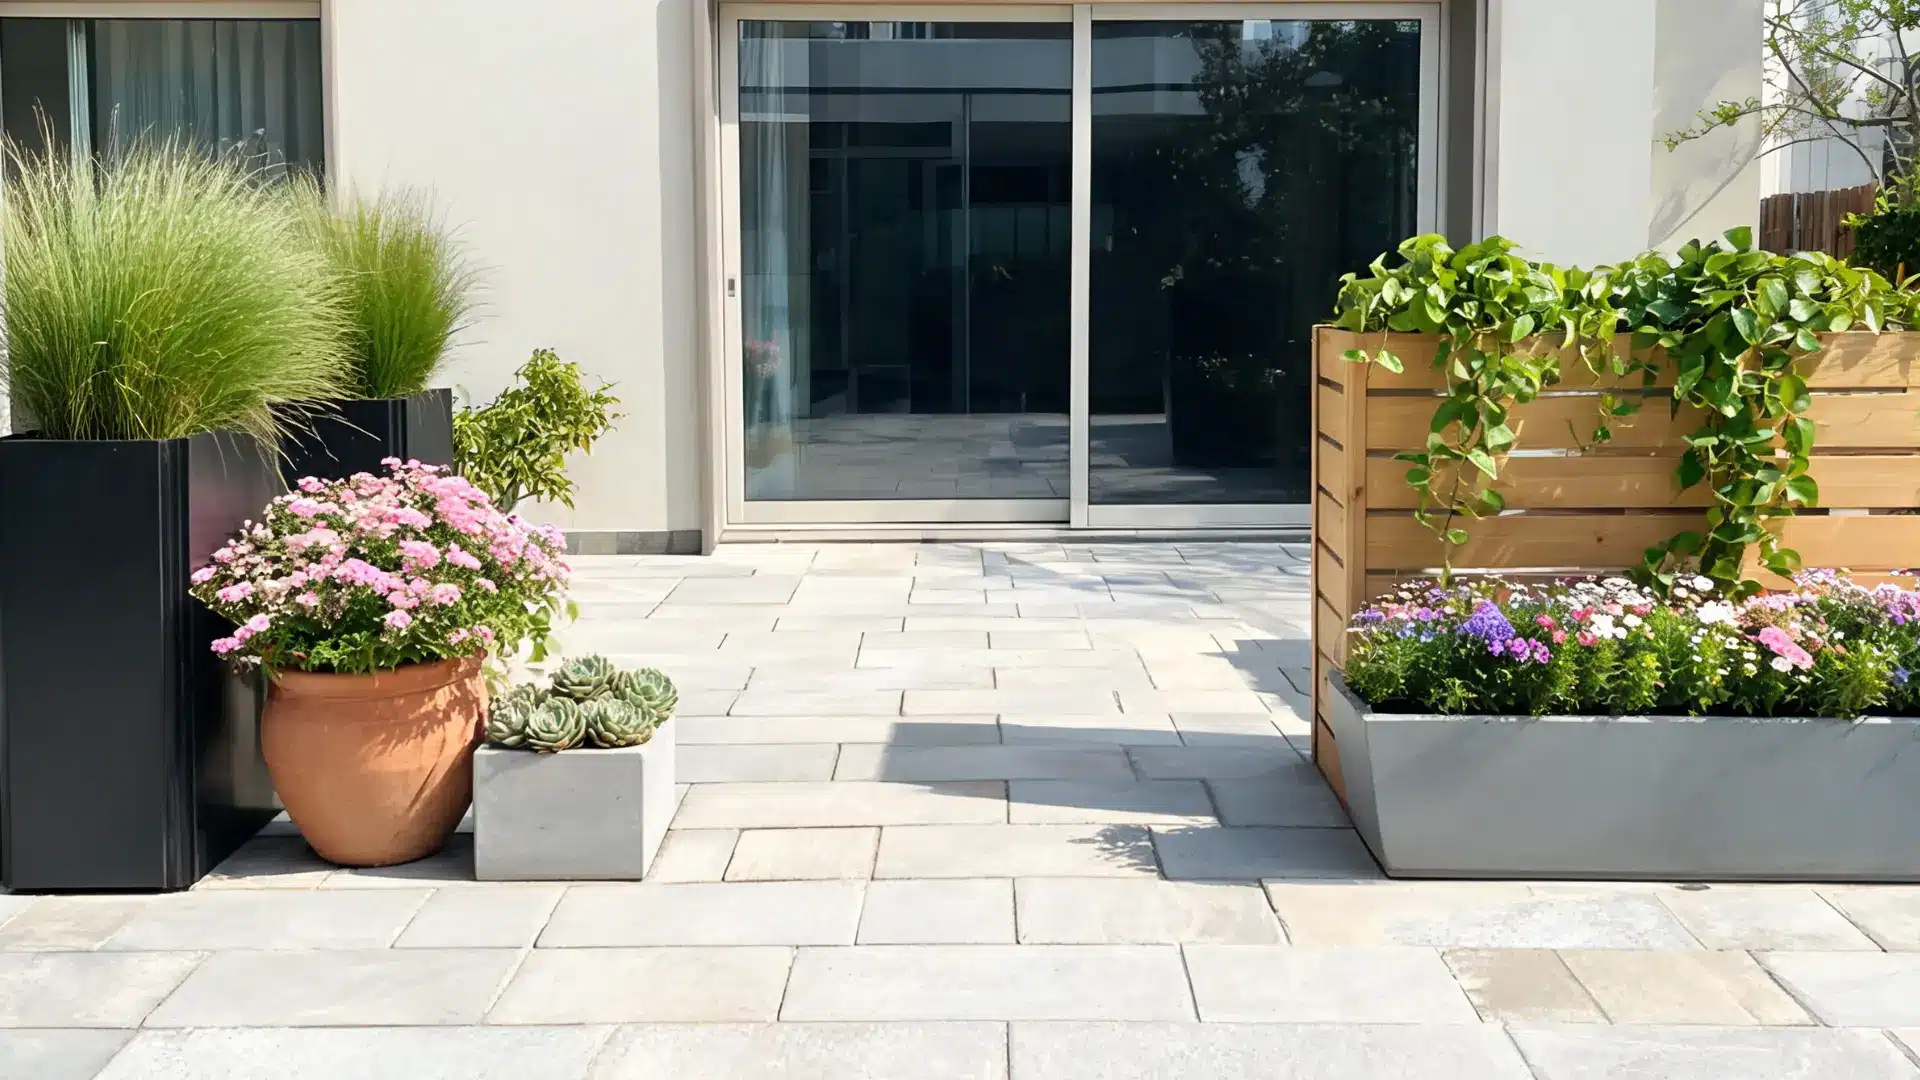
A container-based modular garden replaces fixed beds with movable pots and planters arranged to create a defined outdoor space.
This is the practical layout choice for renters, patio gardeners, rooftop spaces, and anyone who can’t or doesn’t want to make permanent changes to the ground. The structure comes from deliberately grouping containers, not scattering them.
- Height layering: Tall planters at the back or outer edge with lower pots stepping toward the front creates a sense of depth that a flat array of matching pots never achieves.
- Material consistency: Matching pot material or finish tone across different sizes prevents the collection from looking like a clearance sale. Terracotta, galvanized, or matte powder-coated containers each read as a coherent group.
- Path clearance: Containers fully planted and watered are much heavier than they appear when placed. Leave clear 24-inch routes between groupings before they’re in position, not after.
16. Linear Grid Path Garden
A linear grid path garden structures a yard around straight, consistent walking routes that divide the planting into clean sections. This garden layout idea suits narrow rectangular yards and spaces where an edible or cutting garden needs a clear working structure.
The paths define order while the planted sections between them carry the visual interest. The layout also scales easily: adding one more section or extending a path doesn’t require redesigning the whole yard.
- Consistent path width: All main paths should be the same width, typically 36 inches minimum. Uneven spacing creates a maze-like feel that frustrates movement, especially with a barrow or large container.
- Wet zone placement: High-water-use planting areas should sit away from the main path routes. Wet paving is a slip hazard and speeds up surface deterioration on most materials.
- Surface material limit: One material for paths and one for edging keeps a grid layout from feeling fragmented. The strength of a grid design is its clarity, and too many surface changes undermine that.
17. Zen Gravel Garden Layout
A Zen gravel garden uses negative space, controlled texture, and a very limited plant selection to create calm in a yard that needs low maintenance above all else.
The gravel is the surface, the stone is the structure, and the planting is restrained to two or three deliberate choices. This layout works best in enclosed courtyards, dedicated meditation corners, and front yards where upkeep is limited.
- Regular raking: Simple raked line patterns keep gravel areas reading as intentional. Without raking, a gravel garden drifts toward looking like an unfinished patio within one season.
- Limited plant count: Two or three structural plants, placed with space around them, carry more visual impact in this layout than a dozen smaller choices. The space between plants is part of the design.
- Anchor stones: One or two larger stones with real visual weight hold the entire layout together. Scattered small stones without a focal anchor produce a scattered, unresolved result.
How to Match Garden Layout Ideas to Your Style
Style should follow structure. The layouts that fail fastest are the ones chosen for aesthetic first and practical reality second. A cottage look requires depth and softness, which means curved paths and layered borders suit it better than strict symmetry.
A modern aesthetic needs clean edges and controlled plant palettes, which makes raised beds, courtyard layouts, and sunken seating the right starting points.
For hosting, outdoor room layouts give guests clear places to land rather than standing in the center of an undefined space. For calm, water features and Zen gravel layouts slow the pace of a yard in ways that no amount of furniture or planting does.
For food growing, the raised bed and linear grid layouts keep production organized enough to actually maintain through a full season.
The unifying principle in every case: decide on the layout’s structure before selecting any materials, plants, or finishes. Everything is easier to choose once the shape of the space is resolved.
Finishing Details That Support the Layout
Finishing details should make the garden’s structure clearer, not compete with it. These are the only additions worth making after the main layout is set:
- Clean edging: Define beds and paths so the garden’s shape stays readable as plants fill in. This is the one detail that separates a maintained garden from a neglected one at a glance.
- Low path lighting: Ground-level or step lights near level changes, path turns, and seating make the garden safer and warmer to use after dark without adding visual noise during the day.
- One firm seating spot: A single useful place to sit, properly positioned for shade, view, and access, is worth more than three decorative seating areas that rarely get used.
- Consistent container material: Repeating one pot finish or material across loose planters connects them to the broader design rather than making them look accumulated over time.
- Functional screens only: Privacy screens belong where there’s an actual view or exposure problem to solve. Installed anywhere else, they reduce light and add maintenance without improving the space.
Garden Layout Mistakes to Avoid
Most garden layout problems are avoidable. Every mistake in the table below is more expensive to fix after the work is done than it would have been to plan around at the start.
| Mistake | What It Does to the Space | Better Decision |
| Too many focal points | The eye jumps between features and the garden feels busy rather than resolved. | Choose one main feature and let every other element support it. |
| Paths under 36 inches wide | Feels fine before planting. Becomes frustrating daily once growth fills in from both sides. | Set main paths at 36 inches minimum before any plant goes in. |
| Seating placed by aesthetic, not light | A chair that sits in full afternoon sun becomes the seat nobody uses by midsummer. | Check shade, privacy, view, and access at the time the seat will actually be used. |
| Drainage ignored at planning stage | Water finds its own route and usually picks the paving, the path, or the sunken seating area. | Map drainage patterns before fixing any surface material or level change. |
| Layout copied from a different-sized yard | Features scaled for a larger space make a small yard feel crowded and hard to move through. | Match the design to the actual yard’s dimensions, exposure, and daily use pattern. |
These aren’t theoretical mistakes. Every one of them shows up in real gardens, often within the first two seasons of use. The layouts in this guide are built around avoiding them from the start.
Frequently Asked Questions
These are the questions that come up most on outdoor jobs once the planning conversation starts moving.
How do I plan a garden layout from scratch?
Start with how the space gets used, not how it looks. Mark the sun at your typical use time, check drainage by observing the yard after rain, and measure any paths you plan to walk. Sketch zones before committing to any materials. Structure first, planting second.
What is the best garden layout for small yards?
Raised beds, vertical gardens, and container modular layouts all work well in tight spaces. Each one keeps plants off the main movement route and makes better use of vertical space than ground-level spreading. Choose based on whether the priority is growing food, privacy, or seasonal color.
How wide should garden paths be?
Main routes need 36 inches minimum to walk comfortably and carry equipment. Side access paths can go down to 24 inches. Anything narrower creates daily friction once plants fill in from the borders on either side.
What garden layout is easiest to maintain?
A simple raised bed or border layout with clear paths, grouped watering zones, and repeated plant choices requires the least ongoing effort. The fewer materials, the fewer surfaces to maintain. Gravel and edged beds outperform lawn in most low-maintenance comparisons.
What is the best material for garden paths?
Depends on the climate and use. Gravel drains well but migrates without edging. Compacted crushed stone packs firm and handles freeze-thaw reasonably well. Paving stone or concrete pavers hold up longest to foot traffic but require correct base preparation to avoid heaving in cold climates.
How do I divide a garden into sections?
Use changes in surface material, low hedging, planted borders, low walls, or a simple path to create section boundaries. Keep the number of dividers proportional to yard size. Three clear zones in a small garden is usually the maximum before it starts feeling cluttered.
What plants work best in a shaded garden layout?
Hostas, ferns, astilbe, hellebores, and viburnum all perform well in low light. Mixing leaf textures across these creates structure without relying on flowers. Avoid placing light-hungry plants like lavender, rosemary, or most ornamental grasses in consistently shaded positions.
Summing Up
A well-planned outdoor space works best when structure leads every decision rather than decoration.
You get better results when paths, seating, and planting zones are decided before anything is built. I often see gardens improve immediately once layout clarity replaces scattered choices.
The right garden layout ideas help you match space, use, and maintenance so the yard stays functional year after year. I want you to think in zones, proportions, and access before choosing materials or plants.
That approach keeps your space practical and easier to use in real conditions. Try applying these principles to your yard and see what changes feel most useful. You can adjust as you go, but start with structure first.


